Deploying Sentinel LDK Cloud Portal
This section describes how to deploy Sentinel LDK Cloud Portal on a server (referred to in this section as the cloud portal server).
Sentinel LDK Cloud Portal is deployed as a Docker image on the cloud portal server.
This section is only relevant for vendors who are working with Sentinel LDK-EMS and who want to use Sentinel LDK Cloud Portal to manage cloud licensing.
In this section:
>Requirements for Deploying Sentinel LDK Cloud Portal
>Deployment Via Docker Compose
>Deployment in Google Cloud Platform
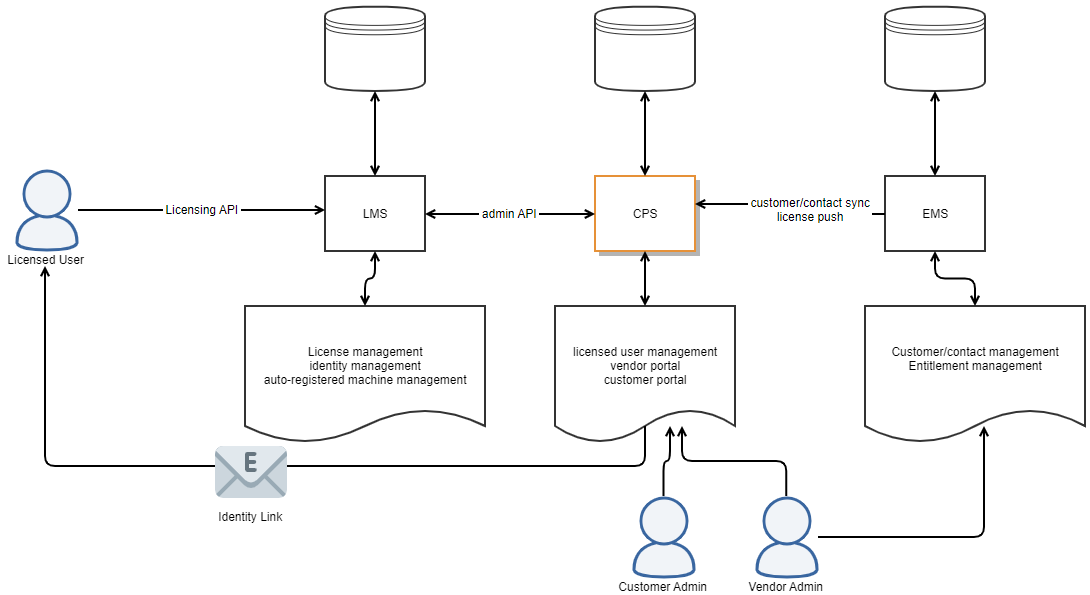
High-Level Architecture
The following diagram provides a high-level overview of the architecture for Sentinel LDK Cloud Portal.
Requirements for Deploying Sentinel LDK Cloud Portal
The following are the requirements for Sentinel LDK Cloud Portal:
>Sentinel LDK license server (referred to as the license server) must exist.
•Sentinel LDK Run-time Environment 10.31 or later must be installed on the license server. Thales recommends that you deploy the Sentinel LDK Run-time Environment Docker image from Docker Hub (https://hub.docker.com/r/thalesgroupsm/sentinel_ldk_rte).
• The license server and the cloud portal server must be deployed in the same environment (for example, both in GCP or both in AWS).
>Sentinel LDK-EMS server 10.3 or later (hosted by the vendor or by Thales)
>MySQL database server (version 8.0 or later)
>You must be working with Docker version 20 or later.
NOTE The CloudPortal service is released as a Docker image. HTTPS support should be configured in the proxy server or the load balancer.
Before Setting Up the Cloud Portal Server
1.Install MySQL on a machine that will serve as the database server for the cloud portal database, or you can use cloud MySQL directly.
Note the following:
•If the database user has full access to the database, the database and tables will be created by Sentinel Cloud Portal automatically.
•If the database user only has read/write rights to update the data in tables, but no right to create the database and tables, the deployment user should create the database and tables for Sentinel LDK Cloud Portal manually. Use the SQL script file to perform initialization.
2.Configure the cloud portal server.
On the cloud portal server, configure the parameters described below.
| Environment Variable | Notes |
|---|---|
| CPS_BACKEND_DB_HOST | The host machine where MySQL is located. |
| CPS_BACKEND_DB_USER | User name for the MySQL account to use to connect to the database. |
| CPS_BACKEND_DB_PASSWORD | Password for the above MySQL account. |
| CPS_BACKEND_DB_NAME | Name of the MySQL database to create. |
| CPS_SWAGGER_ENABLED |
Whether the Sentinel LDK Cloud Portal REST API should be enabled. Possible values are: >true >false (Default) |
| LMS_HOST | The host machine where LMS is located. |
| LMS_PASSWORD |
Password for the above LMS instance. Note: By default, there is no user name for the LMS user account. Sentinel LDK Cloud Portal does not support the use of an LMS user account for which a user name has been defined. |
| LMS_PORT | LMS port for the above LMS instance. |
3.Deploy the Docker image for Sentinel LDK Cloud Portal.
a.You can get the latest docker imager from Docker Hub: https://hub.docker.com/r/thalesgroupsm/sentinel_ldk_cloudportal
b. Use the following command on the cloud portal server:
docker run thalesgroupsm/sentinel_ldk_cloudportal:latest
Deployment Via Docker Compose
This procedure demonstrates how you can use Docker Compose to set up the cloud portal server. Note that the following docker-compose example already contains an integrated cloud licensing server and MySQL server.
1.Download your vendor library using Sentinel LDK Master Wizard.
Copy your vendor library to the same folder that contains docker-compose.yml.
For example, for vendor ID 37517, copy haspvlib_x86_64_37517.so to the folder.
2.Set up the docker-compose.yml file with contents similar to the following:
version: '3.3'

services:
  cps_lms_db:
    image: mysql:8.0
    container_name: cps_lms_db
    command: ["mysqld", "--default-authentication-plugin=mysql_native_password"]
    volumes:
      - lms_db_data:/var/lib/mysql
    restart: always
    environment:
      MYSQL_ROOT_PASSWORD: root!
      MYSQL_DATABASE: lms
      MYSQL_USER: lms
      MYSQL_PASSWORD: Password1!
    healthcheck:
      test: mysqladmin ping -h 127.0.0.1 -u $$MYSQL_USER --password=$$MYSQL_PASSWORD
      interval: 10s
      retries: 3

  cps_backend_db:
    container_name: cps_backend_db
    image: mysql:8.0
    volumes:
      - cps_backend_db_data:/var/lib/mysql
    restart: always
    command: ["mysqld", "--default-authentication-plugin=mysql_native_password"]
    environment:
      MYSQL_ROOT_PASSWORD: admin
      MYSQL_DATABASE: cloudportaldb
    healthcheck:
      test: mysqladmin ping -h 127.0.0.1 -u $$MYSQL_USER --password=$$MYSQL_PASSWORD
      interval: 10s
      retries: 3

  cps_lms:
    depends_on:
      - cps_lms_db
    container_name: cps_lms
    image: thalesgroupsm/sentinel_ldk_rte:10.31
    restart: always
    volumes:
      - type: bind
        source: ./hasplm.ini
        target: /etc/hasplm/hasplm.ini
      - type: bind
        source: ./haspvlib_x86_64_37517.so
        target: /var/hasplm/haspvlib_x86_64_37517.so
    environment:
      HASPLM_DATABASE: mysql
      HASPLM_DATABASE_MYSQL_HOST: cps_lms_db
      HASPLM_DATABASE_MYSQL_USER: root
      HASPLM_DATABASE_MYSQL_PASSWORD: root!
      HASPLM_DATABASE_MYSQL_PORT: 3306
    healthcheck:
      test: ["CMD", "curl", "-X GET", "http://127.0.0.1:1947/sentinel/ldk/v1/healthz"]
      interval: 50s
      timeout: 10s
      retries: 3
    hostname: cps_lms
    ports:
      - "80:1947"

  cps_backend:
    container_name: cps_backend
    depends_on:
      - cps_lms
      - cps_backend_db
      - cps_lms_db
    image: thalesgroupsm/sentinel_ldk_cloudportal:latest
    ports:
      - "8080:8181"
    restart: always
    environment:
      CPS_BACKEND_DB_HOST: cps_backend_db
      CPS_BACKEND_DB_USER: root
      CPS_BACKEND_DB_PASSWORD: admin
      CPS_BACKEND_DB_NAME: cloudportaldb
      CPS_SWAGGER_ENABLED: true
      LMS_HOST: cps_lms
      LMS_PASSWORD: admin:Aa123456
      LMS_PORT: 80
    healthcheck:
      test: ["CMD", "curl", "-X GET", "http://127.0.0.1:8181/cps/api/v1/healthz"]
      interval: 50s
      timeout: 10s
      retries: 3

volumes:
  lms_db_data: {}
  cps_backend_db_data: {}
3.The password for logging in to Sentinel LDK Cloud Portal as the vendor administrator is contained in the hasplm.ini file for Sentinel LDK Cloud Portal. This file is located in the same folder as docker-compose.yml.
The default password Aa123456 is encoded in the adminpassword parameter as seen below:
[SERVER]
adminpassword = 4cn/eL9O60ebqMXfji8OOA==:fNwzohDT4A83ZFm2tVupnw==
listen_also = 1
requestlog = 1
loglocal = 1
logremote = 1
logadmin = 1
errorlog = 1
rotatelogs = 1
pidfile = 1
passacc = 1
accessfromremote = secure
cloud_portal = 1
accremote = 1
adminremote = 1

[REMOTE]
broadcastsearch = 0
The password should be changed for security reasons as follows:
a.Start Sentinel Admin Control Center (ACC) on a local machine.
b.Change the ACC administrator password to the password that you want for Sentinel LDK Cloud Portal.
c.Open the configuration file (hasplm.ini) for Admin License Manager on the same machine. The pathname of the configuration file is as follows:
–For Windows x64: %CommonProgramFiles(x86)%\Aladdin Shared\HASP\hasplm.ini
–For Windows x86: %CommonProgramFiles%\Aladdin Shared\HASP\hasplm.ini
d.In hasplm.ini file for the Admin License Manager, copy the line that contains adminpassword. This line contains the encoded form of your password.
e.Paste the line into the hasplm.ini file for Sentinel LDK Cloud Portal, over the existing adminpassword line.
f.In docker-compose.yml, change the following line to contain the new password:
LMS_PASSWORD: admin:Aa123456
4.Run docker compose up.
5.Open the cloud portal web portal by cloud portal service exposed IP:
http://<IP_exposed>:8080
6.Open the LMS web portal by LMS service exposed IP:
(If you want to enable https, you need to configure LMS https first.)
http://<IP_exposed>
To log in to the Sentinel Cloud Vendor Portal, use:
http://<IP_exposed>:8080/admin
To log in to the Sentinel Cloud Customer Portal, use:
http://<IP_exposed>:8080/customer
To view Swagger (if you have enabled Swagger), use:
http://<IP_exposed>:8080/doc
7.Configure Sentinel Admin Control Center on the license server machine to issue a warning against using Admin Control Center to manage client identities. The warning is activated in Sentinel Admin Control Center once Sentinel LDK Cloud Portal has been used at least once to create client identities. For details, see the cloud-portal parameter.
Do either of the following on the license server machine:
•Add the following configuration parameter in hasplm.ini:
cloud_portal=1
• Set the following environment variable:
HASPLM_CLOUD_PORTAL=1
Deployment in Google Cloud Platform
This section shows how to deploy the cloud portal service to Kubernetes on Google Cloud Platform (GCP).
Before You Begin
>You must have GCP console to use GCP to access your Kubernetes cluster.
>Create a cloud database instance for MySQL 8 on GCP, using the user account created for Cloud Portal database.
Deploying the Docker Image for Sentinel LDK Cloud Portal
NOTE The steps in this section describe how to deploy Sentinel LDK Cloud Portal docker image on GCP. If you want to expose the Cloud Portal service directly on a cloud platform, consider security enhancements to protect the service deployed on Kubernetes according to your security requirements.
1.Create the Cloud Portal deployment YAML file. The YAML file below shows how to deploy the Cloud Portal docker image, how to implement the LivenessProbe for Cloud Portal service, and the ENV to set the database connection .
Note that the YAML file contains the definitions of the required environment variables (described in Before Setting Up the Cloud Portal Server). Modify these definitions as required.
cloudportal_deployment.yaml
apiVersion: apps/v1
kind: Deployment
metadata:
  name: cloudportal-backend
  labels:
    name: cloudportal-backend
spec:
  replicas: 2
  selector:
    matchLabels:
      app: cloudportal-backend
  template:
    metadata:
      labels:
        app: cloudportal-backend
    spec:
      containers:
      - name: cloudportal-backend
        image: thalesgroupsm/sentinel_ldk_cloud_portal:latest
        #should be set "Always" when deployed with kubernetes
        imagePullPolicy: Always
        livenessProbe:
          httpGet:
            path: /cps/api/v1/healthz
            port: 8181
          initialDelaySeconds: 30
          timeoutSeconds: 30
          periodSeconds: 10
          successThreshold: 1
          failureThreshold: 3
        resource:
          limits:
            memory: 2Gi
            cpu: 1
          requests:
            memory: 2Gi
            cpu: 0.2
        ports:
          - containerPort: 8181
        env:
          - name: CPS_BACKEND_DB_HOST
            value: mysql	#host name of the database
          - name: CPS_BACKEND_DB_USER
            value: root	#user name of the database
          - name: CPS_BACKEND_DB_PASSWORD
            value: root!	#password of db user
          - name: CPS_BACKEND_DB_NAME
            value: cloudportaldb	#database name of database
          - name: LMS_HOST
            value: LMSURL	# LMS HOST URL
          - name: LMS_PASSWORD
            value: password	# Password for LMS webportal
          - name: LMS_PORT
            value: "LMS PORT"	# Service port for LMS instance
      hostname: cloudportalbackend
2.Create the Cloud Portal service YAML file. You must decide the way to expose the Cloud Portal service to external. The cloudportal_svc.yaml file below provides an example of how to expose the Cloud Portal service in LoadBalancer.
cloudportal_svc.yaml
apiVersion: v1
kind: Service
metadata:
  name: cloudportal-backend
  labels:
    app: cloudportal-backend
spec:
  type: LoadBalancer
  ports:
  - port: 80
    targetPort: 8181
    protocol: TCP
  sessionAffinity: ClientIP
  selector:
    app: cloudportal-backend
3.Deploy the Cloud Portal service by running:
kubectl apply -f cloudportal_deployment.yaml -f cloudportal_svc.yaml
Sentinel LDK Cloud Portal can be accessed with the URL: http://<exposed ip by loadbancer>:80
Configuration Updates After Deployment
1.The default username/password of the vendor administrator in Sentinel LDK Cloud Portal is admin/admin. Change the password immediately.
2.After logging in to Sentinel LDK Cloud Portal, configure Outgoing Email Settings.
3.Configure Sentinel LDK-EMS Produce and Push and related parameters as described in the Sentinel LDK-EMS Configuration Guide to connect to the Sentinel LDK Cloud Portal service.