Getting Started with Sentinel RMS—Network On-premises Mode
Introduction
This document provides step by step instructions for generating and consuming RMS licenses for the network on-premises mode. The purpose of this document is to help the reader to become familiar with different aspects involved in the process of generating a license, installing the license, and executing a licensed application on Windows.
This document uses:
>Sentinel EMS for defining the Product catalog and generating Entitlements and Licenses.
> Code sample provided with the Sentinel RMS SDK to consume the Licenses.
>Sentinel RMS tools for generating License Fingerprints and installing the Licenses.
Sentinel EMS
Sentinel EMS is a web-based Entitlement Management System that enables software developers and device manufacturers to define and manage their product portfolio and the associated licensing policies. The Sentinel EMS platform includes out-of-the-box interfaces for license generation, activation, tracking, reporting, and back-office integration and customer self-service portals.
For more details, refer to the Sentinel EMS User Guide.
Sentinel RMS
Sentinel RMS provides a set of APIs and tools to be integrated within the software that needs to be licensed and protected. Licenses are generated by the Sentinel RMS license generator that’s integrated with Sentinel EMS. Licenses generated are uniquely encrypted for each software Vendor so that only their application licensed by them can understand and decrypt the licenses for use.
For more details, refer to the Sentinel RMS Developer Guide.
Network Licenses (Supported using the RMS License Manager)
Sentinel RMS provides the following modes in which a protected application can be deployed and executed:
>Standalone mode: The protected application runs on a device or machine independently and has its own independent License.
>Network mode: Protected applications share the License from a common pool that is typically installed on a license server accessible over network. Optionally license servers can be setup in a redundant mode as well for high availability.
For both modes, licenses can be generated and activated in one of the following ways:
>On-premises served mode: In this mode, licenses are activated and generated using the EMS portal or EMS API. License is then transferred to the target device for use. This guide focuses on the on-premises served mode.
>Cloud-served mode: In this mode, licensed application connects to SCC (a component hosted and managed by Thales on the cloud) to get licenses and any future updates.
Prerequisites
This section contains information on what is required for running the licensed application.
>Sentinel RMS SDK: You must meet the software and hardware requirements for installing the Sentinel RMS SDK. For details, refer to the section “Installation Information” in the Sentinel RMS SDK Release Notes.
>Compiler: For compiling the sample application on Windows (32-bit and 64-bit), you need to install Microsoft Visual Studio (any version from 2010 to 2019). We have used Microsoft Visual Studio 2015 to explain the procedures in this document.
Download and Install Sentinel RMS SDK
Before you can execute the sample, you need to install the Sentinel RMS SDK.
>If you are a production customer, refer to the Thales Order emails for links to download the RMS SDK. Alternatively, you can login to your Thales support account and use the available links to download the SDK.
>If you are an evaluation/trial customer, SDK download links are present in the trial portal. URL and credentials for trial portal are shared in the trial access details email that was sent to you.
Downloading the Sentinel RMS SDK
1.Open the Thales Sentinel Order email. In the Download Details table, click the Download link corresponding to the Sentinel RMS SDK field.
2.For trial licenses, clicking the link will directly start the SDK download. For all other licenses, you will be redirected to the Thales Support Portal.
Installing Sentinel RMS License Manager and Sentinel System Driver
For UNIX
The Sentinel System Driver on UNIX is known as Sentinel UNIX Driver (SUD)—its installer is provided in your RMS SDK installation. The installation instructions are provided in the release notes corresponding to your UNIX platform. You can ship this installer to your customers if the supported hardware key needs to be accessed.
For installing the Sentinel RMS License Manager, you can share the License Manager executable (lserv) available in the /redistributable/licenseManager directory.
For Windows
The installation program at: <installdir>\Redistributable\LicenseManager will install both the Sentinel RMS License Manager and Sentinel System Driver on Windows systems. The installer detects whether the operating system is Windows 32 or 64-bit and installs the appropriate version of the Sentinel System Driver accordingly.
Given below are various methods to perform the installation.
Method 1 - Wizard-based Installation
This is a wizard-based graphical installer that does a full step-by-step installation. Since it involves user-interaction, most of your customers will be able to run it on their own.
Method 2 - Quiet Installation
Either during your application's installation or afterward, you can call the setup.exe in quiet mode. The installation is run without any noticeable user interaction. This method is very similar to the first method, except that you call setup.exe yourself, to run without displaying messages (quiet mode).
The following files are required, totaling about 8 MB:
>Sentinel RMS License Manager <version>.msi
>Data1.cab
>Setup.exe
The command-line switches are as follows:
>Use the following option to install both the License Manager and Sentinel System Driver from command-line:
msiexec /quiet INSTALLLEVEL=101 /i "Sentinel RMS License Manager <version>.msi"
>Use the following option to install only the License Manager from command-line:
msiexec /quiet /i "Sentinel RMS License Manager <version>.msi”
Method 3 - Calling the MSI
With your application's Windows Installer-based installation program, you can easily call the License Manager MSI file. It is a supported custom action built into Windows Installer. The trick is to allow the installer to find the files it needs to install. The Sentinel RMS License Manager installer is written using InstallShield for Windows Installer and has all its files placed in the archive data1.cab. After you add a custom action to call this MSI file from your installer, all the components will be installed quietly right along with your application in a seamless manner.
NOTE You must have Windows Installer 2.0 (or later) installed on the target machine.
The following files are required, totaling about 4 MB:
>Sentinel RMS License Manager <version>.msi
>Data1.cab
NOTE It is possible that if you use InstallShield for Windows Installer you also have a .cab file corresponding to your application. In this case, the two files need to be merged together—as they need to reside in one directory. Otherwise, just include the Sentinel RMS License Manager MSI file and .cab file in the same directory as your own MSI.
Steps for Licensing
A typical process of licensing an application involves the following steps:
1.Define Product Catalog: This step involves defining the License Models, Features, and Products. A License Model is associated with a Feature and a Product is a collection of Features. The Product is used at the time of creating an Entitlement.
2.Create Entitlement: This step involves creating an Entitlement for a customer. The Entitlement contains the Products, Features, and associated License Model that the customer is entitled to use.
3.Generate License: This step involves activating the License the end user is entitled to. Users are required to generate the Fingerprint of the machine on which the license will be installed to perform the activation.
4.Install and Consume License: The License generated after activation must be installed on the device/machine where the licensed application will run. During the License consumption, the licensed application uses the RMS APIs to validate the Licenses.
Define Product Catalog
This includes the following steps:
1.Log on to the Sentinel EMS Portal
3.Customize the Flexible License Model
Log on to the Sentinel EMS Portal
To log on to EMS, you need a user ID and password assigned by the administrator. The default user ID and password are shared in the Thales Sentinel Order email.
Navigate to the URL on which your EMS instance is running, and enter the user ID and password to login to the EMS portal.
Note:
>If you are an EMSaaS customer, use the URL sent by Thales in emails to login to the EMS portal.
>If you host EMS yourself, use the URL where EMS is hosted.
>If you are an evaluation/ trial customer, the EMS access URL is present in the trial portal. URL and credentials for trial portal are shared in the trial access details email.
Create Namespace
A Namespace acts as a logical partition for your Sentinel EMS workspace. If you have different Product lines, you can maintain a different Namespace for each and define multiple Products in each Namespace. For details, refer to the Sentinel EMS User Guide.
1.From the navigation pane, select Catalog > Namespaces to open the Namespaces page.
2.Click Add Namespace. The Add Namespace page is displayed.
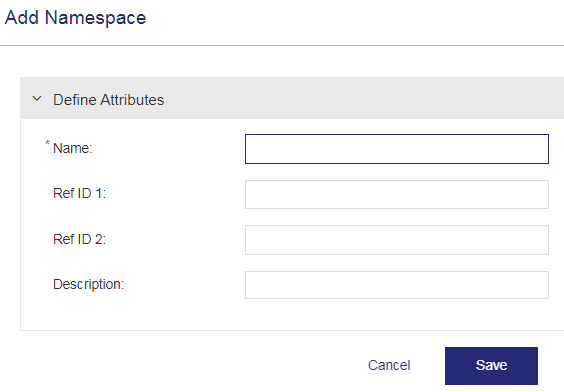
3.In the Name field, type SampleNetwork.
4.Click Save.
Customize the Flexible License Model
A License Model is a combination of various parameters that define how a Product/ Suite can be used by an end user. Sentinel EMS provides you with the flexibility to add multiple License Models to your Product/ Suite so that you can protect your Product once and generate different types of licenses according to your requirement. For details, refer to the Sentinel EMS User Guide.
Sentinel EMS provides various out of the box License Models that you can customize as per the requirements. For the purpose of this guide, we will use the Flexible License Model.
1.From the navigation pane, select Catalog > License Models to open the License Models page.
2.Search by Name for the Flexible License Model.
3.Under the Actions column, click the ![]() icon. The Copy License Model page is displayed.
icon. The Copy License Model page is displayed.
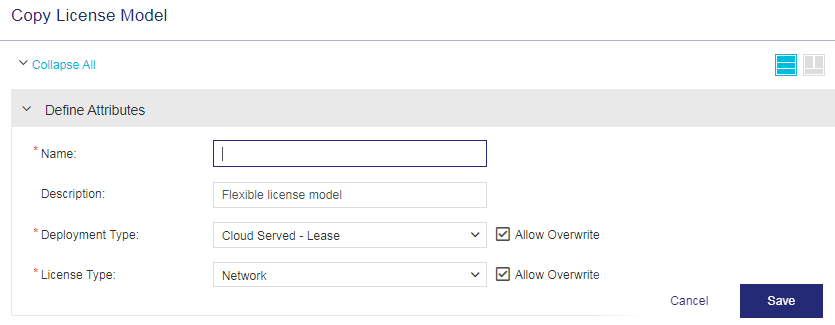
4.In the Name field, type NetworkLM.
5.From the Deployment Type drop-down, select On-premise Served.
6.From the License Type drop-down, select Network.
7.Under the Policy section, set Enforce Clock Tampered to No. This disables time tampering detection.
NOTE Clock tempering is handled by the license manager itself.
8.Under the Locking section, select the desired locking criteria by clicking Change. The Select the locking criteria pop-up is displayed.
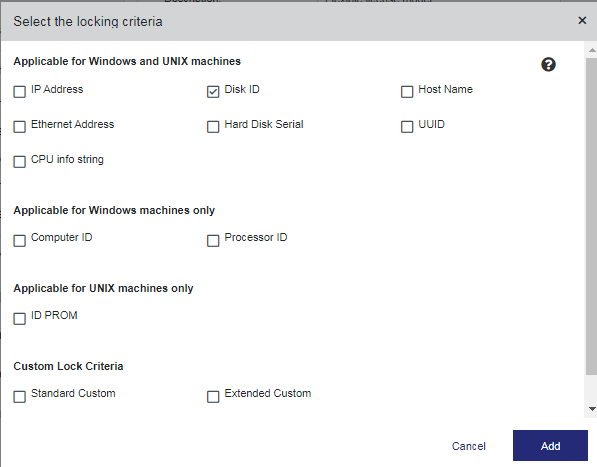
For the purpose of this guide, let us use Disk ID as the Locking Criteria, so no further change is required.
9.Click Add to close the Select the locking criteria pop-up.
10.Click Save. The NetworkLM license model is created.
Create Feature
A Feature is a functional part of an application that can be independently licensed. Features are the basic building blocks of a Product. For details, refer to the Sentinel EMS User Guide.
1.From the navigation pane, select Catalog > Features. The Features page is displayed.
2.Click Add Feature. The Add Feature page is displayed.
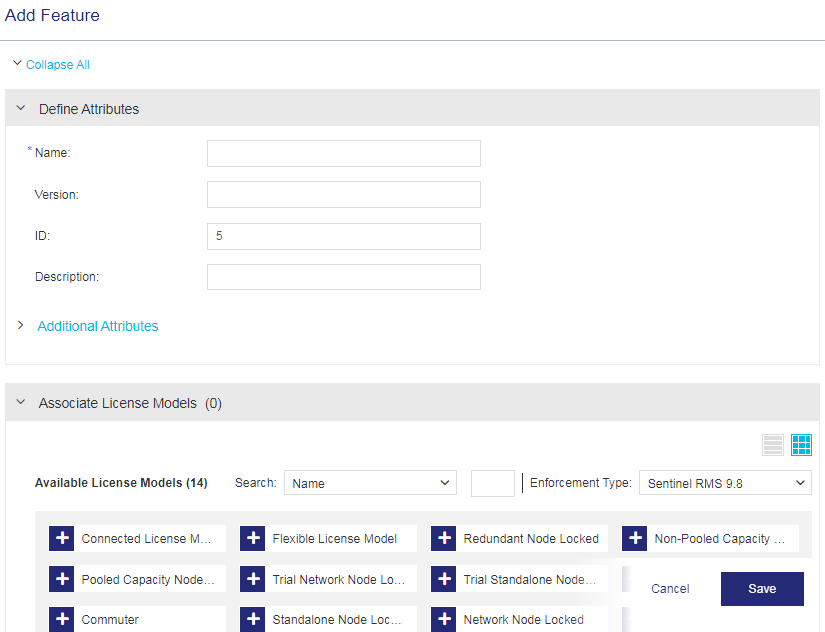
3.From the Namespace dropdown, select SampleNetwork.
4.In the Name field, type Network.
5.In the Version field, type 1.
6.In the Available License Models pane, click the NetworkLM license model to add it to the Associated License Models list.
7.Click Save. The Network feature is created.
Create Product
A Product is a combination of individual Features and is associated with one or more License Models. One or more Features are bundled into a Product as defined by your sales and marketing model. For details, refer to the Sentinel EMS User Guide.
1.From the navigation pane, select Catalog > Products. The Products page is displayed.
2.Click Add Product. The Add Product page is displayed.
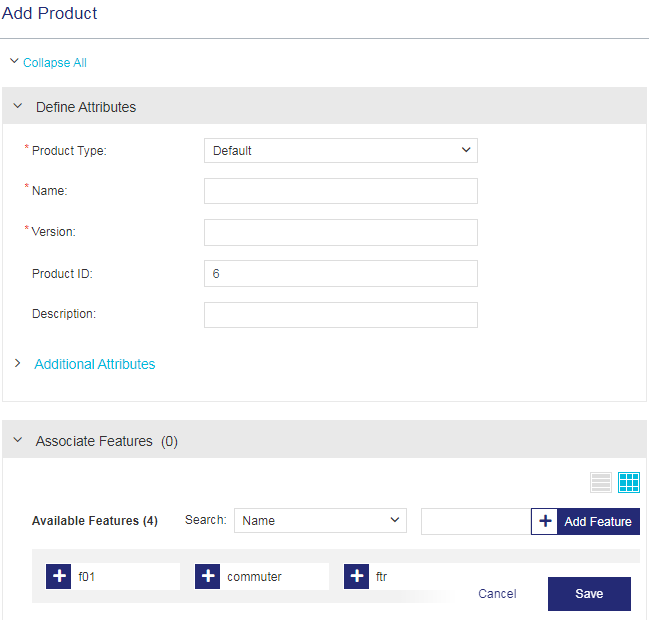
3.From the Namespace drop-down, select SampleNetwork.
4.In the Name field, type Product .
5.In the Version field, type 1.
6.In the Available Features pane, click the Network feature to add it to the Associated Features list.
7.Click Save. The product is created.
8.For the product you created, under the Actions column, click  . The Complete Product dialog box is displayed.
9.Click Complete. This marks the product as complete, and makes the product available for distribution.
With this step, you have successfully created a product catalog.
Create Entitlement
An Entitlement refers to the rights of an end-user to use a software package. It includes information like who can use it and for what duration. After the end-user obtains these rights he can activate, which generates a license to use the software conforming to the defined terms. After Features and Products have been defined in Sentinel EMS, Entitlements can be generated for the Products. In simple terms, Entitlement generation means producing orders for the given Products. For details, refer to the Sentinel EMS User Guide.
1.From the navigation pane, select Entitlements to view the Entitlements page.
2.Click Add Entitlement. The Add Entitlement page is displayed.
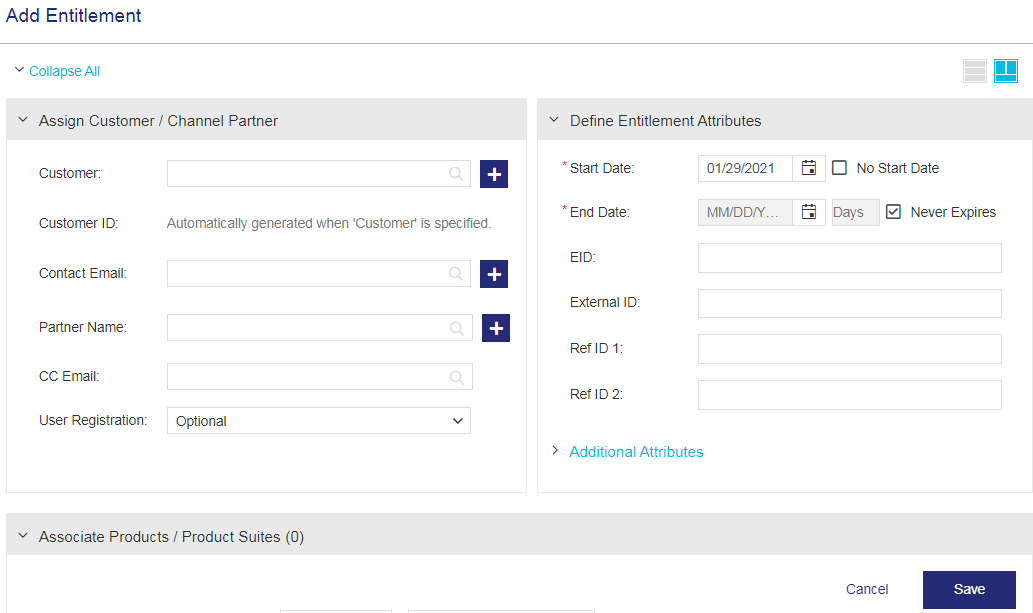
3.Next to the Customer field, click Add Customer  . The Add Customer dialog box is displayed.
4.In the Name field, type CustNetwork.
5.In the Identifier field, type CustNetwork.
6.Click Add. The customer is created.
7.Next to the Contact Email field, click Add Contact . The Add Contact pop-up is displayed.
8.In the Email field, add your email ID to receive the entitlement certificate.
9.Click Add. The contact is created.
10.Expand the Associate Products / Product Suites pane. Under the Available Products section, click the Product 1 product to add it to the Associated Products / Product Suites section.
11.In the Available Quantity field, enter 10 (required number of license).
12.Click Save to save the Entitlement in the draft state.
13.Under the Actions column, Click  to complete the entitlement. A pop-up appears to confirm if you want to proceed.
14.Click Complete. The entitlement details are saved. An entitlement certificate e-mail is sent to the contact email address.
Generate License
Licenses can be locked or unlocked. Licenses generated for RMS in this guide must be bound to the Fingerprint of the device on which the License is going to be used. Steps required are:
Generate Fingerprint
Fingerprint generation is a client-side operation. Sentinel EMS provides an out-of-the-box tool that can be used by your end customers to generate the fingerprint to be used for license activation. This tool is called “Wechoid”. To generate fingerprint, use the following steps:
1.Run the Wechoid.exe on the system where the license manager is hosted to obtain the locking code.
2.Under Locking Criteria, ensure that none of the fields except Disk ID is selected. This is because for the purpose of this guide we are using only Disk ID as the Locking Criteria. See Step 8 of the section Customize the Flexible License Model.
NOTE The Locking Criteria must be the same as specified in the license model associated with the entitlement; otherwise, the fingerprints in the license will not match the fingerprint on the machine/device.
3.The Code field automatically displays the Fingerprint based on the selected criteria. Select and copy it.
NOTE Run the Wechoid tool on the system where the license manager is hosted, and obtain the locking code.
NOTE The terms “Locking Criteria”, “Primary criteria”, and “Locking Selector” are used interchangeably throughout this guide and within Sentinel EMS, tools, and documentation. Likewise, the terms “Locking Code”, “Client info”, and “Fingerprint” are used interchangeably. The former are used to define what machine characteristics the latter will be based on. Combined, the ‘criteria’ and ‘fingerprint’ are referred to as the ‘Locking Data’.
For details of these terms, refer to Sentinel RMS Developer Guide.
Activate Product
Product activation refers to a method by which the machine-specific lock code of a computer is used to generate a license code or file specific to that computer or device. The license code ensures that the Product can be used only on the system(s) to which it is locked. For details, refer to the Sentinel EMS User Guide.
1.After obtaining the fingerprint from the wechoid tool, open the Activate Products page. To do so, expand the entitlement that you created earlier, and click Activate.
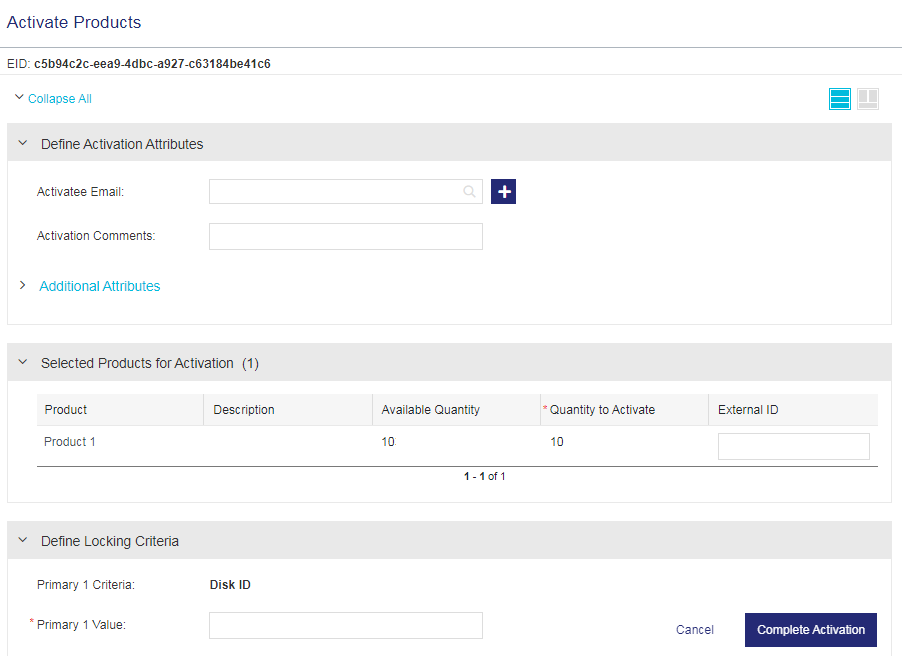
2.Paste the fingerprint generated above into the Primary 1 Value field.
3.Click Complete Activation to generate the license string.
4.Click Save License to create a lservrc file that contains the generated license string.
5.Click Close.
Install and Consume License
To consume the license, you need to compile the sample, install the license, and run the sample.
NOTE
- Before compiling and running the sample, ensure to complete the prerequisites.
- Microsoft Visual Studio 2015 has been used to explain the steps in this section.
- In the steps below, change 9.x to the RMS version you are using where path is referring to the location of sample or output.
Compile Sample (MSVS 2015 and Later)
You need to compile the sntl_demo.c sample to get the executable application, which can be run to consume the license.
To compile the sntl_demo.c sample:
1.Open Microsoft Visual Studio as Administrator.
2.Open the Samples32.MSVS2010.sln solution file in Visual Studio. This file is available in the C:\Program Files (x86)\Thales\Sentinel RMS Development Kit\9.x\Samples\C folder.
3.Edit the sntl_demo.c file:
a.In the Solution Explorer, navigate to the sntl_demo folder, expand Source Files and double-click the sntl_demo.c file to open it.
b.You do not need to make changes in #define CONTACT_SERVER if your server is hosted on same machine.
NOTE If you are using a different sever, you need to provide the IP address of the server (where the license is present) in #define CONTACT_SERVER; otherwise, it is localhost by default.
c.Change the feature name to Network in the sample source file.
NOTE By default, the feature name is Addition and feature version is 1 in the sample source file. However, if you have created a feature in EMS by a different name and version, you need to change the defaults in the sample to the values defined in EMS.
4.Before building the sample, you need to add the library legacy_stdio_definitions.lib (Configuration properties > Linker > Input > Additional Dependencies). To do so, right-click the sntl_demo folder in the Solution Explorer, click Properties.
5.Build the sample. To do so, right-click the sntl_demo folder in the Solution Explorer, and click Build. The output is the sample application executable created at
C:\Program Files (x86)\Thales\Sentinel RMS Development Kit\9.x\Samples\C\Out\MSVS2010\x86\Debug\sntl_demo.exe.
Install License
Before executing the sntl_demo.c sample, you need to install the license.
1.For network applications, place the license file (lservrc) in the same directory where the license manager is installed, which is:
C:\Program Files (x86)\Common Files\Thales\Sentinel RMS License Manager\WinNT
NOTE If you don't have the license file, you can Generate License and place it in the folder containing the compiled sample. You can assign a different file name (other than lservrc) using the environment variables, licensing library API functions, and command-line switches.
2.Restart the License Manager.
Run Sample
Next, you need to run the sample application executable (.exe) to consume licenses. To run the sntl_demo.exe file:
1.Open the command prompt as Administrator.
2.Change the directory to the output folder by running the following command:
C:\Program Files (x86)\Thales\Sentinel RMS Development Kit\9.x\Samples\C\Out\MSVS2010\x86\Debug
3.Execute the sntl_demo.exe file.
Once the sample compiles and runs, the Console window displays the execution results.
1.First, an application context is created.
2.The login call is executed to consume the license. Errors are thrown, if the license is not present (error 210018) or if the existing license on the machine has expired (error 214109).
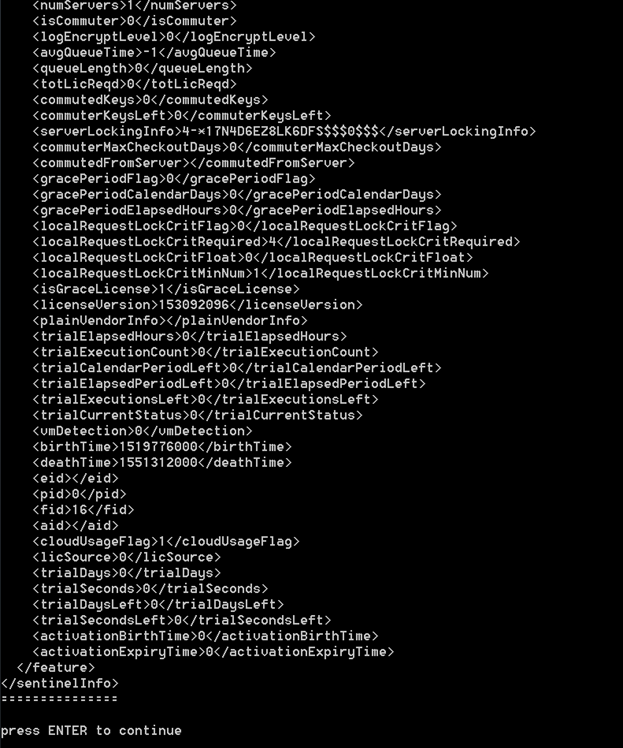
3.When a valid license is present, information about the Network feature is displayed as shown in the figure below:
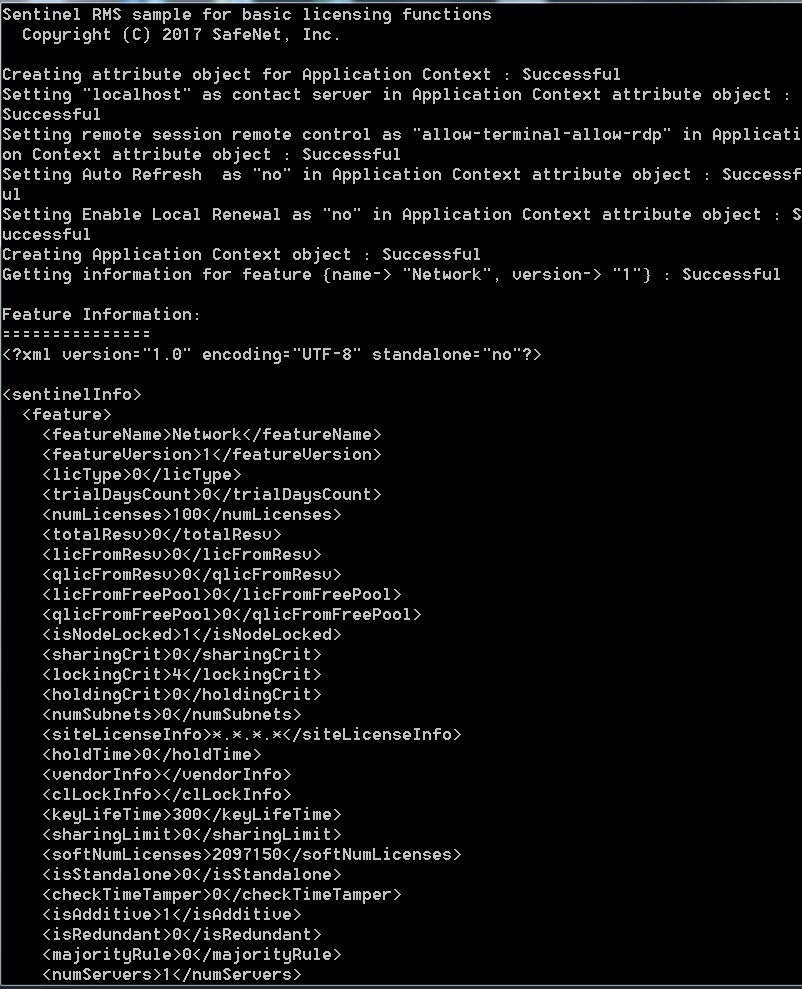
4.Press Enter to call the login API. This requests the license for the Network feature, as shown in the figure below:
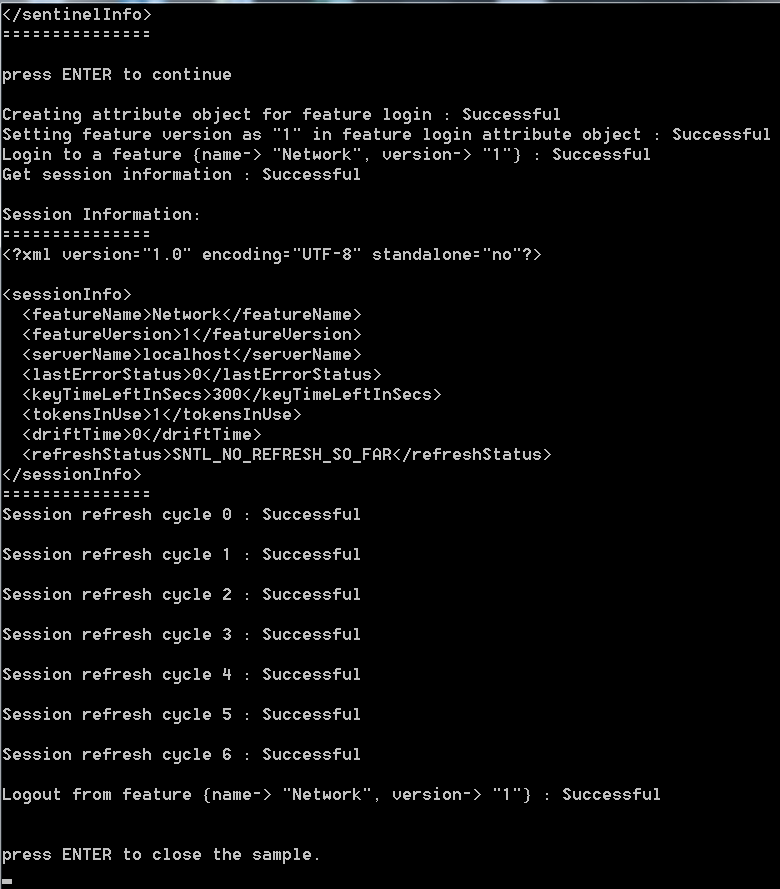
5.The session information is displayed, which is the information for the current license session. Note that a successful license request creates a license session. For example, <tokensInUse> is shown as 1 because one license has been used with the call to the login API.
6.Next, the refresh API is called to periodically refresh the license and keep the license session alive for a longer period.
7.Afterward, the logout call is executed to release licenses.
8.Press Enter to close the sample.
Error Code
Refer to the Sentinel RMS API Reference Guide for information about errors and status codes.
Documentation Resources
Refer to the following online pages to access Sentinel product documentation:
>Sentinel RMS: https://docs.sentinel.thalesgroup.com/softwareandservices/rms
>Sentinel EMS: https://docs.sentinel.thalesgroup.com/softwareandservices/ems