Working with an Entity
>Importing and Exporting Entity Data
>Associations within an Entity
All entity pages are made up of certain common components. This section describes how to work with those components:
Searching an Entity
The search bar is available on all entity screens. It is used for searching and filtering the entity list that appears on the entity page.
To search an entity:
1.Select a search criterion from the left drop-down list. For example, Namespace is a search criterion for all catalog entities. The search bar is displayed below:

2.Enter a search value, for the search criteria. As soon as the search value is entered, the Search Pattern drop-down list appears:

3.Select a Search Pattern as one of the following:
•Exact - Filters records after matching the exact search value entered.
•Any - Filters records based on the search value appearing anywhere in its search criterion.
•Starts with - Filters records based on the initial characters of the search criterion matching the search value entered.
4.Repeat above steps to add multiple search criteria. For multiple search criteria records are filtered if all criteria is met.
NOTE The search bar also appears in the entity association panes in entity creation or entity modification pages.
Sorting an Entity
The sort icon available in the columns that display entity information is used to sort it. Click this icon for the entity attribute name (column name) to sort the entity list based that attribute.
The sort icon is a toggle option that sorts the entity list between ascending and descending order. This icon is made up of two parts:
> ▲: Specifies that the entity list is sorted in ascending order.
> ▼: Specifies the entity list is sorted in descending order descending order.
The sort icon appears highlighted for the column on which the entity list is sorted. For example, the entity list below is sorted on Creation Date in descending order. The sort icon is displayed below:
![]()
Using the Pagination Bar
The pagination bar available below the entity records is used to view and navigate through the entity list. This bar helps control the page view of this list. The pagination bar is displayed below:

The following table explains the components of a pagination bar:
| Label | Description |
|---|---|

|
Specifies the records numbers and the total number of records listed for an entity. The format is <record number from> - <record number to> of <total number of records>. For example, 1 - 5 of 11 in the above image specifies record number 1 to 5 of total 11 records of the entity is displayed. |

|
The current page that is displayed. For example, page 1 is displayed in the above image. |

|
These page numbers specify the separate pages where the entity records have been distributed. |

|
The Page Size drop-down list specifies the number of records to be listed in each page. |
Configuring the Columns
The entity attributes available as columns on the entity page can be configured. This means that you can specify the columns that you want to view on this page. The Configure Columns tool available in the Actions column is used to configure this information. The Configure Columns tool is displayed below:
To configure the grid data for an entity:
1.Navigate to the entity page for which you want to configure the columns.
2.Click the Configure Columns tool. The columns that can be configured for the entity appear in a pop-up as shown:
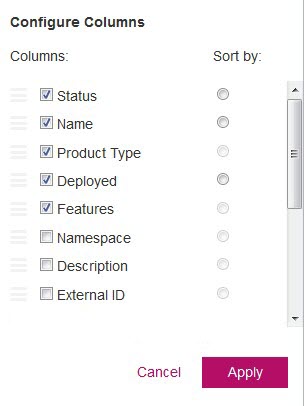
All the columns that can be configured for the entity are listed under Columns. The check boxes for the columns that are already visible for the entity appear selected.
3.Select the check boxes for the columns that you want to display. You can also deselect the check boxes that you want to remove from the display.
4.Select a radio button under Default Sorting to specify the column on which the entity data must appear sorted.
5.Click Apply to apply the settings.
Importing and Exporting Entity Data
The Import option enables you to import your legacy data into Sentinel EMS from a CSV or JSON file. The Export option enables you to export the current data of an entity to a JSON file. The functionality to import and export data is available for the following entities:
>Customers
>Contacts
>Products
>Features
>Entitlements
>Downloads
The Import | Export option is displayed below:
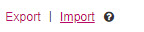
The  icon above is for downloading the sample CSV file for an entity. The sample is for the entity of the active entity page you are working on.
To import entity data:
1.Navigate to the entity page to import its data.
2.Click Import. The Open dialog box appears.
3.Browse to the CSV file that you want to import. The CSV file must conform to the format specified for that entity. For more information on entity specific CSV formats, see Appendix B: CSV File Formats for Data Import.
4.Click Open to import the file.
Creating an Entity
The Add <entity name> button available on the entity page is for creating a new entity. Some prerequisites must be met before an entity can be created. For example, to create a feature the prerequisite is that a namespace and permission (role) to create a feature must be available to the user.
To create an entity:
1.On the entity screen, click the Add <entity name> button. The screen to create the entity appears. A sample page to create a feature is displayed below:
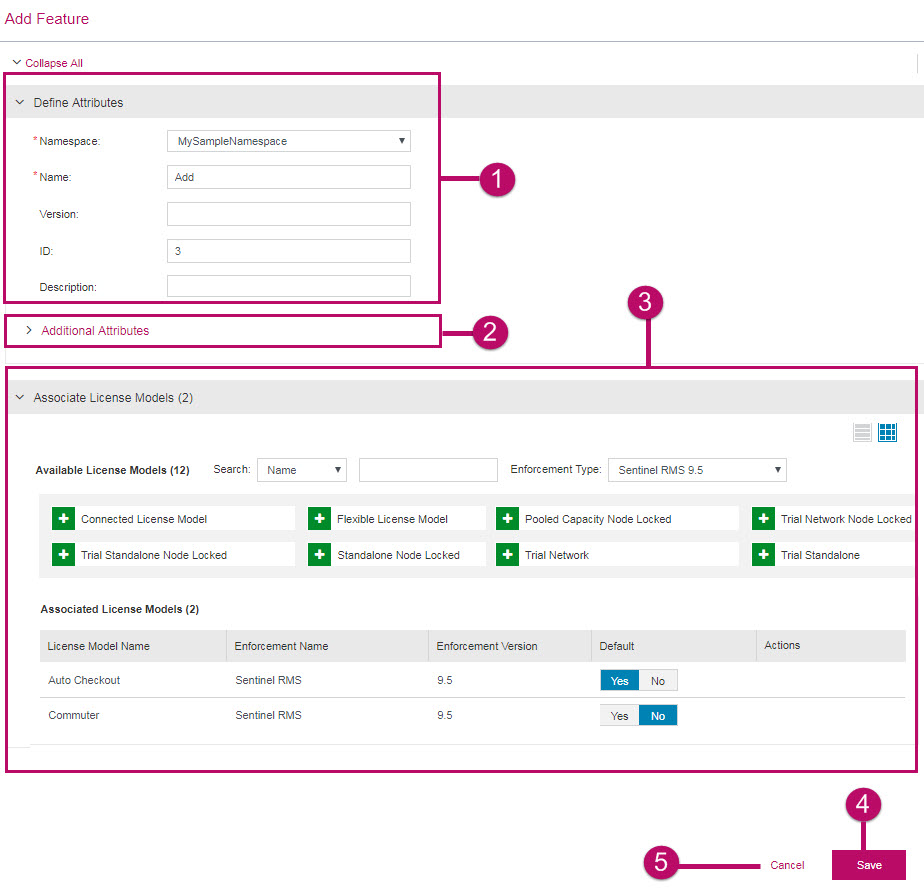
The entity creation screen consists of the following:
| Label | Label | Description |
|---|---|---|
|
|
Define Attributes | List of attributes that are mandatory. Optional and frequently used attributes are also listed in this section. |
|
|
Additional Attributes | Lists the custom attributes and less frequently used optional attributes. |
|
|
Entity Association Pane | This section is available for entities, which need association with other entities during creation. |
|
|
Save | Button to save and create the entity. |

|
Cancel | Button to close the entity creation screen without saving information. |
2.Enter value for all mandatory attributes.
3.Enter optional attributes (including Additional Attributes) as required.
4.Associate other entities as required. See Associations within an Entity for details on how to associate an entity.
5.Click Save.
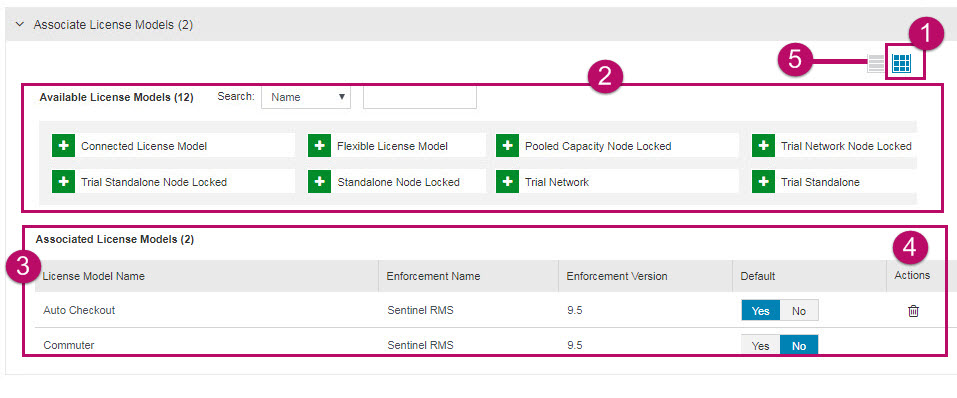
Associations within an Entity
The Entity Association Pane is part of the entity create, copy and edit screens. This pane is used to associate other entities with the entity being created or modified. For example, license models are associated with a feature using the Entity Association Pane when a feature is created. Two views of the Entity Association Pane are:
>Thumbnail View: Displays the details of the entity being associated as thumbnails. This is the default view.
>Grid View: Displays the details of the entity being associated in a grid.
Thumbnail View
The following image displays the Entity Association Pane in thumbnail view:
The Entity Association Pane in the thumbnail view consists of the following:
| Label | Label | Description |
|---|---|---|
|
|
Thumbnail View | Tool to switch to the thumbnail view. This is the default view of the Entity Association Pane. |
|
|
Available Entities |
List of entities that are available for association. Selecting an entity from this section associates it the entity being created or updated. The selected entity is moved to the Associated Entities section. NOTE The number of objects that can be listed for an entity in this view is limited to 200. |
|
|
Associated Entities | List of entities that are associated with the entity being created or updated. This section also displays the details of an associated entity. Some of the attributes available here can be configured from this section. |
|
|
Actions | Actions that can be performed on an associated entity. The  action is used to remove the association move the entity back to the Available Entities section. action is used to remove the association move the entity back to the Available Entities section. |
|
|
Grid View | Tool to switch to the grid view. |
Grid View
The following image displays the Entity Association Pane in grid view:

| Label | Label | Description |
|---|---|---|
|
|
Grid View | Tool to switch to the grid view. |
|
|
Available Entities | List of entities that are available for association. Entities are selected from this section and associated with the entity being created or updated. |
|
|
Associated Entities | List of entities that are associated with the entity being created or updated. This section also displays the details of an associated entity. Some of the attributes available here, can be configured from this section. |
|
|
Pagination Bar | Navigate through and customize the number of records available under Available Entities. |
|
|
Add | Entities selected under Available Entities are moved to the Associated Entities section on the click of this button. |

|
Thumbnail View | Tool to switch to the thumbnail view. This is the default view of the Entity Association Pane. |

|
Actions | Actions that can be performed on an associated entity. The action is used to remove the association move the entity back to the Available Entities section. |
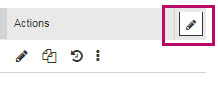
Editing an Entity
To edit an entity:
1.Navigate to the entity screen.
2.Identify entity to edit.
3.Under Actions, click  to display the entity attributes the of the selected entity in the Edit Entity page.
4.Update the entity attributes with new information as required.
5.Click Save.
Deleting an Entity
To delete an entity:
1.Navigate to the entity page.
2.Identify the entity to delete.
3.Ensure the requirement to delete the entity is being met.
4.Click  to delete the selected entity.