Remotely Check Out a Commuter License
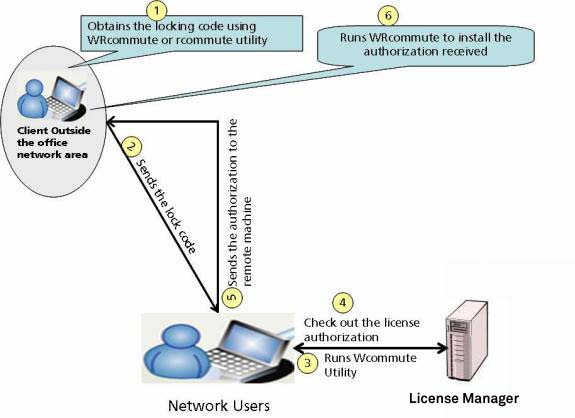
A license can also be checked out for a computer that does not have direct access to the License Manager. In such a case, any system that can access the License Manager can check out the license for a remote system by using remote checkout. However, the remote computer needs to produce its computer locking code as a verification code. If the remote computer locking code matches with the local license request criteria, only then the network user can check out a license authorization for the remote user. The network user sends the checked out authorization code to the remote user. The remote user needs to install the authorization code received from the network user to run the application.
NOTE Remote clients using applications licensed using RMS v8.1.1 (or earlier) must ensure that the versions of the tools used in this process such as WRcommute, rcommute, Wcommute, and lcommute—are matched.

Figure 1: Remotely Check Out a Commuter License Authorization
NOTE When the commuter duration lapses, the licensed application stops running on the portable computer.
To check out an authorization remotely, a remote user can contact a local user to relay the remote request to the License Manager. The remote user runs WRCommute or rcommute to create the locking code for the specific remote laptop computer. The local user retrieves an authorization from the License Manager and sends the authorization to the remote user. The remote user installs the authorization on the remote laptop. Refer to the image under Roles and Responsibilities for Commuter Licenses.
The process of obtaining and installing a remote commuter authorization is as follows:
Step 1: Obtaining the Remote Locking Code Using WRCommute or rcommute
The remote user can generate a commuter locking code for the remote computer using WRCommute or rcommute. This code needs to be sent to the network user.
>Run WRCommute and click the Get Locking Code tab. The commuter locking code for the current computer is displayed.
>Copy the locking code to the clipboard using the Copy to Clipboard option.
>Save the commuter locking code to a file using the Save to file button.
>To send the commuter locking code as an e-mail message, type an e-mail address and click Send.
NOTE If Hard Disk Serial is being used as a local locking criteria for commuter licenses, administrative privileges are required to check out such licenses using WCommute/lcommute or WRCommute/rcommute utilities.
The following options available to use rcommute
| Options | Description |
|---|---|
| -l |
Retrieve the commuter locking code and store it in a specified file. |
| filename | The name and path for the file in which the commuter locking code is stored. |
For example:
rcommute -l lock.txt
Step 2: Checking Out an Authorization for Remote User
The network user can check out a license for the remote user using WCommute or lcommute. The network user then sends the authorization code to the remote user.
The steps for checking out an authorization using WCommute are as follows:
>Run WCommute.
> Select the commuter authorization that you want to use from the network.
>Select the Check out authorization for remote machine check box.
>If the duration of an existing license needs to be extended, specify a value (between 1 to 1827) in Enter duration for which the existing commuter token need to be extended.
>Select the No Limit check box for unlimited check-out duration (lasts up to the expiration of the network license).
>Click Check Out. WCommute displays the Locking Code for Remote Machine dialog box.
>You can add the remote users locking code in any of the following ways:
•You can type the commuter locking code received from the remote user. To do so, select Enter the locking code for remote machine and type the locking code.
•You can directly paste the commuter locking code from the computer clipboard. To do so, click Paste from Clipboard.
•You can add the commuter locking code from a file. To do so, select Get locking code for remote machine from file and type the file name or use the Browse button to find it.
>Click OK. The Remote Commuter Licensing dialog box is displayed.
>Send the commuter authorization to a remote user using any of the following methods:
•Type an e-mail address in the Email address text box and click Send.
•To save the commuter authorization to a file, click the Save to File icon.
Step 3: Installing Commuter Authorization on a Remote Computer
The remote user can install the commuter authorization using WRCommute or rcommute.
The steps to install the authorization code using WRCommute are as follows:
>Run WRCommute.
> Click the Install Remote Authorization Code tab.
>You can add the authorization code in any of the following ways:
•You can type the authorization code received from a network user. To do os, select Enter remote authorization code and type the authorization code.
•You can directly add the authorization code from a file. To do so, select Get remote authorization code(s) from file and type the file name or use the Browse button to select the desired file.
>Click Install.
The options available for using rcommute are as follows:
| Options | Description |
|---|---|
| -i |
Install the commuter authorization from the specified file. |
| filename | The name and path of the file in which the commuter locking codeis stored. |
For example:
rcommute -i commuter.txt
