Installing a Client Identity on an End User's Machine
Each client identity is represented by a unique identity string. You obtain the string for each client identity using Admin Control Center (go to Configuration page > Configuring Client Identities tab). The client (person or entity) that receives the identity string can install it on their machines using one of the following methods:
>Install the identity string using Admin Control Center on the machine.
>Enter the identity string manually in the License Manager configuration file on the machine.
Each of these methods is described in this section.
Identity String Syntax
The identity string generated by Admin Control Center uses the following syntax:
<identityString>@<address>
where:
| <identityString> | A unique string generated for each client identity. |
| <address> | The license server machine address. This address is taken from the field Public Address for Access With Identity that is specified in Admin Control Center as described earlier (see Configure Access From Remote Clients). |
For example:
4VE5N3V:oBWAAQCBEBJnJ3btDmfbhLtCw/o7kjE@10.162.104.213
Installing an Identity String Using Admin Control Center
The user can use Admin Control Center on the remote machine to install the identity string.
To install the identity string using Admin Control Center:
1.In Admin Control Center on the remote machine, go to Configuration page > Access to Remote License Managers tab (or enter this URL in a browser on the remote machine: http://localhost:1947/_int_/config_to.html). The Configuration for Sentinel License Manager tab is displayed.
2.Ensure that Allow Access to Remote Licenses is selected.
3.In Remote License Search Parameters, enter the identity string using one of the formats described above. The screen should now look similar to the following:
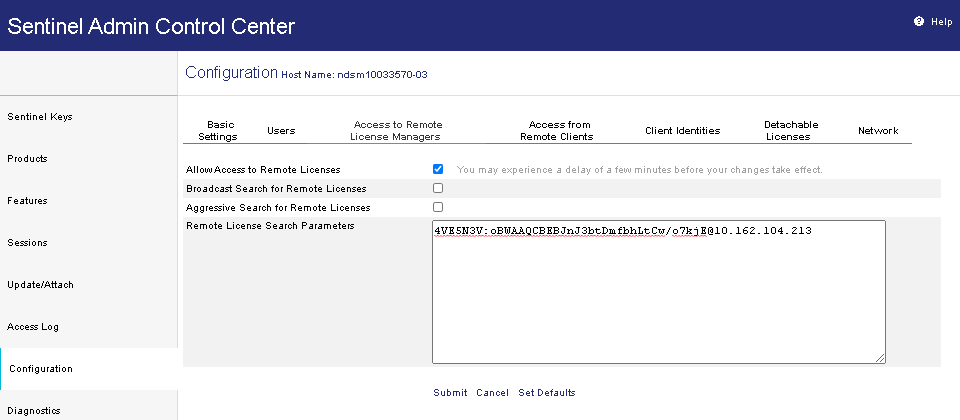
4.Click Submit.
5.If proxy communication is required, go to Configuration page > Network tab. Enter the required proxy settings and click Submit.
Entering an Identity String Manually
For a remote machine that does not have the Run-time Environment installed, the user must enter the identity string manually in the configuration file for the Integrated License Manager or the External License Manager.
To determine where to find the configuration file for the License Manager, see Working Directly With License Manager Configuration Files.
For a Windows desktop application, this file is typically:
%LocalAppData%\SafeNet Sentinel\Sentinel LDK\hasp_<vendorId>.ini
where <vendorId> is the Vendor ID associated with your Batch Code (or hasp_demo for DEMOMA).
Open the configuration file in a text editor. Enter the identity string using the serveraddr parameter. For example:
serveraddr = 4VE5N3V:oBWAAQCBEBJnJ3btDmfbhLtCw/o7kjE@10.162.104.213
The configuration file can contain multiple serveraddr parameters.
If proxy communication is required, manually set proxy attributes in the configuration file described above.
Add the following parameters in the configuration file:
proxy = 1
proxy_host = <host>
proxy_port = 8080
proxy_username = <username>
proxy_password = <password>
Provide the required values where indicated.