Managing Custom Reports
Relevant for: Administrators with a Super User or Batch Code Admin role
Sentinel LDK-EMS provides a set of standard reports. If these reports do not provide exactly what your users need, you can define custom reports according to your requirements. To create custom reports, you must be familiar with the Sentinel LDK-EMS data model. For details, see the Sentinel LDK-EMS Configuration Guide.
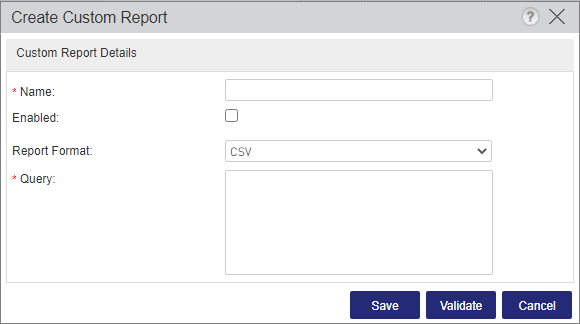
You create custom reports using the Create Custom Report dialog box. The Edit Custom report dialog box is similar and allows you to update the details of a custom report.
You can schedule custom reports in the same way as other reports. For details, see Scheduling a Report.
To create or updating a Custom Report:
1.Open the Create Custom Report or Edit Custom Report dialog box![]() Show me how
Show me how
2.In the Name field, provide a name for the report (maximum 50 characters).
3.Do one of the following:
a.To enable the report, select the Enabled check box.
b.To disable the report, clear the Enabled check box.
You can enable or disable the report later, if needed.
4.Select one or more User-Associated Batch Codes to enable only users with permissions for the selected Batch Codes to view the generated custom report.
5.In the Report Format list, select the output format for the report:
•CSV: Generates the output in CSV format.
•Jasper: Generates the output in CSV/PDF/HTML/RTF format. This requires a pre-defined Jasper report template.
If you select the Jasper report format, in the Report Template row, click Choose File and browse to the .jrxml or .jasper file. Then click Upload.
NOTE When creating a .jrxml file, replace the text [language="groovy"] with [language="java"] as Sentinel LDK-EMS does not support Groovy.
6.In the Query field, insert an SQL query where the table name is in upper case, for example:
select * from T_ENT_ACTIVATION
CAUTION! The SQL query does not enforce the batch codes selected in step 4. Make sure that you include only statements that relate to the selected Batch Codes.
7.Click Validate to validate the SQL query.
8.Click Save. You can now run the custom report.
Enabling or Disabling a Custom Report
If you disable a custom report, the report is not displayed in the reports list. To make the report type available, you must enable the report.
To enable or disable a custom report:
1.In the list of custom reports (Administration > Custom Reports), select a custom report.
2.Click ![]() and select Enable or Disable as needed.
and select Enable or Disable as needed.
Deleting a Custom Report
A custom report cannot be deleted if a scheduled report exists for it.
To delete a custom report:
1.In the list of custom reports (Administration > Custom Reports), select a custom report.
2.Under Actions, click Delete.
3.In the confirmation box, click Yes.
Running a Custom Report
Running a custom report is the same as running a pre-defined report.
To run a custom report:
1.In the Reports tab (Reports > Reports), under Custom Reports, select the report you want to run.
2.For Jasper reports, in the Output Format list, select the required output.
3.Click Generate Report.