Products
|
>Prerequisites for Creating a Product >Lifecycle Stages of a Product >Comparing Sentinel EMS Product Types |
New to Sentinel EMS?
|
What Is a Product?
A product is a salable entity that contains one or more bundled features
| Default Products | Versionless Products and Variants |
|---|---|
|
A default product is a standard product type with a straightforward, self-contained configuration that remains unchanged over time and provides minimal editing capabilities. This is especially useful if your offerings do not require granular control or include multiple permutations. Default products can contain one or more features and memory files, both of which are optional. Benefits of Default Products: >Simple to set up for static or infrequently updated products. >Direct, one-to-one entitlement-to-product mapping in which each line item in an entitlement maps directly to a specific, identifiable product version. This can simplify inventory tracking and sales reporting if your ERP is designed around discrete product versions or if you require a clear, static link for compliance purposes. |
A versionless product acts as a flexible, dynamic container for your software, treating the software as a product family rather than a fixed version. This approach entitles users to that entire family, which can include multiple product versions and editions (known as variants). Users activate the relevant variant of the versionless product based on their purchase. The versionless products themselves are enforcement-agnostic, enabling you to create variants for any enforcement. Versionless products provide you with maximum flexibility to deliver your software without needing to create new entitlements and re-issue customer licenses for every change. New product variants are automatically available to end customers. A versionless product is the flexible "parent" that allows you to manage various "children" (variants) of your software over time. Variants are sub-configurations of versionless products. Each variant represents a specific, distinct version or customized edition of your software, which your customers can activate. Variants provide you with granular control over your software offerings, enabling you to define and bundle specific features, versions, or platforms, all within a single entitlement. This ensures that customers can activate the exact software and features matching their current purchase, ensuring seamless access and updates over time. If needed, variant activations can be revoked, just like default products. Versionless products and variants must contain one or more features. Variants can also contain memory files. Benefits of versionless products and variants: >Continuous updates: You define your core, versionless product once. As you release new versions, bug fixes, or minor updates, you create new variants of that versionless product. Customers with an entitlement to the versionless product receive access automatically. This enables customers to activate these newer variants without the need for new or modified entitlements. >Multiple tiered offerings and editions: You can offer different editions, such as, "Basic", "Pro", or "Enterprise", or platform-specific versions, such as Windows, Mac, Linux, or Android, under a single product umbrella. This reduces the number of unique product entries you need to manage in Sentinel EMS and integrate with your ERP/CRM systems. You create a versionless product for the core, and then define variants for each tier or platform. Customers purchase the versionless product and activate the variant corresponding to their purchased tier. For example, instead of maintaining a separate SKU for "Software X v1.0" and "Software X v1.1", you maintain one master SKU for "Software X (Versionless)" in your back-office systems. The different versions and editions are handled as variants within Sentinel EMS. >Feature control and future-proofing entitlements: You can enable or disable specific features for customers as their needs or subscriptions change. Similarly, as you develop and release new variants with new features or capabilities, your customers can use their existing entitlements to access these new features automatically or via an upgrade. |
Prerequisites for Creating a Product
>A role that includes Catalog (Namespace) permissions for the relevant namespace.
Lifecycle Stages of a Product
A product's lifecycle contains the following stages:
>Not Deployed: The product is not included in any entitlement.
>Deployed: The product is used in an entitlement.
Product Status
The Status attribute on the Products page indicates the status of a product.
Possible values:
>Draft: When you first create a product, it is saved as draft. You cannot create production entitlements for a draft product, however, you can create test entitlements for testing purposes.
>Completed: You can create entitlements for the product.
>End of Life: An obsolete product. You cannot edit or delete the product.
Comparing Sentinel EMS Product Types
The following table describes and compares the available product types.
| Default Product | Versionless Product | Variants for a Versionless Product | |
|---|---|---|---|
| Product Definition |
>Contains one or more features that are specific to customer requirements. >You modify the product definition every time a feature >You cannot remove a feature from a deployed product. |
>Contains one or more features that are specific to customer requirements. When you create a versionless product, you must specify at least one feature. >Serves as a basis for creating variants. >Flexible product definitions enable you to associate new features with versionless products when defining variants. >Versionless products can be used with any supported enforcement. |
>Inherit all features associated with the versionless product. >You can add or remove features >All features must have the same enforcement type and license model. Specific license model attributes, including concurrency and accessibility, can differ. >Features added to a variant are automatically associated with the variant's versionless product. >Memory files are intended only for the variant and are never associated with the variant's versionless product. |
| Version and Activation Method |
Specifying a version is optional. You set the activation method when creating an entitlement. |
>Versionless products do not have versions. >You activate the variant, not the versionless product. Therefore, the activation method is not relevant. |
>Variants require a version. >Variants require an activation method. Possible activation methods: See Activation Method |
| Entitlement and Activation |
>Included in entitlements. > Customers activate default products to generate licenses. |
>Included in entitlements. > Customers do not activate versionless products. Instead, customers activate variants to generate licenses. |
>Included in entitlements—either as part of a versionless product or on their own as a variant. If a variant is included on its own, it is treated as a default product. >Customers select the variants to activate from an entitlement. |
Creating a Product
This section describes how to create a default or versionless product. For details on creating a variant, see Creating a Variant for a Versionless Product.
When you create a product, you define the product attributes and associate any required features
To create a product:
1.From the navigation pane, select Catalog > Products to view the Products page.
2.Click the Add Product button. The Add Product page opens.
3.If
The relevant Add Product page opens. The following
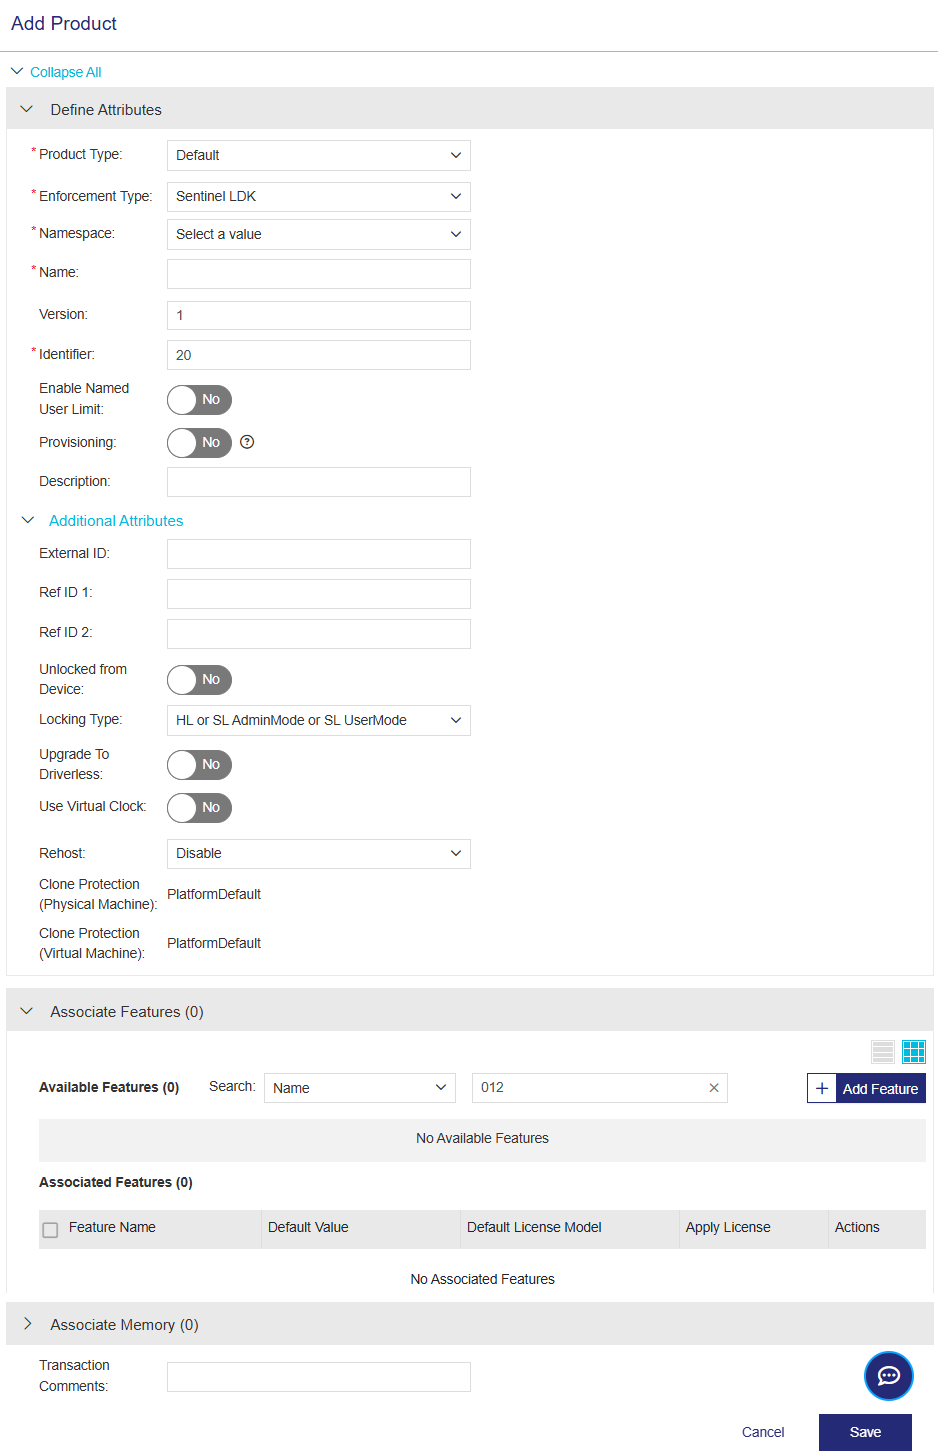
4.Define the
TIP To create a product that is not locked to a specific device, set Unlocked from Device to Yes and select an SL-type Locking Type. Defining a product as unlocked from a device is permanent and cannot be reverted after the product is marked as Completed.
5.
NOTE If you are creating a product that is set as Unlocked from Device, the Execution Count and Time from License Generation license models are not relevant and are, therefore, not available in the list.
6.(Optional) Click the Associated Memory Files bar to expand the pane. Then associate and configure one or more memory files.
7.Click Save. The Add Product page closes, and the product is added to the Products list as a draft product.
8.In the Actions column for the product you just created, click the Complete ![]() button to enable the product to be added to an entitlement. For other actions, see Actions for Products. For details on creating entitlements, see Entitlements.
button to enable the product to be added to an entitlement. For other actions, see Actions for Products. For details on creating entitlements, see Entitlements.
Product Attributes
The following table explains the product attributes. The displayed attributes depend on the product type—Default, Versionless, or Variant of a versionless product.
| Attribute | Description | Required/Optional | Valid Values |
|---|---|---|---|
| Product Type |
The type of product: Default or Versionless For details, see Comparing Sentinel EMS Product Types. When creating a variant, the Variant product type is displayed automatically. Default: Default
|
Required |
Default: Default |
|
(Visible only if more than one namespace is available) The namespace in which the product is stored. Even if only one namespace is available, you can still view the assigned value in the product attributes after the product is created or when editing the product. |
Required |
Any namespace in the list |
|
| Batch Code |
(Visible only if more than one batch code is available) The batch code that you want to associate with this product. Even if only one batch code is available, you can still view the assigned value in the product attributes after the product is created or when editing the product. |
Required | Any batch code in the list |
| Name | Name of the product. | Required |
>Maximum: 50 characters >Cannot contain: < > |
| Version |
Version of the product. Examples: aaa.bbbb.cccc.dddd, 5.0.0.100. |
>Optional for Default products >Required for Variants |
>Maximum: 80 characters >Default: 1 (for Default products only) |
| Identifier |
Numeric identifier for the product. NOTE Although it is technically possible to apply the same Product Identifier to multiple products, Thales recommends that you use a unique identifier for every product. |
Required (even if a red asterisk (*) is not displayed on the screen).
|
>Integer from 2-65471 >Can be one of the following: •An automatically generated, sequential product identifier. •Your own numeric identifier, if you want to maintain consistency with existing product data, for example. |
| Enable Named User Limit |
(Relevant only for User-Based Licensing for default products and variants of versionless products. Supported only for Sentinel CL keys.) When set to Yes, allows you to limit the number of unique users permitted to access the licensed software. |
Optional |
Yes OR No Default: No |
| Number of Named Users |
(Relevant only for User-Based Licensing when Enable Named User Limit is set to Yes) The number of unique users who can access the licensed software. How is the final number of named users calculated? After a named entitlement line item is activated, the number of users that can access the license is equal to the Number of Named Users multiplied by the Activated Quantity of the product. For example, for 10 named users and 5 product activations, the number of users that can access the license is 50. For details on creating an entitlement for named users, see Named Entitlements for User-Based Licensing. |
Required if Enable Named User Limit is set to Yes |
Integer from 1-99999 Default: 1 |
| Provisioning |
When set to Yes, enables Sentinel EMS to initiate provisioning requests for the product. When you apply provisioning, you must associate a provisioning method and plan with the product. For more information, see Provisioning. |
Optional |
Yes OR No Default: No |
| Activation Method |
(Available only for Variants. Not relevant for Default or Versionless products) The method of defining and allocating the quantity of licenses available for the product in an entitlement. Activation methods: >Fixed: The total number of licenses must be divided equally for consumption in one or more activations. When you select Fixed, the >Partial: The quantity can be consumed in multiple activations. Each activation reduces the total number of available activations by the quantity activated. >Full: The entire quantity is activated in a single activation. |
Required |
Select from the list. Possible values: >Fixed. If you select Fixed, set the Fixed Quantity value to 1. >Full >Partial . |
| Description |
Additional information about the product. For example, you may want to highlight product features, differentiate between similar products, and so on. |
Optional |
Maximum: 500 characters |
|
Additional Attributes |
|||
| External ID | External reference identifier that uniquely identifies the product in an external system. | Optional |
>Maximum: 60 characters >Must be unique |
| Ref ID 1 |
Reference identifier that identifies the product in an external system. |
Optional | Maximum: 100 characters |
| Ref ID 2 |
Reference identifier that identifies the product in an external system. |
Optional | Maximum: 100 characters |
| Unlocked from Device |
A product that is distributed with a license that is not locked to a specific device and can therefore be installed freely by any user on any device. Typical uses include: >Trial licenses (free for up to 90 days), which can start from the date of license generation or first use, depending on the License Model. (The Execution Count license model is not relevant for products that are not locked to a device.) >"Unlimited" products that may or may not have licensing restrictions. For example, you might apply a Perpetual license, you may decide to limit the time period, you may use a different mechanism to license the application, or you may decide not to impose any licensing restrictions at all. For more details, see the section on unlocked products in the Sentinel LDK Software Protection and Licensing Guide. Note: Defining a product as unlocked from a device is permanent and cannot be reverted after the product is marked as Completed. |
Required | Yes OR No |
| Locking Type |
The level of protection for a product according to the type of Sentinel protection key supplied with the product. You set the locking type when defining a product. Locking types can be hardware-based (Sentinel HL keys) or software-based (Sentinel SL keys). When using the Cloud Licensing service (CL keys), you must select one of the SL AdminMode options, such as the default HL or SL AdminMode or SL UserMode option. For more information, see the section on choosing the protection level for your products in the Sentinel LDK Software Protection and Licensing Guide. |
Required |
>HL. Use for burning licenses on physical, Sentinel HL keys (dongles). >SL AdminMode. Use for activating licenses on Sentinel SL AdminMode keys (software). •Requires the installation of Sentinel Run-time Environment (RTE). For the minimum required Sentinel Run-time Environment version, see the RTE and Sentinel EMS Integration section in the Sentinel LDK with Sentinel EMS Release Notes. •Supports all license terms, including concurrency and detachable licenses. •Provides a high level of compatibility with future operating system updates. >SL UserMode. Use for activating licenses on Sentinel SL UserMode keys (software). •Does not require the installation of Sentinel Run-time Environment (RTE). •Provides limited security for products that are not locked to a device than SL Admin mode. •Provides the highest level of compatibility with future operating system updates. >HL or SL AdminMode. Use with either Sentinel HL keys or Sentinel SL AdminMode keys. >HL or SL AdminMode or SL UserMode. (Default) Use this locking type if the decision on which type of Sentinel protection key is to be shipped with the product is made when each order is processed. For more details, see Sentinel LDK Software Protection and Licensing Guide. |
| Upgrade To Driverless |
Relevant for: HL locking type Enables you to upgrade any Sentinel HL (HASP configuration) keys in the field to Sentinel HL (Driverless configuration) keys. Advantages over Sentinel HL (HASP configuration) keys: >On Microsoft Windows: • Uses HID drivers, which are an integral part of the Windows operating system. Customers can often use these keys without installing any additional support software. •Does not require the Run-time Environment to protect an application. >Supports a higher number of features. >Provides larger on-key memory space. NOTE To upgrade a Sentinel HL key to the Driverless configuration inside a virtual machine, you must first perform the HASP-to-Driverless upgrade on a physical machine. When ready, move the Sentinel HL key to a virtual machine and reapply the same V2CP file. |
Required |
Yes OR No |
| Use Virtual Clock |
Lets you manage time-based licenses for Sentinel HL (Driverless Configuration) keys using a virtual clock when no real-time clock is available. NOTE For Sentinel SL keys, the virtual clock is always available and does not require configuration. How does Virtual Clock work? The expiration period or date for a time-based license is initially calculated according to the system clock of the end user's machine. Sentinel License Manager reads the system time at startup (by default, part of the machine startup) and then uses its internal running time to calculate the time. When an application that is protected with Virtual Clock runs for the first time, Sentinel License Manager queries its internal clock to determine the start time of the software’s license duration. >If the license duration is a fixed period (for example, 30 days or 1 year), Sentinel License Manager calculates the actual date on which the license must stop working and stores this information in the secure storage area of the Sentinel key. The secure storage for a Sentinel SL key is on the hard drive of the end user's computer. The secure storage for a Sentinel HL key is in the HL key. >If the license is set to expire on a specific date, Sentinel License Manager records that date. The expiration time is determined using the formula: [current Sentinel License Manager time] + [number of seconds to expiration] For more information, see the Sentinel LDK Software Protection and Licensing Guide. |
Required | Yes OR No |
|
(Visible only if an SL Locking Type is selected) |
Relevant for: Any SL locking type Allows the end user to transfer a Sentinel SL protection key from one computer to another. The rehosting process is performed entirely by the end user, with no interaction from the vendor. If no product is set to Disable, but one or more products are set to Enable, then rehosting is enabled for the Sentinel protection key. |
Required |
One of the following: >Enable. Enables rehosting for the product. >Disable. (Default) Disables rehosting for the product. >Leave As Is. Uses the existing rehosting value that is defined in the Sentinel protection key. >Define in Entitlement. Uses the rehosting value specified when generating the entitlement. |
| Clone Protection (Physical Machine) |
Relevant for: Sentinel SL keys The clone protection scheme to protect against the cloning of physical machines.
About Device Cloning Device cloning is one method for enabling the unauthorized use of licensed software. Device cloning involves creating an image of one device (including your software and its legitimate license) and copying this image to other devices. This allows multiple instances of the software even though only a single license was purchased. Sentinel LDK automatically detects probable cloning and disables protected software that is locked to Sentinel SL keys. Clone detection is effective whether the protected software is installed on a physical device or on a virtual machine. |
Required |
One of the following: >Platform Default: The default clone protection scheme used for all products created in Sentinel EMS. When a product license is installed on an end user's machine, Sentinel LDK automatically selects the most appropriate clone protection for the type of operating system and the environment. >A custom clone protection scheme for physical machines. >The clone protection scheme defined in Sentinel LDK-EMS, if the completed product was migrated from Sentinel LDK. |
| Clone Protection (Virtual Machine) |
Relevant for: Sentinel SL keys The clone protection scheme to protect against the cloning of virtual machines. About Device Cloning Device cloning is one method for enabling the unauthorized use of licensed software. Device cloning involves creating an image of one device (including your software and its legitimate license) and copying this image to other devices. This allows multiple instances of the software even though only a single license was purchased. Sentinel LDK automatically detects probable cloning and disables protected software that is locked to Sentinel SL keys. Clone detection is effective whether the protected software is installed on a physical device or on a virtual machine. |
Required |
One of the following: >Platform Default: The default clone protection scheme used for all products created in Sentinel EMS. When a product license is installed on an end user's machine, Sentinel LDK automatically selects the most appropriate clone protection for the type of operating system and the environment. >A custom clone protection scheme for virtual machines. >The clone protection scheme defined in Sentinel LDK-EMS, if the completed product was migrated from Sentinel LDK. |
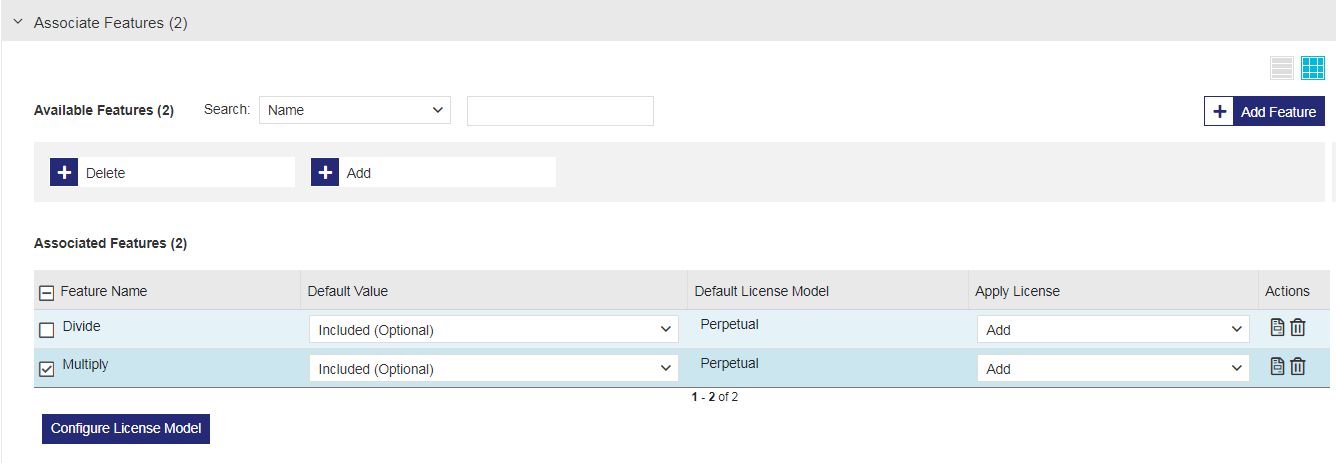
Associate Features
The Associate Features pane enables you to associate (link) features with your products during creation or editing, and to view a list of all associated features.
Default products: If you associate a feature without a pre-defined license model, you can either assign the required license model to apply when the line item in the entitlement is activated, or select the Define in Entitlement option to defer the license model definition and assign the license model directly in the entitlement.
You can mark this product as complete without associating any features, even though most products include features. For example, you might create a product with only memory files.
Versionless products and variants: You must associate at least one feature with each versionless product, and each feature must contain a license model. You can associate features in one or both of the following ways:
>Associate features directly with the versionless product. This enables you to add all features needed across variants.
>Associate features directly with each variant. Any features linked to a variant are automatically associated with its versionless product.
Feature Association Attributes
| Attribute | Description | Values |
|---|---|---|
|
(checkbox) |
(Available only for Default and Variant products) Use to select one or more features if you want to open the Configure License Model dialog box. When you select at least one checkbox, the Configure License Model button is enabled. You can select the Feature Name checkbox to configure the license model for all features simultaneously. |
(Selected or Cleared) |
| Feature Name | The name of the feature. | (Read-only) |
| Identifier | Numeric identifier for the feature | (Read-only) |
| Default Value |
Specifies if an associated feature will be included in or excluded from the entitlement. Note: Although this option is visible for Sentinel Fit, it is not supported and should not be used. For best results, leave Included (Optional) as is. |
One of the following: >Mandatory: Prevents the order taker from excluding the feature while generating entitlements. >Included (Optional): The feature will be listed by default while generating an entitlement for the product but can be excluded. >Excluded (Optional): The feature will NOT be listed by default, but the order taker can include the feature. |
|
The default license model for the associated feature. |
One of the following: >If multiple license models are available, select from the list. >If only one license model is displayed, you can leave the default license model as is or click one of the Configure License Model buttons to select another license model. The default license model is displayed only if the Associate Default License Model value is set to Yes in the Administration Console. |
|
| Apply License
|
Specifies how to apply the license model attributes to the feature. Only one license model may be associated with a feature.
Which option is best? You select an option based on what you are trying to achieve. For new products, although you can select any of the options, for the most flexibility when updating the expiration date, number of days, or execution count license terms, we recommend selecting System-specified. System-specified enables you to resell the product to the same customer without changing the product properties. For example, suppose you sell a product with a one-year subscription. At the end of the year, you can renew the subscription by setting the new expiration date in the entitlement, without changing the product properties in Sentinel EMS. If you need to update the concurrency or change the license model for the same customer's existing product, select Add or Overwrite instead. Note: If you receive an error message related to applying a license, you may need to select another Apply License option. |
One of the following: >System-specified: Enables Sentinel EMS to automatically apply the best option for the license—Add or Overwrite—based on the specified attributes. When applying license updates to activated products, this lets you quickly update the expiration date, number of days, or execution count (depending on the license model) without extensive manual changes. You must retain the existing concurrency values, including the number of concurrent instances (number of concurrent seats). If you must select another license model or change any concurrency or accessibility values post-activation, you need to create a new entitlement. >Add: Adds the specified license model attributes to the feature. When applying license updates to activated products, this option adds to the existing values. The "add" mechanism is applied based on the attribute values set in the license model during the update. •To retain the current value for the expiration date, you must explicitly set the same expiration date. •To retain the current value for the number of days, execution count, and concurrent instances, set the relevant values to 0. This instructs Sentinel EMS not to add anything to those values. >Overwrite: Modifies the license model attributes associated with the feature by overwriting the existing values with the updated values. When applying license updates to activated products, this option overwrites the existing values with the values specified in the license model during activation. |
| Configure License Model |
Buttons used to open the Configure License Model dialog box. Enables you to associate and configure a license model for a feature. A feature can be associated with one license model. When you configure the license model, you can add Custom Info to include additional attributes that are not included by default. The value that you define can include static text or dynamic expressions. The evaluated values are then included in the license and can be viewed in the V2C file when generating a readable license. For details see the relevant license model under Sentinel LDK Enforcement - License Models. To start configuring a license model, do one of the following: >In the Associated Features pane, select the checkbox for one or more features and click the Configure License Model button.
Note: If you select multiple features, they must all be associated with the same license model. >In the Actions column, click the Configure License Model |
The available attributes depend on the selected license model. For details, see: |
Actions >
 Delete Delete |
Removes the associated feature from the product. | N/A |

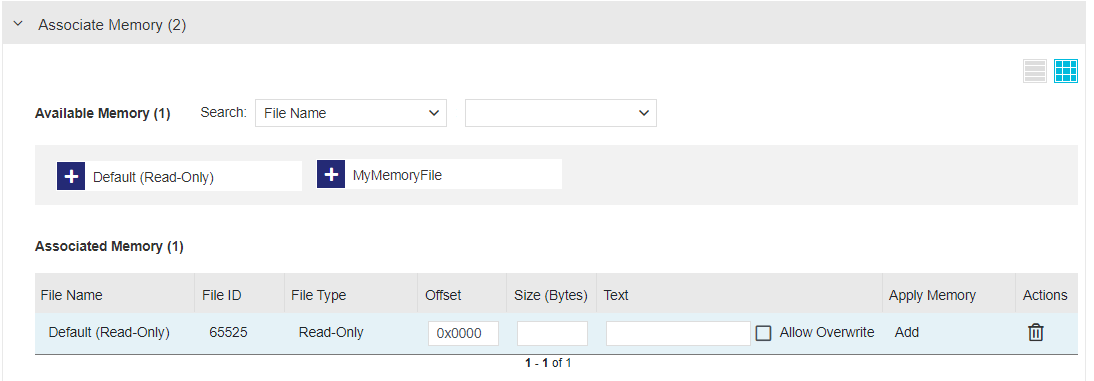
Associate Memory Files
The Associate Memory pane enables you to associate available memory files with default products and variants (excluding versionless products) and to view the list of associated memory files. For details on creating and using memory files, see Memory.
You can apply:
| Memory File Type | Supported Sentinel Keys |
|---|---|
| Custom-Defined |
>Sentinel SL AdminMode keys >Sentinel SL UserMode keys >Sentinel HL (Driverless configuration) keys (excluding Sentinel HL Basic keys) |
| Default |
>Sentinel SL AdminMode keys >Sentinel SL UserMode keys >Sentinel HL (Driverless configuration) keys (excluding Sentinel HL Basic keys) >Sentinel HL (HASP configuration) keys (excluding Sentinel HL Basic keys) |
Memory Association Attributes
You can associate one or more memory files with a product. Associating multiple memory files enables you to segregate data efficiently. If needed, you can also include memory segments by associating the same memory file more than once. For details on the specific cases in which memory segments are useful, see What Is a Memory Segment?.)
If you include multiple memory data, you can set the order in which the data is used by setting the offset. If you do not set the offset, Sentinel EMS sets the offset for you.
NOTE The combined value of Text and Offset must not exceed the memory File Size (Bytes). For memory segments, this combined value must not exceed Size (Bytes).
| Attribute | Description | Required/Optional | Valid Values |
|---|---|---|---|
| File Name |
A descriptive name of the memory file. |
Required | (Read-Only) |
| File ID |
Integer that identifies the memory file and is used by your application to refer to that file. |
Required | (Read-Only) |
| File Type |
File permissions for the data stored in the memory file. |
Required | (Read-Only) |
|
Size of the memory file in bytes. For default memory files, the file size is set automatically and is read-only. For custom-defined memory files, if not defined, the size is determined automatically based on the text length and offset. |
Optional Although this attribute is optional, you must set either the memory file size or text value (or both).
|
Maximum:
Custom-defined memory: >Sentinel SL keys: 65535 bytes >Sentinel HL key version 6.x keys: 65535 bytes >Sentinel HL key version 4.x keys: 25944 bytes Default memory: >Default (Read/Write): 4032 bytes* >Default (Read-Only): 2048 bytes* NOTE If you include multiple memory files with the same File ID and File Type, you must set the same File Size (Bytes) value for each. |
|
| Segment Name |
A descriptive name of the memory segment. The name is intended for your convenience. You can apply the same name to multiple segments in a memory file as long as the offset is different. |
Optional |
>Maximum: 50 characters >Cannot contain: < > |
| Offset |
The hexadecimal starting point of the memory file or segment in bytes. You can use the offset to set the order and location of the memory data as needed. Make sure that the data do not overlap. For memory segments: Make sure that the offset and segment size fit within the memory file size. |
Optional |
Default: 0 |
| Size (Bytes) |
Size of the memory segment in bytes. Make sure that the offset and segment size fit within the memory file size. |
Optional |
Maximum: Custom-defined memory: >Sentinel SL keys: 65535 bytes >Sentinel HL key version 6.x keys: 65535 bytes >Sentinel HL key version 4.x keys: 25944 bytes Default memory: >Default (Read/Write): 4032 bytes* >Default (Read-Only): 2048 bytes* |
|
|
The memory data value in text or hexadecimal format. >
To enable the value to be changed when creating an entitlement, select the Allow Overwrite checkbox. >
To set or edit the value, click the Configure Memory Data Note:
|
Optional Although this attribute is optional, you must set either the memory file size or text value (or both). |
Maximum: Custom-defined memory: >Sentinel SL keys: 65535 bytes >Sentinel HL key version 6.x keys: 65535 bytes >Sentinel HL key version 4.x keys: 25944 bytes Default memory: >Default (Read/Write): 4032 bytes* >Default (Read-Only): 2048 bytes* NOTE The text size cannot exceed the File Size and Offset in bytes. |
| Apply Memory |
Specifies how to attach the memory file to the product. Sentinel EMS applies memory files in the order in which they are added to the product. To modify a deployed, default memory file: 1.Select a memory file with the same File ID that is already associated with product's Identifier. 2.Select Add. To modify a deployed, user-created memory file: 1.Select a memory file with the same File ID that is already associated with product's Identifier. NOTE If you plan to replace only some of the text, then, in the memory file on the Memory page, make sure that the Offset and File Size (Bytes) are defined to insert the text at the required location. 2.Do one of the following: •To replace all of the text, select Overwrite. •To replace some of the text, select Add. The original text is overwritten only where the offset and size overlap the original settings. To enable the value to be changed when creating an entitlement, select the Allow Overwrite checkbox. |
Required |
>Add: (Default) Adds the memory file to the product. When modifying a product with the same File ID as an existing memory file, the location where the file text is added depends on the specified offset and size defined in the memory file on the Memory page. •If both memory files have the same offset and size, the existing file is overwritten. •If the memory files have different offset and size settings, and the new values overlap the old values, the file is added, and the original text is overwritten only where the values overlap. •If the memory files have different offset and size settings, and the new values do not overlap the old values, the file is added in addition to the original file. >Overwrite: Replaces the data in the existing memory file (using the same File ID) by overwriting the memory file. (Not available for default memory files) >Delete: Permanently deletes the memory file attached to the specified license. (Not available for default memory files) |
| Actions > Delete |
Removes the associated memory file from the product. | N/A | N/A |

Creating a Variant for a Versionless Product
You can add a variant to any versionless product that is marked as "complete". For details on creating a versionless product, see Creating a Product.
Variants for versionless products are distinguished based on their unique name and version combinations.
To create a variant for a versionless product:
1.From the navigation pane, select Catalog > Products to view the Products page.
2.In the Actions column for the relevant, completed, versionless product, click the Add Variant ![]() button.
button.
3.Fill in the
NOTE
>You must specify the license model for each feature, as well as the activation method for the variant. You set these attributes directly in the product, not in the entitlement. Therefore, the Define in Entitlement activation method is not supported.
>If you set the Activation Method to Fixed, you must set the value to 1.
>If a feature with a license model that is set to Fixed is included in a versionless product, then the license models in any other variant of that versionless product using the same feature must also be set to Fixed.
4.Add or remove associated features
5.In the Enforcement Extensions pane (if displayed), specify the licensing and enforcement-specific attribute details for the variant. The attribute details required depend on the selected enforcement type and license model.
Actions for Products
The following table lists the actions available for products:
| Action | Description | |
|---|---|---|

|
Complete |
Marks a product as Completed. This finalizes the product and makes the product available for inclusion in an entitlement. Note: >You cannot modify any attribute for a product that is included in an entitlement. >You cannot delete a product that is included in an entitlement. |

|
Edit |
Enables you to update existing product information. For details on editing products, see Editing an Entity. Note: >To perform the following changes, you must first remove all associated entities. For example, if features and/or memory files are associated with the product, you must remove them before you can: •Change the Locking Type value for a draft or completed product. •Change the Unlocked from Device value for a draft product. |

|
Copy |
Duplicates an existing product, enabling you to edit the copy and create a new product. Note: >You can add or remove features from the product and change the settings to allow features to be excluded if required. >To make the product unique, you must change at least the product Name or Product Identifier. >To perform the following changes, you must first remove all associated entities. For example, if features and/or memory files are associated with the product, you must remove them before you can: •Change the Locking Type value for a draft or completed product. •Change the Unlocked from Device value for a draft product. >You can modify or retain other attributes. |

|
End of Life |
Marks a product as End of Life (EOL) to make the product obsolete. Note: >You cannot add an EOL product to entitlements. >You cannot edit or delete a product that is marked EOL. >You can create a copy of an EOL product, modify the copy as needed, and mark it as Complete >You can restore an EOL product by marking it as Complete |
|
|
Delete |
Deletes a draft product. Note: You cannot delete a draft product that is associated with a test entitlement. |
| View Downloads |
Associates downloads with the product using the Downloads page. To link a download to a product: 1.Select Downloads to open the Downloads page. 2.Follow the steps in Creating a Download to create and associate a download with a product. |
|