Creating Entitlements
|
•Entitlements for Sentinel LDK CL (Produce and Push) •Entitlements for Versionless Products |
Entitlement Status
The Status attribute available on the Entitlements page specifies the status of an entitlement:
>Draft: When an entitlement is first created, it is saved as a draft that you can edit or delete.
>Completed: A draft entitlement must be marked as completed before it can be activated.
>Disabled: A disabled entitlement cannot be updated
>Closed: Indicates that the entitlement is permanently disabled and no action can be performed on it. You cannot enable a closed entitlement.
Creating an Entitlement
You create an entitlement from the Entitlements page.
To create an entitlement:
1.Prerequisite: Make sure that the required products and features are available for inclusion in the entitlement. For details, see Creating a Feature and Creating a Product.
2.From the navigation pane, select Entitlements to view the Entitlements page.
3.Ensure that the Test Entitlement Mode is set as needed.
•For production purposes, set Test Entitlements to Off.
•For testing purposes, set Test Entitlements to On. For more information, see Test Entitlement Mode.
4.Click the Add Entitlement button. The Add Entitlement page opens.
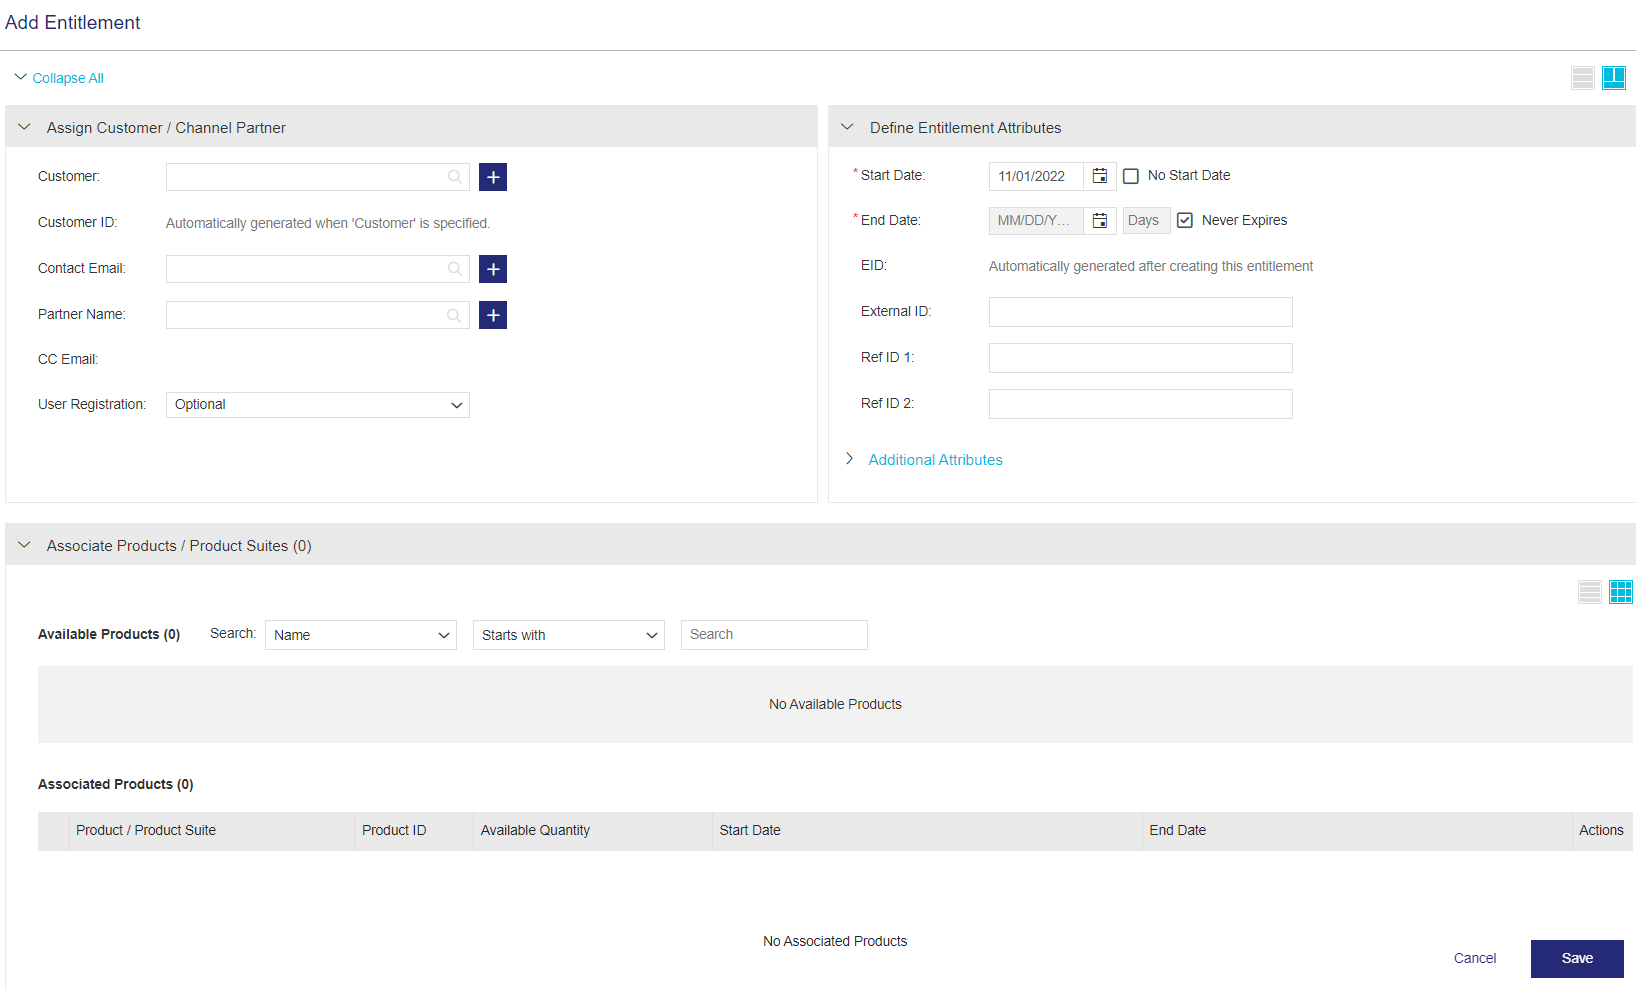
5.Assign Customers, Users, Channel Partners, and Market Groups.
6.Define Entitlement Attributes.
7.Associate Line Items. Products
a.For Products:
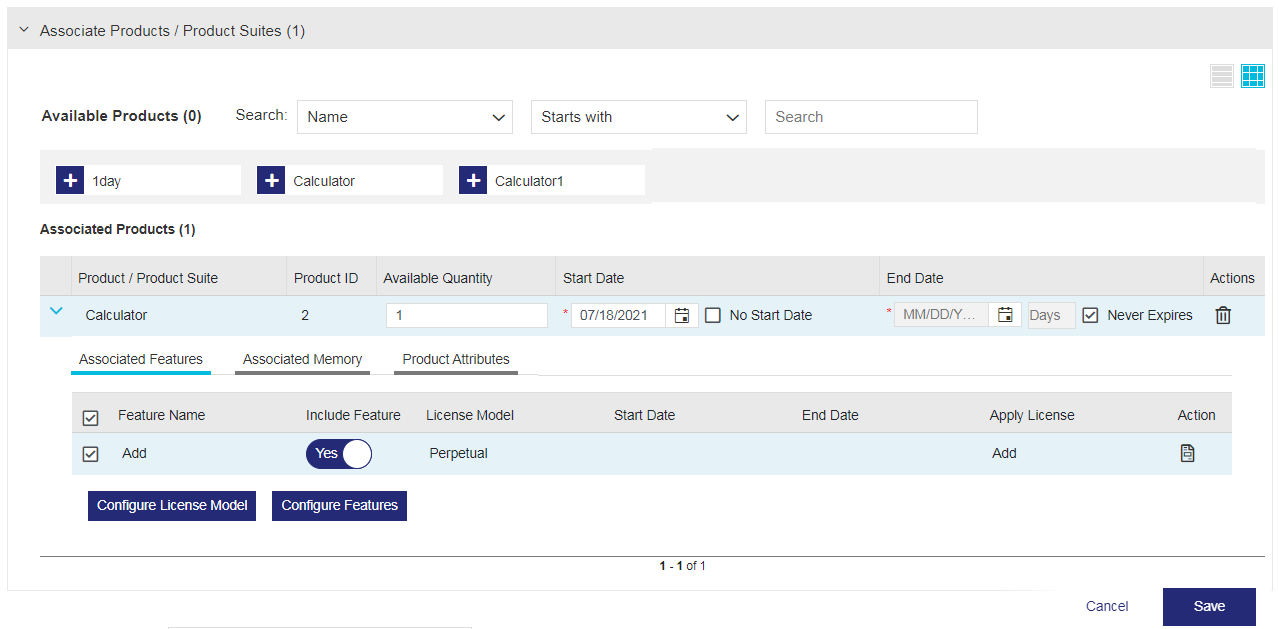
i.In the Associate Line Items pane, click on the Products tab and select the products that you want to add to the entitlement from the Available Products section. The items move to the Associated Line Items sections.
ii.In the Associated Line Items section, you can modify the Line Item Attributes as needed.
iii.Expand each product to view and modify the Associated Features and Product Attributes.
For Associated Features:
–(Optional) Click the Configure License Model button to modify the license model attributes as needed. Then click Save to close the window.
–(Optional) Click the Configure Features button to display a multiple-feature configuration bar in the first row. Then click the checkbox for the features whose attributes you want to define or modify. Using the options in the bar, configure the settings for all selected features as needed. Despite its name, this bar is available for single features, as well.
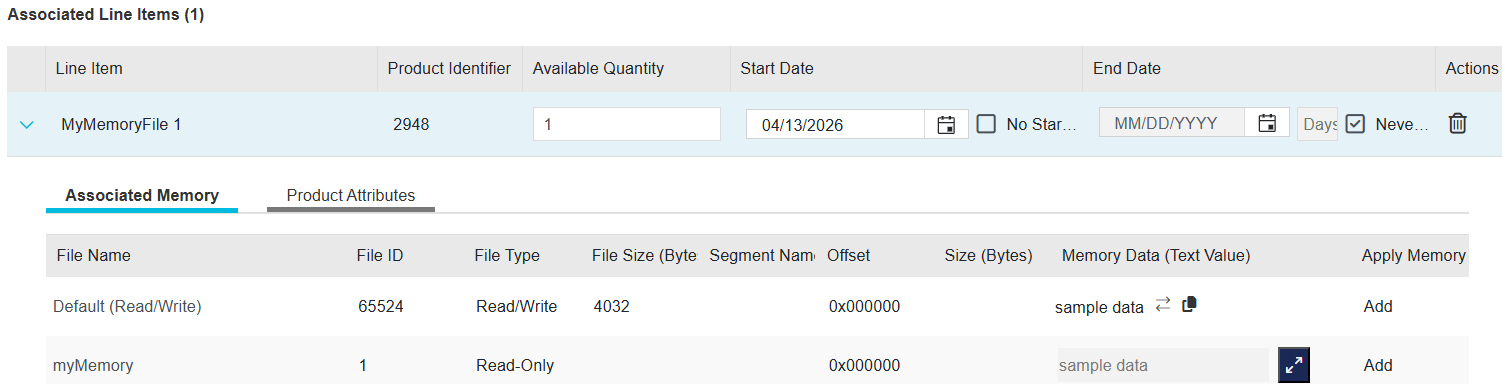
iv.If memory files are associated, click the Associated Memory tab to view them. If Allow Overwrite was selected during product creation, you can modify the text as needed.
b.For Product Bundles:
i.In the Associate Line Items pane, click on the Product Bundles tab and select the product bundles that you want to add to the entitlement. A dialog box for Set Quantity for Product Bundle appears. You must set a quantity for the product bundle after which the products in the product bundle move to the Associated Line Items pane.
ii.You cannot edit the quantities of the products per product bundle. You can, however, edit the quantity of the product bundle by selecting the  Edit button next to the Available Quantity of each product. The Set Quantity for Product Bundle dialog box opens.
iii.(Optional) Edit the start date and end date for each product in the product bundle.
iv. Expand each product to view the Associated Features and Product Attributes as needed.
(Optional) For Product Attributes, you can modify the External ID or any custom attributes defined for the product key of the product bundle.
8.Click Save to save the entitlement as draft. The entitlement is added to the list of entitlements. By default, the entitlement is added to the top of the list, but this may change according to the grid sorting rules.
9.Do one of the following:
•Finalize the entitlement and make it available for activation![]() Complete in the Actions column.
Complete in the Actions column.
•Create a batch entitlement by following the steps in Configuring a Batch Entitlement.
Assign Customers, Users, Channel Partners, and Market Groups
The Assign Customer / Channel Partner pane displays the attributes that are used to specify the ownership details of an entitlement. You can use this pane to specify the customer, the user associated with the customer, the channel partner, and market group details. The following table explains the attributes that are available in this pane.
| Attribute | Description | Required/Optional | Valid Values |
|---|---|---|---|
|
Market Group (Visible only if the logged-in vendor user is associated with more than one market group) |
List of Market Groups to which the logged in vendor user belongs. Each market group specifies a target market for specific catalog elements and their entitlements. Vendor users can work only with catalog elements and entitlements in their own market group. If the logged in vendor user is associated with only one market group, then the system automatically picks the logged in vendor user's market group. If the logged in vendor user is not associated with any market group, then the system uses a default value that is not visible to the vendor user. After an entitlement is created, the market group is displayed in the Entitlement Attributes list. |
Required |
Any market group in the list that is allocated for the required enforcement |
| Customer |
Name of the customer for which you are creating the entitlement. Start typing and select from the list of suggestions. If the customer does not yet exist, you must first create the customer. Click the |
Optional
|
>1 to 255 characters >Alphanumeric |
| Customer Identifier | The customer identifier defined in Sentinel EMS is displayed automatically. This field is read-only and cannot be modified. |
Mandatory for: |
>Alphanumeric >Must be Unique |
| User Email |
Email of the user that is associated with the customer for which you are creating the entitlement. Start typing and select from the list of suggestions. If the user does not yet exist, you must first create the user. You can click the TIP Make sure to click Save before navigating to another page if you want to save your work. If you plan to use Produce and Push to activate the entitlement, select a customer administrator user. A customer's administrator user manages user-based licensing or machine account |
Optional |
>Valid email address |
| Partner Name |
Name of the channel partner. Entering the first few characters, displays the matching entries. Select a channel partner from the displayed list or click the |
Optional |
>Maximum: 5 channel partners >1 to 250 characters >Alphanumeric |
| CC Email |
Displays the additional email addresses to which the entitlement confirmation email must be sent. You can edit the value only if the CC Email Change Allowed property is set to Yes in the Administration Console. For more information, see CC Email Change Allowed. |
Optional |
>Maximum: 15 email addresses >Add email addresses by typing or by selecting from auto-complete. Press Enter after each manually entered email address. |
| User Registration |
Specifies whether end user registration is required when logging on to the Sentinel EMS customer portal. NOTE For Sentinel HL keys, we recommend selecting Optional or None. |
Required |
>Mandatory: The end user must register when logging on to the Sentinel EMS customer portal using the EID (entitlement ID) or PKID (product key ID). >Optional: The end user is prompted to either provide registration information or register later. >None: The user registration page is not displayed to the end user. |
Define Entitlement Attributes
Entitlement-related attributes are specified in the Define Entitlement Attributes pane, described below.
| Attribute | Description | Required/Optional | Valid Values |
|---|---|---|---|
|
Start date for the entitlement. The default time zone is UTC. See also: No Start Date checkbox |
Required |
A start date entered manually or selected from the calendar. | |
| No Start Date checkbox |
Excludes the start date. Select this checkbox for licenses that need to support embedded devices that do not have a system clock, for example.
Note: |
Optional |
(Selected or Cleared) If selected, start date is set to 01/01/1960. |
|
End date for the entitlement. The default time zone is UTC. To specify an end date, do one of the following: >Click the calender button and select the end date. The number of days for the entitlement is automatically calculated and displayed. >In the Days box, enter the number of days for the entitlement. The end date is automatically calculated and displayed.
Note: >You cannot activate an entitlement if the End Date has passed. >Value of Days must be between 0-41000. |
Required |
An expiry date or Never Expires checkbox | |
| Days |
The number of days during which the entitlement can be activated. If Days is specified, the end date is automatically calculated and displayed. |
Optional |
0-41000 days |
|
Indefinitely extends the end date. |
Optional |
(Selected or Cleared) If selected, expiry date is set to 31/12/2500. |
|
|
EID |
Entitlement ID. A unique identifier for an entitlement. If not provided, Sentinel EMS automatically generates an EID after creating an entitlement. You can modify the EID only if the Allow Manual Creation of EID and PKID checkbox is selected in the Administration Console. |
Optional
|
> 6 to 60 characters >Alphanumeric >Cannot contain spaces |
|
External ID |
External reference identifier that uniquely identifies the entitlement in an external system. |
Optional |
>0 to 60 characters >Unique across Sentinel EMS for all entitlements. |
|
Ref ID 1 |
Reference identifier that identifies the entitlement in an external system. |
Optional |
>0 to 100 characters |
|
Ref ID 2 |
Reference identifier that identifies the entitlement in an external system. |
Optional |
>0 to 100 characters |
|
If Allow Activation is set to Yes, allows the specified type of user to activate the entitlement.
You set the type of user in the By box. |
Required |
Allow Activation: Yes OR No Default: Yes
By: >All Users (Default): Any user that has access to the entitlement can activate the entitlement. Vendor users require activation role permissions. >Vendor Only: Vendor users with activation role permissions can activate the entitlement. On the Sentinel EMS customer portal, the entitlement is visible, but cannot be activated. |
|
|
If set to Yes, vendor users, customer administrators, and end users can revoke an activation and return the license to the vendor. The quantity is re-credited to the entitlement after revocation This applies to: >Individual products >Products in a product bundle. For details, see Revocation. >Product suites To sync revoked Sentinel LDK licenses to Sentinel EMS: You need a revocation C2V file from the end user machine that includes the revoked product license. Use one of the following options: >Vendor portal: Use the Sync Revocation option on the Sentinel Keys page. For details, see Syncing Revoked Product Licenses with Sentinel EMS. >Customer portal: Use the Update/Sync Licenses Online or Perform Offline Update/Sync options on the Sentinel EMS customer portal. For details, see To revoke and sync product licenses simultaneously: Use the Custom Revocation endpoint as described in the Sentinel EMS REST API Reference. Important: If you set Allow Revocation to No for an entitlement, end users can still revoke a license on their device. After revocation, the license is removed from the device and the end user can no longer use the software. When they attempt to sync with Sentinel EMS, the re-credit fails, and the license cannot be restored. Therefore, ensure this setting aligns with your intended licensing policy before saving the entitlement. |
Required |
||
|
Specifies that all products (line items) that are part of this entitlement are activated at the same time.
The following conditions must be met to activate an entitlement as a whole: > The activation method of all line items in the entitlement must be the same. >The quantity of all line items must be same. >All line items must have the same Fixed Quantity value. > All line items must use the same enforcement. > >For unlocked products, set Entitlement as a Whole to Yes. |
Required |
Yes OR No Default: |
|
|
Send Notification |
Sends a notification to the User Email address after the entitlement is created. |
Required |
Yes OR No Default: Yes |
Associate Line Items
Use the Associate Line Items pane displayed below to associate products
Line Item Attributes
Attributes related to products
| Attribute | Description | Required/Optional | Valid Values |
|---|---|---|---|
| Product / Product Bundle / Product Suite | Name of the associated product |
Required | Read-Only |
| Product Identifier | Numeric identifier for the product. | Required | Read-Only |
| Available Quantity |
Total number of available activations. You must use the same value in all line items for: |
Required |
An integer > 0 or Unlimited |
| Start Date |
The date (day, month, and year) before which the licensed software cannot be run. The default time zone is UTC. By default, the start date for an associated product You can specify different dates by modifying the date in the line item. >If a start date is defined in the license model, then this date is also displayed for the entitlement. However, if the license model start date is earlier than the current date, then the current date is displayed as the start date. >You can select a start date that is earlier than the current date. |
Required |
Do one of the following: >Enter a valid date. >Select the No Start Date checkbox to exclude the start date. If selected, start date is set to 01/01/1960. |
| End Date |
The date (day, month, and year) after which the licensed software cannot be run. The default time zone is UTC. By default, the end date for an associated product You can specify different dates by modifying the date in the line item. If the license model end date is a future date, then that end date is displayed by default as the end date for the product. |
Required |
Do one of the following: >Enter a valid date. >Enter the maximum number of days. >Select the Never Expires checkbox to extend the end date indefinitely. If selected, expiry date is set to 31/12/2500. |
|
Action > |
Removes the association with the entitlement. The product |
Optional | N/A |
 Delete
Associated Features
Feature-related attributes are specified in the Associated Features tab, described below.
| Attribute | Description | Required/Optional | Valid Values |
|---|---|---|---|
| Feature Name | Name of the associated feature. | Required | Read-Only |
| Identifier | Numeric identifier for the feature. | Required | Read-Only |
| Include Feature |
Toggle button that specifies if a feature is included in the entitlement. Note: Although this option is visible for Sentinel Fit, it is not supported and should not be used. For best results, leave Included (Optional) as is. |
Required | Yes or No |
| License Model |
The license model associated with the feature. Note: >If license model dates are not configured during entitlement creation, then the end date will be one year after the current date. >If license model dates are configured during entitlement creation, then the end date will be the same as the one defined during configuration. |
Required |
A valid license model |
| Start Date |
The date (day, month, and year) before which the licensed feature cannot be run. The default time zone is UTC. By default, the start date for an associated product You can specify different dates by modifying the date in the line item. >If a start date is defined in the license model, then this date is also displayed for the entitlement. However, if the license model start date is earlier than the current date, then the current date is displayed as the start date. >You can select a start date that is earlier than the current date. |
Required |
Do one of the following: >Enter a valid date. >Select the No Start Date checkbox to exclude the start date. If selected, start date is set to 01/01/1960. |
| End Date |
The date (day, month, and year) after which the licensed feature cannot be run. The default time zone is UTC. By default, the end date for an associated product You can specify different dates by modifying the date in the line item. If the license model end date is a future date, then that end date is displayed by default as the end date. |
Required |
Do one of the following: >Enter a valid date. >Enter the maximum number of days. >Select the Never Expires checkbox to extend the end date indefinitely. If selected, expiry date is set to 31/12/2500. |
| Apply License |
Specifies how to apply the license model attributes to the feature. You can edit the value if the Allow Overwrite checkbox was selected when creating the product. You cannot configure this field for product bundles. Which option is best? You select an option based on what you are trying to achieve. For new products, although you can select any of the options, for the most flexibility when updating the expiration date, number of days, or execution count license terms, we recommend selecting System-specified. System-specified enables you to resell the product to the same customer without changing the product properties. For example, suppose you sell a product with a one-year subscription. At the end of the year, you can renew the subscription by setting the new expiration date in the entitlement, without changing the product properties in Sentinel EMS. If you need to update the concurrency or change the license model for the same customer's existing product, select Add or Overwrite instead. Note: If you receive an error message related to applying a license, you may need to select another Apply License option. |
Required |
One of the following: >System-specified: Enables Sentinel EMS to automatically apply the best option for the license—Add or Overwrite—based on the specified attributes. When applying license updates to activated products, this lets you quickly update the expiration date, number of days, or execution count (depending on the license model) without extensive manual changes. You must retain the existing concurrency values, including the number of concurrent instances (number of concurrent seats). If you must select another license model or change any concurrency or accessibility values post-activation, you need to create a new entitlement. >Add: Adds the specified license model attributes to the feature. When applying license updates to activated products, this option adds to the existing values. The "add" mechanism is applied based on the attribute values set in the license model during the update. •To retain the current value for the expiration date, you must explicitly set the same expiration date. •To retain the current value for the number of days, execution count, and concurrent instances, set the relevant values to 0. This instructs Sentinel EMS not to add anything to those values. >Overwrite: Modifies the license model attributes associated with the feature by overwriting the existing values with the updated values. When applying license updates to activated products, this option overwrites the existing values with the values specified in the license model during activation. |
|
Action > |
(Available only for Products and Product Suites.) Button used to open the Configure License Model dialog box. Enables you to view and configure the license model associated with the selected feature.
Tip: In the Associated Features pane, you can select the checkbox for one or more features and click the Configure License Model button to configure and apply the same license model to all selected features simultaneously.
|
Optional | N/A |
 Configure License Model
Associated Memory
Memory-related attributes are specified in the Associated Memory tab, as shown below.
| Attribute | Description | Required/Optional | Valid Values |
|---|---|---|---|
| File Name | A descriptive name of the memory file. | Required | Read-Only (Set when creating the Memory file.) |
| File ID |
Integer that identifies the memory file and is used by your application to refer to that file. |
Required | Read-Only (Set when creating the Memory file.) |
| File Type | Type of data stored in the memory file. | Required | Read-Only (Set when creating the Memory file.) |
| Offset | The hexadecimal starting point of the memory file. | Optional |
Read-Only (Set when creating the Memory file or when you Associate Memory Files with a product.) |
| Size (Bytes) |
Size of the memory file in bytes. |
Optional
|
Read-Only (Set when creating the Memory file or when you Associate Memory Files with a product.) |
|
Memory Data (Text Value) |
The memory data in text or hexadecimal format. NOTE The combined value of Text and Offset must not exceed the memory File Size (Bytes). For memory segments, this combined value must not exceed Size (Bytes). Tip: >
If the Allow Overwrite checkbox was selected when creating the product containing the memory file, you can add or edit text. >
|
Optional |
Read-Only (Set when creating the Memory file or when you Associate Memory Files with a product.) OR Text with a maximum size that does not exceed: >The defined file or segment size as described in Memory, and >One of the following: Custom-defined memory: >Sentinel SL keys: 65535 bytes >Sentinel HL key version 6.x keys: 65535 bytes >Sentinel HL key version 4.x keys: 25944 bytes Default memory: >Default (Read/Write): 4032 bytes* >Default (Read-Only): 2048 bytes* |
| Apply Memory |
Specifies how to attach the memory file to the product. Sentinel EMS applies memory files in the order in which they are added to the product. |
Required |
Read-Only (Set to one of the following when you Associate Memory Files with a product.): >Add >Overwrite >Delete For more information about these values, see Apply Memory. |

Product Attributes
Product-related attributes are specified in the Product Attributes tab.
| Attribute | Description | Required/Optional | Valid Values |
|---|---|---|---|
|
The method of defining and allocating the quantity of licenses available during activation. The actual quantity of concurrent instances or executions that are available in a license is determined by the value selected from this list combined with the number of concurrent instances or executions (if any) defined in the license model attributes for a feature as follows. >Concurrency. When concurrency is enabled in the license model for a feature, the maximum number of possible concurrent instances of license usage is calculated by multiplying the Quantity to Activate value by the Concurrent Instances value in the license model. For example, if the number of concurrent instances is set to 10, and the activation quantity is set to 5, then the maximum number of possible concurrent instances of license usage is 50. >Executions. When using the Execution Count license model, the maximum number of possible executions is calculated by multiplying the Quantity to Activate value by the Executions value in the license model. For example, if the number of executions is set to 100, and the activation quantity is set to 2, then the maximum number of possible executions is 200. To ensure that only the required number of licenses are made available to end users and no activations are wasted, we recommend that you select Partial only if you plan to dynamically split or allocate concurrency or execution count on demand. Possible values: >Fixed. The Available Quantity can be consumed in multiple activations. Each activation reduces the Available Quantity by 1. For example, if the Available Quantity is 10, then after an activation, the Available Quantity is 9. >Partial. The quantity can be consumed in multiple activations. Each activation reduces the total number of available activations by the quantity activated. >Full. The entire quantity is activated in a single activation. >Unlimited.An unlimited number of activations can be performed for the product. When you select Unlimited, the Available Quantity changes to Unlimited. Default: Fixed |
Required |
One of the following: >Fixed >Partial >Full >Unlimited |
|
|
(Available only if Fixed is selected in Activation Method.) One license is consumed in each activation. |
Required if the Activation Method is set to Fixed. |
1 | |
| Available Quantity | The maximum number of activations that can be performed. | Required | An integer > 0 or Unlimited |
| Enable Named User Limit |
Whether the product is configured to limit the number of unique users that can access the licensed software. |
Required | Yes OR No |
| Number of Named Users |
(Available only if Named User Limit is set to Yes) The number of unique users who can access the licensed software. |
Required |
The number specified in the product. |
| External ID |
External reference identifier that uniquely identifies the product in an external system. |
Optional |
>0-60 characters >Must be unique |
| Batch Code | The Batch Code value specified during product creation. | Required | Read-Only |
| Locking Type | The Locking Type value specified during product creation. | Required | Read-Only |
|
Override Available Activation Types |
By default, the available activation types for a product depends on its Locking Type. This attribute enables you to override the default activation types and define the activation types available for each product in the entitlement. Default: No |
Optional |
Yes OR No |
|
(Available only if Override Available Activation Types is set to Yes.) Displays a list of available activation types based on the specified Locking Type. You can select any combination from the list. For each locking type, the following activation types are supported: >SL Admin: Activate, Produce & Push >SL User Mode: Activate >HL or SL AdminMode: Activate, Burn Key, Produce & Push >HL or SL AdminMode or SL UserMode: Activate, Burn Key, Produce & Push NOTE When multiple line items are selected during activation, Sentinel EMS enables only the common activation types across them. If no common activation type exists, all activation types are disabled. Example: Line item 1: Supports the Activate and Burn Key activation types. Line item 2: Supports the Activate activation type. When both line items are selected for activation, Sentinel EMS enables only the activation types that are common across the selected items. In this case, only Activate is available. |
Required |
Select one or more values: |
|
| Rehost | The Rehost value specified during product creation. If Define in Entitlement was specified, you must set the value in this field. | Required |
One of the following: >Enable >Disable >Leave As Is |
Test Entitlement Mode
Sentinel EMS enables you to work in the Test Entitlements mode for testing purposes. (Not recommended for use with production devices.)
You can use test entitlements to verify that:
>License models, features, products
>Entitlements are being generated successfully.
>Entitlement certificates and license certificates are generated correctly and are sent to the end user.
>The generated license code or string works for the products.
The following is true for test entitlements:
>You can create test entitlements for products
>You can delete a test entitlement that is not yet activated.
To create a test entitlement:
1.From the navigation pane, select Entitlements to view the Entitlements page.
2.Set Test Entitlements to On. By default, the Test Entitlements mode is switched off.

NOTE When working with test entitlements, real entitlements are not listed (and vice versa). To move back to real entitlements, set the Test Entitlements mode back to "Off".
3.Create the test entitlement as defined in Creating an Entitlement.
Entitlements for Sentinel LDK CL (Produce and Push)
The process of creating an entitlement for cloud licensing (that you plan to activate using Produce and Push) is identical to creating any other entitlement with some minor exceptions described in this section.
TIP If you are working only with Sentinel LDK CL (in other words, you are not using Sentinel HL or Sentinel SL keys or any enforcement other than Sentinel LDK), you can ease maintenance by changing the global settings in the Entitlement Configuration pane of the Administration Console as follows:
>Set Entitlement as a Whole to Yes.
>Set Allow Activation By to Vendor Only.
To create an entitlement for Sentinel LDK CL for activation using produce and push:
1.(Optional) If you plan to delegate user-based licensing or machine account management to customers via the Sentinel EMS customer portal, you must associate an administrator user with the customer.
The customer's administrator user is responsible for managing:
• User association with activations
•Machine accounts and registered machines, which is part of device-based licensing. For details, see Machine Accounts.
Although you can associate a customer administrator user with the customer after you create the entitlement, we recommend handling this in advance for ease of maintenance.
2.Start creating an entitlement as described in Creating an Entitlement.
3.Assign a customer to the entitlement as described in Assign Customers, Users, Channel Partners, and Market Groups. If the customer is associated with an administrator user, the User Email address is automatically populated in the entitlement.
4.If you did not configure the global settings as described in the tip above, then, in the Define Entitlement Attributes pane, expand Additional Attributes and set the following. Otherwise skip to the next step.
•Allow Activation to Yes and set By to Vendor Only. This ensures that end users that access the Sentinel EMS customer portal cannot activate the products in the entitlement.
•(Recommended) Entitlement as a Whole to Yes. This enables you to activate all products at once without the need for selecting each product.
5.Associate products that include:
•One of the SL-AdminMode locking types. For details, see Locking Type.
•Features whose license model supports concurrency on a network and specifies the maximum number of concurrent instances. For details, see Configure License Model and Sentinel LDK Enforcement - License Models
6.Complete the entitlement as described in Creating an Entitlement.
Entitlements for Versionless Products
Versionless products are created to support dynamic entitlements in Sentinel EMS.
To create an entitlement for a versionless product:
1.Create a versionless product. For details, see Creating a Product.
2.Create its variants as needed. For details, see Creating a Variant for a Versionless Product. The versionless product must have at least one variant.
3.Create an entitlement using the Entitlements page. For details, see Creating an Entitlement. All versionless products must belong to the same namespace.
4.During entitlement creation:
•Use the Associate Line Items pane to associate the versionless product. All variants of the versionless product will automatically be available during activation.
•All line items must be of the same product type—Default, Versionless, or Variant. Do not combine product types in the same entitlement.
5.Save the entitlement. During activation, the variant is activated using the activation method defined for that variant. The versionless product itself is never activated.
Important points to remember when creating an entitlement for versionless products are
>License model attributes are not displayed for entitlements with versionless products. At the time of activation, depending on the variant selected, the license model attributes are applied from its definition.
>If the Copy License Date from Line Item in the Administration Console and the Start From Activation Date license model attribute of a versionless product are both set to No then the license duration of the line item is the sum of the date of activation and the license model duration.
Named Entitlements for User-Based Licensing
A named entitlement is a specific type of entitlement in which the usage of the licensed products and services is explicitly tied to a list of named users. This means only those specific users, whose identities are associated with the activated line item (via the
In contrast to concurrent user limits, where any authorized user can access your software if a concurrent license is available, named user licensing enables you to assign specific users, ensuring that these users always have access to your software.
To create and activate a named entitlement:
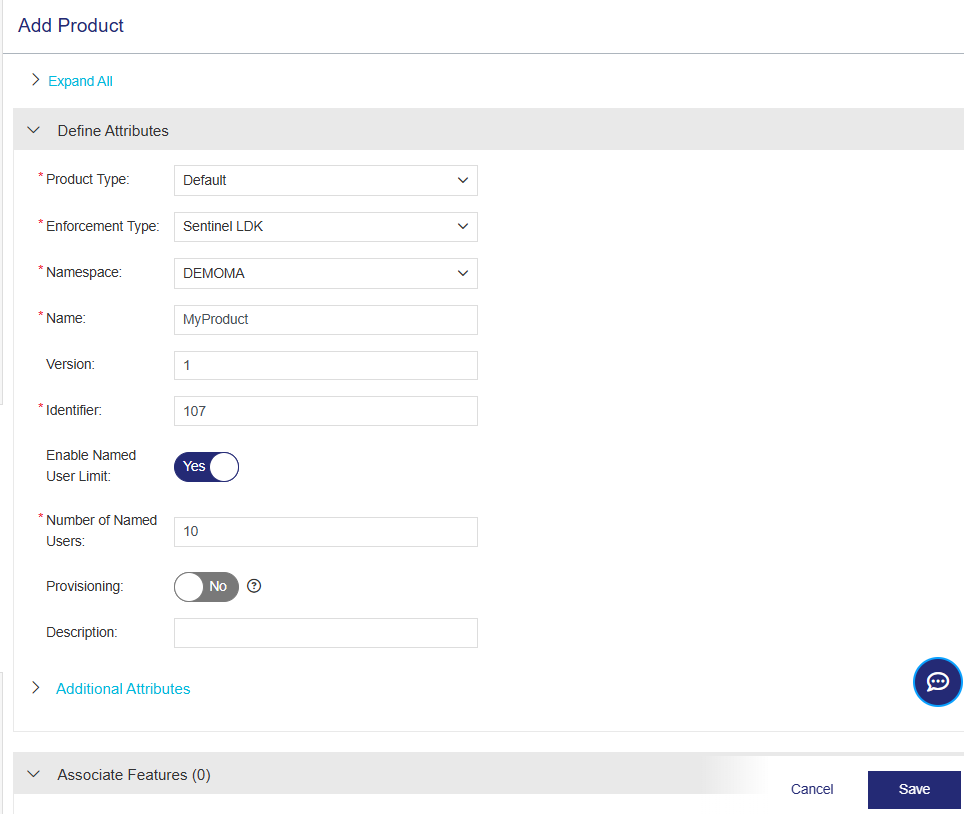
1.Create a default product or variant, as described in Creating a Product or Creating a Variant for a Versionless Product.
a.While creating the product, set the following attributes in the Define Attributes pane to enable support for named user licensing:
–Enable Named User Limit: Yes
–Number of Named Users: Integer from 1-99999
b.Associate one or more features and configure their license models.
For each license model, set the following:
–Enable Concurrency: Yes
–Concurrent Instances: Unlimited
–Network: Yes.

c.(Optional) Associate memory files if needed. For details, see Associate Memory Files.
d.Save the product and mark it as complete.
2.Create an entitlement as described in Creating an Entitlement. While creating the entitlement, add the products and product bundles that are configured for named users. Considerations:
•Entitlement as a Whole: If you select Entitlement as a Whole:
–You cannot activate an entitlement that includes products with both enabled and disabled named user limits.
– You cannot add named users with the same product identifiers to the same Sentinel Key.
•Sentinel Keys: For Sentinel keys, each product identifier must be unique, meaning you cannot activate the same product identifier more than once when Named User Limit is enabled.
•Editing and Disabling Named User Limit:
–You cannot change the value of the Number of Named Users attribute in an entitlement. If you need to modify this value, you must create another product.
–If needed, you can disable the Named User Limit attribute for a product in a named entitlement during creation or while it is a draft, for example, when renewing a license. After an entitlement is marked as complete, you cannot disable this attribute, except when adding a new line item, as that specific line item is in a draft state. After you disable this attribute by settings its value to No, you cannot revert its value to Yes.
To disable named user limit for a product in an entitlement:
i.If the entitlement is saved as a draft, then in the Actions column for the relevant entitlement, click Edit. Otherwise, continue with the next step.
ii.In the Associated Products pane, expand the relevant product.
iii.Select the Product Attributes tab and set the Enable Named User Limit value to No.
3.Save the entitlement and mark it as Complete.
Important points to remember when creating and activating a named entitlement for user-based licensing:
>To view product attributes such as Named User Limit and Number of Named Users after completing the entitlement, expand the entitlement, and then expand the relevant product and select the Product Attributes tab.
>For Sentinel LDK, you must activate using Produce and Push.
After a named entitlement line item is activated, the number of users that can access the license is equal to the Number of Named Users multiplied by the Activated Quantity of the product. For example, for 10 named users and 5 product activations, the number of users that can access the license is 50.