Entitlement Actions
|
>Editing an Entitlement Marked as Complete >Viewing an Entitlement Certificate |
>New to Entitlements?
>Want to Create an Entitlement?
|
Actions for Entitlements
The following table lists the actions available for entitlements:
| Action | Description | |
|---|---|---|

|
Complete |
Marks an entitlement as "complete" to finalize it and make the entitlement available for activation. Note: >An entitlement must contain at least one product >An entitlement marked as "complete" cannot be deleted. >Start From Activation Date and License Duration (days) license model attributes are disabled after an entitlement is marked as "complete". |

|
Edit |
Updates existing entitlement information. For details on editing entitlements, see Editing an Entity. Note: >For a draft entitlement, the attributes to edit are same that appear while creating a new entitlement. See Define Entitlement Attributes for detailed information on these attributes. >For information on how to edit entitlements marked as complete, see Editing an Entitlement Marked as Complete. |

|
Copy |
Duplicates an existing entitlement to create an identical copy. Note: >Customer information is not automatically copied to the new entitlement to avoid unintentionally creating entitlements for the wrong customers. >The new entitlement is created with a different entitlement ID. >The new entitlement is saved as a draft. You can edit the entitlement before marking it as "complete". |

|
Delete |
Deletes a test or draft entitlement. Note: >You can delete an entitlement only if it is marked as a draft. >You can delete a test entitlement that is marked as either draft or complete. |

|
Transactions |
Displays transaction details of a selected entitlement. For details, see Transactions. |
| View Certificate |
Enables you to view and/or email the entitlement certificate. For details, see Viewing an Entitlement Certificate. |
|
| View Activations |
Displays activations that are already performed for a entitlement. For details, see Activations. |
|
| View Downloads |
(Available for vendor users with View permissions for downloads) Opens the Downloads page, which enables you to associate downloads with the product included in the entitlement. To link a download with a product: 1.In the Actions column, select View Downloads to open the Downloads page. 2.Follow the steps in Creating a Download to create and associate a download with a product in the entitlement. |
|
| View Provisioning Requests |
Opens the Provisioning Requests page, which is filtered to display any provisioning request that is related to the specified entitlement. |
|
| Split/Transfer |
Enables you to split and/or transfer the unused quantity in an entitlement to other customers or channel partners. For details, see Splitting and Transferring Entitlements. |
|
|
Manage Sentinel Keys |
Controls which Sentinel keys are on the allow list for the selected line item. When a Sentinel key is associated with a line item, only that Sentinel key is available during activation. If no Sentinel key is associated, any Sentinel key can be used. For details, see Managing Sentinel Keys. | |

|
Disable |
Disables an entitlement that is marked as "complete". Note: >The details of a disabled entitlement cannot be modified. >A disabled entitlement cannot be activated. |
|
|
Enable |
Enables an entitlement that has been disabled. Note: Enabling a disabled entitlement restores all the line items of the entitlement to their previous state (same as before disable). |
| Close |
Permanently disables an entitlement by marking it closed. Note: An entitlement that has been marked "closed" is permanently disabled and no modification action can be performed on the entitlement. |
|
| Configure Batch |
Configures a batch job. This action is only available for entitlements that are in draft state. For more information, see Configuring a Batch Entitlement. |
|
Editing an Entitlement Marked as Complete
When modifying an entitlement marked as complete, consider the following:
Start Dates and End Dates
•You can change the start date of an entitlement to "No Start Date".
•You cannot change the end date of an entitlement to precede any of its line items' start dates.
•You can change the end date of an entitlement to "Never Expires".
>User Registration (only for activated entitlements)
•You can change an existing user registration value from "Optional" to "None" or "None" to "Optional".
•You cannot change an existing user registration that is marked as "Mandatory".
•For completed and activated entitlements, you can change the Entitlement as a Whole value from "Yes" to "No" (but you cannot change the value from "No" to "Yes"). Changing the value from "Yes" to "No" enables you to add and modify specific line items in an entitlement whose "Entitlement as a Whole" value was originally set to "Yes", instead of creating a new entitlement. If you have activation role permissions, you can activate only the newly added or changed line items in the modified entitlement, instead of activating the entire entitlement.
>Associated Customers
If at least one product in an entitlement is associated with a customer's users (User Association), you cannot disassociate the customer from that entitlement.
>Channel Partner
If you are logged in as a channel partner, the following conditions are true:
•A channel partner can only modify customer, user, and channel partner details of the entitlement to which it is associated.
•A channel partner can add new customers and users for an entitlement if the relevant permissions are set for the Channel Partner Permissions property in the Administration Console.
•A channel partner can associate a customer with an entitlement only if no customer is previously associated with that entitlement. After a customer is associated, the channel partner cannot further modify it.
• If a customer is associated with an entitlement, the channel partner can modify the customer's user that is associated with the entitlement. The updated user must also belong to the associated customer.
•A channel partner can associate other channel partners with an entitlement.
Editing a Line Item in an Entitlement Marked as Complete
For an entitlement that has been marked as "complete" or activated, you can edit the associated line items.
>Available Quantity
You can change the available quantity of the line item by specifying a new quantity. You can also use the (+) and (-) symbols to increase or decrease the available quantity.
>Start Date (relevant only for Expiration Date License Model)
You can change the line item start date by specifying a new start date. The line item start date must not be earlier than the entitlement start date. You can select "No Start Date" for a specific line item if the entitlement is marked with "No Start Date".
>End Date (relevant only for Expiration Date License Model)
You can change the line item end date by specifying a new end date. The line item end date must not be earlier than the line item start date or later than the entitlement end date. You can select "Never Expires" for a specific line item if the entitlement is marked with "Never Expires".
Viewing an Entitlement Certificate
The entitlement certificate contains the details of the entitlement.
To view and email an entitlement certificate for an entitlement marked as "complete":
1.In the Actions column, hover over an entitlement marked as "complete".
2.Click the View Certificate action button. The entitlement certificate appears as shown:
3.Click Send Email. The Send Email pop-up appears.
4.In the Send Email pop-up:
a.Specify the email address where the entitlement certificate must be sent. You can enter up to 15 email addresses. Press Enter after each email address.
b.Select another language if required. The language options that appear in the list depend on the language packs installed on your system.
c.Click Send. The entitlement certificate is sent to the specified email address in the selected language.
Splitting and Transferring Entitlements
You can split and/or transfer the existing quantity of an entitlement to other customers or channel partners. You can split the available activation quantity of an existing entitlement and transfer it to another party (customer, user, or channel partner). This helps to better allocate and utilize an entitlement.
Users with the Add permission can perform Split/Transfer actions automatically. If a user does not have the Add permission, they must have the Split/Transfer permission to perform these actions.
The following is applicable for Split/Transfer action:
>An entitlement can be split for all products or for selected products, based on the available quantity.
>You cannot split an entitlement that has product bundles.
>A split entitlement can be assigned to the same customer or user, to a different customer or user, or not assigned to any customer or user.
>For customers or users that are associated with a market group, the split or transfer of an entitlement can be done only within that market group.
>A channel partner can be updated or added during Split/Transfer.
>During Split/Transfer, the following conditions are true for channel partners:
•A channel partner can only Split/Transfer an entitlement to which it is associated.
•A channel partner can add new customers and users for an entitlement if the relevant permissions are set for the Channel Partner Permissions property in the Administration Console.
•A channel partner can associate other channel partners with an entitlement.
>You can split and then transfer an entitlement when the activation method used is Fixed.
>Entitlements using the Unlimited activation method cannot be split and can only be transferred because no quantity is specified.
To perform Split/Transfer on an entitlement:
1.In the Actions column for the relevant entitlement, click More Actions > Split/Transfer. The Split/Transfer Entitlement page opens.
![]()
2.Enter the Customer name, User Email address, Channel Partner, External ID, or CC Email as required. You can also leave the fields blank. These fields specify the owner for the new (split) entitlement. For details about these attributes, see Assign Customers, Users, Channel Partners, and Market Groups
3.In Define Entitlement Attributes, under Additional Attributes, enable Send Notification to send an email to the new owner (specified as the User Email) of the entitlement.
4.For a line item, enter the quantity to be transferred in the Transfer Quantity field. This value must be less than or equal to the Remaining Quantity of the product.
NOTE The transfer quantity must be a multiple of the fixed quantity for product line items with the Fixed activation method.
5.Click Save. The entitlement page displays the details of the new entitlement and the details of the existing entitlement from which the new entitlement was split.
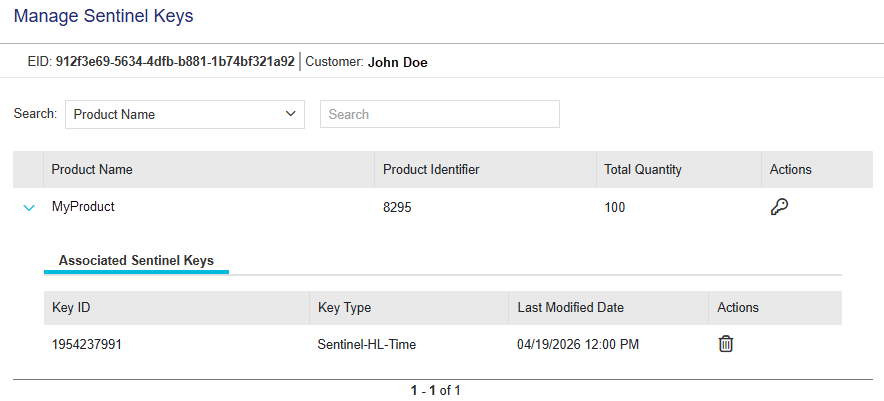
Managing Sentinel Keys
You can use the Manage Sentinel Keys action to associate specific Sentinel keys with a product in an entitlement. This creates an allow list of Sentinel keys available during activation. By pre-defining authorized Sentinel keys, you control which Sentinel keys can be used to activate specific line items. When you associate specific Sentinel keys with a line item, the selection tabs (C2V, Customer Key, EID, and Key ID) are hidden during activation, and only the pre-selected Sentinel keys are available.
If you do not specify a Sentinel key, Sentinel EMS allows activation on any available Sentinel key for the selected line item or generates a new Sentinel key if none exist.
NOTE When all selected line items include associated Sentinel keys, only the Sentinel keys common to those line items are available for activation.
To manage Sentinel keys for an entitlement:
1.In the Actions column for the relevant entitlement, click Manage Sentinel Keys. The Manage Sentinel Keys page is displayed.
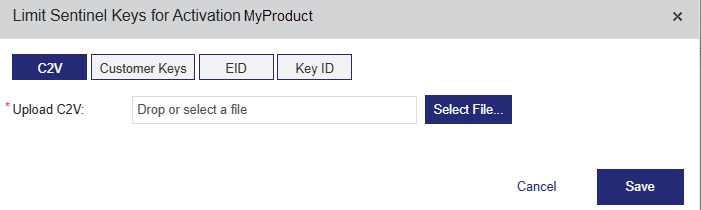
2.In the Actions column for the selected product, click the Limit Sentinel Keys for Activation button. The Limit Sentinel Keys for Activation dialog box opens.
![]() Limit Sentinel Keys for Activation - By C2V
Limit Sentinel Keys for Activation - By C2V
![]() Limit Sentinel Keys for Activation - By Customer Keys
Limit Sentinel Keys for Activation - By Customer Keys
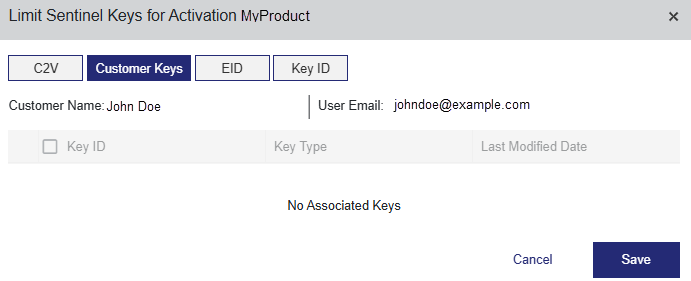
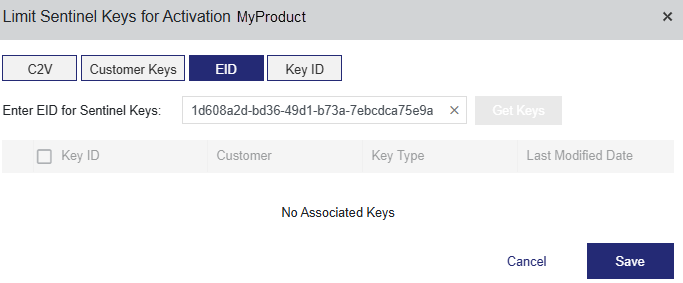
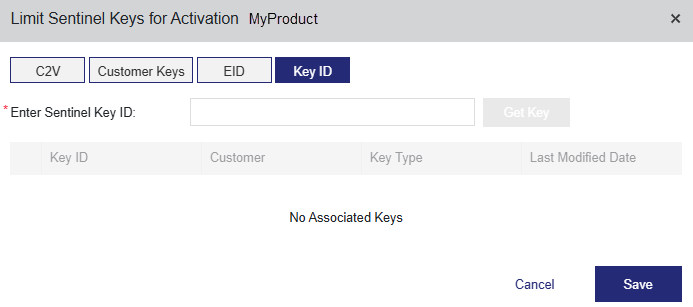
3.Select C2V, Customer Keys, EID, or Key ID, depending on how you want to locate the Sentinel keys.
| If you select... | Do this... |
|---|---|
| C2V |
In the Upload C2V box, specify the location of the C2V file received from the customer. You can drag and drop the C2V file or browse to and select the file. The selected C2V file is displayed as "C2V" (not the C2V file name). Ensure that the C2V value is linked to an existing Sentinel key with a valid HASP ID. Sentinel EMS accepts only registered and mapped keys. |
| Customer Keys |
(Displayed only if a customer is associated with this entitlement.) Select one or more existing Sentinel keys displayed in the grid. |
| EID |
Retrieve associated Sentinel keys in one of the following ways: >By default, the EID of the entitlement is displayed in the Enter EID for Sentinel Keys box, and the associated Sentinel keys are displayed in the grid. >To retrieve Sentinel keys that are associated with another entitlement, enter the full EID in the box, and then click Get Keys. The Sentinel keys associated with that entitlement are displayed in the grid. After the Sentinel keys are displayed, select one or more Sentinel keys. The line items can then be activated only on those Sentinel keys. |
| Key ID | Enter the ID for the Sentinel key that you want to associate with the selected line item. Then click Get Key. |
4.Click Save. The associated Sentinel keys are displayed in the Associated Sentinel Key pane:

The following table explains the Associated Sentinel Keys attributes:
| Attributes | Description |
|---|---|
| Key ID | The ID for the Sentinel key that you want to activate in this entitlement. |
| Key Type | The type of Sentinel key. Possible values: SL-AdminMode, SL-UserMode, or the specific type of Sentinel HL key, such as Sentinel-HL-Max. |
| Last Modified Date |
The date and time when the associated Sentinel key was generated or last updated. The default time zone is UTC. |
| Actions > Delete
|
Removes the association between the product and the Sentinel key. |
Configuring a Batch Entitlement
With Sentinel EMS, you can create entitlements as a batch. This enables you to create large batches of products with the entitlement details eliminating the need for small, and low-volume production cycles.
To configure an entitlement as a batch:
1.Create a draft entitlement with the product specifications as required.
2.In the Actions column, click Configure Batch, for the entitlement for which you want to create a batch. The Add Batch Entitlement page appears:
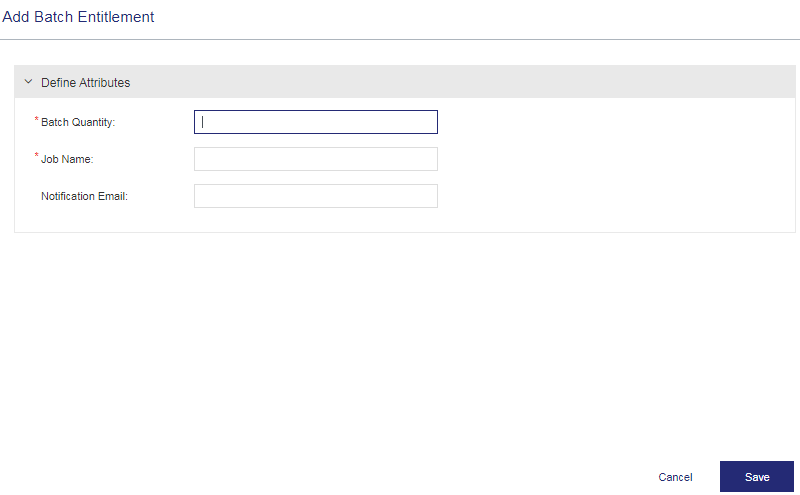
3.Enter the attribute details for the batch entitlement.
| Attribute | Description | Required/Optional | Valid Values |
|---|---|---|---|
| Batch Quantity | Number of entitlements to be created in the batch job. | Required | |
| Job Name | The name for the batch job to identify the set of entitlements being created. | Required | |
| Notification Email | Email address to which the notification with the batch job details is to be sent. | Optional |
4.Click Save. A success message is displayed stating that the batch entitlement is created and can be accessed through the Job Queue.
5.Navigate to Transactions > Job Queue to view the details of the batch entitlement. For details, see Job Queue.