Activations
What is an Activation?
An activation refers to a method of generating a license (or license code) for a product
Sentinel EMS enables you to perform an activation even before the start date of the line item has been reached, so that you can generate and apply a license in advance. Even though you apply the license in advance, the license takes effect only on its start date. This avoids a delta while using a current license and applying the new one, and ensures that the license cannot be misused if activated earlier.
Who is an Activatee?
An activatee is the user (individual or customer) that "owns" and therefore, performs the activation. Sentinel EMS enables you to associate an activatee during activation using the Activatee Email attribute.
For details on whether you must associate an activatee with an activation, see Activatee Email.
For more information on working with activatees, see Managing Activatees.
Prerequisites for Activations
The following are the prerequisites for activations:
Entitlement Prerequisites for Activations
>A role that includes Activation Management permissions. At minimum, you need the Add permission. For details, see Roles.
>The entitlement must be marked as "complete".
>When activating multiple products simultaneously, the products must meet the same conditions defined for Entitlement as a Whole.
TIP To verify that the products that you plan to activate all belong to the same enforcement, expand the entitlement and, under Associated Products, expand each product. Then, in the Associated Features tab, click the license model link and look at the Enforcement Technology value.
>The Allow Activation attribute of the entitlement must be set to "Yes". For details, see Define Entitlement Attributes.
>In the line item:
•The available quantity must be more than zero.
•The end date must not be in the past.
Installation Prerequisites for Activations
Installation prerequisites to enable end users to perform self-service, online activation through the Sentinel EMS customer portal:
>The Sentinel Run-time Environment must be installed on the end user computer. To achieve this, distribute Sentinel Run-time Environment together with your application. For example, your application might call the Sentinel Run-time Environment installer. For instructions, see Sentinel LDK Installation Guide. For the minimum required Sentinel Run-time Environment version, see the RTE and Sentinel EMS Integration section in the Sentinel LDK with Sentinel EMS Release Notes.
>Sentinel EMS must be configured to work with Sentinel Admin Control Center as described below:
a.Open Sentinel Admin Control Center (http://localhost:1947).
b. In the Sentinel Admin Control Center > Options area, click Configuration.
c.In the Configuration for Sentinel License Manager page, click the Network tab.
d.In the EMS URL area, add the domain for Sentinel EMS. (Do not include a trailing "/" at the end of the URL.)
Example: http://localhost:8080/ems
e.Click Submit.
Installation prerequisites to activate or update a product using a C2V file:
>
This applies to updating all key types—Sentinel HL and Sentinel SL (including CL).
>You must have access to the C2V file that was generated on the end user's machine.
Activation Status
The Status attribute for an activation can be one of the following:
>Activated: The line item is activated. License was generated.
>Revocation Confirmed: Revocation completed or synced successfully. The revoked quantity is deducted from the Activated Quantity and returned to the Available Quantity of the entitlement, ready for reuse.
Activating a Product
You can activate products
To activate a product:
1.Navigate to the Entitlements page.
2.Select and expand the entitlement that you want to activate.
3.Select the line items of the entitlement that you want to activate.
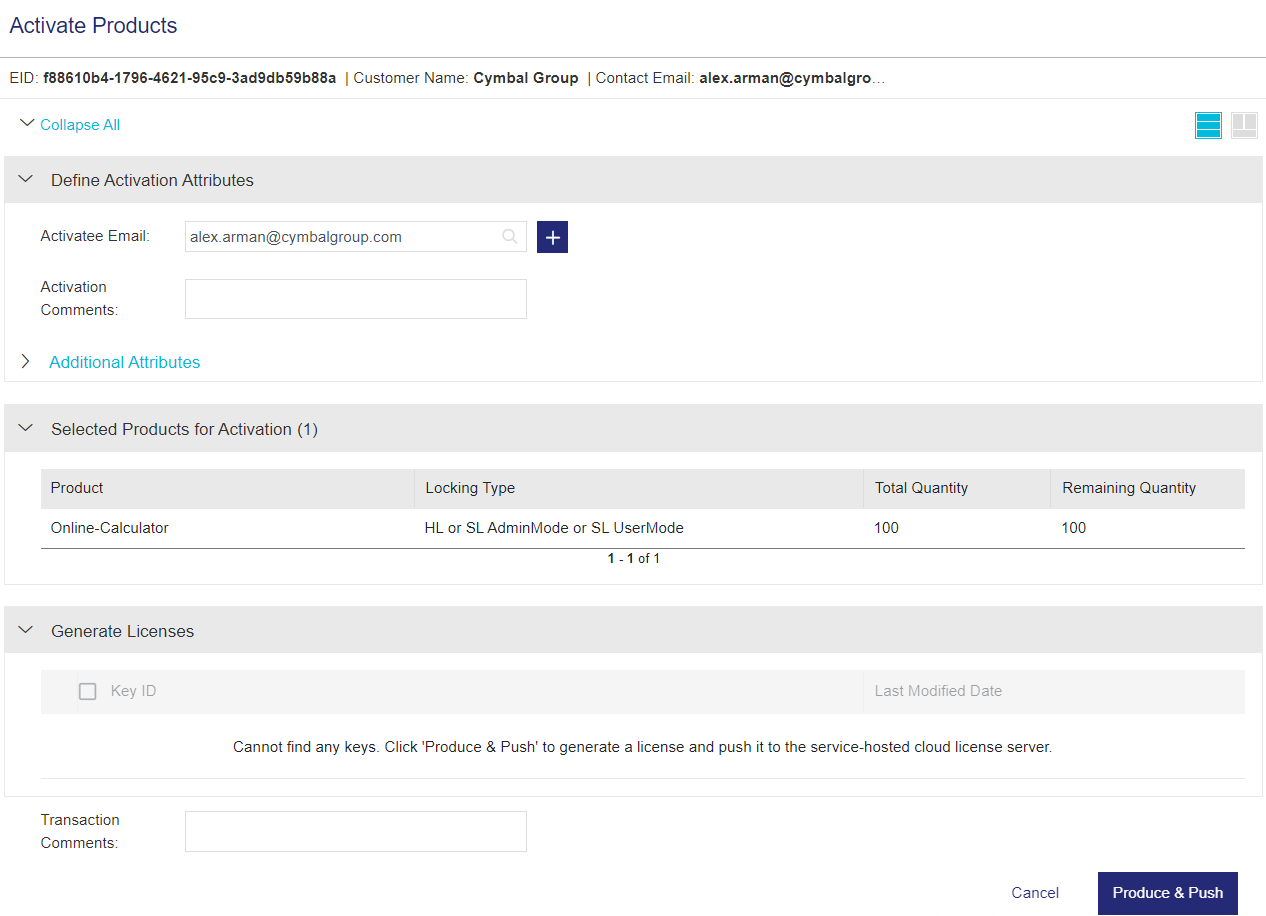
4.Click Activate. The Activate Product page appears as shown:
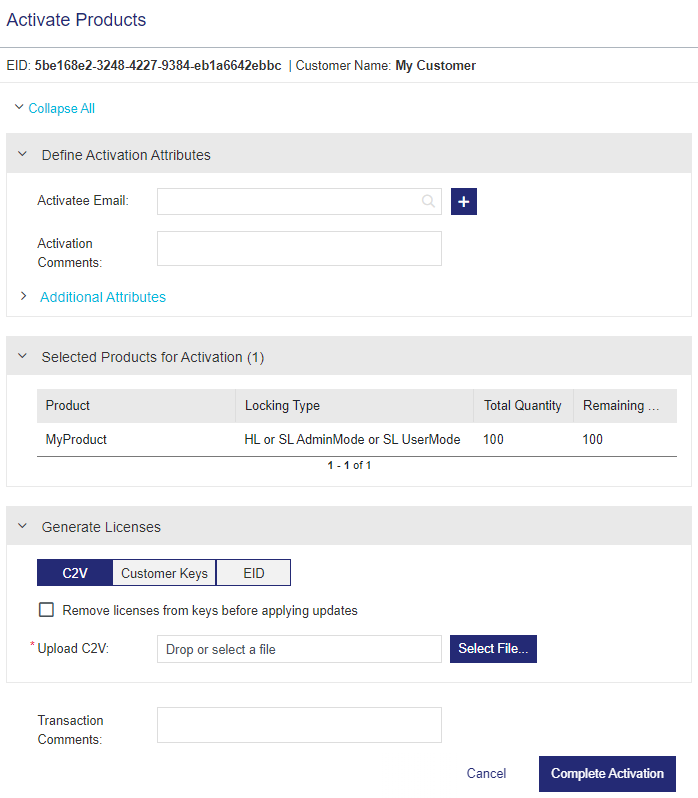
5.In the Define Activation Attributes pane, specify the Activation Attributes. For details, see Define Activation Attributes.
6.In the Selected Products for Activation pane, specify the product attributes, such as Quantity to Activate, the Variant name (relevant only for versionless products), and External ID, if any. For details, see Define Product Attributes.
7.In the Generate Licenses pane:
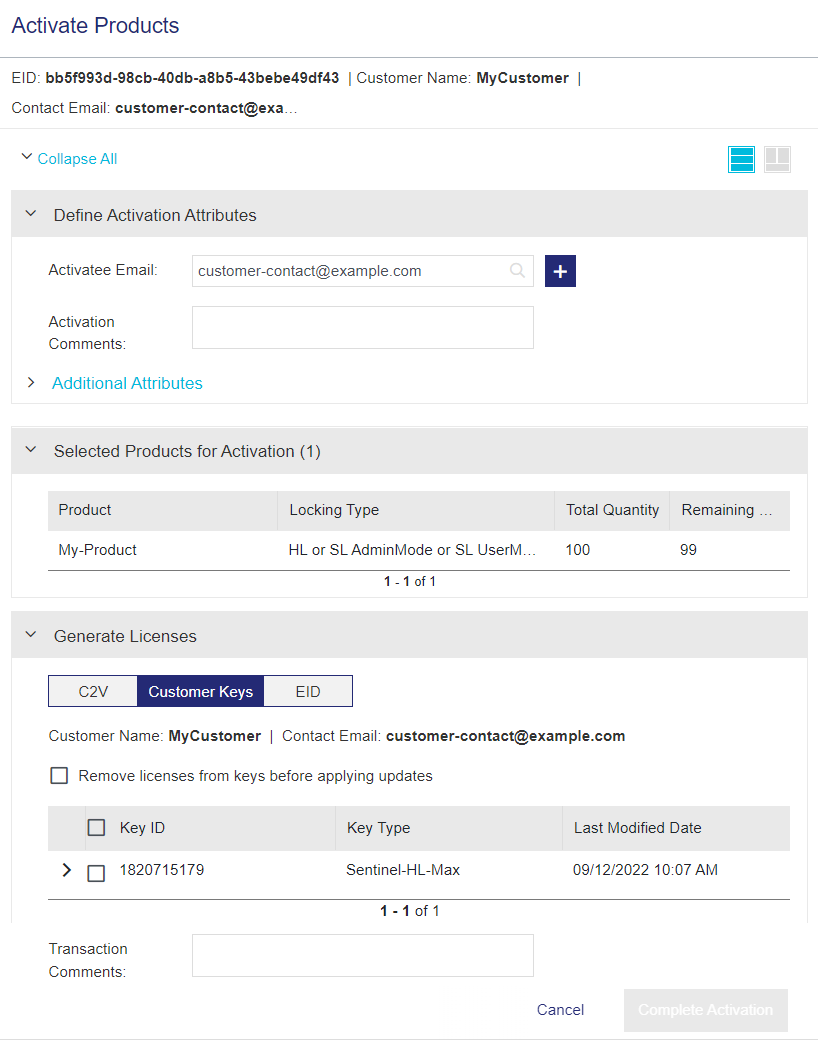
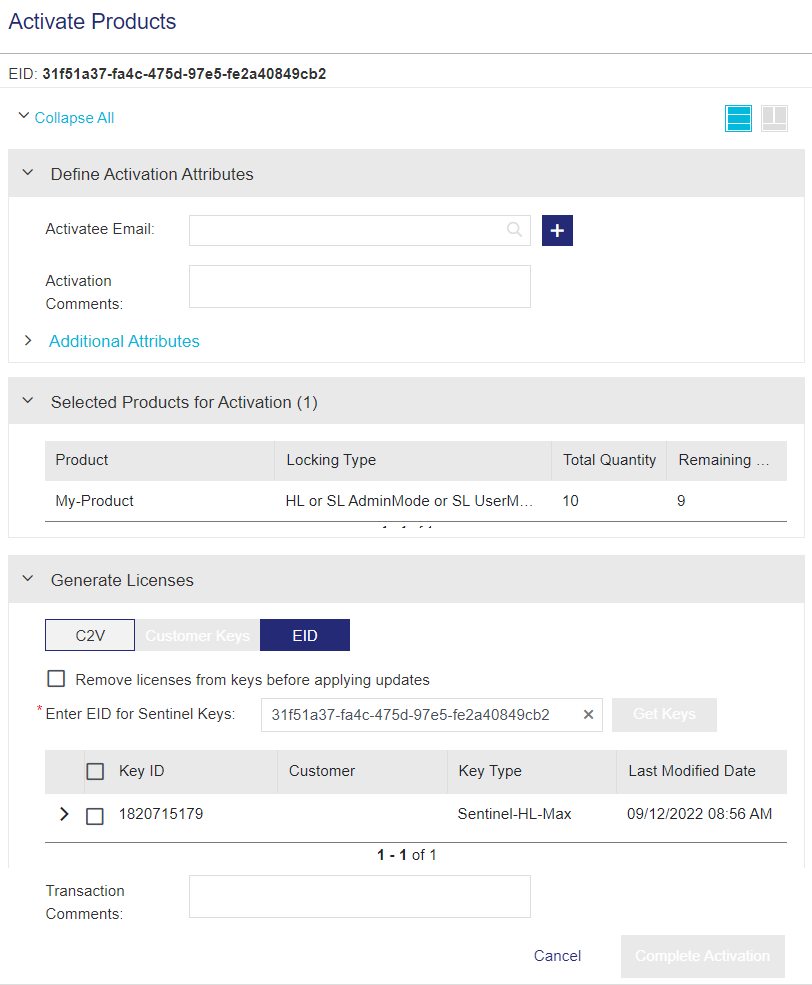
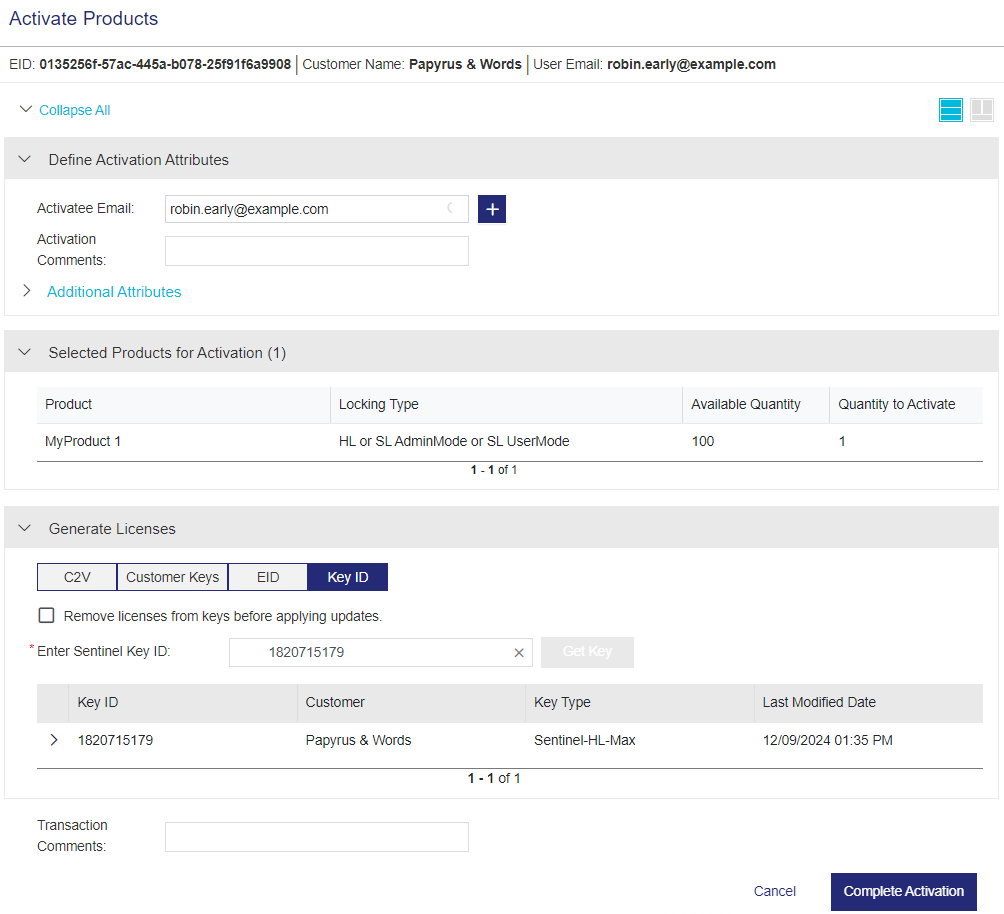
a.Select C2V, Customer Keys, EID, or Key ID, depending on how you want to activate the selected products.
| If you selected... | Do this... | Useful if... | ||||
|---|---|---|---|---|---|---|
| C2V |
In the Upload C2V box, specify the location of the C2V file received from the customer. You can drag and drop the C2V file or browse to and select the file. The selected C2V file is displayed as "C2V" (not the C2V file name). |
You have access to the C2V file for the customer's machine. | ||||
| Customer Keys |
Select one or more Sentinel keys for which you want to activate the products. You can expand each line item to view the associated products, associated memory files, and key attributes. For details on any of these properties, see Sentinel Key Attributes. When you select a customer key, the Complete Activation button is enabled. |
The entitlement is assigned to a customer, and you do not have access to the C2V file for the customer's machine, or you prefer to use Sentinel keys to generate a license. This option is available only if the entitlement is assigned to a customer and at least one Sentinel key is associated with that customer. |
||||
| EID |
|
The entitlement is not assigned to a customer, and you do not have access to the C2V file for the customer's machine, or you prefer to use Sentinel keys to generate a license. This option locates the Sentinel keys that are already associated with the entitlement. This enables you to activate products in entitlements that use other attributes, such as External ID, Ref ID, or User Email, to link entitlements to customers whose details are stored in an external system, for example. |
||||
|
Key ID |
Enter the ID for the Sentinel key for which you want to generate licenses. Then click Get Key. The data is populated in the grid, and you can expand the key to view the associated products and features, associated memory data, and the attributes of the key. |
You know the Sentinel key ID for which you want to generate license updates. For example, suppose a channel partner contacts you asking to create an entitlement update for one of their customers. If the channel partner shares the Sentinel key ID with you, you can update the entitlement and then activate the updated entitlement to generate the updated license. You can then share the V2CP file with the channel partner, who forwards this file to their customer. The customer can then apply the license update locally. This sample scenario might include the following steps: 1.The channel partner activates the original entitlement for their customer using the Sentinel EMS customer portal. They then apply the license to a Sentinel HL key using the resultant V2CP file and subsequently send the Sentinel HL key to the customer. 2.After using the license for almost a year, the customer contacts the channel partner asking to extend their license for another year. 3.The channel partner asks the customer for their Sentinel key ID and passes this information to you, so that you can create an entitlement update and generate an updated license for them. 4.You activate the entitlement update using the Sentinel key ID that you received from the channel partner, and send the generated V2CP file to the channel partner with the updated license. 5.The channel partner forwards the V2CP file to their customer who then applies the updates to their Sentinel HL key. |
b.(Optional) Select the Remove licenses from keys before applying updates checkbox to clear any pre-existing licenses from the selected keys. This might be useful, for example, if features or products have been discontinued. This option does not clear data from the key memory. When this checkbox is selected, any pre-existing products on the key are updated according to the entitlement. For example, if Apply License is set to Add or Overwrite, then the license attributes are added or overwritten accordingly instead of being removed. For details, see Apply License.
6.Click Complete Activation to activate the product and generate the license certificate.
Define Activation Attributes
You define the activation-related attributes in the Define Activation Attributes pane.
(This section describes how to define activation attributes when activating a product. To view the list of attributes that are included after a license is successfully activated, see Viewing Activation Attributes.)
| Attribute | Description | Required/Optional | Valid Values | |
|---|---|---|---|---|
| Activatee Email |
Email address of the user (individual or customer) who is responsible for or performs the activation. You can click For Produce and Push, the activatee email is pre-populated if a user is associated with the customer that defined in the entitlement. You can remove or modify the email address if needed. |
Required only for the following: >When User Registration is set to Mandatory in an entitlement. See also: Who is an Activatee? |
>A valid email address >Cannot contain: spaces and \ () [] : ; “ <> >Cannot start with a '.' >Cannot contain double .. >Cannot contain double @@ |
|
| Activation Description |
Description to include in the activation. (When burning a key, this box is displayed in the line item for each selected key instead of the Define Activation Attributes pane.) |
Optional |
Maximum: 500 characters |
|
| Send Notification | Sends a notification to the user email defined in the entitlement after activation. | Required | Yes OR No | |
Define Product Attributes
You define the product quantity-related attributes in the Selected Products for Activation pane.
| Attribute | Description | Required/Optional | Valid Values |
|---|---|---|---|
| Quantity to Activate |
The quantity to activate. Depending on the activation method defined in the entitlement, the following occurs after activation: >Fixed: >Unlimited: After activation, the remaining quantity is "Unlimited". >Partial: After activation, the remaining quantity is the total available quantity minus the quantity specified in this field. >Full: After activation, the remaining quantity is zero. You can activate a line item of an entitlement only once. |
Required |
For the Partial activation method, set an integer that is less than or equal to the Available Quantity. |
Activating and Revoking Product Bundles
You activate and revoke licenses for products in product bundles as described in Activating a Product. When doing so, consider the following:
>Packaged product bundles:
•Activation: You must activate all products at the same time.
•Revocation: You can revoke products separately, but you must first revoke all products before you can activate the products in the product bundle again.
>Discrete product bundles:
•Activation: You can activate individual products independently or all at once.
•Revocation: You can revoke individual products separately.
For more information, see Activation.
Produce and Push
When you activate products using produce and push, you generate a cloud license and push the license to the Thales service-hosted, cloud license manager server in a single step.
After produce and push is performed, the vendor or the customer's administrator user can create machine accounts for end users, so that end users can access the protected application as soon as they receive their unique identity credentials and the protected application.
On the Sentinel EMS customer portal, a customer's administrator user can create and manage machine accounts for end users, view the list of activated products, and manage the list of registered machines on which each end user can access protected applications. The vendor can also perform these tasks on the Sentinel EMS vendor portal.
Each time you use produce and push, a single activation is performed. The activation is then deducted from the total quantity.
Prerequisites for Produce and Push
>Sentinel LDK CL must be available to Sentinel EMS. For details on the various ways to consume cloud licenses that are produced and pushed, see User-Based Licensing and Machine Accounts.
>The entitlement must:
• Be assigned to a customer. For details, see Customers.
•Include a customer's administrator user that is associated with that customer. Required only if you plan to delegate user-based licensing or machine account management to the customer via the Sentinel EMS customer portal. For details, see Users.
>The products in the entitlement must:
•Use one of the SL_AdminMode locking types. For details, see Locking Type.
•Include features whose license model supports concurrency on a network and specifies the required number of concurrent instances. For details, see Configure License Model and Sentinel LDK Enforcement - License Models.
To activate products using Produce and Push:
1.Navigate to the Entitlements page.
2.Select and expand the entitlement that you want to activate.
3.If the entitlement is not configured as Entitlement as a Whole, then select the product line items that you want to activate. Otherwise, skip to the next step.
The Produce & Push button is enabled if the Locking Type is one of the Sentinel SL AdminMode key types.
4.Click Produce & Push. The Activate Products page opens.
5.In the Define Activation Attributes pane, modify the attributes if needed.
If the customer's administrator user is associated with this customer (recommended), then the Activatee Email value is pre-populated with the email address of the user that handles User-Based Licensing or Machine Accounts for this customer. For details, see User Type. You can modify or remove the email address from this box if needed.
6.In the Define Product Attributes pane, specify the quantity to activate if needed.
7.In the Generate Licenses pane, do one of the following:
•If this is the first time that you are generating a CL key using produce and push, a message in the Generate Licenses pane informs you that there are no CL keys yet for this customer.
Click Produce & Push. The CL key is generated and pushed to the Thales service-hosted, cloud license manager server. You can see the newly added key in the Activation Details area, which displays the status of the key and the key ID.
•If produce and push was performed at least once, then the Generate Licenses pane lists the generated CL keys.
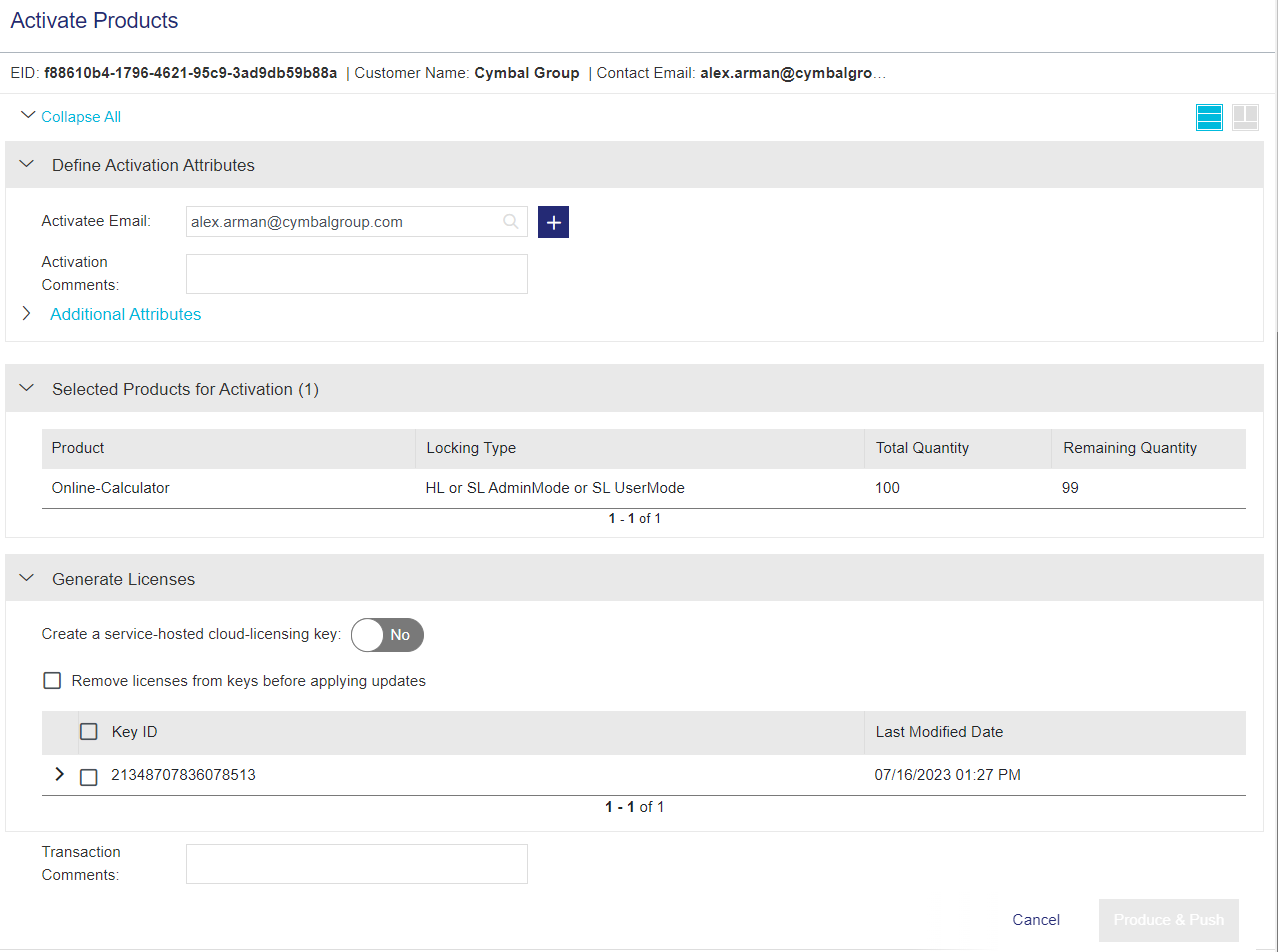
Do one of the following:
Apply the license to the existing key. (Generally, only one key is required per customer. If you see multiple keys, you can apply the updates to all relevant keys.)
i. Select the required key. You can expand each line item to view the associated products, associated memory files, and key attributes. For details on any of these properties, see Sentinel Key Attributes.
ii.(Optional) Select the Remove licenses from keys before applying updates checkbox to clear any pre-existing licenses from the selected keys. This might be useful, for example, if features or products have been discontinued. This option does not clear data from the key memory. When this checkbox is selected, any pre-existing products on the key are updated according to the entitlement. For example, if Apply License is set to Add or Overwrite, then the license attributes are added or overwritten accordingly instead of being removed. For details, see Apply License.
iii.Click Produce & Push. The CL key is updated and pushed to the Thales service-hosted, cloud license manager server.
Otherwise:
Only if required, set Create a service-hosted cloud-licensing key to Yes to create another CL key. Although you can create multiple CL keys for the same customer, we recommend that you create a single CL key for each customer for ease of maintenance.
8.Click Done. If the activatee email address was provided, then a license certificate is sent to the activatee. The license certificate email does not include a license string because the license is applied automatically without the need for user input. Instead of a license string, the end user's machine can access the cloud license directly using the installed identity credentials.
The generated key is displayed on the Activations page. Navigate to the Sentinel Keys page to view the key and check its status. If you do not know the key ID, you may want to search by customer to locate the key. Keys are pushed asynchronously, so, rarely, there may be a delay, which is indicated by the Out-of-Sync status. ![]() Synchronize button in the Actions column.
Synchronize button in the Actions column.
9.(Optional) You or the customer's administrator user can now create a machine account to notify the end user that the protected application containing the activated products is available for use. For details, see Machine Accounts.
Burning a Product Key
You can write (burn) an entitlement to connected Sentinel HL keys.
Prerequisites for Burning a Key
>Sentinel Run-time Environment (RTE) must be installed on the computer on which you are burning the key. For instructions, see Sentinel LDK Installation Guide. For the minimum required Sentinel Run-time Environment version, see the RTE and Sentinel EMS Integration section in the Sentinel LDK with Sentinel EMS Release Notes.
>
>Sentinel EMS must be configured to work with Sentinel Admin Control Center as described below:
a.Open Sentinel Admin Control Center (http://localhost:1947).
b. In the Sentinel Admin Control Center > Options area, click Configuration.
c.In the Configuration for Sentinel License Manager page, click the Network tab.
d.In the EMS URL area, add the domain for Sentinel EMS. (Do not include a trailing "/" at the end of the URL.)
Example: http://localhost:8080/ems
e.Click Submit.
To burn a Sentinel HL key:
1.Navigate to the Entitlements page.
2.Select and expand the entitlement that you want to activate.
3.Select the line items that you want to activate. If the Locking Type is one of the Sentinel HL key types, the Burn Key button is enabled.
4.Click Burn Key. The Activate Products page opens.
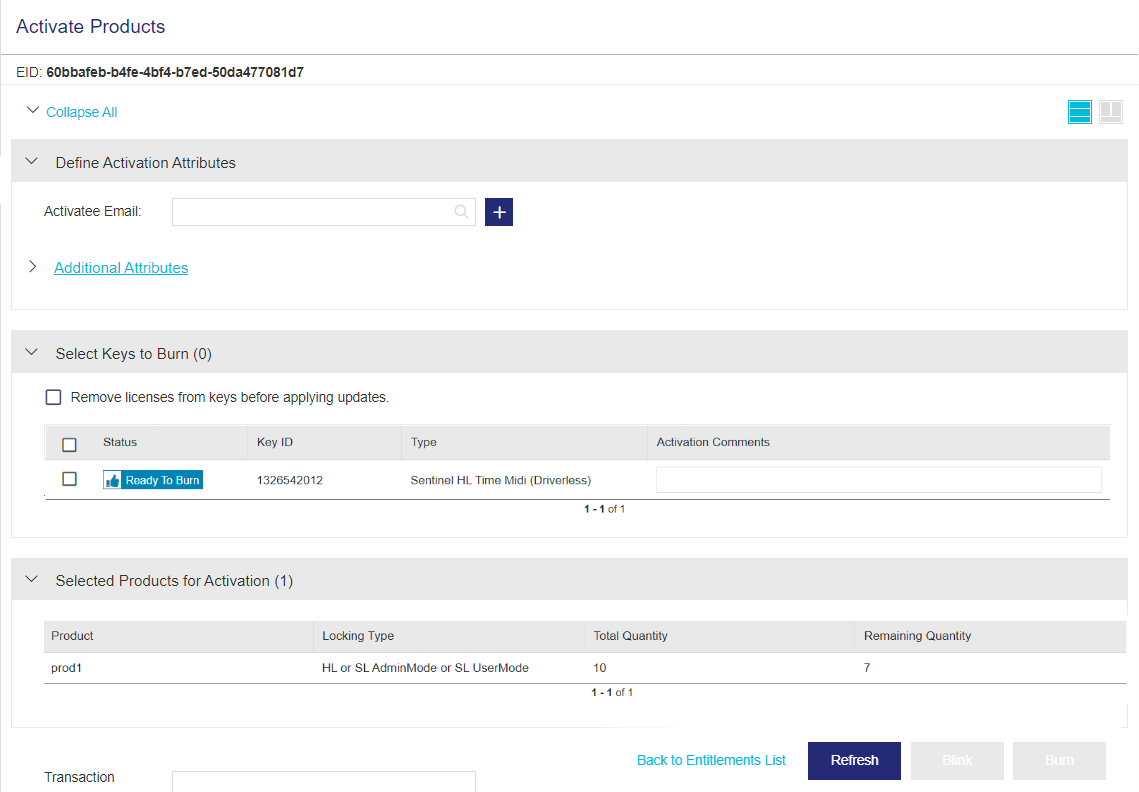
5.In the Define Activation Attributes pane, modify the attributes if needed.
6.In the Select Keys to Burn area:
a.Select the required keys.
–If the required keys are not listed in the Select Keys to Burn pane, click Refresh to display them.
–To locate keys that are connected to your machine, click Blink. The LED of the selected keys blinks for five seconds.
b.(Optional) In the Activation Description box, enter a description (up to 500 characters).
c.(Optional) Select the Remove licenses from keys before applying updates checkbox to clear any pre-existing licenses from the selected keys. This might be useful, for example, if features or products have been discontinued. This option does not clear data from the key memory. When this checkbox is selected, any pre-existing products on the key are updated according to the entitlement. For example, if Apply License is set to Add or Overwrite, then the license attributes are added or overwritten accordingly instead of being removed. For details, see Apply License.
7.In the Define Product Attributes pane, specify the quantity to activate if needed.
8.Click Burn. The entitlement is written to the Sentinel HL key and the production totals (Total Quantity and Remaining Quantity) are updated. The key is marked as Burned.
Activating Variants in Dynamic Entitlements for Versionless Products
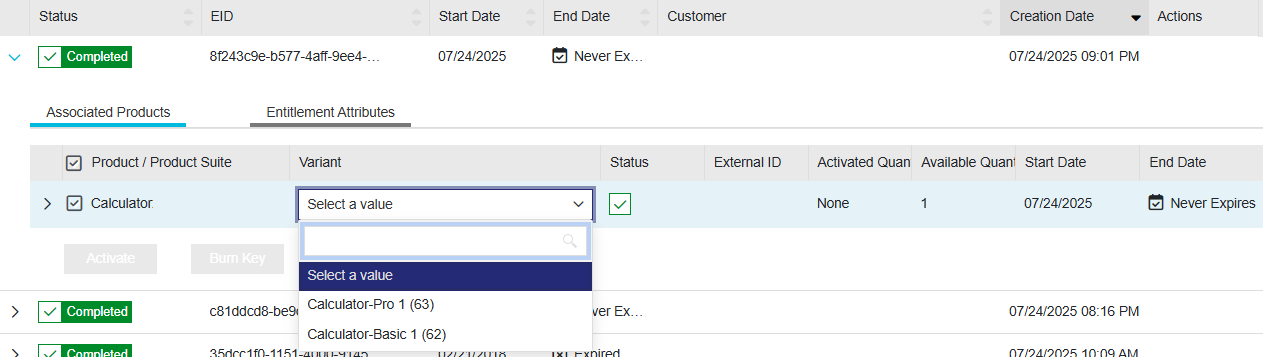
A versionless product is a "container" for one or more variants. When you activate a dynamic entitlement containing a versionless product, you select the required variant from the list of available variants for that versionless product and then activate that variant.
When activating a variant for a versionless product:
>In the Selected Products for Activation section, you select a variant when activating a versionless product, as shown below. To expand the list, click in the field or press the space bar.
>Supported activation methods for variants: Fixed, Partial, or Full.
>Depending on the selected variant, the system displays the relevant attributes.
>Whenever a new feature is added to a deployed versionless product, a new license certificate is generated after entitlement activation.
>There is no pre-allocated quantity defined for a variant. A quantity limit is allocated as a whole for the versionless product and can be used to activate any of its variants. Therefore, the quantity of licenses that are activated for a variant is determined by the customer and the activation method.
>After revoking a license for a variant, the customer can reallocate the quantity freed to activate another variant.
>With changing requirements, new variants can be created independently and made available to the customer in an existing entitlement for activation. This is also known as future key activation.
Activating Multiple Line Items in a Single Entitlement
You can activate more than one line item in an entitlement simultaneously.
To activate multiple line items in a single entitlement:
1.Navigate to the Entitlements page.
2.Expand a completed entitlement. Under Associated Products, select the checkboxes for the line items that you want to activate together.
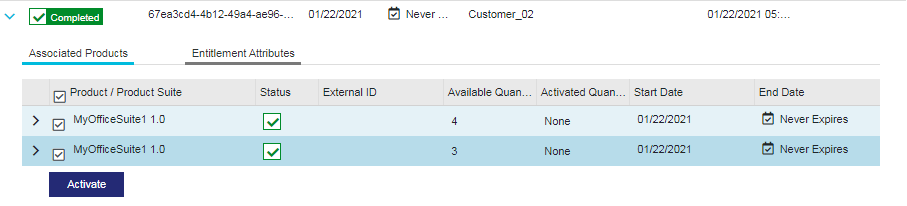
•All line items must be activated together for:
–Entitlements where Entitlement as a Whole is set to "Yes"
•Multiple line items must have the same locking
3.Click Activate.
4.In the Activate Product Keys page, enter the Activatee Email and other activation attributes as required. For more information, see Define Activation Attributes.
5.Click Complete Activation.
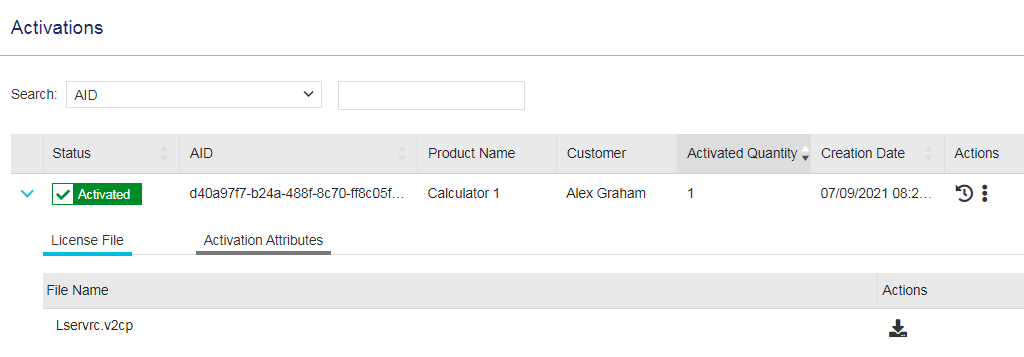
Viewing Activation Attributes
After you activate a license, you can view the activation attributes in the Activations grid.
To view the activation attributes:
1.Navigate to the Activations page.
2.Select and expand the activation for which you want to view the activation attributes.
3.Click the Activation Attributes tab. The attributes for the selected activation are displayed.
The following table lists some of the common activation attributes that are displayed in addition to the attributes defined during the activation process. An activation may also include enforcement-specific attributes and custom attributes.
| Attribute | Description | ||||||||
|---|---|---|---|---|---|---|---|---|---|
| Status | The status of the activation. For possible values, see Activation Status. | ||||||||
| AID | The activation ID. | ||||||||
| Activation Date |
The date that the license was activated. The default time zone is UTC. |
||||||||
|
Earliest Start Date |
The activation date, which is the earliest date |
||||||||
| Latest End Date |
The latest date on which a license can expire based on all of the licenses in the activation. The default time zone is UTC. Sentinel EMS examines the license data for every feature included in the entitlement and displays the latest possible end date available. In some cases, this may be an estimated end date, for example, if all of the feature licenses are set to start the first time that the license is used, then the end date is based on the specified number of days after the estimated start date
|
Viewing Revocation Attributes
In addition to the revocation Activation Status, you can view the revocation attributes in the Activations grid.
To view the revocation attributes:
1.Navigate to the Activations page.
2.Select and expand the activation for which you want to view the revocation attributes.
3.Click the Revocation Attributes tab. The attributes for the selected revocation are displayed.
The following table lists some of the common activation attributes that are displayed in addition to the attributes defined during the revocation process.
| Attribute | Description |
|---|---|
| Revoked By | The user name of the individual who initiated the revocation process. |
| Recredited Quantity | The number of licenses (activations) re-credited back to the entitlement following the successful revocation. |
| Send Notification | Indicates whether a notification email was sent about the revocation. |
| Revocation Initiation Date | The date and time when the revocation process was initiated. |
NOTE The Creation Date (in the Activations section) indicates when the record was initially created in the database. The Activation Date (in the Activation Attributes section) informs users of the Activation API about when an Entitlement was activated. Ideally, both values are the same.
Actions for Activations
You manage activated licenses using the Activations page, which you access from the navigation pane. The following table lists the actions available for activations:
| Action | Description | |
|---|---|---|

|
Transactions |
View transaction details of a selected activation. For more information, see Transactions. |
| View Entitlement |
For a selected activation, opens the entitlement in the Entitlements page. |
|
| View Downloads |
View and associate downloads with the product within the activation using the Downloads page. This action is visible to vendor users with "View" permissions for downloads. To link a download with a product: 4.In the Actions column, select View Downloads to open the Downloads page. 5.Follow the steps in Creating a Download to create and associate a download with a product in an entitlement. |
|
| View Provisioning Requests | View and update the status of provisioning requests using the Provisioning Requests page. For details, see Provisioning Requests. | |
| Manage Activatees |
Manage activatees (the users, individual or customer, that generate a license code for products |
|
Viewing and Applying the License File (V2CP)
When you activate an entitlement, the output is a file that can be sent to the customer by email. This file is known as a Vendor-to-Customer Package (V2CP) file.
To view the V2CP file:
1.From the navigation pane, select Activations to view the Activations page.
2.Expand the required activation.
3. Click the ![]() Download button. The lservrc.v2cp file is downloaded to your default downloads folder.
Download button. The lservrc.v2cp file is downloaded to your default downloads folder.
4.Open the lservrc.v2cp file with any text editor.
To apply the V2CP file:
1.Locate the lservrc.v2cp file.
2.On the target machine, apply the lservrc.v2cp file using Sentinel Admin Control Center or a utility that you provide to your customers.
Managing Activatees
You manage activatees by clicking the Manage Activatees action button for a selected record on the Activations page. The Manage Activatees page that opens is displayed below:
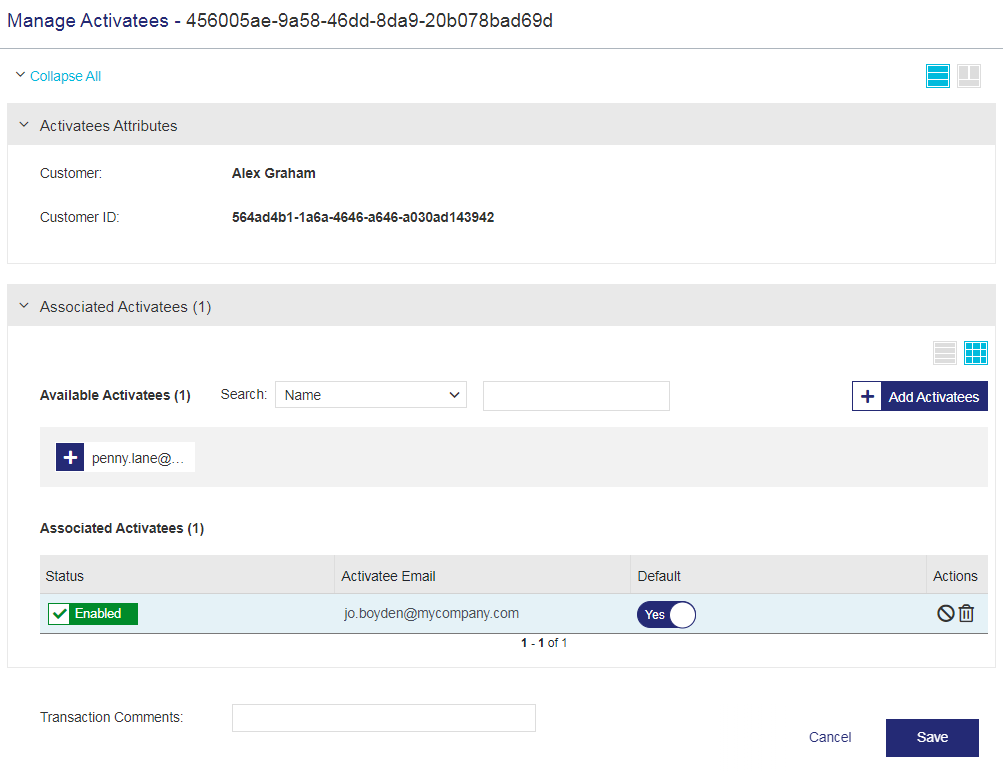
The Managing Activatees page can be used to perform the following actions:
>Add and associate activatees
>Mark an activatee as default
>Delete an associated activatee
>Disable an associated activatee
>Enable an activatee that was previously marked as "disabled".
Adding and Associating Activatees
You add and associate activatees by clicking the Add Activatees button on the Manage Activatees page. The following shows an example of the page that opens:
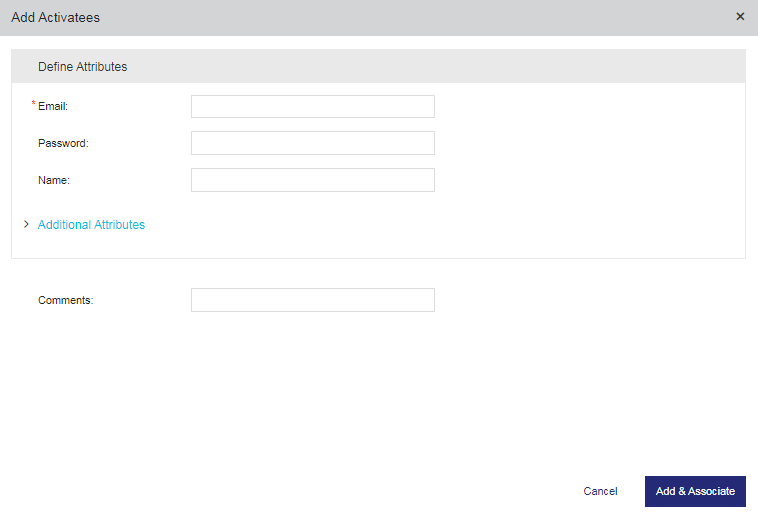
The following table explains the activatee attributes:
| Attributes | Description | Required/Optional | Valid Values |
|---|---|---|---|
| User ID |
Unique identifier of the activatee (user). |
Required |
>3 to >Alphanumeric >Special characters supported: underscore (_) |
|
Name of the identity provider that is used to authenticate the activatee (user) that accesses your application or service. If more than one identity provider is available, select the relevant option from the list. Otherwise, Sentinel IDP is used by default and is displayed as read-only. If you select an identity provider other than Sentinel IDP, and User Attribute for Identity Federation is set to External ID, you must also specify a value for External ID. |
Optional |
Sentinel IDP or your own identity provider. |
|
|
Email of the activatee (user) who performs the activation. |
Required | A valid email address. | |
| Password | Password the activatee (user) uses to log on to the Sentinel EMS customer portal. | Optional |
> 8 to 30 characters >At least one lowercase character (a-z) >At least one uppercase character (A-Z) >At least one number (0-9) OR special character (! @ # $ % ^ & * ( ) _ - + = , .) |
| Enforce Password Change on First Login |
(Displayed when you start entering a password.) Specifies whether the activatee (user) must change the password after the first successful login to Sentinel EMS. When set to Yes, the activatee (user) must change the password after the first successful login before accessing Sentinel EMS, ensuring that the initial password is replaced with a secure one. This attribute inherits its default value from the Enforce Password Change on First Login Administration Console property, but you can modify this value. If you clear the password, this attribute is not displayed. NOTE For the Sentinel EMS customer portal, password change at first login is enforced only when logging in using user credentials (user ID or email address and password), and does not apply to login using EID or PKID. |
Optional |
Yes OR No |
| Name | Name of the activatee (user). | Optional |
>1 to 100 characters >Alphanumeric >Cannot contain: ( ) |
| User Type |
Type of activatee (user). |
Read-Only | Standard OR Administrator |
| External ID |
External reference identifier that uniquely identifies the activatee (user) in an external system. |
Required only if: > The activatee (user) belongs to an Identity Provider other than Sentinel IDP >User Attribute for Identity Federation is set to External ID |
>0 to 60 characters >Alphanumeric >Must be unique across users |
|
Additional Attributes |
|||
| Ref ID 1 | Reference identifier that identifies the activatee in an external system. | Optional |
>0 to 100 characters >Alphanumeric >Must be unique across Sentinel EMS for all activatees |
| Ref ID 2 | Reference identifier that identifies the activatee in an external system. | Optional |
>0 to 100 characters >Alphanumeric |
| Phone | Telephone number of the activatee. | Optional |
0 to 100 characters |
| Language |
Display language for the activatee. Select a language from the available languages to specify a language other than English. Automatically generated emails (for example, entitlement certificate, license certificate) are sent to the activatee in this language. Also, when the activatee logs on to the Sentinel EMS, the pages displayed are in the selected language. |
Required | The options displayed depend on the language packs installed for Sentinel EMS. |
| Company Website | URL of the company website | Optional | A valid URL |
|
Billing and Shipping Address Attributes Billing Address |
|||
| Street/PO Box | Street address or the post office box details of the activatee for billing statements (for example credit card statements). | Optional | 0 to 100 characters |
| City | City of the activatee. | Optional | 0 to 30 characters |
| State/Province | State of the activatee. | Optional | 0 to 30 characters |
| Country | Country of the activatee. | Optional | 0 to 30 characters |
| ZIP Code / Postal Code | ZIP or postal code of the activatee. | Optional | 0 to 20 characters |
| Use as Shipping Address |
>Select Yes to use the same address for both billing and order shipment. > Select No to expand the pane and specify a different Shipping Address for receiving orders. |
Yes OR No |
|
Actions for Managing Activatees
The following table lists the actions available for managing activatees:
| Action | Description | |
|---|---|---|

|
Delete |
Deletes the activatee. You can delete an activatee to remove its association with the activation. |

|
Disable | Disables the activatee. |

|
Enable | Re-enables an activatee that is marked as disabled. |