Configuring Callouts
|
NOTE Ensure that a Sentinel Connect client is configured before adding a callout. For details, see Configure Client.
|
What is a Callout?
Callouts are programmable integration points that allow Sentinel Connect to interact with external systems or custom components before the key stages in the Sentinel Connect workflow. These stages include customer and user handling, entitlement creation, update, and activation. Callouts extend the built-in Sentinel Connect workflow by invoking external systems or custom component URLs to retrieve additional information or post data before executing actions in Sentinel EMS. This enables integration with third-party systems, such as front-office or back-office systems, and external Identity Providers (IdPs). For example, if you want to send data to your financial system when creating an order, you can use a callout in Sentinel Connect.
Use Cases for Callouts
Sentinel Connect uses callouts to communicate directly with external systems and custom components using configurable, no-code setups. This eliminates the need for custom connectors and enables more flexible, maintainable workflows. Before callouts, Sentinel Connect could only use data from business systems (ERP/CRM systems) in a fixed workflow limited to Sentinel EMS operations. Any integration with external systems required custom connectors for each operation.
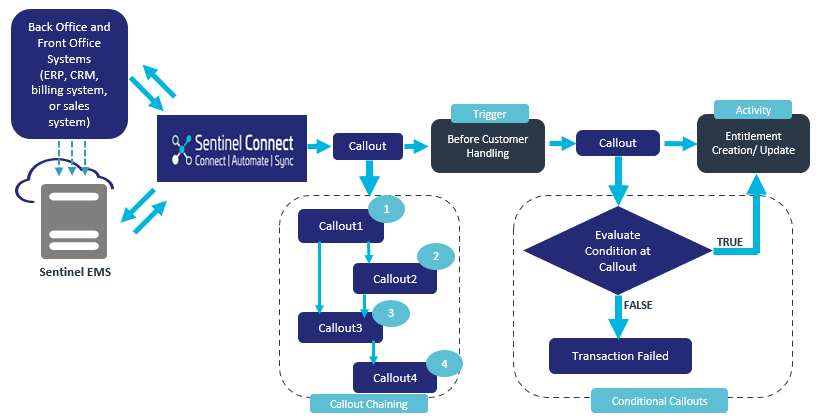
By using the Callout Chaining and Conditional Callouts capabilities, system integration and business logic execution work together more effectively. Callout Chaining enables seamless, step-by-step synchronous callouts, aligning systems in real-time, and enabling context-aware decisions. Conditional Callouts add precision by triggering specific callouts only when predefined conditions are met, minimizing unnecessary processing. For example, the trigger point, Before Partner Handling, allows the partner to be validated before moving forward with partner-related processing during entitlement creation and update.
Callout Execution Modes
Callouts use the GET, POST, PUT and PATCH methods to send and retrieve data. These methods support both synchronous and asynchronous calls for callout execution, depending on whether the Sentinel Connect workflow waits for a response before proceeding:
>Synchronous (Wait for Response): Sentinel Connect waits for a response from the external system before continuing the workflow. Use this mode for operations when the external system’s response is critical for the next workflow step. For example, validating a customer's CRM IDs before initiating order creation.
>Asynchronous (Fire and Forget): Sentinel Connect triggers the callout but does not wait for a response. The workflow continues as soon as the callout is sent. Use this mode for operations where the external system's response is not needed to proceed to the next step in the workflow, allowing the workflow to continue without delay. For example, notifying billing systems about a completed transaction.
Supported Callout Activities and Triggers
An activity refers to the specific operation being performed in the Sentinel Connect workflow. Callouts transmit data based on the type of activity, such as Entitlement Creation.
A trigger is the event that causes the callout to be initiated, such as Before Customer Handling. Each activity contains a predefined set of trigger points to invoke callouts. The available callout triggers depend on the selected activity. Each activity can be configured with up to four callouts, of which only two can be synchronous.
The following table lists the supported callout activities and triggers in Sentinel Connect along with example use cases:
| Supported Activity | Supported Trigger | Example Use Case |
|---|---|---|
| Entitlement Creation | Before Entitlement Creation |
Validate the product code against a product catalog system before creating the entitlement. |
| Before Customer Handling | Check if the customer record exists in the CRM system before proceeding with customer handling. | |
| Before Activation | Confirm readiness of the cloud service before triggering entitlement activation. | |
| Before Partner Handling | Validate the partner details and ensure readiness before proceeding with partner-related processing during entitlement creation. | |
| Before User Handling | Verify the user’s status in the identity management system before linking the user. | |
| Entitlement Update | Before Entitlement Update | Validate the updated product configuration against business rules before applying the changes. |
| Before Customer Handling | Push updated customer info to the CRM system before applying entitlement changes. | |
| Before User Handling | Verify user roles and access permissions using the external access control system before updating entitlement data. | |
| Before Partner Handling | Validate the partner details and ensure readiness before proceeding with partner-related processing during entitlement update. |
NOTE Callouts are used to trigger actions before an activity takes place. For any actions that need to be performed after the activity, use Webhooks and Events.
Adding Callouts
You can add a callout from the Callouts page.
To add a callout:
1.From the navigation pane, select Callouts to view the Callouts page.
2.Click Add Callout. The Add Callout page is displayed.
3.Configure the callout, its execution details, and authentication requirements in Callout Definition.
4.Set up authentication to validate client requests in Authentication Setup.
5.Define how your application communicates with external systems in Request Configuration by setting the HTTP method, payload, and query parameters.
6.Specify how to handle responses for synchronous calls in Response Configuration.
7.Set up the Condition Configuration to configure the execution of callouts based on one or more condition expressions.
8.Click Save after completing the callout configuration.
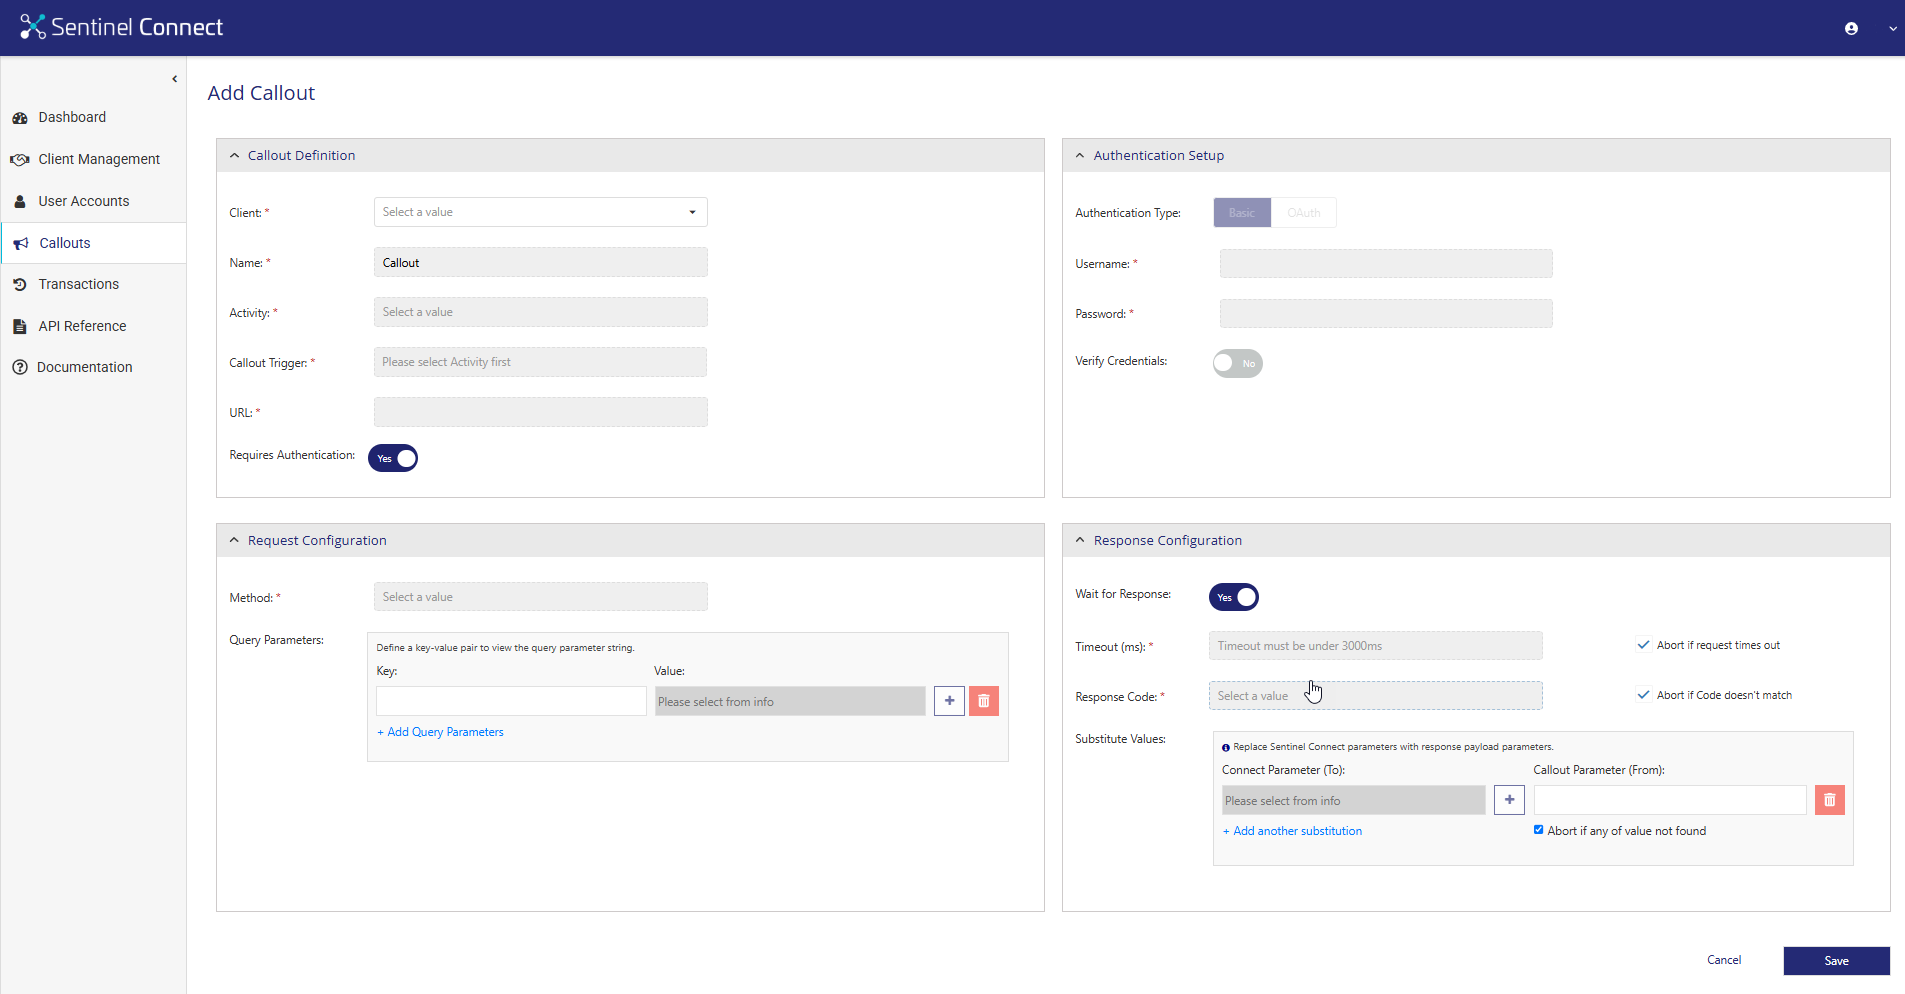
Callout Definition
The Callout Definition section is displayed as:
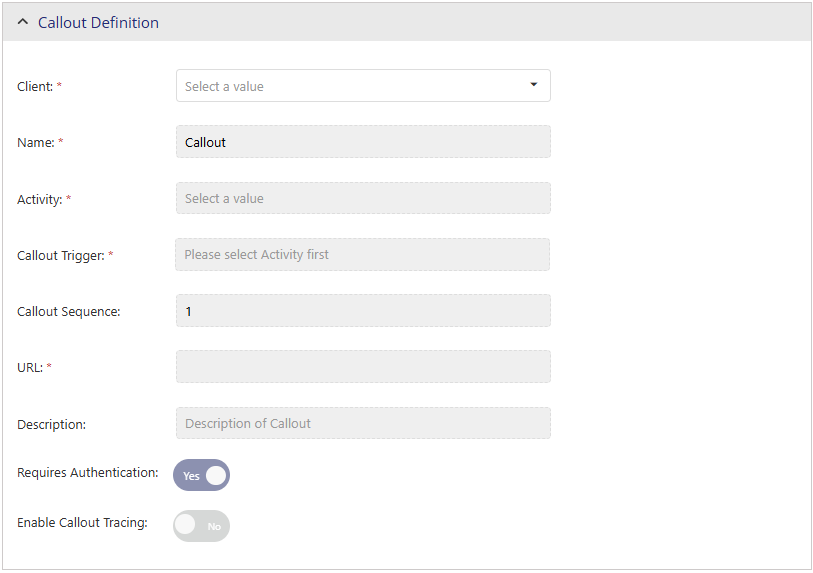
The following properties define the callout:
| Attribute | Description | Required/ Optional | Valid Values |
|---|---|---|---|
| Client |
Name of the Sentinel Connect client for whom the callout is being added. >Administrator accounts: When logged in as an administrator, a list is displayed showing all existing clients. >Client Admin accounts: When logged in as a client administrator, the list is pre-populated with the associated client accounts and cannot be edited. |
Required |
Select from the list of client names of Sentinel Connect clients. |
| Name | Name of the callout. | Required | Maximum: 200 characters |
| Activity | Specifies the step in the workflow during which the callout is executed. | Required |
Possible Values: >Entitlement Creation >Entitlement Update |
| Callout Trigger | Specifies the event point within the selected activity where the callout is triggered, just before the event occurs. | Required | Possible Values:
>Before Activation >Before Customer Handling >Before Entitlement Creation >Before Entitlement Update >Before Partner Handling >Before User Handling |
| Callout Sequence | Specifies the sequence of actions executed or triggered in a defined order for a combination of Activity and Callout Trigger. For details, see Callouts Chaining. | Optional |
Possible Values: 1, 2, 3, 4 Default Value: 1 |
| URL | The target endpoint URL where you send the callout request. | Required |
>Maximum: 200 characters >Alphanumeric > Must start with: http:// or https:// >A valid domain name (For example: example.com) >May optionally include www. >May include optional path or query parameters >For example: /https?:\/\/(www\.)?[-\w@:%.~#=]{1,256}\.[a-zA-Z]{2,}(\/[\w@:%.~#?&=]*)?/ |
| Description | A short description of the callout to understand what the callout does. | Optional |
Maximum: 250 characters |
| Requires Authentication | Specifies if credentials are needed to access the callout URL. | Optional | Possible Values: Yes or No
Default Value: Yes |
|
Enable Callout Tracing |
Specifies whether Sentinel Connect captures and stores callout execution details for tracing purposes. >When set to Yes, Sentinel Connect logs all callouts executed within a transaction, capturing the fully resolved endpoint URL along with request and response details, and displays all entries in the Callout Traces tab. >When set to No, Sentinel Connect does not log the details of the callout. |
Optional |
Possible Value: Yes or No Default Value: No |
Authentication Setup
NOTE Visible only when you set Requires Authentication to 'Yes'.
The Authentication Setup section is displayed as:
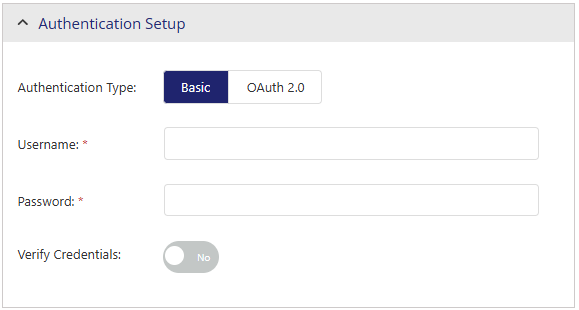
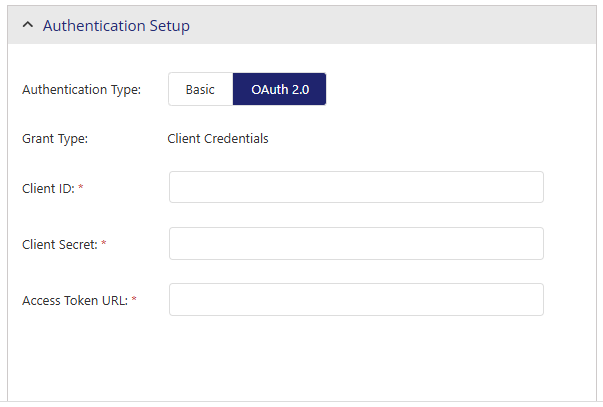
The following properties specify the user authentication:
| Attribute | Description | Required/ Optional | Valid Values |
|---|---|---|---|
| Authentication Type |
Type of authentication profile, which specifies the authentication method used by Sentinel Connect to authenticate client requests when working with the Sentinel Connect callouts. >Basic: Requires you to specify verified user name and password with your request. >OAuth: Requires you to specify OAuth 2.0 details for a client to request an authentication token from the authorization server, including Client Credentials grant type details such as client ID, client secret, and access token URL with your request. |
Required | Possible Values:
>Basic >OAuth Default Value: Basic |
| Basic | |||
| Username | User name for the client application. | Required |
>Maximum: 200 characters >Alphanumeric |
| Password | Password for the user name you provided. | Required | Maximum: 200 characters |
| Verify Credentials |
Specifies whether to validate the authentication setup. >When set to Yes, Sentinel Connect validates the credentials by sending a basic authentication request to the server specified in the Verification URL before creating the authentication setup. >When set to No, Sentinel Connect creates the authentication setup without validating the credentials. |
Optional |
>Possible Values: Yes or No >Default Value: No |
| Verification URL |
(Visible only when Verify Credentials is set to 'Yes'.) The URL that is used to the validate the authentication setup of the client. |
Required |
>Maximum: 200 characters >Alphanumeric > Must start with: http:// or https:// > A valid domain name. For example: example.com > May optionally include www. >May include optional path or query parameters >For example: /https?:\/\/(www\.)?[-\w@:%.~#=]{1,256}\.[a-zA-Z]{2,}(\/[\w@:%.~#?&=]*)?/ |
| OAuth | |||
| Grant Type | Specifies the method used to request an access token based on the client’s credentials. | Required | Default Value: 'Client Credentials' |
| Client ID | The unique identifier of the client application, used to identify the client during the authentication process and to authorize access to the target service or URL. | Required |
>Maximum: 200 characters >Alphanumeric |
| Client Secret | A secret that is confidential to the application and the authorization server to access the target URL. | Required |
>Maximum: 200 characters >Alphanumeric |
| Access Token URL | URL of the authorization server that issues the token using the client ID and client secret. A request is sent to this URL with the given credentials. | Required |
>Maximum: 200 characters >Alphanumeric > Must start with: http:// or https:// > A valid domain name (For example: example.com) > May optionally include www. >May include optional path or query parameters >For example: /https?:\/\/(www\.)?[-\w@:%.~#=]{1,256}\.[a-zA-Z]{2,}(\/[\w@:%.~#?&=]*)?/ |
Request Configuration
The Request Configuration section is displayed as:
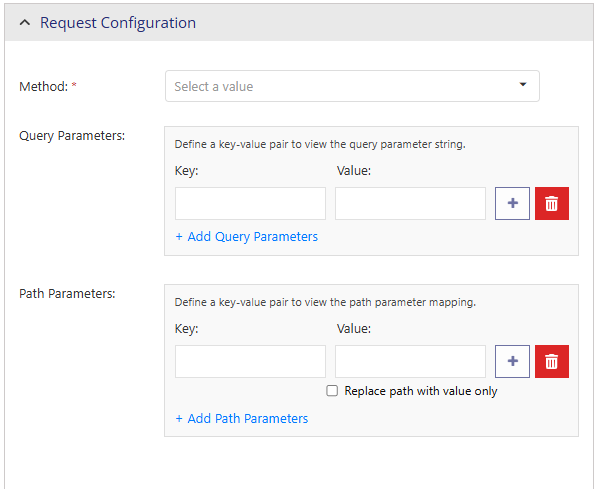
The following properties specify the request configuration:
| Attribute | Description | Required/ Optional | Valid Values |
|---|---|---|---|
| Method | Specifies the HTTP method used to send the request. | Required |
Possible Values: >GET >POST >PUT >PATCH |
| Request Payload |
(Visible only if Method is set to POST, PUT, PATCH.) Specifies the body content sent with the HTTP request. Click Parse Payload to validate the payload format and automatically structure it as a properly formatted JSON object. This ensures that the request body is syntactically correct before submission. |
Required |
JSON value. For example: >Dynamic Payload: {"Key": "${value}"} >Static Payload: {"Key": "Value"} |
| Type |
(Visible only if Method is set to POST, PUT, PATCH.) Specifies the data format used in the request body. Note: Sentinel Connect supports only JSON format. |
Required | JSON |
| Query Parameters |
Specifies key-value pairs that are passed to the target URL. Each query parameter consists of the following: >Key: Specifies the name of the parameter added to the URL as query string. >Value: Specifies the dynamic value used to replace the placeholder at run time. Select the value from the Select Value window. You can use: >
> > + Add Query Parameters: Adds a new key-value pair. For example, Request URL: https://api.example.com/customers Key: status | Value: active Resolved URL: https://api.example.com/customers?status=active (returns only active customer records) |
Optional |
>Maximum: 10 query parameters >Key: Parameter name. For example: entitlement, date >Value: Select from the mapped values listed in the Select Value window •Entitlement •Customer •User •Channel Partner •Activation |
|
Specifies key-value pairs embedded directly within the target URL path to identify a specific resource. You can use path parameters when the resource is variable (for example, retrieving a contact by email address). Each path parameter consists of the following: >Key: Specifies the placeholder name defined in the target URL path template. At runtime, the key is replaced with the corresponding value to identify the specific resource. For example, in the request the key customerUserEmail is replaced with the actual user email value to retrieve the corresponding customer record. >Value: Specifies the dynamic value used to replace the placeholder at run time. Select the value from the Select Value window. You can use: >
>
>Replace path with value only: When enabled, Sentinel Connect replaces the path parameter placeholder in the target URL with only the parameter’s actual value. When disabled, Sentinel Connect keeps the key-value placeholder format defined in the target URL. For Example, •Disabled (default): https://api.example.com/customers/customerUserEmail=jane.doe@example.com •Enabled: https://api.example.com/customers/jane.doe@example.com . >+ Add Path Parameters: Adds a new key-value pair. |
Optional |
>Maximum: 10 path parameters >Key: Parameter name. For example: entitlement, date >Value: Select from the mapped values listed in the Select Value window •Entitlement •Customer •User •Channel Partner •Activation |
Response Configuration
Response configuration in Sentinel Connect is needed only for synchronous calls. When Wait for Response is set to 'Yes', the response configuration properties are displayed and you can configure the properties as needed. The Response Configuration section is displayed as:
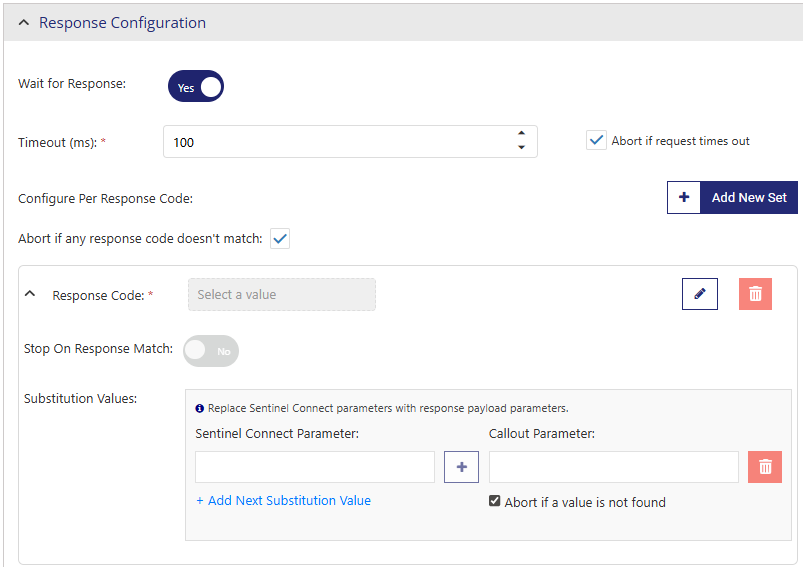
The following properties specify the response configuration:
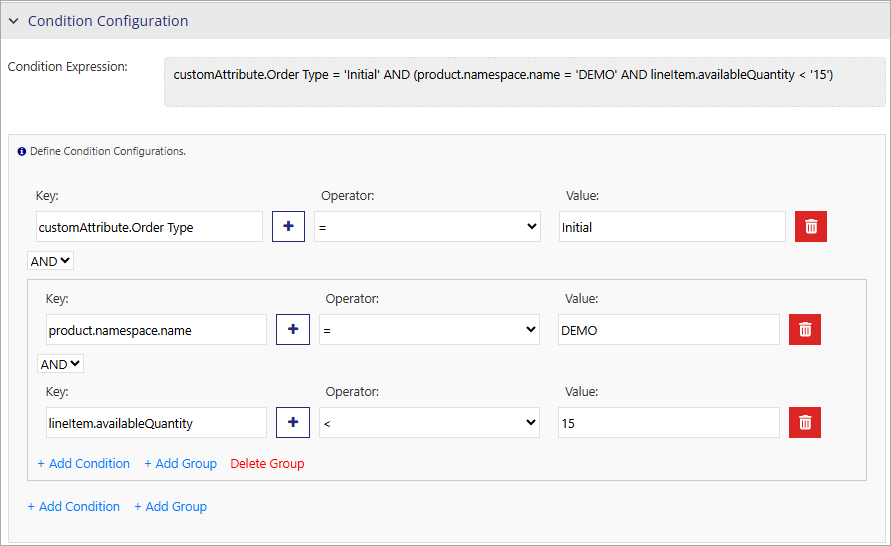
Condition Configuration
Configuring callouts with conditions enables dynamic behavior in callouts. A condition expression is defined by a key, an operator, and a value; together, these evaluate to a Boolean value that determines whether to execute the callout. For details, see Conditional Callouts.
The following properties specify the condition configuration:
Callout Chaining
In the Sentinel Connect workflow, multiple callouts can be configured to run in sequence, enabling multi-step business flows where each callout performs actions such as fetching data, updating records, or triggering processes by communicating with external systems. This process, known as callout chaining, enables the output from one callout to serve as the input for the subsequent callout, creating a linked sequence of dependent actions within the overall workflow.
Chained Callout Execution
You can use callout chaining to execute multiple callouts sequentially for a client, where each callout belongs to the same activity and is triggered by the same event. The output of a callout (with a lower sequence number) is used in the next callout (with a higher sequence number) by saving the responses of the previous callouts.
You can set the order of these callouts from the Callout Sequence list while defining callouts, the default being '1'. Once the value of the sequence is greater than '1', the callouts are treated as chained callouts. Chained callouts can also be used in the request and response configurations, as described in Chained Callouts in Query Parameters and Path Parameters and Chained Callouts in Substitution Value.
Callout Chaining Rules
To chain callouts and pass data between them, you must follow these specific rules:
>Callouts must belong to the same activity and the same trigger.
>Up to four callouts can be triggered per activity, with a maximum of two allowed to run synchronously.
>Only the responses from synchronous callouts (those with 'Wait for Response' enabled) can be used in subsequent callouts.
>The sequence number of each callout must be unique (1, 2, 3, or 4) and in increasing order .
>Once a specific sequence number is assigned, that sequence number is not available for selection from the Callout Sequence list.
>The sequence number of callouts can be non-consecutive, that is, you can assign ‘1’, '2', and ‘4’, skipping ‘3’. This reserves sequence slots for future callouts, allowing you to add new steps later without breaking existing logic, which provides long-term flexibility for updates.
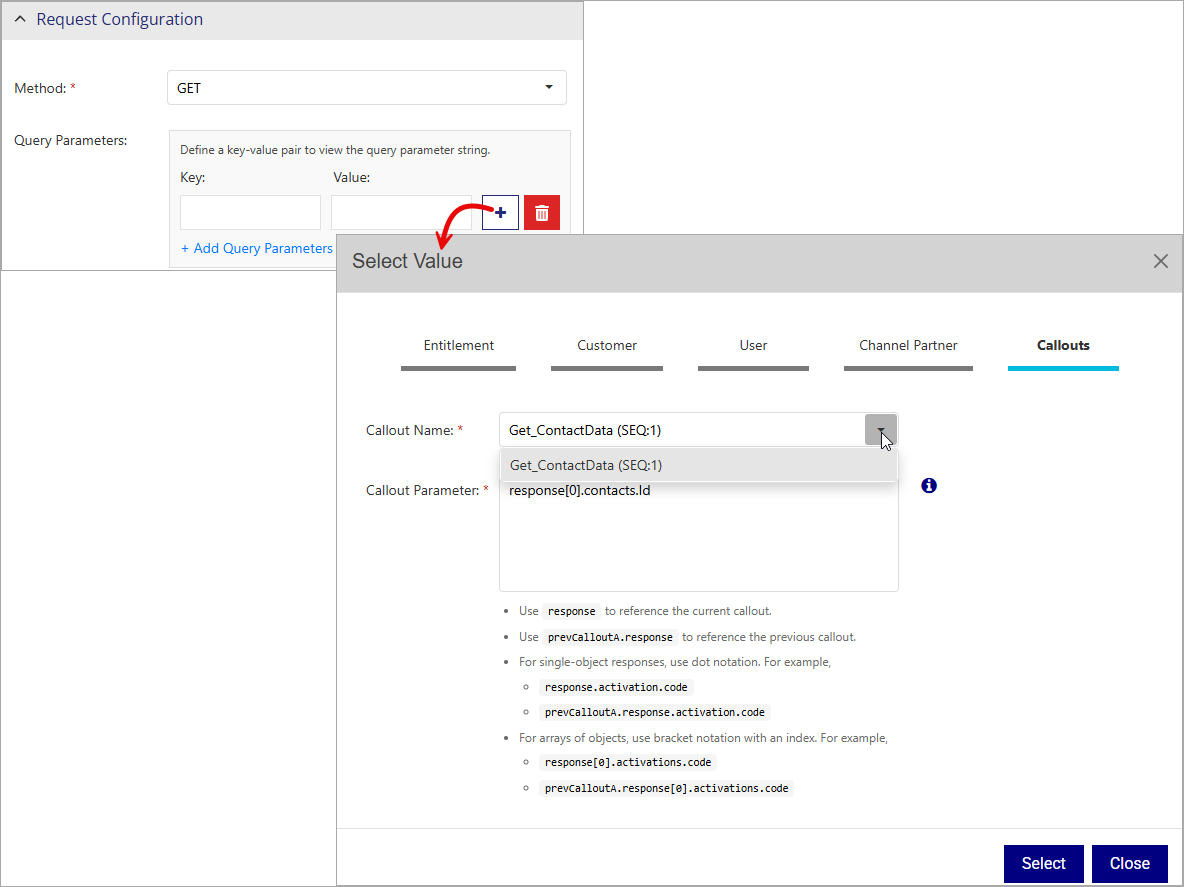
Chained Callouts in Query Parameters and Path Parameters
Callout chaining allows you to use the response from a previous callout in a subsequent one, if the previous callout is configured as synchronous. To reference these responses in Query Parameters and Path Parameters (in request configuration), click ![]() next to Value to open the Select Value window and then go to the Callouts tab.
next to Value to open the Select Value window and then go to the Callouts tab.
![]() Chained Callout Query Parameters
Chained Callout Query Parameters
![]() Chained Callout in Path Parameters
Chained Callout in Path Parameters
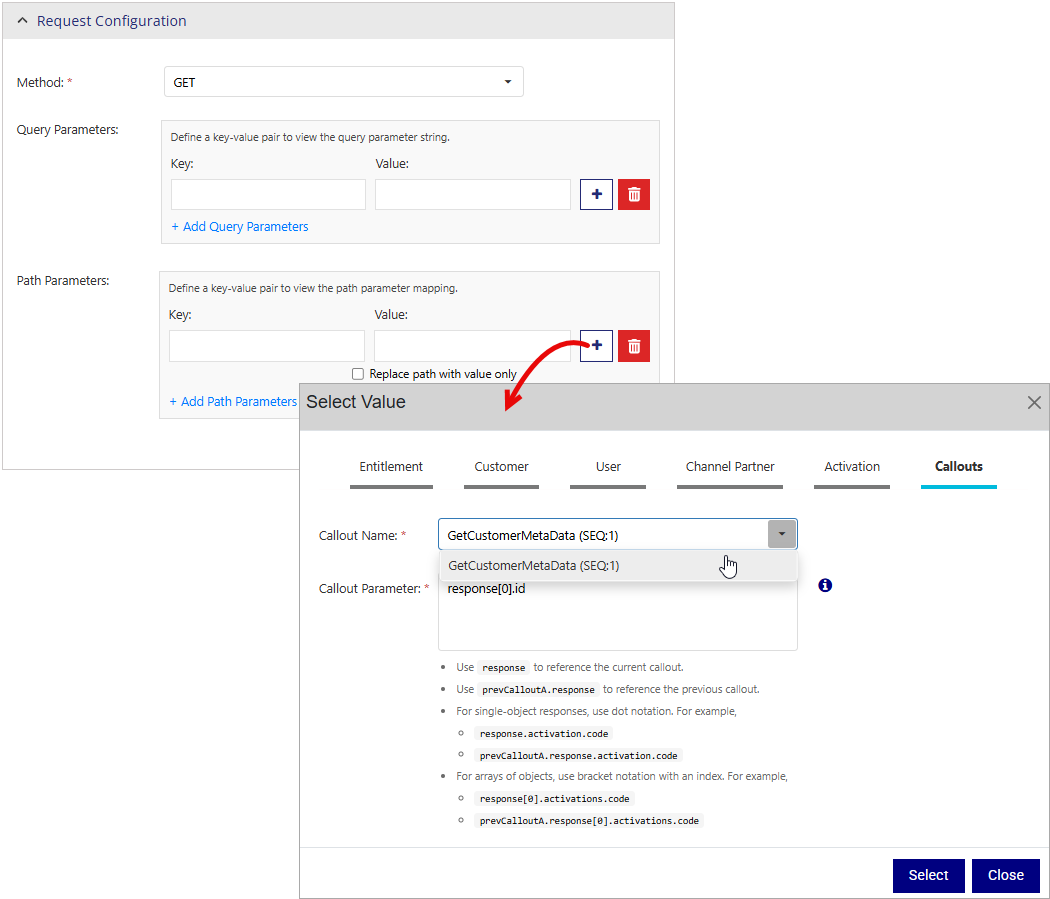
In the Callouts tab, fill in the following fields:
Callout Name: All the available synchronous callouts that have been configured in sequence are available for selection in the Callout Name list. The callouts display the name and the sequence number, allowing you to easily identify and reference the appropriate callout and its response paths.
Callout Parameter: The Callout Parameter input box takes a JSONPath expression to map data from the callout's JSON response to a target field. It is important to follow the notation for accessing the callouts' response as described below:
>Use response to reference the current callout.
>Use prevCalloutA.response to reference the previous callout.
>For single-object responses, use dot notation. For example:
•response.activation.code
•prevCalloutA.response.activation.code
>For arrays of objects, use bracket notation with an index. For example:
•response[0].activations.code
•prevCalloutA.response[0].activations.code
Chained Callouts in Substitution Value
You can use the response from a previous synchronous callout in a callout chain to dynamically substitute Sentinel Connect parameters. This ensures data enrichment from external systems before sending it to Sentinel EMS. To reference the responses in Substitution Values (in response configuration), go to Callout Parameter and add a synchronous callout from all the available synchronous callouts configured in sequence.
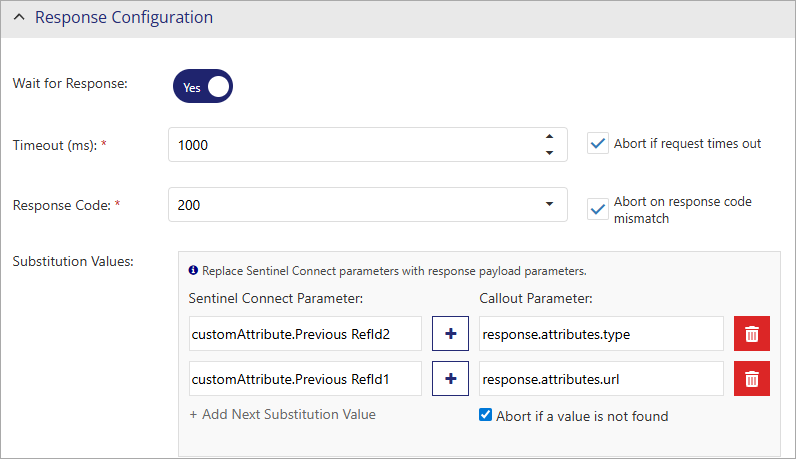
The callout parameter is an open entry that follows the same notation as the callout parameter in query parameters and path parameters.
Chained Callouts in Condition Configuration
Callout chaining allows you to use the response from a previous synchronous callout when configuring conditions for a subsequent callout. In the Condition Configuration, you can select attributes from the Callouts entity to reference values returned by earlier callouts in the chain.

Validation Errors and Common Scenarios
To ensure smooth and reliable callout execution, it is important to address validation errors caused by configuration issues and to handle failures that may stop the entire callout chain.
Common scenarios involving validation errors
Validation errors in the request configuration or response configuration may occur in the following scenarios:
>When chaining values are referenced in the request configuration (Query Parameters).
>When chaining values are referenced in the request configuration (Request Payload).
>When chaining values are referenced in the response configuration (Substitution Values).
Troubleshooting failed callout chaining
If any predecessor callout in a chain fails, the subsequent callouts are skipped, and the entire flow stops. To troubleshoot such failures, you can use the logs. For example, if you have three chained callouts (sequence 1, 2, and 3) and callout 2 fails, you can refer to the log information provided in the transactions and API logs, respectively, to troubleshoot the issue.
11: "2025-08-06T08:33:56.673ZInfo: Callout_Chain_1 (SEQ:1) (BFR-CSTMR) - No Conditions configured for this callout."
					12: "2025-08-06T08:33:57.0097 Info: Callout_Chain_1 (SEQ:1) (BFR-CSTMR) - Request body updated with Key: customer.refId, Value: "213131335""
					13: "2025-08-06T08:33:57.009Z Info Callout_Chain_1 (SEQ:1) (BFR-CSTMR) - Response code: 200"
					14: "2025-08-06T08:33:57.0097 Info: Callout_Chain_1 (SEQ:1) (BFR-CSTMR) - Saved API response for Callout Chaining"
					15: "2025-08-06T08:33:57.0337 Info: Callout_Chain_2 (SEQ: 2) (BFR-CSTMR) - Condition expression "( customAttribute. Business Classification = Defense )" evaluated to 'false'"
					16: "2025-08-06T08:33:57.033Z Info: Callout_Chain_2 (SEQ: 2) (BFR-CSTMR) Condition failed: "customAttribute.Business Classification = Defense""
			17: "2025-08-06T08:33:57.0332 Info: Callout_Chain_2 (SEQ: 2) (BFR-CSTMR) failed, so the remaining chained callouts will be skipped."
Sample Log Info from API
{
					"status": "Fail",
					"errors": [
					{
					"callOutInfo": "Callout_Chain_2 (SEQ:2) (BFR-CSTMR) failed",
					"error": "Callout_Chain_2 (SEQ:2) (BFR-CSTMR) failed, so the remaining chained callouts will be skipped."
					}
					]
			}
Conditional Callouts
Conditional callouts provide dynamic control over whether a callout must be triggered, based on a defined condition. If the condition expression evaluates to false, the callout is not executed. In such cases, the callout is considered to have failed, and the activity is not sent to Sentinel EMS. This helps prevent invalid or unnecessary requests from proceeding further, protecting downstream systems and ensuring a clean process flow.
You can configure conditional callouts using data from the following:
>Entitlement
>Entitlement LineItem
>Product
>Callouts
NOTE Standard and custom attributes apply only to entities (Entitlement, Entitlement LineItem, and Product). Callouts do not support attributes for conditional configuration.
Conditional Callout Execution
The execution of conditional callouts depends on the evaluation of their configured conditions:
>Callouts are triggered only when the condition expression evaluates to true.
>Callouts are not triggered when the condition expression evaluates to false.
You can add conditions individually or as part of groups to create more complex logic combined with AND/OR logic. Within a group, you can also add additional conditions, called nesting. This capability allows hierarchical structuring, enabling more precise configuration across multiple levels.
Conditional Callouts Rules and Limits
To ensure performance and clarity when working with conditional callouts, the following rules and limits must be followed:
>Nesting depth is limited to four levels. This limit helps prevent overly complex and hard-to-maintain logic structures that may slow down evaluation and are difficult to debug.
>Condition and Group Limits
•Each group can contain up to five conditions or subgroups.
•At the top level, you can define up to five groups.
•A maximum of five conditions can be added in a subgroup.
•A maximum of four groups can be added within a subgroup.
Beyond these limits, the Add Condition and Add Group options are disabled. You can point to each option to view the restriction on the limit.
Examples of Conditional Callouts
The following table illustrates some example conditions and the resulting callout trigger behavior.
| Condition Type | Example Condition Expression | Callout Trigger Behavior |
|---|---|---|
|
Simple Condition A single comparison between a product field and a static value. |
|
Triggered only if the condition is true. |
|
Simple Multiple Conditions Combines two or more conditions using logical operators (AND/OR). |
|
Triggered only if both conditions are true. |
|
|
Triggered if either condition is true. | |
|
Grouped Multiple Conditions Groups conditions for more complex logical evaluation. Grouped conditions are enclosed in parenthesis. |
|
Triggered only if the condition |
Callout Status
The Status attribute available on the Callouts page specifies the status of a callout:
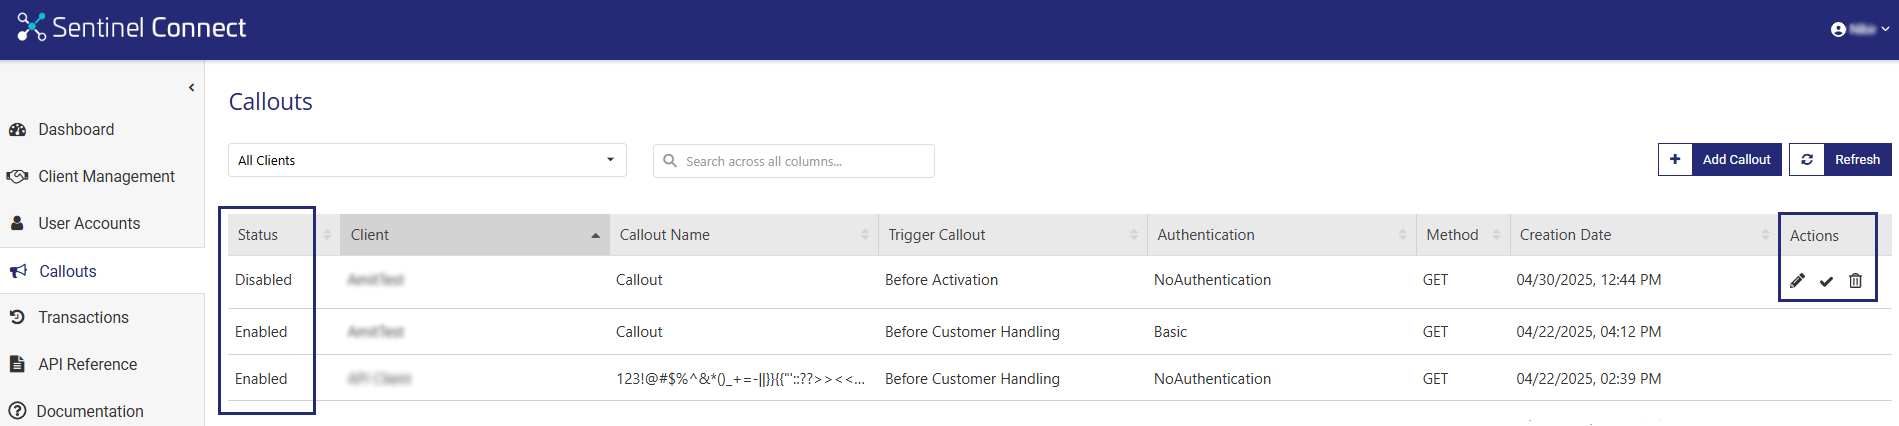
Enabled: When a callout is first created, it is saved as enabled that you can edit, disable, or delete.
Disabled: A disabled callout cannot be updated. You can enable a disabled callout when needed.
Actions for a Callout
The following table lists the actions available for callouts:
| Action | Description | |
|---|---|---|
|
|
Edit |
Updates information for a callout. |
|
|
Delete |
Deletes a callout. |
|
|
Disable | Disables a callout. The callout can no longer be edited. |
|
|
Enable | Enables a disabled callout. |
FAQs and Troubleshooting
Question 1: Why don’t I see the Before Activation callout trigger when selecting Entitlement Update?
Answer: The Before Activation callout trigger is only applicable to the Entitlement Creation activity. It is designed to execute before the first activation of a newly created entitlement. An activation applies to continuation orders—additional orders placed to activate or renew licenses on an already activated key. When you select Entitlement Update activity, the system assumes the entitlement already exists and may have already been activated, making the Before Activation callout trigger no longer relevant. Therefore, it does not appear as an available option for the Entitlement Update activity.
Question 2: What happens if the callout exceeds the timeout duration?
Answer: If a callout exceeds the timeout duration, Sentinel Connect logs the error in the transaction logs and sends a response back to the business system. When Abort if request times out is selected, the transaction stops immediately on timeout, but any actions completed before the timeout are not rolled back.
For example: If the callout times out before entitlement creation, any customer or user records already created remain, but the entitlement itself does not get created.
Question 3: Why do I see a callout failure in the transaction log even though the entitlement was successfully created, and what should I do in this case?
Answer: If the transaction log shows a callout failure but the entitlement is created, it means the callout failed after entitlement creation and the operation wasn’t aborted due to the current timeout or error handling configuration. Since the process did not fully abort, Sentinel Connect does not retry failed callouts automatically. You need to handle the failure manually—review the error, fix any issues, and complete any pending steps outside Sentinel Connect.