Configuring Pre-built Connectors
Configuring pre-built connectors defines the settings and properties required to establish a seamless connection between the client and Sentinel EMS through Sentinel Connect. The connector specific configuration ensures proper integration between by linking Sentinel EMS and the selected connector. Sentinel Connect enables a seamless connection between the enterprise resource planning (ERP) system and Sentinel EMS, enabling efficient entitlement management and licensing work-flows.
Supported Pre-built Connectors
Sentinel Connect provides connectors for the following:
| Connector | Supported Version |
|---|---|
| Salesforce (SFDC) |
Salesforce Connected Apps: 1.7 Salesforce CPQ: 234.4 or above API Version: 57 or above |
| SAP |
SAP R3, S/4 HANA, BPT |
|
Zuora |
2023.09.R1 or above |
|
MS Dynamics |
365 |
Configuring Salesforce
Salesforce is a cloud-based ERP system that helps businesses manage customer relationships, sales, and marketing through its various applications.
Prerequisites
A Salesforce instance URL is required for authentication to Salesforce. The URL directs to the specific salesforce instance required to write back responses from Sentinel EMS to Salesforce through Sentinel Connect. This URL is provided by the Salesforce team to enable the Salesforce configuration.
Steps
The following are the steps to configure the Salesforce Connector by entering the required URL in Sentinel Connect:
1.Click Client Management in the left pane of Sentinel Connect to open the Client Management page.
2.Click Add Client to open the Add Client page.
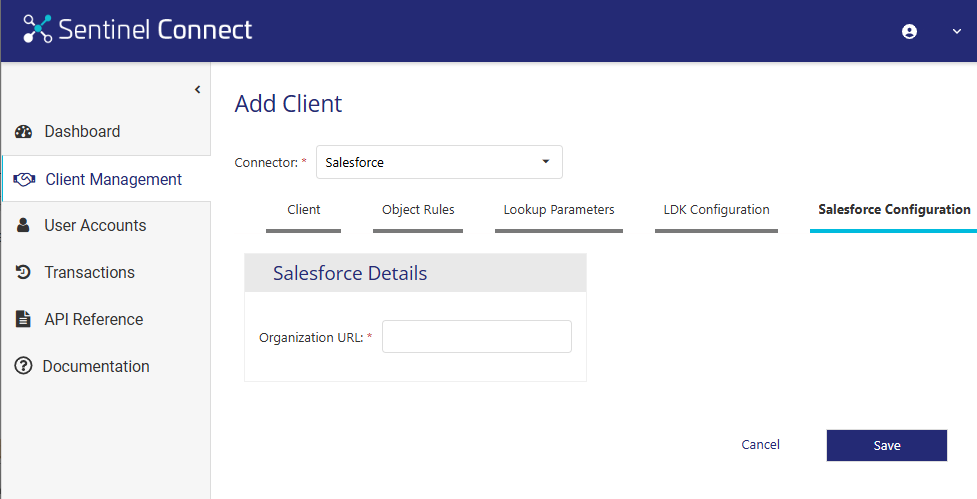
3.Click the Salesforce Configuration tab to open the Salesforce Configuration page.
4.Enter the URL in the Organization URL field.
5.Click Save.
Configuring Zuora
Zuora is a cloud-based ERP system designed for subscription billing, revenue recognition, and financial management.
Prerequisites
>Zuora client credentials to retrieve data for mapping screens.
>A Zuora instance URL is required for configuring the Zuora Connector. This URL corresponds to the Zuora instance used by the client.
Steps
The following are the steps to configure the Zuora connector by entering the required details in Sentinel Connect:
1.Click Client Management in the left pane of Sentinel Connect to open the Client Management page.
2.Click Add Client and select Connector as Zuora.
3.Click the Zuora Configuration tab and enter the fields in Zuora Details (see List of Zuora Details).
4.Click the Usage Synchronization tab and enter the fields in Auto Sync Settings.
5.Click the Order Configuration tab for mapping the Zuora order fields to Sentinel EMS.
NOTE If you do not see the Order Configuration tab while adding a new client for the Zuora connector, you need to first save the Zuora Configuration and then edit the same client from the Client Management page.
6.Click Save.

List of Zuora Details
Zuora details are required to configure the Zuora Connector for retrieving metadata for mapping screens and writing back responses to Zuora.
| Field | Description |
|---|---|
| Client ID | A unique identifier for the Zuora application used to authenticate and authorize Zuora API calls. |
| Client Secret | A secure key paired with the Client ID used together to verify and allow access to Zuora's APIs. |
| URL | A Zuora instance URL used to connect to a specific Zuora instance. |
Usage Synchronization
Usage Synchronization in Zuora is a functionality designed to automate and simplify the tracking, updating, and billing procedures of usage-based services. Businesses ensure that their clients receive accurate bills for the services they use by enabling this function, which is based on planned or real-time data synchronization. Businesses that provide subscription models with usage-based pricing, such as cloud services, utilities, or telephones, can benefit from this functionality. Sentinel Connect enables businesses to send usage data from the SCL Database to the Zuora system. Usage syncs manually from the SCL database to Zuora via the Client Action button. Usage Synchronization occurs only once a day, week, or month, based on the selected frequency.
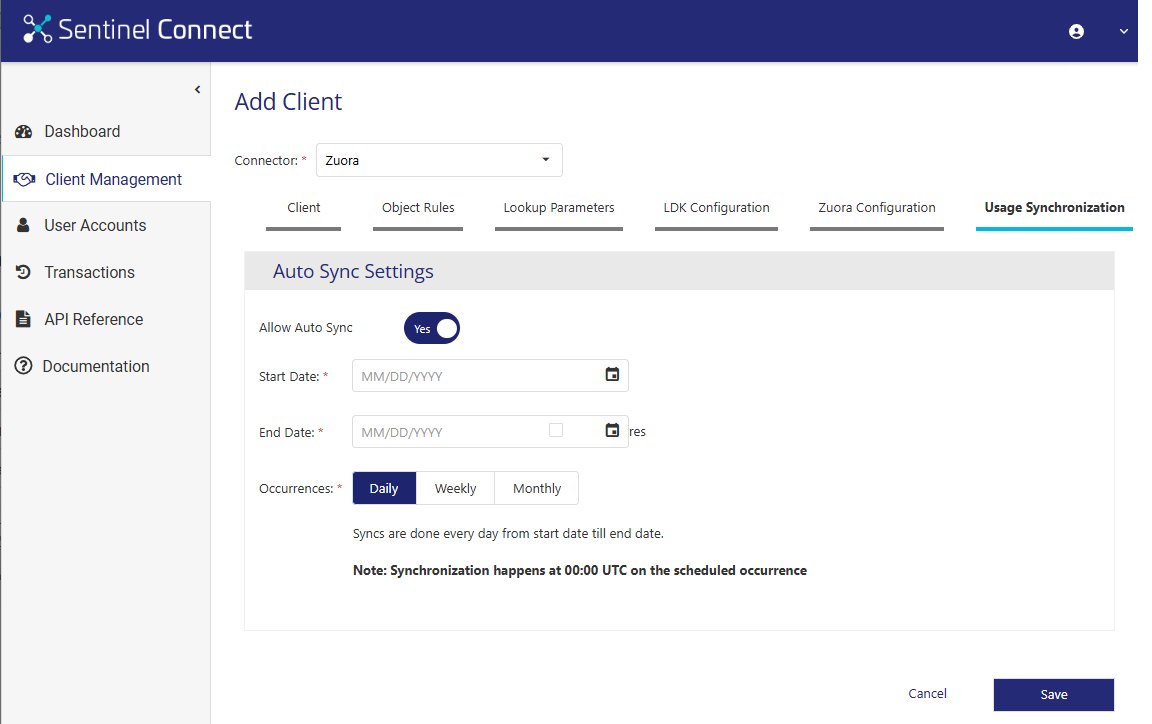
By configuring the relevant settings in the Auto Sync Settings section, the handling of usage synchronizations is automated:
| Field | Description |
|---|---|
| Allow Auto Sync |
Specifies if auto sync is enabled. Possible Values: Yes or No Default Value: Yes |
| Start Date | Start date of usage data synchronization from the SCL database to the Zuora system. |
| End Date | End date of usage data synchronization from the SCL database to the Zuora system. |
| Occurrences |
Specifies the usage auto synchronization frequency. Possible Values: >Daily: Synchronization occurs daily from the start date to the end date. >Weekly: Synchronization occurs on selected days of the week (Monday to Sunday). >Monthly: Synchronization occurs on a specific date within each month. Default Value: Daily |
| Never Expires Check box | Indefinitely extends the end date. |
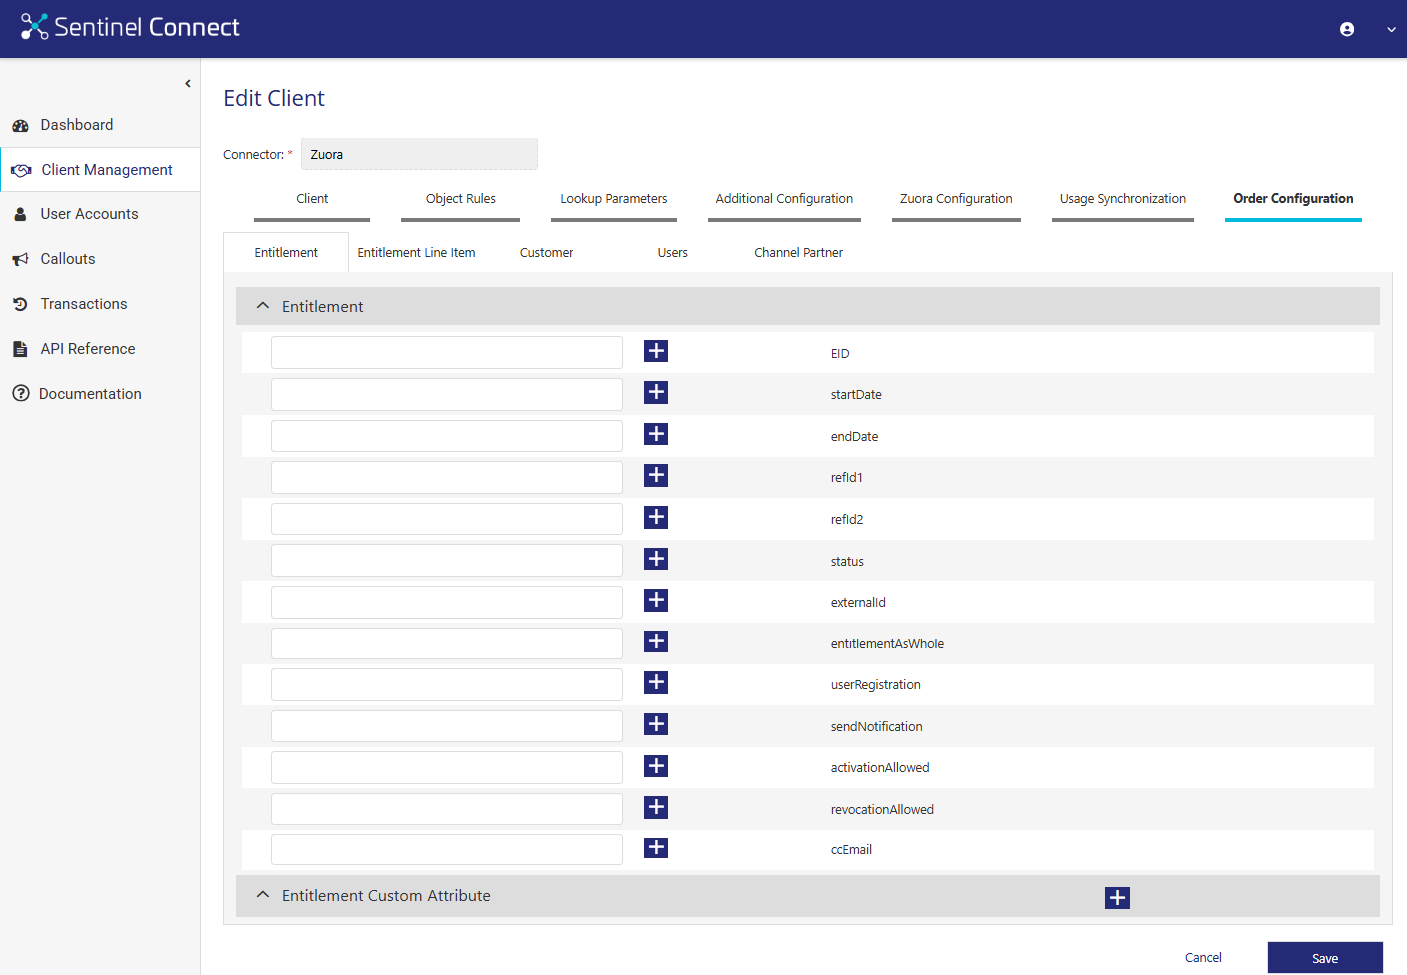
Order Configurations (for SAP and Zuora)
Order Configuration tab manages the mapping configurations for SAP and Zuora connector from within Sentinel Connect. The following are the Sentinel EMS entities for which SAP and Zuora provides mapping with:
>Entitlement
>Entitlement Line Item
>Customer
>Users
>Channel Partner
You can map a SAP/Zuora Field or a Fixed Value. A fixed (or constant) value can be a string, integer, or Boolean data type. It can be assigned to any attribute (standard and custom attributes) in Sentinel EMS while mapping orders (and quotes in case of SAP in Quote Configuration tab). By using fixed values in the data-mapping process, users can ensure consistent value mapping across all orders and prevent invalid data entry.
The following sections explain the key functionalities involved in order mapping.
Mapping an Order Field
1.Go to Order Configuration tab.
2.Click the entity tab corresponding to the field you want to map.
3.Click plus (+) next to the field in the entity you want to map.
For example, if you want to map a fixed value to the sendNotification field, click (+) next to this field. This opens the screen where you can select the field to map.


4.Select either SAP/Zuora Field or Fixed Value as the value source.
•SAP/Zuora Field: Choose from the available fields in the list.
•Fixed Value: Enter a value in the input field. For the sendNotification field in our example, which is Boolean, select ‘true’ or ‘false’.
5. Click Save.
Following are the supported data types for fixed Values:
>String
>Integer
>Boolean (true/false)
For each attribute, the input is validated based on the selected data type before being mapped to Sentinel EMS.
NOTE Fixed values are not supported for date-type Sentinel EMS attributes. If you attempt to assign a fixed value to these date fields, the interface blocks the mapping and shows a restriction message.
The Fixed Values have the following data type considerations:
Standard Attributes: For standard Sentinel EMS entity fields such as entitlement attributes, the system respects the predefined attribute data type when mapping a fixed value. For instance, if 'refid1' is a string-type attribute, only string values are allowed to be assigned as fixed values.
Custom Attributes: For custom Sentinel EMS attributes, there is no data type validation when mapping fixed values. Unlike standard entities, all fixed values are treated as strings during mapping. Therefore, while users can input any data type (string, integer, or Boolean), they must ensure that the fixed values align with the attribute’s actual data type as defined in Sentinel EMS.
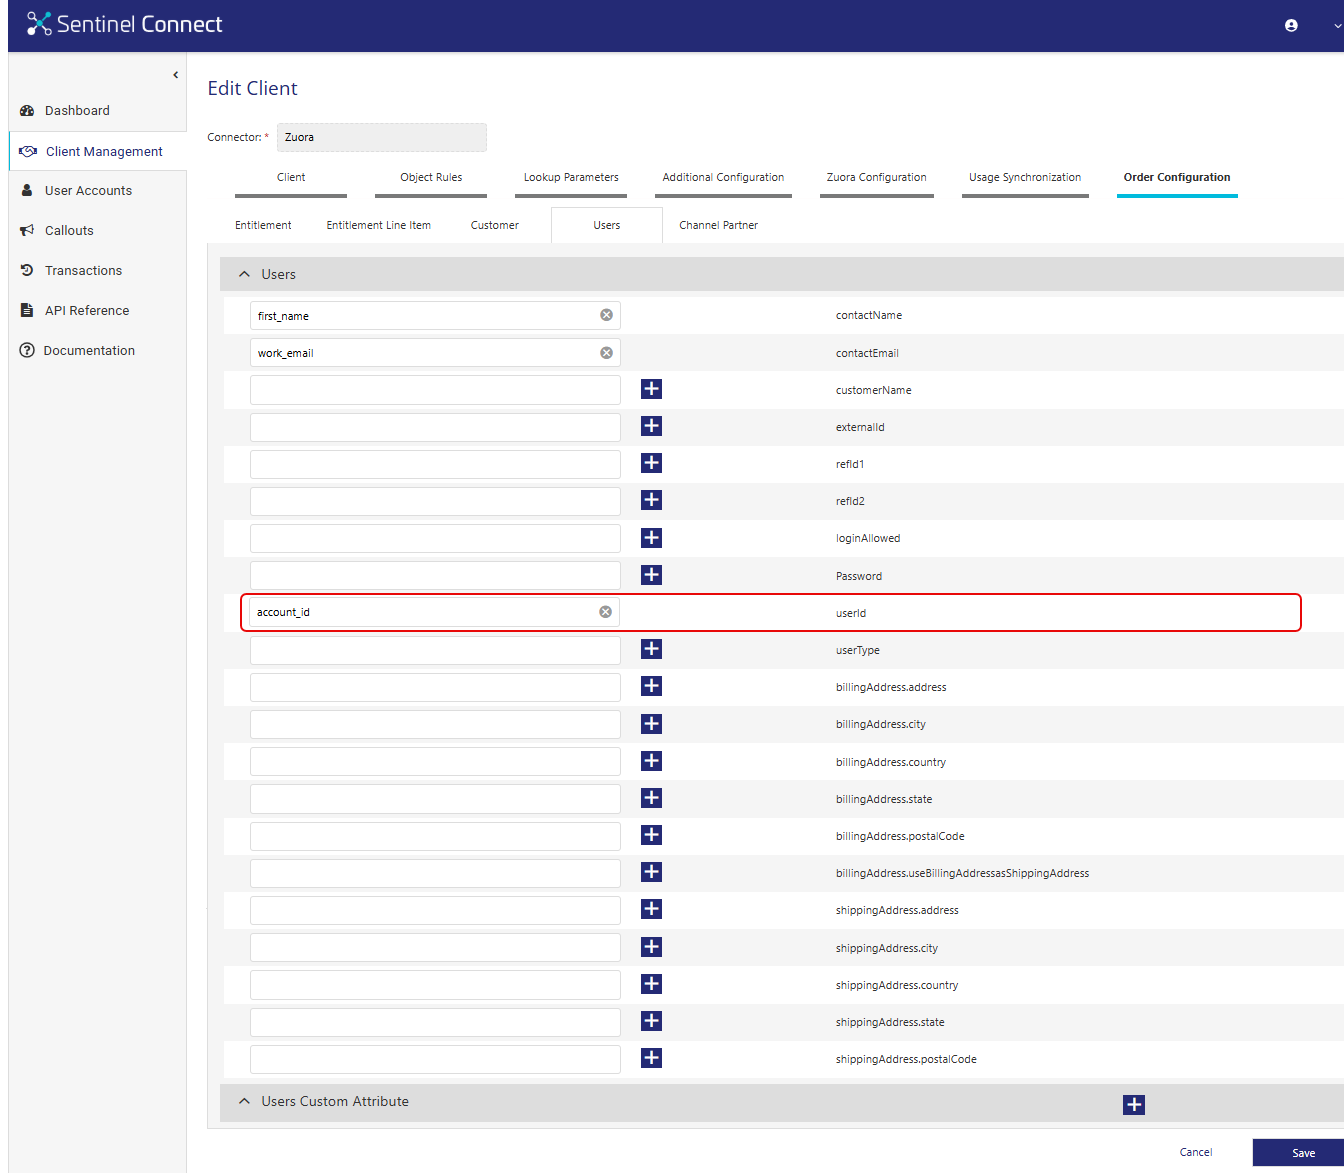
The Zuora connector includes the new userId field, which has been added to the Users entity tab. This field is visible on the Users page under User Attributes in the Sentinel EMS UI.
Configuring SAP
SAP (Systems, Applications, and Products in Data Processing) is an ERP system that supports business operations and customer management.
Prerequisites
An SAP IDoc file is required to set up the SAP Connector. An IDoc (Intermediate Document) is a standardized data format used for exchanging information between SAP applications and external systems. The SAP team of the vendor provides this format. Sentinel Connect uses the IDoc file to create entitlements.
Steps
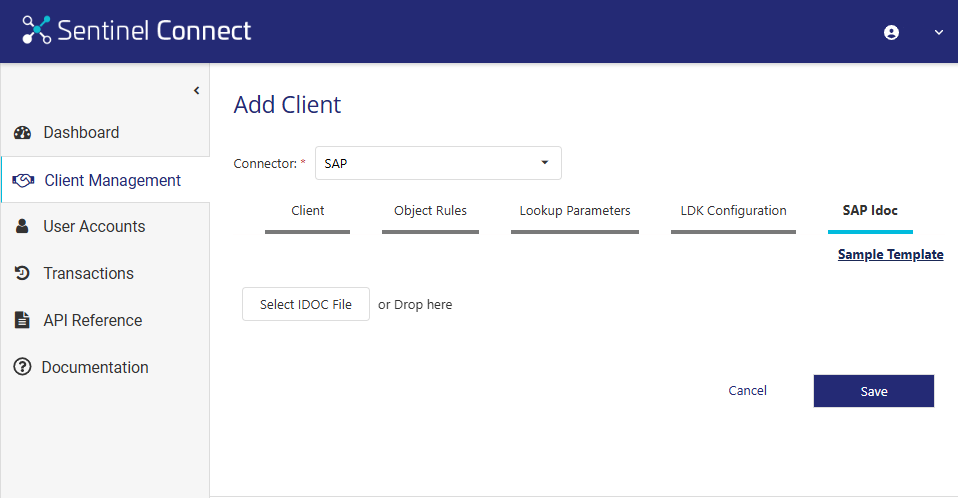
The following are the steps to configure the SAP Connector by uploading the required IDoc file in Sentinel Connect:
1.Click Client Management in the left pane of Sentinel Connect to open the Client Management page.
2.Click Add Client to open the Add Client page.
3.Click the SAP IDOC tab to open the SAP IDOC page.
4.Select or drag and drop the IDOC file generated in the Select IDOC File field. You can refer to the Sample Template for your reference.
5.Click the Quote Configuration tab for mapping the SAP quote fields to Sentinel EMS.
6.Click the Order Configuration tab for mapping the SAP order fields to Sentinel EMS.
NOTE If you do not see Quote Configuration or Order Configuration tab while adding a new client for SAP connector, you need to first save the SAP Idoc configuration and then edit the same client from Client Management page.
7.Click Quote Configuration tab for mapping the SAP quote fields to Sentinel EMS.
8.Click Save.
Quote Configuration (for SAP)
Similar to the Order Configuration tab, the Quote Configuration tab manages attribute mapping configurations for SAP quotes.
Configuring MS Dynamics
There is no specific configuration required for MS Dynamics in Sentinel Connect.