Custom Entities
|
New to Sentinel EMS?
|
What Is a Custom Entity?
Custom entities in Sentinel EMS enable you to define and manage data models specific to your business needs. An entity can represent virtually anything—such as a person, a vehicle, an organization, or any other object relevant to your workflow within Sentinel EMS.
These entities function similarly to built-in system entities but are fully customizable. They offer the flexibility to store and manage information that does not fit within the scope of the predefined Sentinel EMS entities—such as products, features, or namespaces.
Custom entities streamline data handling, enabling for a more organized, scalable, and context-specific representation of information across your system. Using custom entities enables you to manage key data efficiently, without depending on traditional entities or navigating complex workflows to access specific information.
You can add attributes to a custom entity to record additional details. For every attribute, you specify a data type—such as string, integer, or date—to ensure that data is stored in a consistent and meaningful format. This enables you to manage specific information more efficiently, without relying on traditional entities or navigating complex workflows to access a single detail.
Prerequisites for Creating a Custom Entity
You must have administrative rights in Sentinel EMS.
Creating a Custom Entity
You create a custom entity from the Custom Entities page.
To create a custom entity:
1.From the navigation pane, select Configuration > Custom Entities to view the Custom Entities page.
2.Click the Add Custom Entity button.
3.Fill in the custom entities attributes.
4.(Optional) Click Add Attribute to display a new row in the Associated Attributes table to associate an attribute.
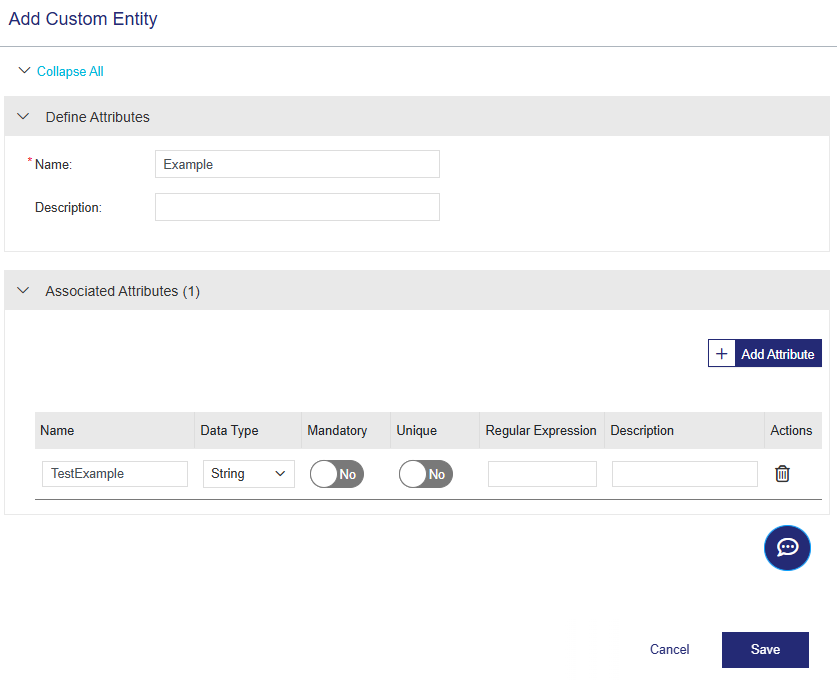
5.Click Save.
Defining Custom Entities Attributes
The following table explains the attributes that are used to create a custom entity:
| Attributes | Description | Required/Optional | Valid Values |
|---|---|---|---|
| Name | Name of the custom entity. | Required |
>Maximum: 100 characters >Alphanumeric >Must be unique >Cannot contain: % ^ [ ] < > & : " |
| Description | Additional information about the custom entity. For example, you may want to highlight entity features, differentiate between similar entities, and so on. | Optional |
> Maximum: 500 characters >Alphanumeric >Cannot contain: % ^ [ ] < > & : " |
Associated Attributes
After defining the custom entity, you can associate attributes with that custom entity. You can associate multiple attributes with a custom entity. The following table explains the values that you can define for each associated attribute:
Actions for Custom Entities
The following table lists the actions available for custom entities:
| Action | Description | |
|---|---|---|

|
Edit |
Enables you to modify information for an existing custom entity. You can: >Modify editable fields, such as the description. You can edit only those attributes that are not currently in use by any record. >Add new attributes to a custom entity. >Remove existing attributes from a custom entity using the |

|
Copy |
Duplicates an existing custom entity, enabling you to edit the copy and create a new custom entity. Records associated with the original entity are not duplicated. |

|
Delete |
Deletes a custom entity. Note: >You can delete a custom entity only after removing all its associated attributes. >All records associated with the attribute must be removed using the Delete Custom Entity Record endpoint in the Sentinel EMS REST API Reference. |
| View Custom Entity Records | Displays the records created for a custom entity in JSON format. For details, see Viewing Custom Entity Records. | |
Viewing Custom Entity Records
You create records for a custom entity using the Sentinel EMS REST API Reference, but you can view these records directly from the Sentinel EMS vendor portal.
To view the records created for a custom entity:
1.In the Actions column, click View Custom Entity Records for the custom entity for which you want to display the records.
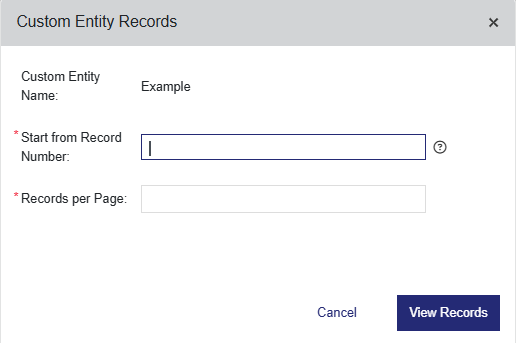
2.Enter the required values detailed in the table:
| Attributes | Description | Required/Optional | Valid Values |
|---|---|---|---|
| Custom Entity Name | Name of the entity for which the records are displayed. This field is read-only and cannot be modified. | Required | Name of the selected entity. |
| Start from Record Number |
Specifies the record number to retrieve the records from. |
Required | Integer starting from 0, where 0 represents the first record. |
| Records per Page |
Number of entries displayed per page. |
Required | Maximum: 2000 |
3.Click View Records. The associated attribute records are displayed in JSON format. You can click the ![]() Copy to Clipboard button to copy the content.
Copy to Clipboard button to copy the content.