Getting Started with Sentinel LDK Cloud Licensing (CL) Service
Looking for a powerful, centralized, role-based solution for handling all of your software protection, licensing, and entitlement needs? You've come to the right place!
•Sentinel EMS entitlement management system has a straightforward design that walks you through the process of defining the various features and products that match the features and products in your back office system (ERP, CRM, billing system, or sales system).
•Sentinel LDK is a comprehensive, out-of-the-box software monetization solution that protects and licenses your applications and services, so that you can maximize revenues while introducing flexible and customer-centric offerings into the market.
Cloud Licensing (CL) Service combines Sentinel EMS and Sentinel LDK to provide a user-centric, identity-based approach to cloud licensing that Thales hosts for you on a secure, cloud license manager server. CL Service comprises two main components. Sentinel EMS provides licensing and account (identity) management; Sentinel LDK Cloud License Manager Service provides consumption management for cloud licenses and accounts.
The Basics
The following are the foundation of Sentinel EMS with Sentinel LDK enforcement. It's important to understand these terms before you perform the steps in this Getting Started Guide.
Features
Features are the basic building blocks of products and licenses. Each feature can represent anything from a functional component to an entire application. Learn More![]()
Products
A product represents a saleable item in your organization—such as a software application—usually with a SKU or similar unit. You can package products with individual features and memory files. Learn More![]()
Entitlements
An entitlement is a customer order for one or more products. Similar to orders in your back office system (ERP, CRM, billing system, or sales system), an entitlement![]()
Cloud Licensing Service
Cloud licensing service (also known as CL Service) refers to software and service licensing that Thales hosts on a service-hosted, cloud license manager server. Learn More![]()
Accounts
An account represents a set of cloud licensing permissions that grant authorization rights to a customer's end user to access protected applications or services on one or more client devices (also known as registered machines). Accounts are an integral part of cloud licensing. Learn More![]()
Identity Credentials
Identity credentials are used to verify the identity of a client device and grant access to a cloud-based license. Learn More![]()
TIP Want to learn more about any of the concepts and terminology used in Sentinel EMS with Sentinel LDK enforcement? Check out the Glossary at the end of this guide.
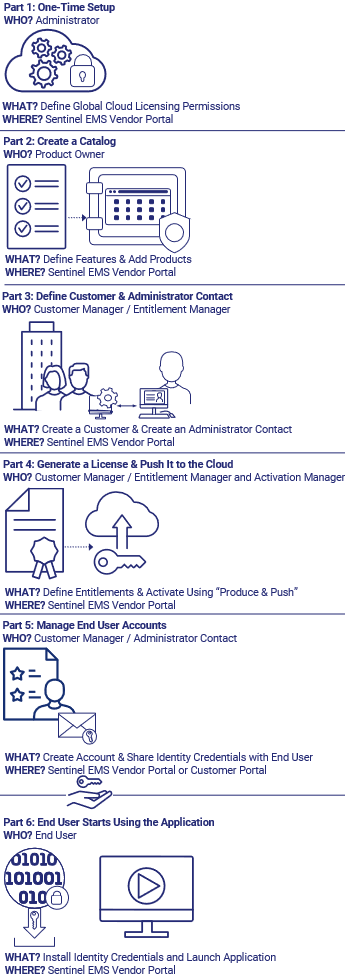
Sentinel EMS Workflow
The following diagram illustrates the end-to-end workflow of creating and delivering a cloud license in Sentinel EMS using the Cloud Licensing Service. Each section represents a part in this getting started guide.
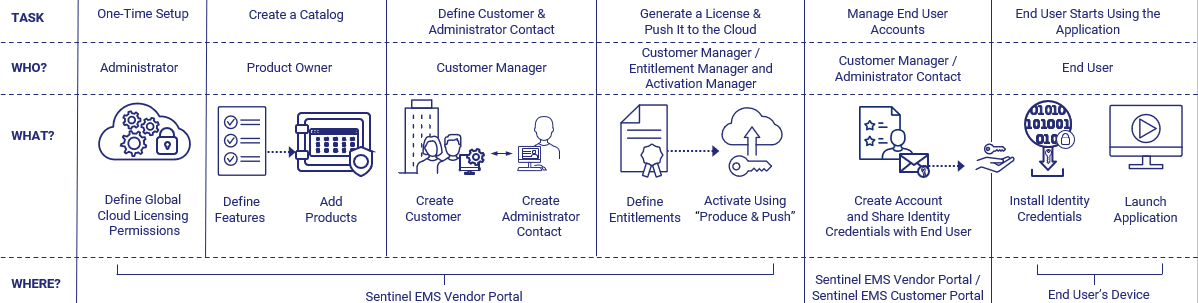
![]() Learn about the different personae in the Sentinel EMS workflow
Learn about the different personae in the Sentinel EMS workflow
![]() See what's not included in this workflow
See what's not included in this workflow
Before You Begin
•Install the latest version of Sentinel LDK. For instructions, see Sentinel LDK Installation Guide with Sentinel EMS.
•Review The Basics to learn about the Sentinel EMS components.
•Make sure that your Thales account enables you to access Sentinel EMS. At minimum, you need a role in Sentinel EMS that includes Customer Management permissions. Contact your Thales representative for assistance if needed.
One-Time Setup
Make sure that you are connected to the Sentinel EMS vendor portal. ![]() Show me how
Show me how
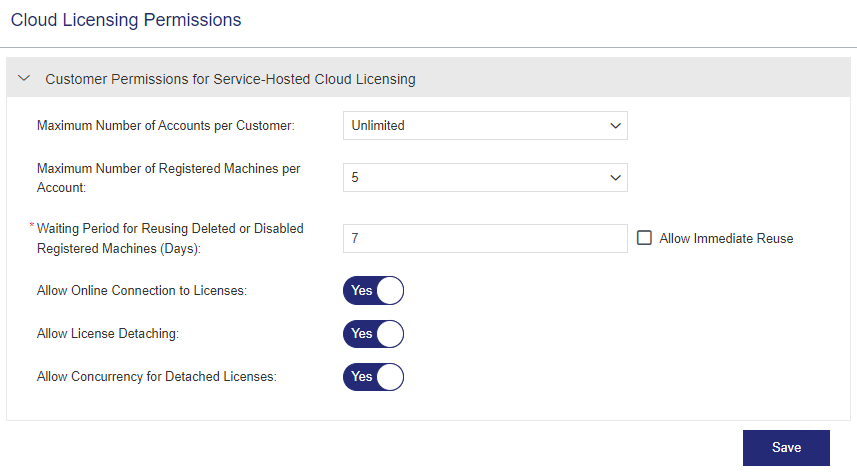
In this step, you review the global cloud licensing permissions, which are the default usage permissions for all customers that use CL keys. These settings are also inherited by each customer's end user accounts. Later, you can adjust these settings for specific customers and end user accounts as required.
This step provides explanations of each of the settings, so that if you need to modify these settings later, you will understand how to define each option. Unless you already know your specific needs, you can retain the default settings for now. To learn more about any of these settings, see Cloud Licensing Permissions.
1.From the navigation pane, select Configuration > Cloud Licensing Permissions.
2.Look at each of the settings.
•You can set the Maximum Number of Accounts per Customer to unlimited or to the number of network seats available on your Sentinel LDK Master license. Learn why this matters![]()
•You can set the Maximum Number of Registered Machines per Account from 1-10 or unlimited. You can leave the default value for now. Learn how machine registration works![]()
•You can set the Waiting Period for Reusing Deleted or Disabled Registered Machines (Days) value to an integer of 1-30 representing 1-30 days, or you can select the Allow Immediate Reuse check box to override the waiting period. and allow deleted or disabled machines to be automatically re-registered immediately. Why set a waiting period?![]()
•When you set Allow Online Connection to Licenses to Yes, any machine with an installed identity string can consume a license from the service-hosted, cloud license manager server. If you set this option to No, then end users cannot consume the license to access the protected application.
•When you set Allow License Detaching to Yes, any machine with an identity string can detach a license (a network seat) for a protected application from the service-hosted, cloud license manager server for offline use whenever a license is required. Learn why this is useful![]()
•If Allow License Detaching is set to Yes, then you can enable concurrency for manually detached licenses using the Allow Concurrency for Detached Licenses option. Why use concurrency on an end user's machine?![]()
OPTIONAL At this point, you might want to customize the license notification email template. This is a one-time step that enables you to modify the out-of-the-box email template that is sent automatically to a customer's end user when an account is created, which is described towards the end of this training. For detailed instructions on modifying the email template, see Sentinel LDK Account Certificate.
Create a Catalog
In this section, you create a catalog that includes your saleable items—a feature and a product. Make sure that you are connected to the Sentinel EMS vendor portal. ![]() Show me how
Show me how
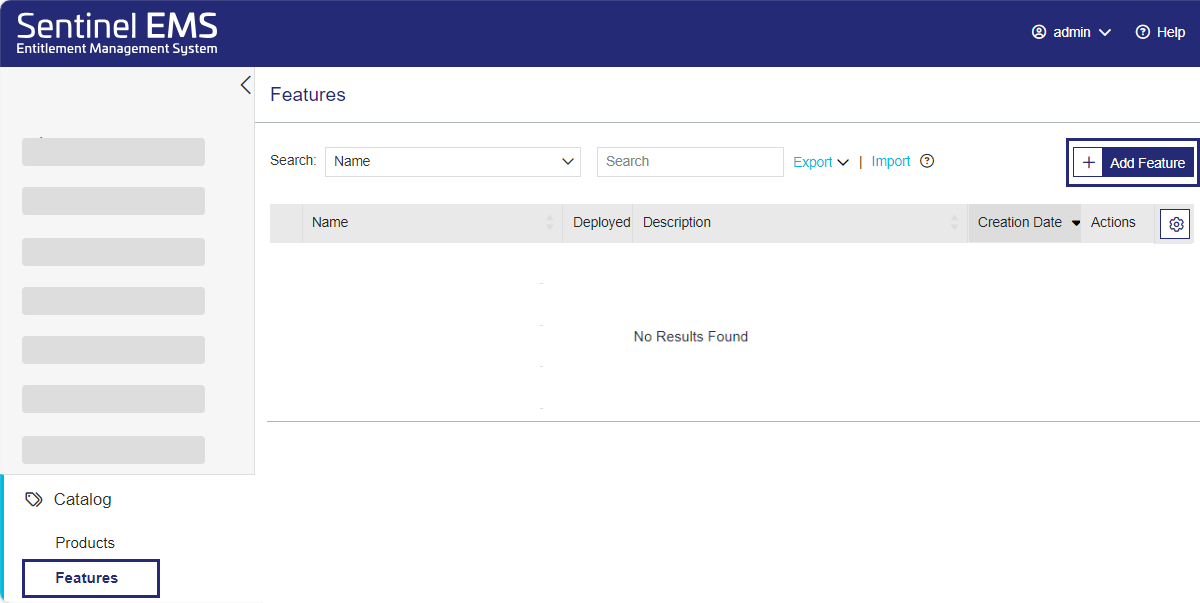
The first step in creating a catalog is defining features.
1.From the navigation pane, select Catalog > Features.
2.In the Features page, click Add Feature  .
.
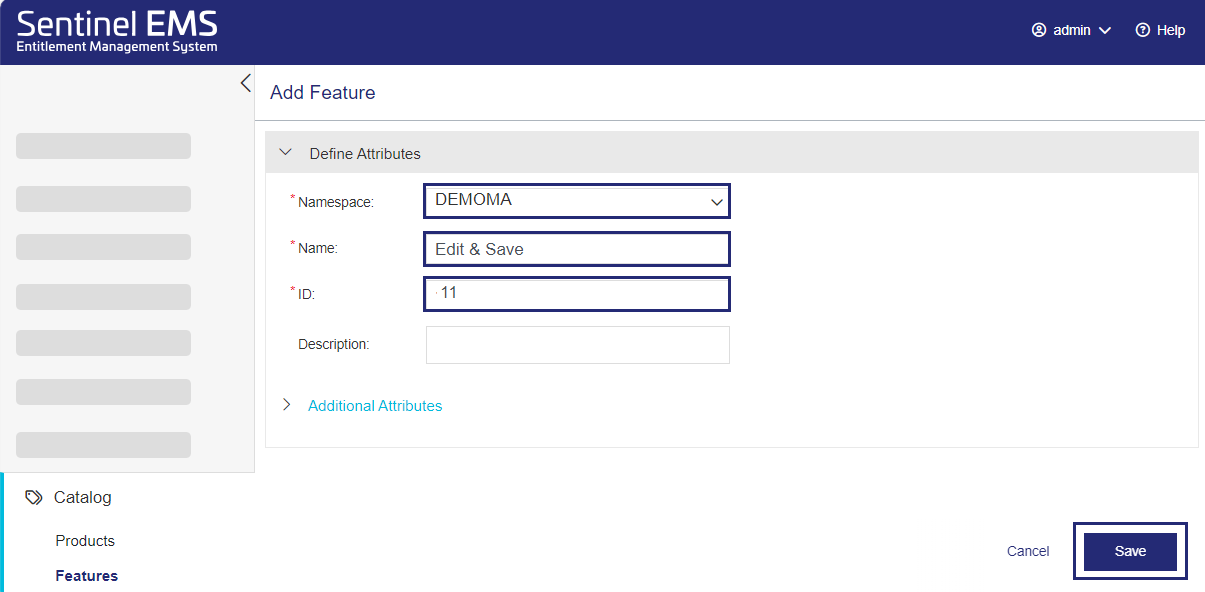
3.In the Add Feature page, if the Namespace list is displayed, select the namespace you want to use. If you have your organization's vendor code, you may want to select that namespace. Otherwise, select DEMOMA to use the demo namespace and vendor code.
4.In the Add Feature page, in the Name field, enter a feature name, such as Edit & Save.
5.In the ID field,
When you create your own features, you can use the default ID or apply another ID to match an existing feature in one of your company's products.
The ID must match the feature ID in the Sentinel LDK application you are using to protect your application (Sentinel LDK Envelope or Sentinel Licensing API) as described in Features.
NOTE If Sentinel EMS supports additional enforcements, you may see additional fields. These fields are not relevant for Sentinel LDK and can safely be ignored.
6.Click Save.
You've created your first feature. Next, you will add the feature to a product.
Now that you created a feature, you can add it to a product. This is known as associating a feature with a product. You can also associate a memory file, but we are not going to cover that here.
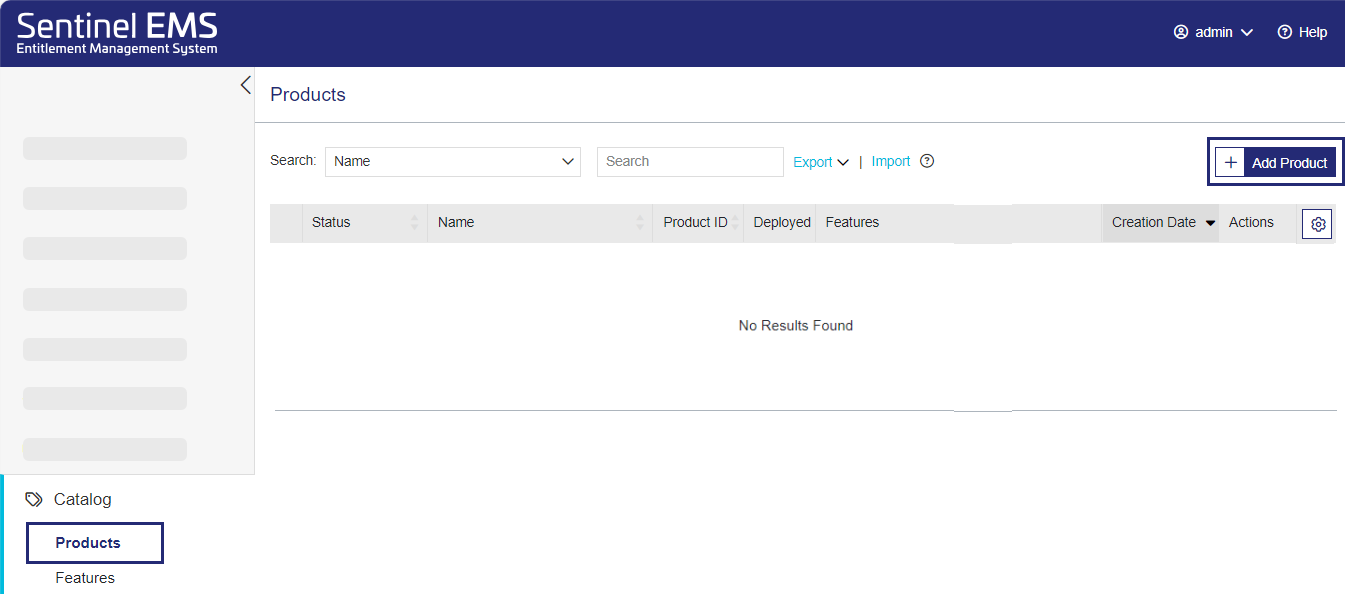
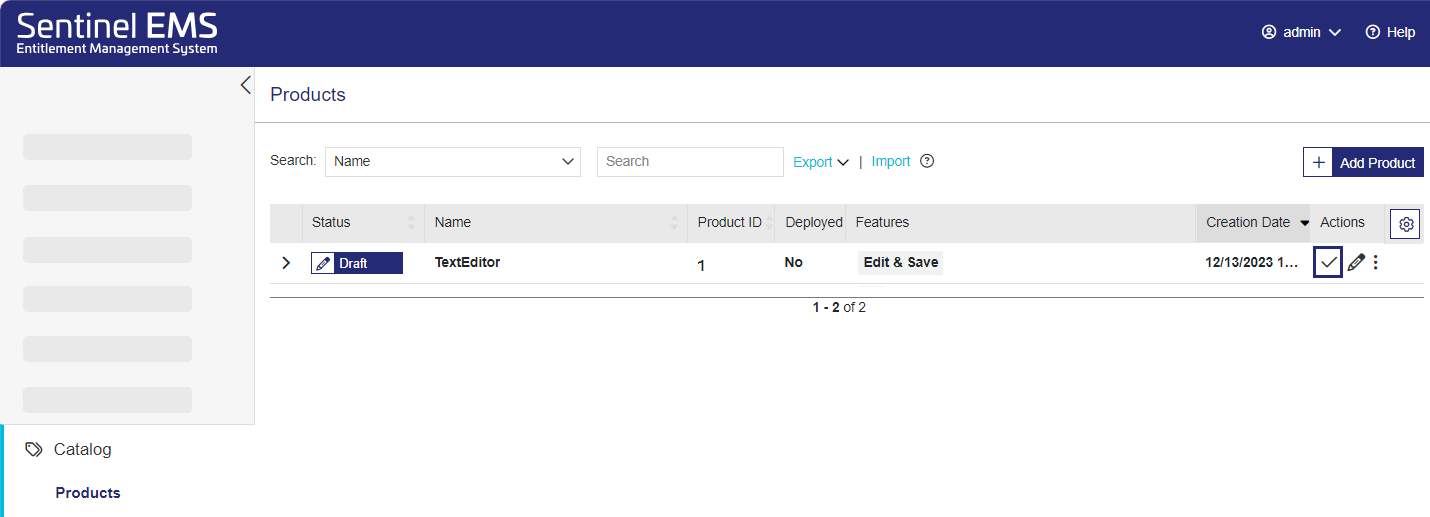
1.From the navigation pane, select Catalog > Products.
2.In the Products page, click Add Product .
3. If Sentinel EMS includes support for other enforcements in addition to Sentinel LDK, you need to select the relevant enforcement before continuing.
In the Add Product page, in the Enforcement Type field (not shown), select Sentinel LDK. Otherwise, skip to the next step.
4.In the Add Product page, if the Namespace list is displayed, select the namespace you used when creating a feature. Otherwise, skip to the next step.
5.In the Add Product page, in the Name field, enter any product name, for example, TextEditor.
6.In the Product ID field, leave the default ID.
Later, when working with your own products, you can change the number to match an existing product ID in your saleable product.
7.Expand Additional Attributes, click the Locking Type arrow
8.In the Available Features area of the Associate Features pane, click the feature you created to add it to the Associated Features list.
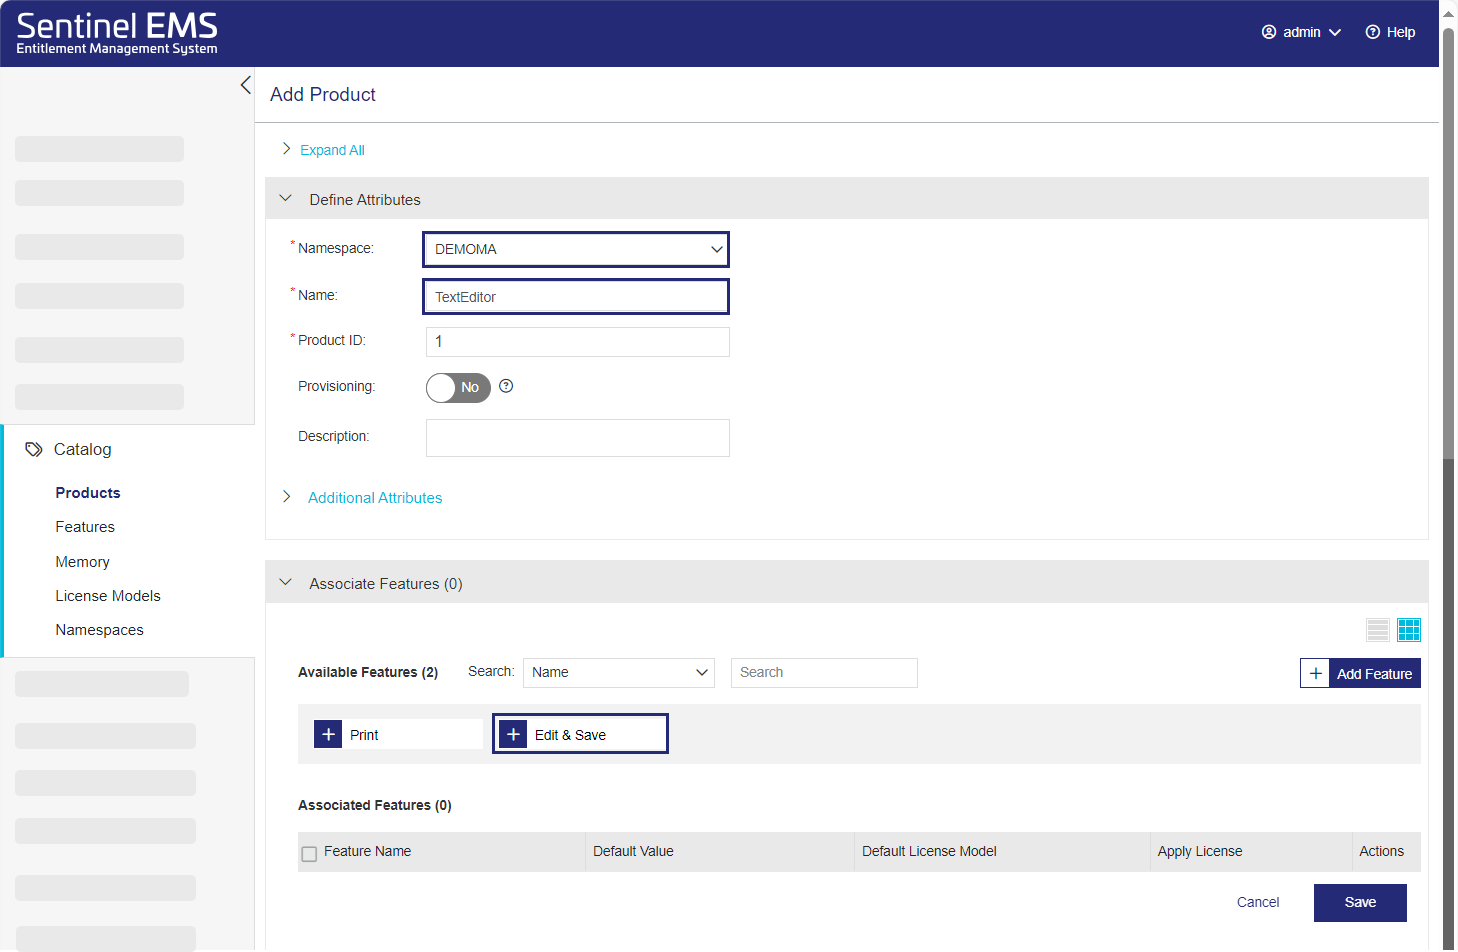
9.In the Associated Features list, for the feature you added, either select the check box and click the Configure License Model button, or, under Actions, click Configure License Model ![]() .
.

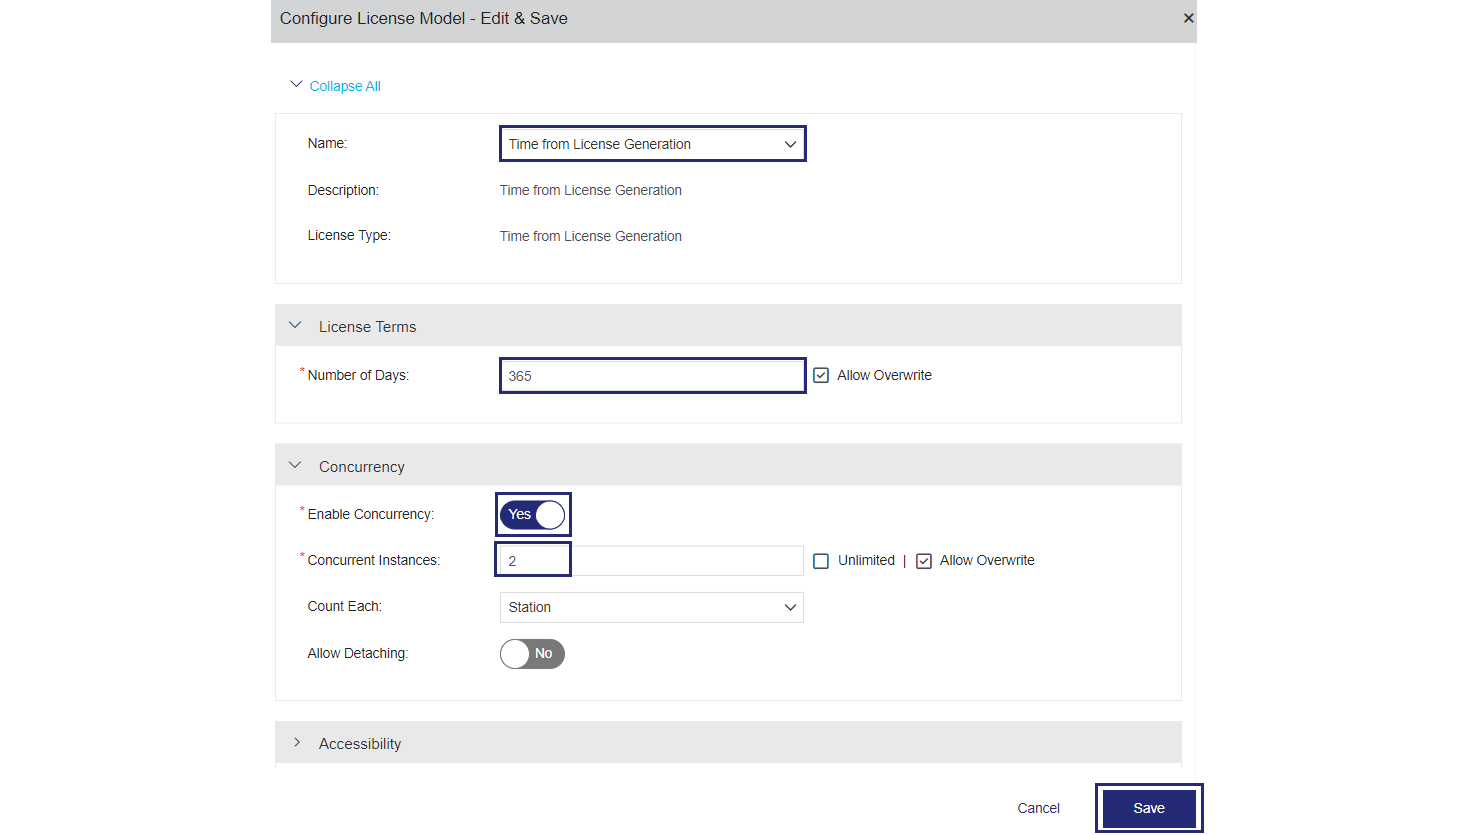
10.Set the license model.
a. Click the Name arrow and select Time from License Generation, which is one of the available license models. Notice that the displayed attributes change to reflect the selected license model.
b. Under License Terms, in the Number of Days box, enter 365.
c. Under Concurrency, set Enable Concurrency to Yes.
d. In the Concurrent Instances box, enter the number of license instances that need to be able to run at the same time, for example, 2.
e. Click Save.
11.In the Add Product page (not shown), click Save. The product is created as a draft.
12.In the Products page, for the product you created, in the Actions column, click the Complete  button.
13.In the confirmation box that opens, click Complete (not shown). This makes the product available for distribution.
You've successfully created your first product. Next, you will create an order, known as an entitlement, for the product.

Define a Customer and Administrator Contact
In this section, you define a customer for the entitlement that you will be creating later. At this stage, you will also create an administrator contact for the customer. Adding an administrator contact lets you delegate account management directly to the customer. Without an administrator contact, you, the vendor, would have the sole responsibility of managing your customers' end-user accounts. Make sure that you are connected to the Sentinel EMS vendor portal. ![]() Show me how
Show me how
When working with cloud licensing, every entitlement is associated with a customer. We are going to create a customer before we start creating our catalog, but you can create customers whenever needed at any stage of the process prior to generating a license. Make sure that you are logged in to the Sentinel EMS vendor portal.
1.From the navigation pane, select Customers > Customers.
2.In the Customers page, click Add Customer .

3.In the Add Customer page, if the Market Group list is displayed, select the market group for the namespace that you are using, for example, DEMOMA.
4.In the Add Customer page, in the Name field, enter a name for the customer that you are creating, for example Papyrus & Words. You can enter any customer name that you want.
5.Leave the Identifier blank, so that a customer identifier will be generated automatically when you save the customer.
6.In the Associated Contacts area, if an administrator contact already exists, you can select that contact to link to this customer. All types of contacts are listed here—not just administrator contacts. You can search by various fields to find the contact that you need.
In our case, though, we have not yet created an administrator contact. Let's do that now after we save the customer.
7.Click Save.
You've created your first customer. Next, you will assign an administrator contact to this customer.

Before we continue, let's create an administrator contact who will handle account management for our customer. This will save us time when creating an entitlement because the administrator contact will automatically be assigned to the entitlement when you select the customer. The administrator contact will also automatically receive email notification informing them that the licensed products are ready to share with consumer end users as soon as the entitlement is activated. Administrator contacts can view and manage only the accounts for which they are responsible. For the purposes of this training, you will assign yourself as the administrator contact.
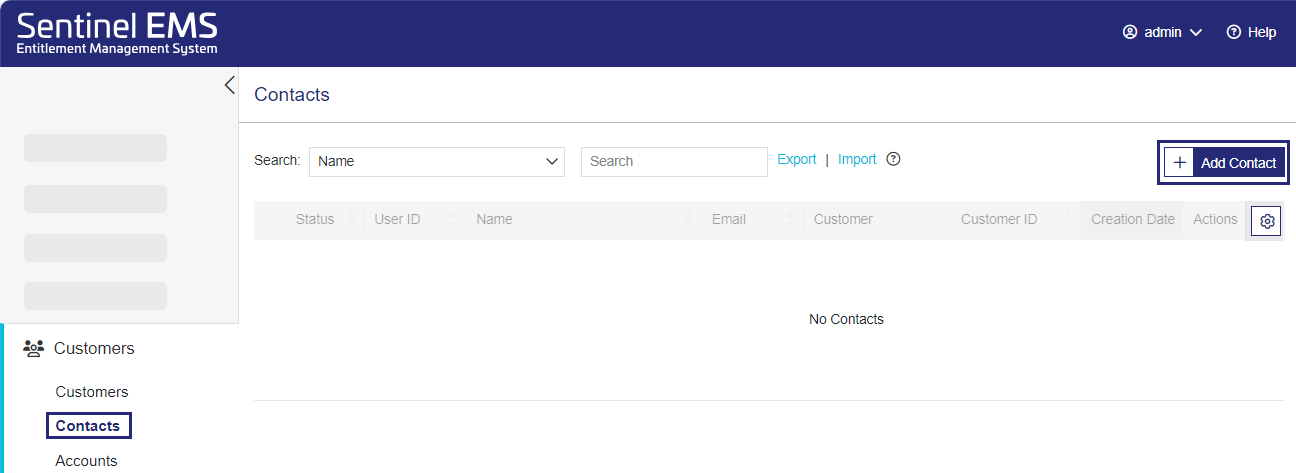
1.From the navigation pane, select Customers > Contacts.
2.In the Contacts page, click Add Contact .
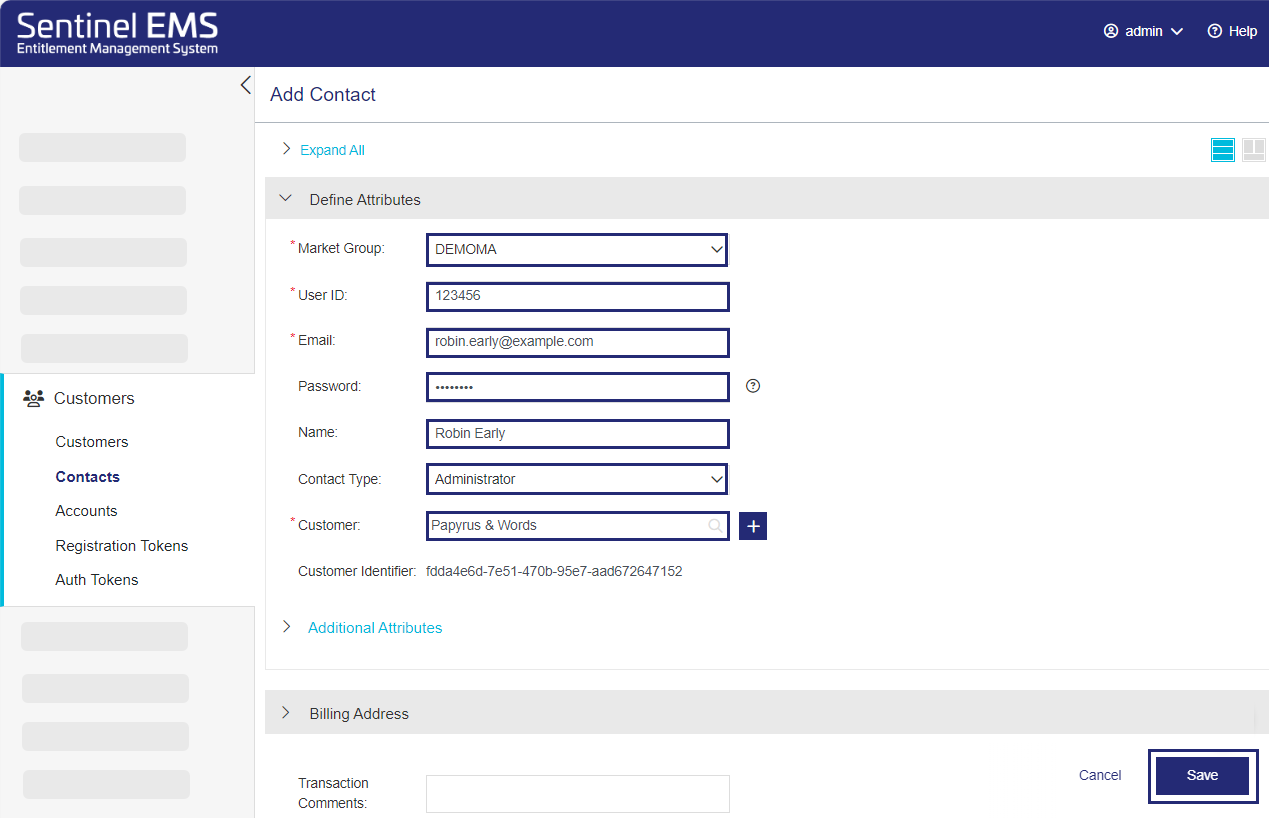
3.In the Add Contact page, if the Market Group list is displayed, select the market group for the namespace that you are using, for example, DEMOMA.
4.In the Add Contact page, in the User ID field, enter an identifier for the contact that you are creating, such as 123456. You can enter any identifier that you want, including a name or email address.
5.In the Email field, enter your email address, so that you will receive a notification when the entitlement is activated. The image shows an example.
6.In the Password field, enter a password that you will remember. Click the  icon to see the criteria.
You can use this password to log on to the Sentinel EMS customer portal to manage registered machines for the accounts that you handle.
7.In the Name field, enter a name for the administrator contact, such as Robin Early. You can enter your own name if you want.
8.Under Contact Type, select Administrator. Only administrator contacts can manage accounts for cloud licensing.
9.In the Customer field, start typing the name of the customer that you created earlier. As you type, a list of suggestions is displayed. Select the relevant entry. This associates the contact with the specified customer when you save the customer.
10.Click Save.
You've created your first contact. In the Contacts page (not shown), you can expand the contact that you just created to view the various contact attributes.
Next, you will create a catalog and generate a license.
Generate a License and Push It to the Cloud
In this section, you generate a license and push that license to Thales' cloud license server manager using Sentinel EMS with Sentinel LDK enforcement.
First you will generate an entitlement to fulfill an order for a specific customer. Then you will use Produce and Push to generate a cloud license for the product features included in the entitlement. The license will automatically be pushed to Thales's service-hosted, cloud license manager server, making it ready to share with the customer's end users. Make sure that you are connected to the Sentinel EMS vendor portal. ![]() Show me how
Show me how
In this step, you are creating an entitlement.
1.From the navigation pane, select Entitlements.
2.In the Entitlements page, click Add Entitlement .

3.In the Add Entitlement page, under Assign Customer / Channel Partner, set the required fields:
a. If the Market Group list is displayed, select the market group that you are using, for example, DEMOMA.
b. In the Customer field, start typing the name of the customer that you created earlier. As you type, a list of suggestions is displayed. Select the relevant entry.
c. In the Contact Email field, verify that the email address of the administrator contact that is associated with the customer is displayed. Earlier, you defined yourself as the administrator contact, so this should be your email address.
4.Expand Define Entitlement Attributes > Additional Attributes and set the following to ensure that the entitlement can be activated using Produce and Push.
a. Set Allow Activation to Yes, and ensure that Vendor Only is selected.
b. Set Entitlement as a Whole to Yes.
c. (Optional) Set Send Notification to Yes. This sends an email to the administrator contact, notifying them that the entitlement is ready for activation.
5.In the Associate Products / Product Suites pane, under Available Products, click the product you created to add it to the Associated Products / Product Suites section.
6.Click Save to save the entitlement as a draft. (If you skip this and go to another tab, your input will be lost.)

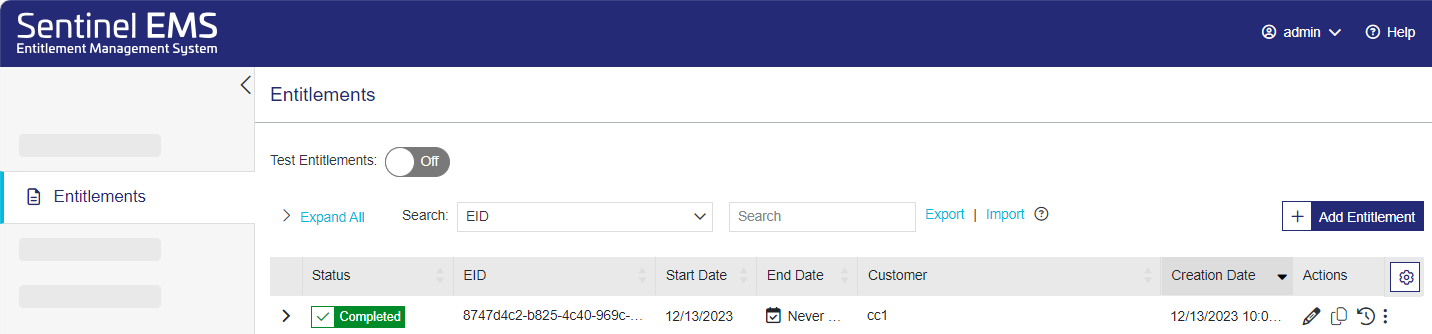
7.In the Entitlements page, in the Actions column, click  to complete the entitlement.
(The image shows the Draft status prior to confirmation.)
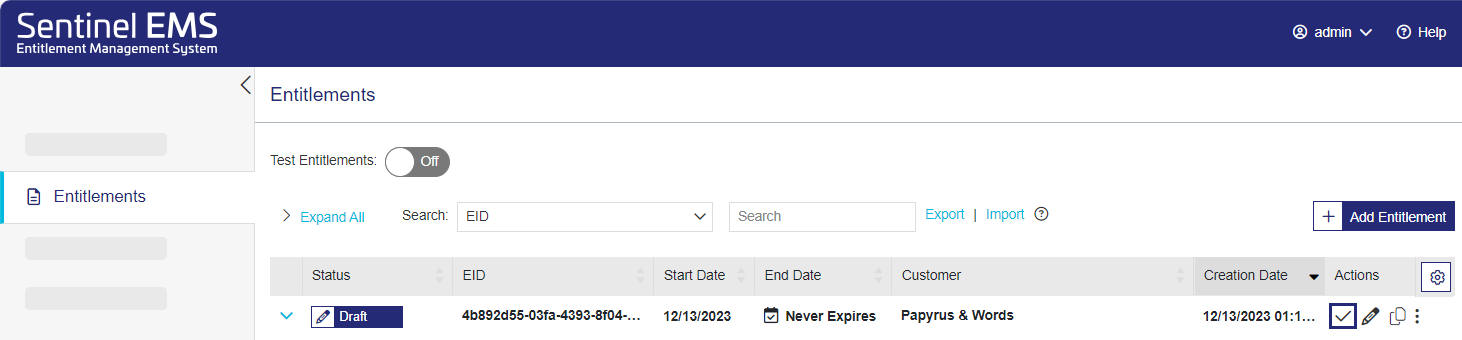
8.In the confirmation box, click Complete (not shown). The entitlement details are saved. An Entitlement Certificate email is sent to the contact email address you entered earlier.
(The image shows the Completed status post-confirmation.)
In the next step, you will
In this step, you generate a cloud license and push the license to the Thales service-hosted, cloud license manager server in a single step.
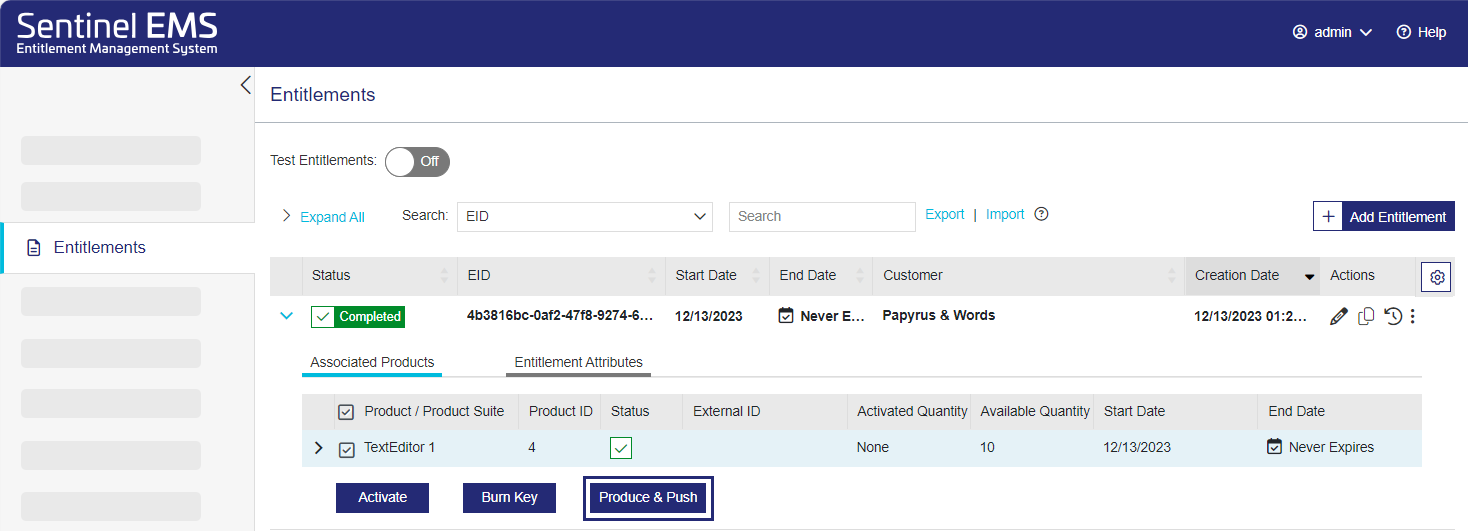
1.From the navigation pane, select Entitlements.
2.Expand the entitlement you created and click Produce & Push.
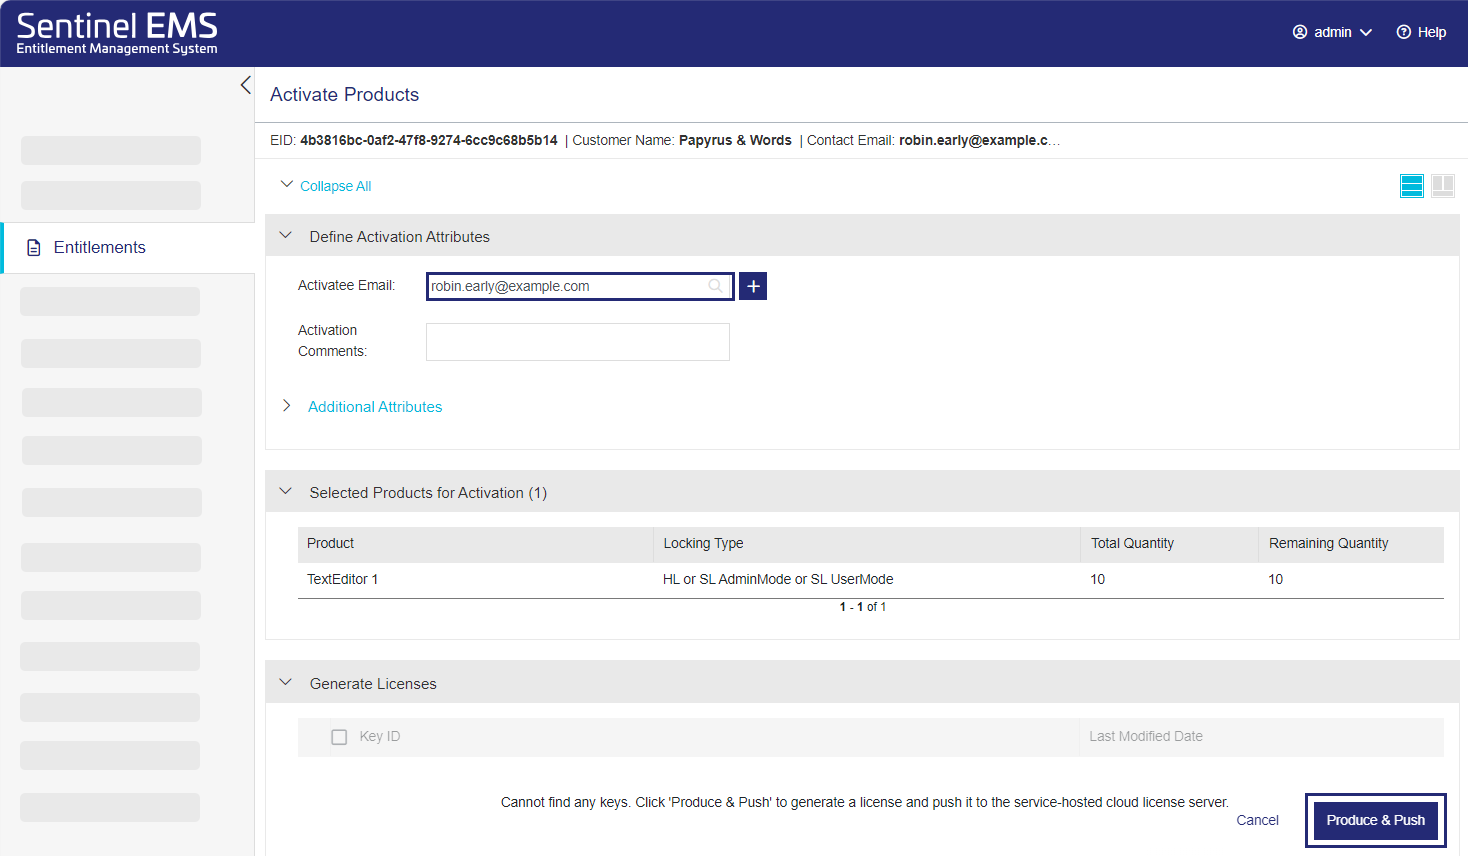
3. In the Activate Products page, verify that the Activatee Email is correct.
4.Click Produce & Push to generate a new key with the required licenses.
TIP If you ever need to update this key, the Generate Licenses area lets you choose between generating a new key or updating the licenses on the existing key.
Unless needed, Thales recommends that you update the existing key. By maintaining a single key for each customer, you limit confusion and ease maintenance over time.
When you update licenses, you would select the existing key that you already created, and either remove all existing licenses from the key to start with a clean key, or update the licenses on the key.
5.The Activate Products page displays information about the activated products and the activation details.
6.Click Done. A license certificate is sent to the activatee email address that you specified earlier.
The license certificate email does not include a license string because the end user machine accesses the cloud license using unique identity credentials instead of a license string.
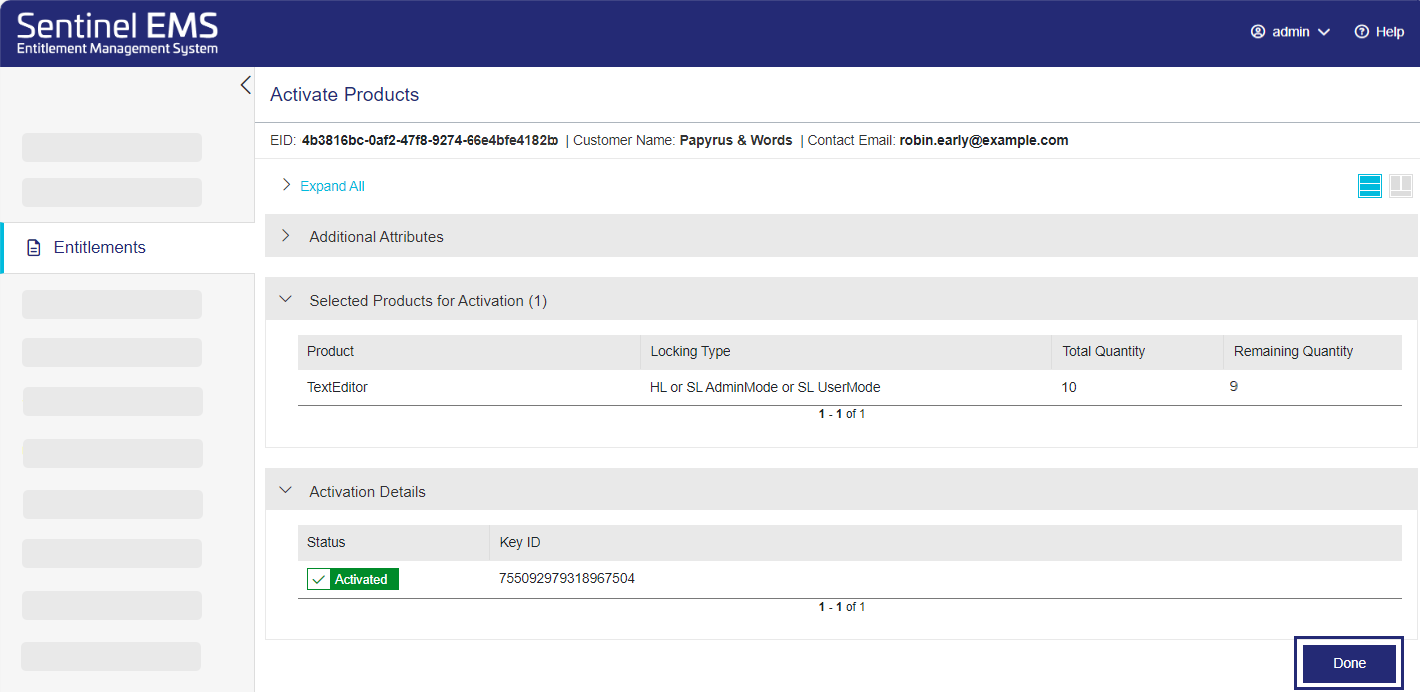
7.The key is marked as Activated, and the license is now stored on Thales' service-hosted, cloud license manager server.

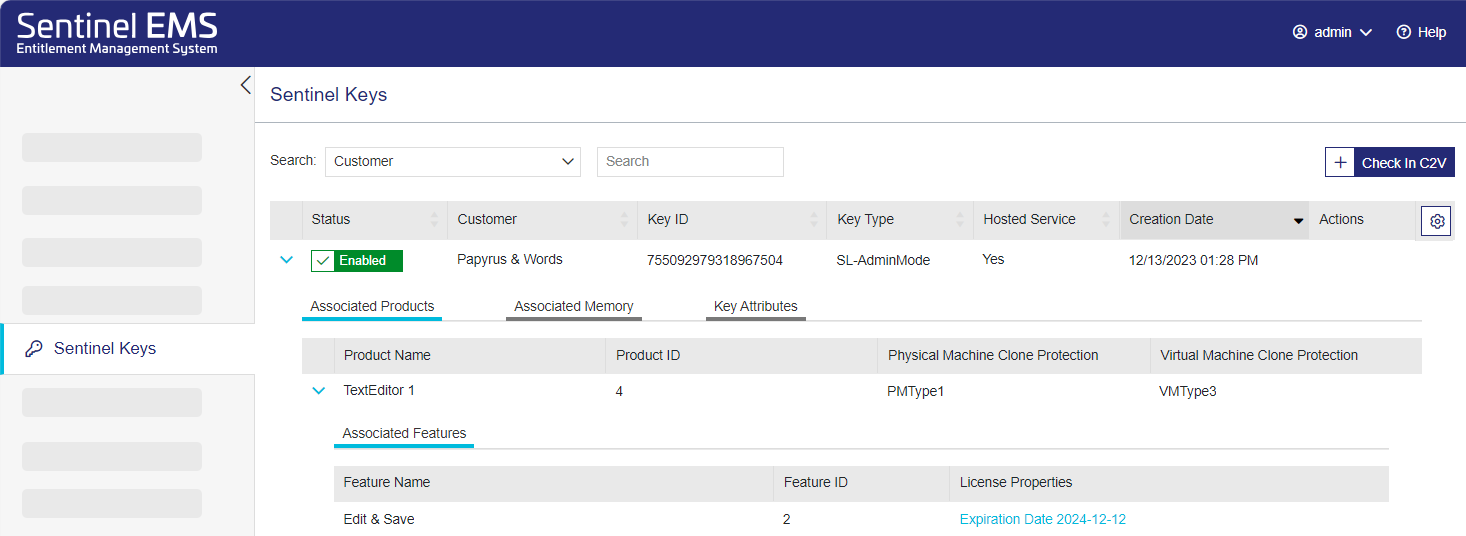
8.(Optional) View the key in the Sentinel Keys page.
In the navigation pane, click Sentinel Keys. Then expand the key line item and switch between the tabs to view the associated products and features, associated memory, and key attributes.
TIP When there are multiple keys on the page, you may want to search by customer to locate the key.
Congratulations! You successfully generated a CL (cloud licensing) key.
Manage End User Accounts
Earlier, you created an administrator contact, who is responsible for handling account management for your customer. You are now using that persona to create an account for your customer's end user. You will enable the Send Notification option to send an email directly to the end user, informing them that they can start using the TextEditor application by clicking the link in the email. Clicking this link installs identity credentials on the end user's machine using an identity string. This string is used to authorize the use of the application on that machine.
Where do you create an end user account?
Vendors create accounts from the Sentinel EMS vendor portal. Customers' administrator contacts create accounts from the Sentinel EMS customer portal.
For the purposes of this training, you can use either portal to create an account.
1.Navigate to the URL shared by Thales.
2.Log on using the user name and password provided by Thales.
3.From the navigation pane, select Customers > Accounts.
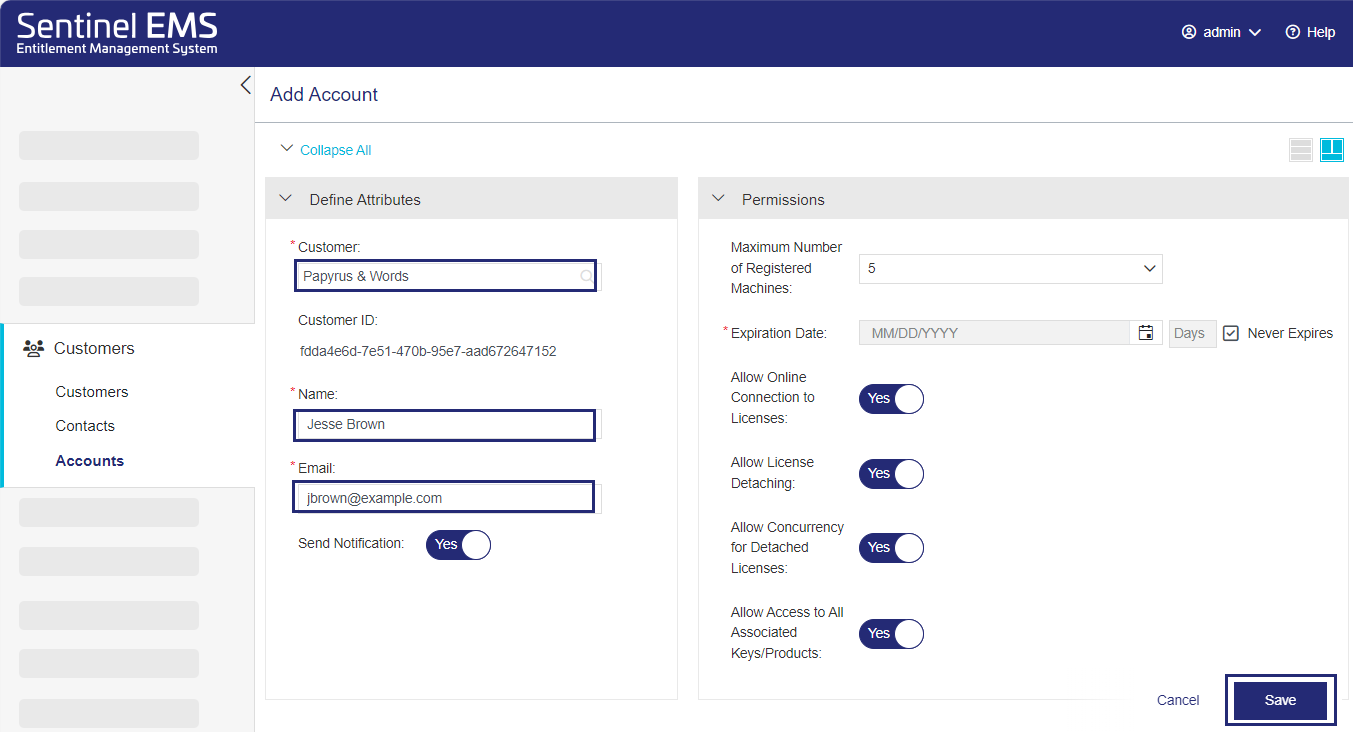
4.In the Accounts page, click Add Account .
5.In the Add Account page, in the Customer field, start typing the name of the customer that you created earlier. As you type, a list of suggestions is displayed. Select the relevant entry. This associates the account with the specified customer when you save the account.
Notice that the permission settings on the right side of the page are now editable.
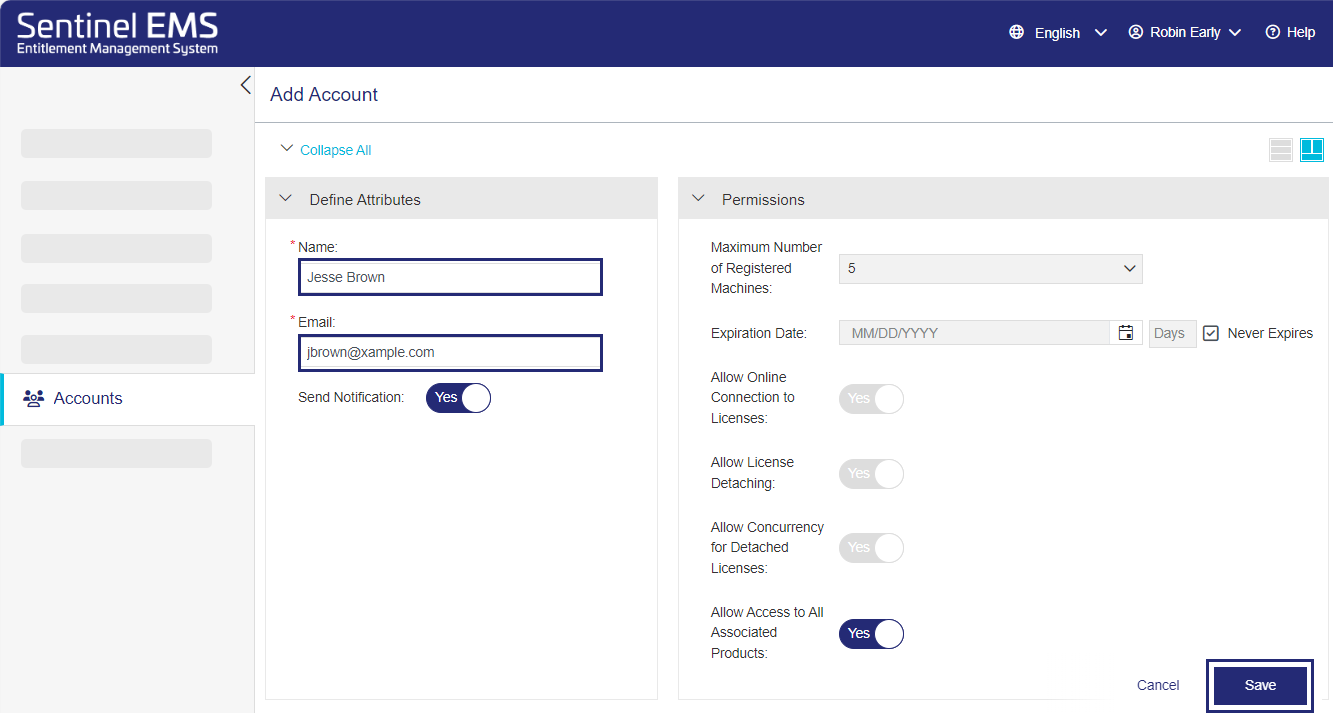
6.In the Name field, enter a name for the end user who will actually be using your application. For now, you can enter your own name if you want.
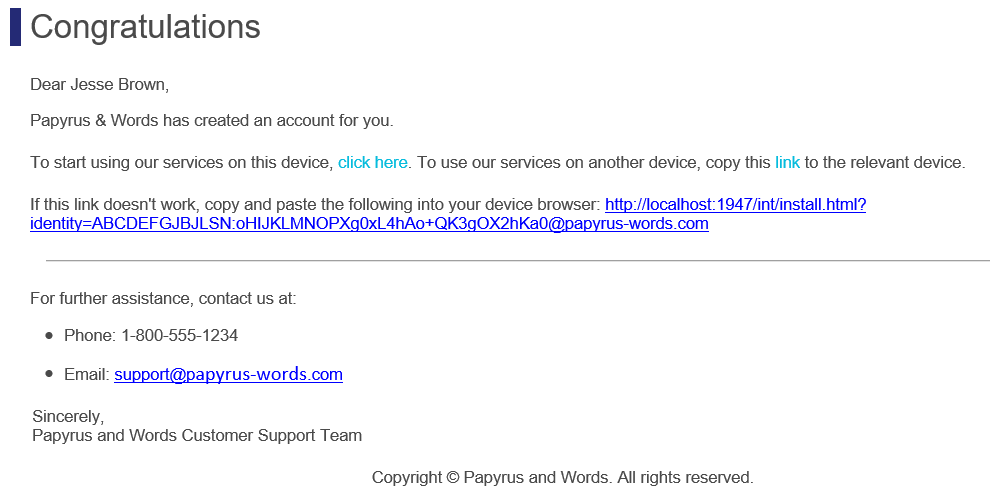
The name you enter will be used in the salutation of the notification email. This email contains identity credentials that enable the end user to access the protected application. You'll learn more about that in the next section.
7.In the Email field, enter your email address, so that you will receive a notification when the account is created. In a real-life situation, you would enter the email address of the actual end user.
8.Ensure that Send Notification is set to Yes. This will send an email to the account email address you specified above when the account is created. The email will contain an identity link that an end user must click to install an identity string on their machine, which will enable them to use the protected application provided by the customer.
If you set this to No, you will have to provide the end user with the identity link included in the email in another way.
9.In the Permissions area, leave the settings as is. An account inherits the permissions defined for the customer, which inherited the permissions you defined earlier in the global settings. This may sound complicated, but it's really just a hierarchical inheritance structure—global permissions are passed to the customer, and the customer permissions are passed to the account. You can modify these permissions at any level as needed.
You can leave the Expiration Date as Never Expires, or you can set an expiration date if you want.
10.Click Save. You've created your first account.
11.In the Accounts page, notice that in addition to the attributes that you just defined, an Identity Code was added by the system to identify the individual account when accessing the application.
12.Check your email to see the message that will be sent to actual end users.
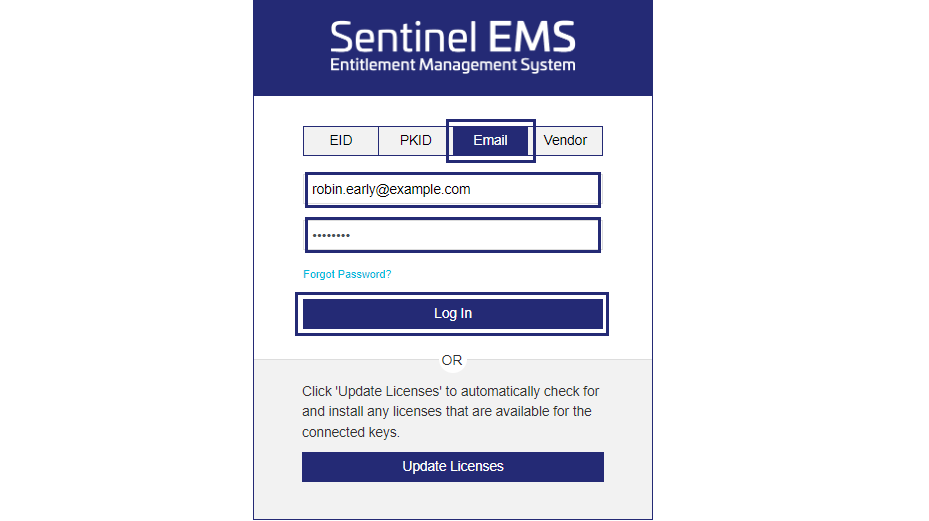
1.To connect to the Sentinel EMS customer portal, navigate to the URL shared by Thales using the following modified format: https://YOUR-SENTINEL-EMS-DOMAIN/customer/login
Log in using the Email option and the credentials that you created for the administrator contact in Define a Customer and Administrator Contact.
2.From the navigation pane, select Accounts.
3.In the Accounts page, click Add Account .
4.In the Add Account page, in the Name field, enter a name for the end user who will actually be using your application. For now, you can enter your own name if you want.
The name you enter will be used in the salutation of the notification email. This email contains identity credentials that enable the end user to access the protected application. You'll learn more about that in the next section.
5.In the Email field, enter your email address, so that you will receive a notification when the account is created. In a real-life situation, you would enter the email address of the actual end user.
6.Ensure that Send Notification is set to Yes. This will send an email to the account email address you specified above when the account is created. The email will contain an identity link that an end user must click to install an identity string on their machine, which will enable them to use the protected application provided by the customer.
If you set this to No, you will have to provide the end user with the identity link included in the email in another way.
7.In the Permissions area, notice that many of the options are read-only. These permissions are inherited from the associated customer's permissions and cannot be changed in the Sentinel EMS customer portal (although they can be changed in the Sentinel EMS vendor portal if needed).
Leave Allow Access to All Associated Products as is to enable the end user to access and run your application. You can leave the Expiration Date as Never Expires, or you can set an expiration date if you want.
8.Click Save. You've created your first account. Check your email to see the message that will be sent to actual end users.
End User Starts Using the Application
Now that you have created an account, the customer's end user can install their unique identity credentials and launch your protected application or service.
For the purposes of this training, let's assume that:
• Your application is already packaged together with Sentinel Run-time Environment.
•The end user has already installed the application on the target device and is just waiting for the license to use the application.
This step emulates what end users do to start using an application on their device.
You should have received the email with your identity credentials.
1.Open the email that you received from Sentinel EMS. (If you didn't receive the email, please check your Spam folder.)
Notice that the Name attribute value that you provided in the account is used in the salutation.
2.Click one of the links depending on the machine on which the application is installed or will be used. To install the identity string on a machine, you must click the actual installation link on the machine where the vendor's application runs.
When the vendor's application runs for the first time, the machine is automatically registered on the service-hosted, cloud license manager server (unless the Maximum Number of Registered Machines per Account cloud-licensing permission is set to Unlimited).
3.You, as the vendor user or administrator contact, can now view and manage the registered machine in Sentinel EMS vendor or customer portal, respectively.
In Sentinel EMS, navigate to Customers > Accounts, and expand the account that you created to view the registered machine. Here is an example of what the registered machines section might look like on the Accounts page. The content is identical in both portals. Notice the Actions column, where you can disable, enable, delete, or synchronize the machine.

The customer's end user can now launch the protected application on their device.
Congratulations! You have completed the entire cloud-licensing flow!
Glossary
Let's review the concepts and terminology that you need to know to work with Sentinel LDK enforcement in Sentinel EMS. ![]() Show the glossary
Show the glossary