Tutorial: User-Based Licensing
Sentinel LDK Cloud Licensing (CL) with Sentinel EMS
Looking for a powerful, centralized, role-based solution for handling all of your software protection, licensing, and entitlement needs? You've come to the right place!
The Sentinel LDK CL service combines Sentinel LDK and Sentinel EMS to offer a user-centric approach to cloud licensing fulfillment in which Thales securely hosts the CL service for you. The CL service gives you and your customers granular control over who can access a cloud license. You can optionally delegate end-user account management to customer administrator users.
•Sentinel LDK is a comprehensive, out-of-the-box software monetization solution that protects and licenses your applications and services, so that you can maximize revenues while introducing flexible and customer-centric offerings into the market. In this tutorial, you will use Sentinel LDK to manage cloud licenses and
•Sentinel EMS entitlement management system has a straightforward design that walks you through the process of:defining the various features and products that match the features and products in your back office system (ERP, CRM, billing system, or sales system). In this tutorial, you will use Sentinel EMS to handle license fulfillment
This tutorial focuses on user-based licensing. User-based licensing uses OAuth to enable end users to access the vendor's application or service using login credentials—for example, their user name or email address and their password. End users can log in to the application from any supported device without the need to activate a license or install anything special on the device. With user-based licensing, the user is authorized instead of the device. By associating products with users, vendors and customers can quickly enable or disable user access without the need for updating entitlements as long as other license details remain the same.
TIP
•Thales also offers device-based licensing, which authorizes a device instead of a user. This enables anyone using the device to access your protected applications and services. To use device-based licensing, Identity string credentials must be installed on the device. For cloud licensing, the vendor or customer administrator must also set cloud licensing permissions for each device using machine accounts. These permissions can be set at the global, customer, or individual device level for enhanced flexibility. View the tutorial
•To learn more about the various licensing methods that Sentinel LDK offers, see Choosing and Integrating Hardware-, Software-, and Cloud Licensing.
The Basics
The following are the foundation of Sentinel EMS with Sentinel LDK enforcement. It's important to understand these terms before you perform the steps in this Getting Started Guide.
Sentinel EMS
Sentinel® EMS™ is a web-based solution that provides you with a centralized interface for all your license and entitlement management functions. It offers an easy-to-use interface for all your back office systems and a variety of advanced data collection and reporting functions.
Sentinel LDK Envelope
Sentinel LDK Envelope provides both copy and reverse-engineering protection for applications on various platforms. Its easy-to-use user interface enables you to apply protection to executable files and DLLs in minutes.
ToolBox and Sentinel Licensing API
Sentinel LDK ToolBox is an interactive application that enables software developers to learn about the various Sentinel LDK APIs. With this tool, you can execute API functions, observe their behavior, and copy the corresponding source code for integration into your own applications. For more information, see the Sentinel LDK ToolBox User Guide.
Sentinel Licensing API enables you to integrate finely grained license enforcement into your application for an unlimited number of features, thereby ensuring end-user compliance with licensing terms. Each feature in your application is integrated separately using a unique feature ID and login API call. For more information, see the Sentinel LDK Software Protection and Licensing Guide.
Features
Features are the basic building blocks of products and licenses. Each feature can represent anything from a functional component to an entire application.
TIP Want to learn more about any of the concepts and terminology used in Sentinel EMS with Sentinel LDK enforcement? Check out the Glossary at the end of this guide.
Tutorial Workflow
This tutorial showcases how to use Sentinel LDK and Sentinel EMS to protect and license an application. You will use a sample TextEditor application that has two separately licensable features: Edit & Save and Print. To simplify this tutorial, TextEditor is already integrated with the necessary Sentinel LDK Licensing API calls to manage and consume licenses for each feature.
![]() Learn about the different personae in the Sentinel EMS and Sentinel LDK workflows
Learn about the different personae in the Sentinel EMS and Sentinel LDK workflows
Initial Setup, License Integration, Application Protection, and Testing
This end-to-end workflow illustrates the license integration and application protection process for developers and product owners, focusing on testing and integration.

Production and License Fulfillment for a Vendor's Customers
This end-to-end workflow for Sentinel EMS personae occurs after testing is done, focusing on actual production and license fulfillment for a vendor’s customers.

Before You Begin
•Review The Basics to learn about the Sentinel LDK and Sentinel EMS components.
•Make sure that your Thales account enables you to access Sentinel EMS. At minimum, you need a role in Sentinel EMS that includes Customer Management permissions. Contact your Thales representative for assistance if needed.
Create a Catalog
In this section, you create a catalog that includes your saleable items—a feature and a product. Make sure that you are logged on to the Sentinel EMS vendor portal. ![]() Show me how
Show me how
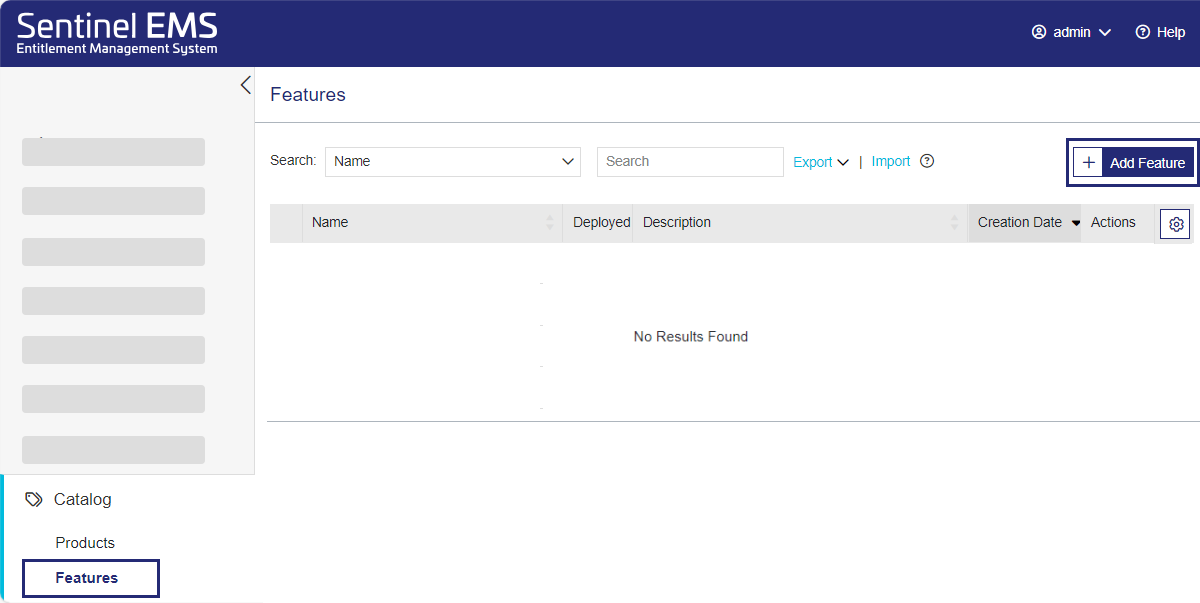
The first step in creating a catalog is defining features.
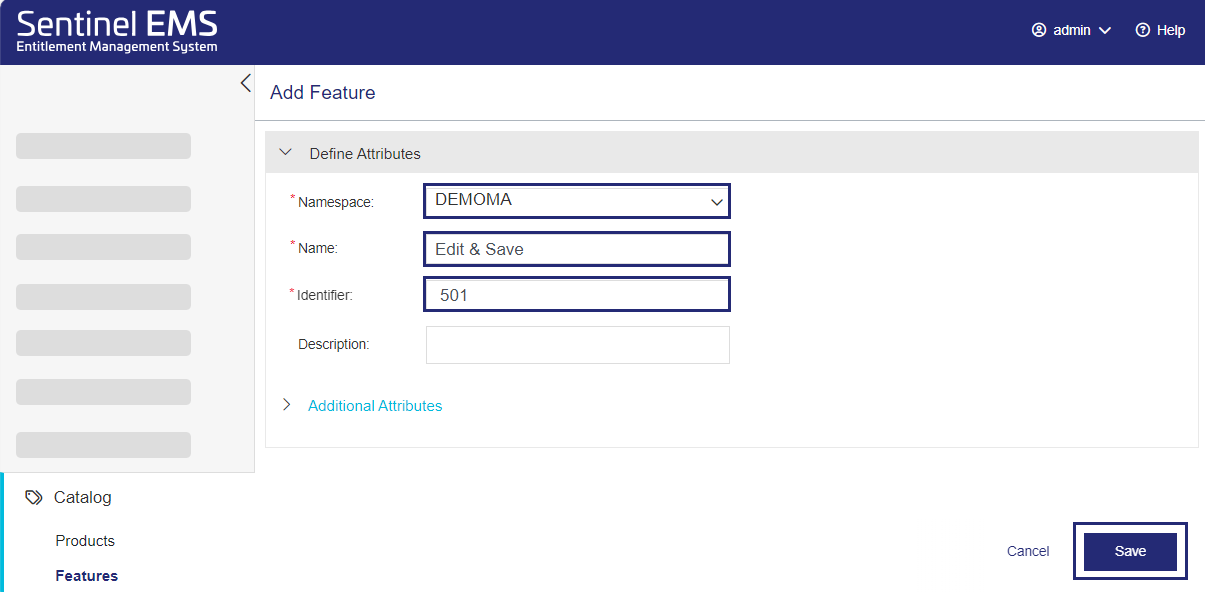
3.In the Add Feature page, if the Namespace list is displayed, select the namespace you want to use. If you have your organization's batch code (known as a namespace in Sentinel EMS), you may want to select that namespace. Otherwise, select DEMOMA to use the demo namespace and batch code.
4.In the Add Feature page, in the Name field, enter Edit & Save.
NOTE If Sentinel EMS supports additional enforcements, spaces and special characters may not be supported. Enter Edit-and-Save instead.
5.If the Version field is displayed (not shown), you can optionally add a version for the feature, for example, 1.
6.In the Identifier field,
When you create your own features, you can use the default identifier or apply another identifier to match an existing feature in one of your company's products.
The identifier must match the feature ID in the Sentinel LDK application you are using to protect your application (Sentinel LDK Envelope or Sentinel Licensing API) as described in Features.
NOTE If Sentinel EMS supports additional enforcements, you may see additional fields. These fields are not relevant for Sentinel LDK and can safely be ignored.
7.Click Save.
8.Now add another feature. In the Features page, click Add Feature ![]() .
.
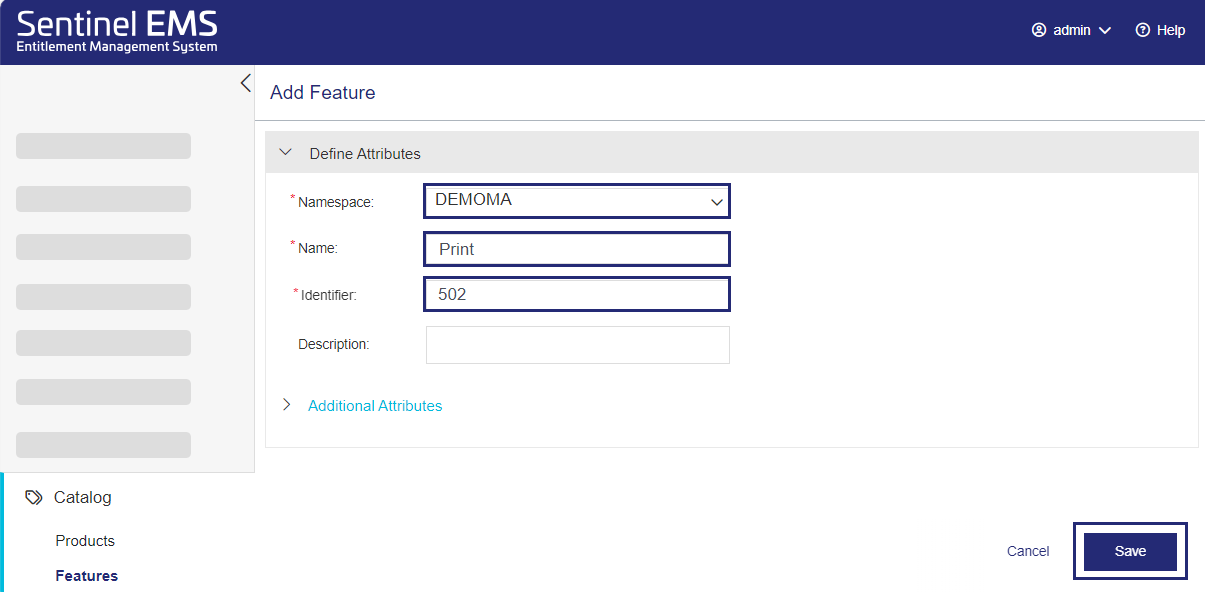
9.In the Add Feature page, if the Namespace list is displayed, select the namespace you want to use. If you have your organization's batch code, you may want to select that namespace. Otherwise, select DEMOMA to use the demo namespace and batch code.
10.In the Add Feature page, in the Name field, enter, Print.
11.In the Identifier field, enter 502.
NOTE The TextEditor sample used in this tutorial already embeds Sentinel LDK Licensing API calls for feature IDs 501 and 502. When working with your own applications, you would share the feature identifiers with your developers. The developers would then include these as feature IDs in Sentinel LDK Licensing API login calls from the relevant sections in the application code. This enables the application to determine if the customer has access to a valid license for each feature.
You've created your first features. Next, you will add these features to a product.
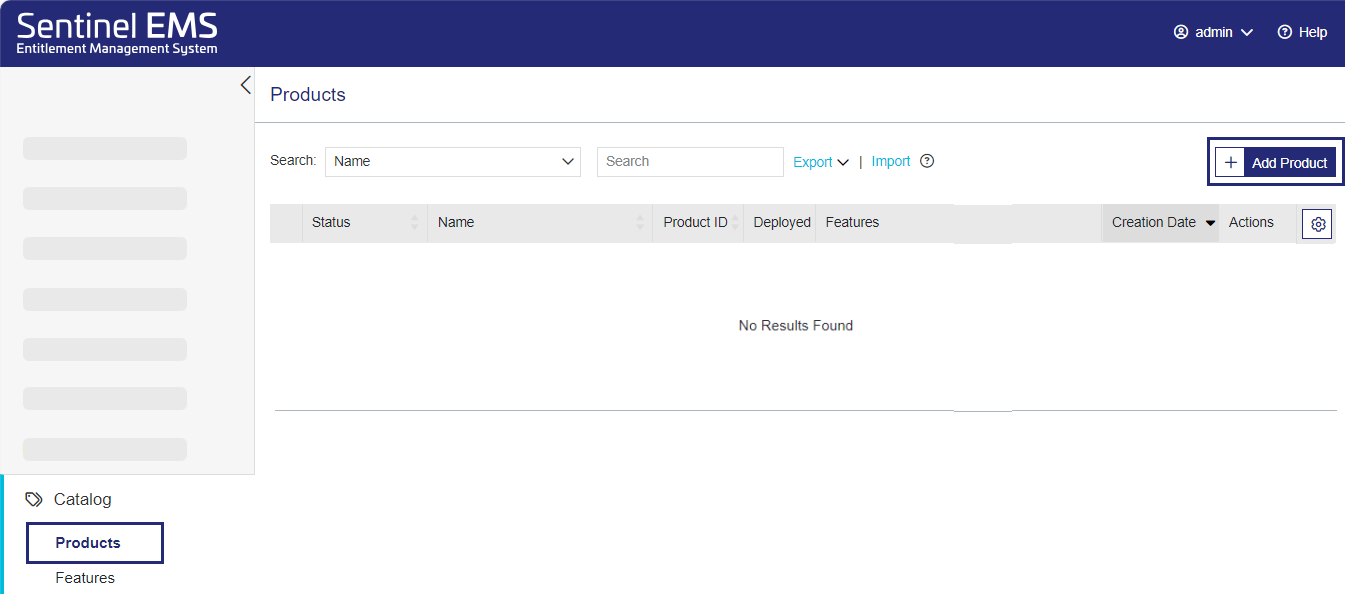
Now that you created your features, you can add them to a product. This is known as associating features with a product.
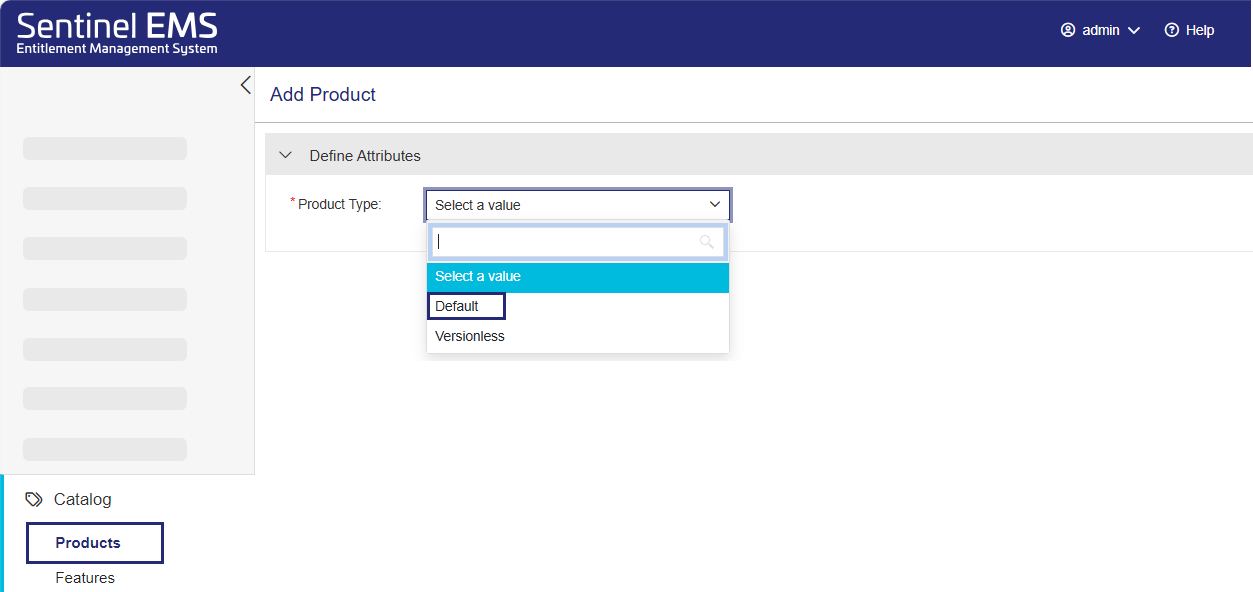
3.Set the product type.
Let's define a default product. A default product is a standard product with a straightforward, self-contained configuration that remains unchanged over time and provides minimal editing capabilities. To learn more about the product types available in Sentinel EMS, see Sentinel EMS User Guide for Sentinel LDK.
In the Add Product page, in the Product Type field, select Default.
4.If Sentinel EMS includes support for other enforcements in addition to Sentinel LDK, you need to select the relevant enforcement before continuing.
In the Add Product page, in the Enforcement Type field (not shown), select Sentinel LDK. Otherwise, skip to the next step.
NOTE Until now, only one or two fields were displayed on the Add Products page. Now, the page refreshes to show all the fields that are relevant for default products.
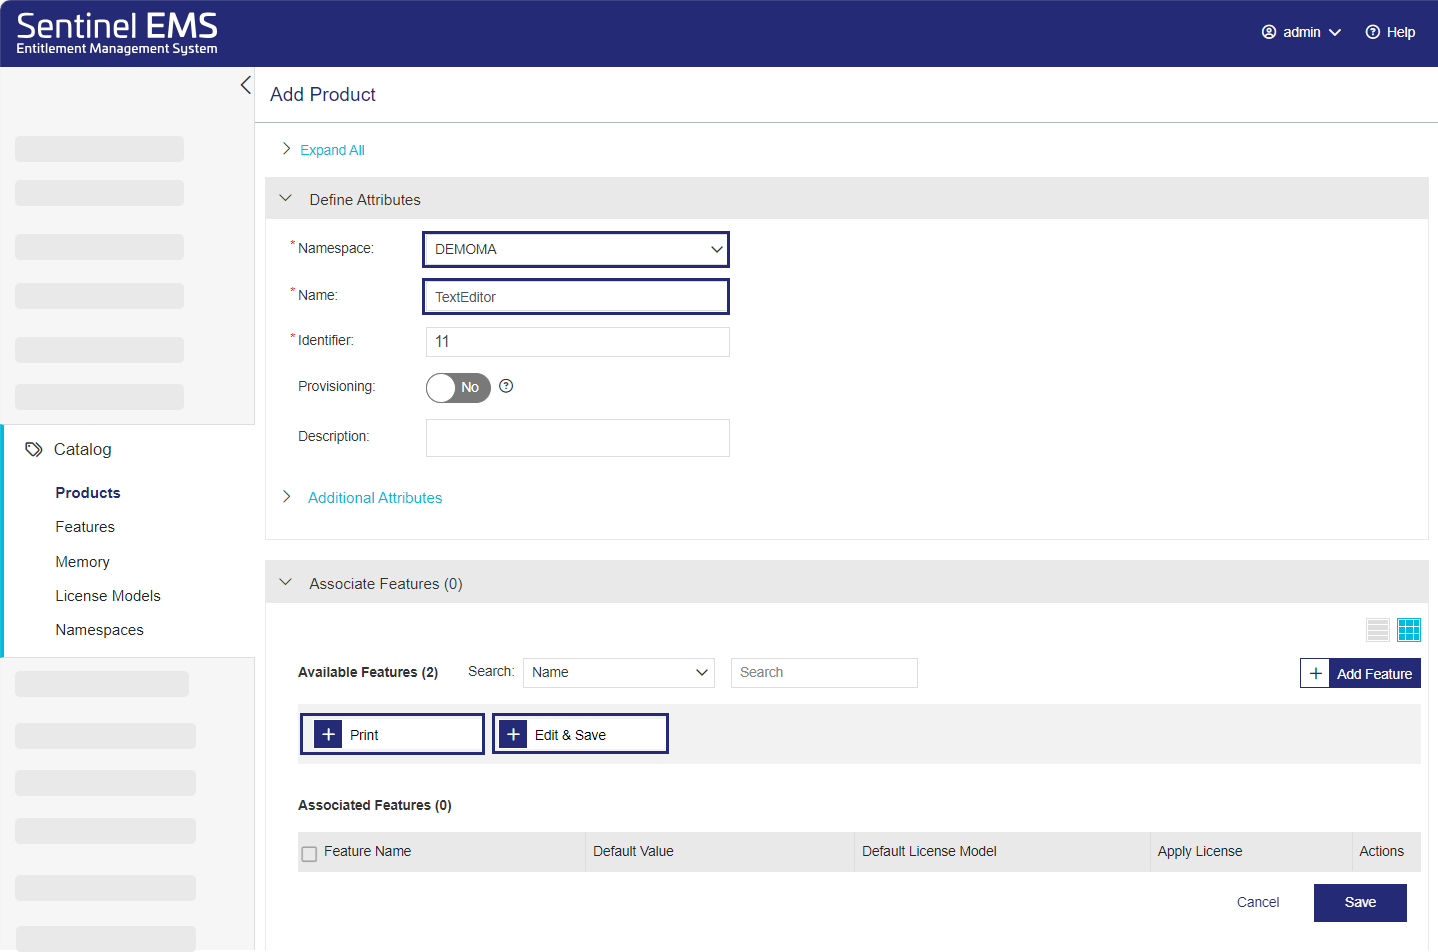
5.In the Add Product page, if the Namespace list is displayed, select the namespace you used when creating a feature. Otherwise, skip to the next step.
6.In the Name field, enter TextEditor.
7.In the Version field, leave the default value.
For default products, this is an optional value that is populated automatically every time you create a product. When working with your own products, you can update the version number to match your requirements.
8.In the Identifier field, leave the default value.
Later, when working with your own products, you can change the number to match an existing product identifier in your saleable product.
9.Expand Additional Attributes, click the Locking Type arrow
10.In the Available Features area of the Associate Features pane, click the features you created one by one and add them to the Associated Features pane.
NOTE In the Associated Features pane, a value for Default License Model may or may not be displayed depending on your Sentinel EMS configuration.
11. Let's configure the license models for each feature.
In the Associated Features pane, either select the check box for the Edit & Save feature and click the Configure License Model button, or, under Actions, click Configure License Model.
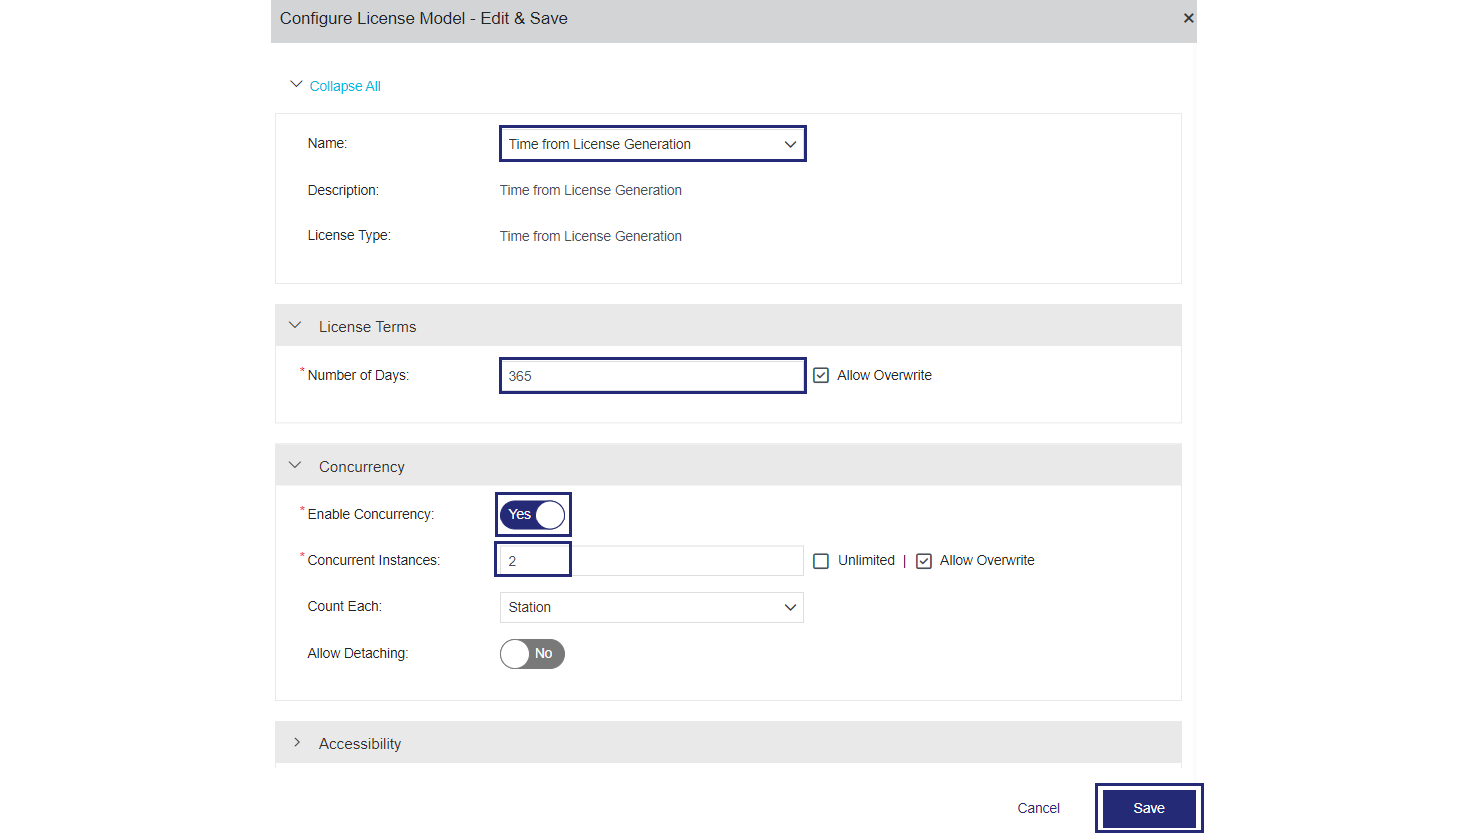
12. Set the license model for the Edit & Save feature.
a. Click the Name arrow and select Time from License Generation, which is one of the available license models. Notice that the displayed attributes change to reflect the selected license model.
b. Under License Terms, in the Number of Days box, enter 365.
c. Under Concurrency, set Enable Concurrency to Yes. This is required for using Produce and Push to activate an entitlement.
d. In the Concurrent Instances box, enter the number of license instances that need to be able to run at the same time, for example, 2.
e. Click Save.The license configuration for the Edit & Save feature is saved.
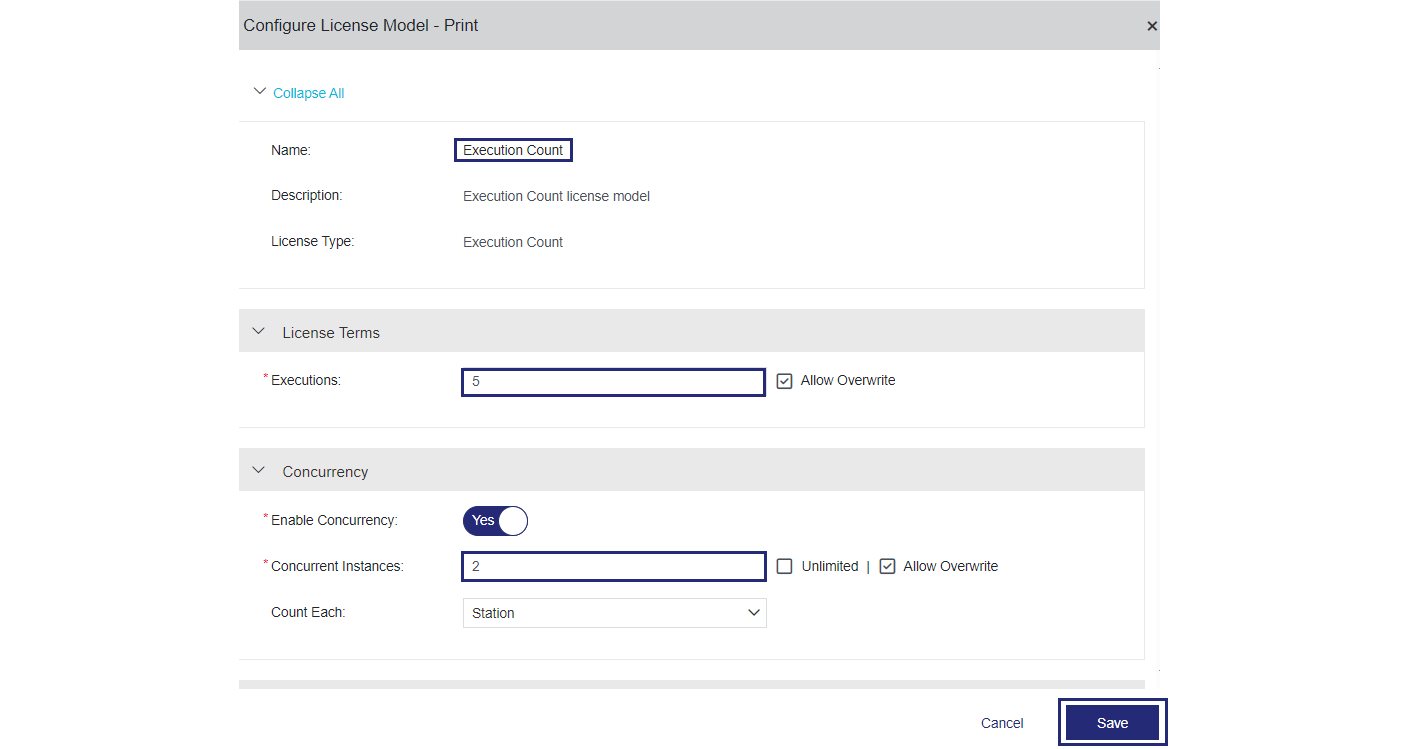
13.In the Associated Features pane (not shown), follow the steps described earlier to open the Configure License Model dialog box for the Print feature. Make sure to clear the check box for Edit & Save if you selected it earlier.
a. Click the Name arrow and select Execution Count, which is one of the available license models. Notice that the displayed attributes change to reflect the selected license model.
b. Under License Terms, in the Executions box, enter 5.
c. Under Concurrency, set Enable Concurrency to Yes. As mentioned earlier, this is required for using Produce and Push to activate an entitlement.
d. In the Concurrent Instances box, enter the number of license instances that need to be able to run at the same time, for example, 2. You must set a minimum of 1 to use Produce and Push to activate an entitlement.
e. Click Save.The license configuration for the Print feature is saved.
14. In the Add Product page (not shown), click Save. The product is created as a draft.
Define a Customer and Administrator User
In this section, you define a customer for the entitlement that you will be creating later. At this stage, you will also create an administrator user for the customer. Adding an administrator user lets you delegate![]() Show me how
Show me how
When working with cloud licensing, every entitlement is associated with a customer. We are going to create a customer now, but you can create customers whenever needed at any stage of the process prior to generating a license. Make sure that you are logged in to the Sentinel EMS vendor portal.
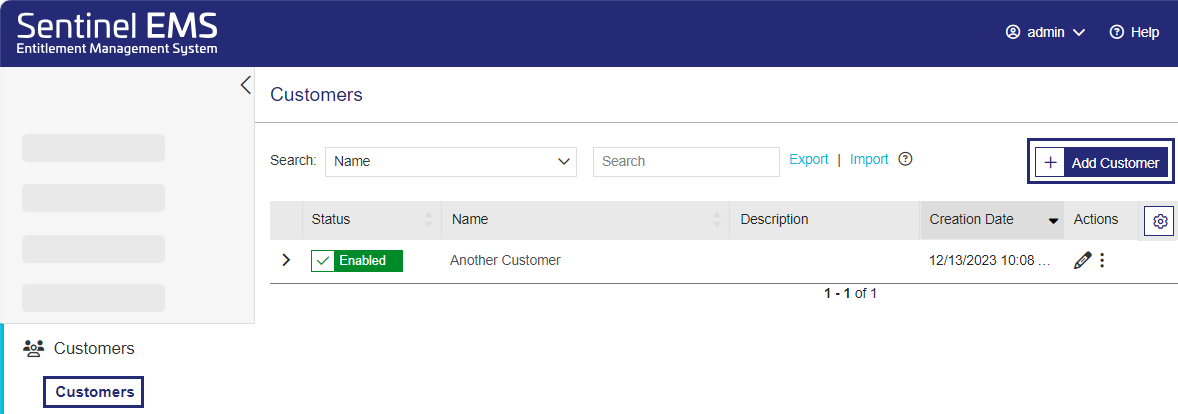
1.From the navigation pane, select Customers > Customers.
2.In the Customers page, click Add Customer ![]() .
.
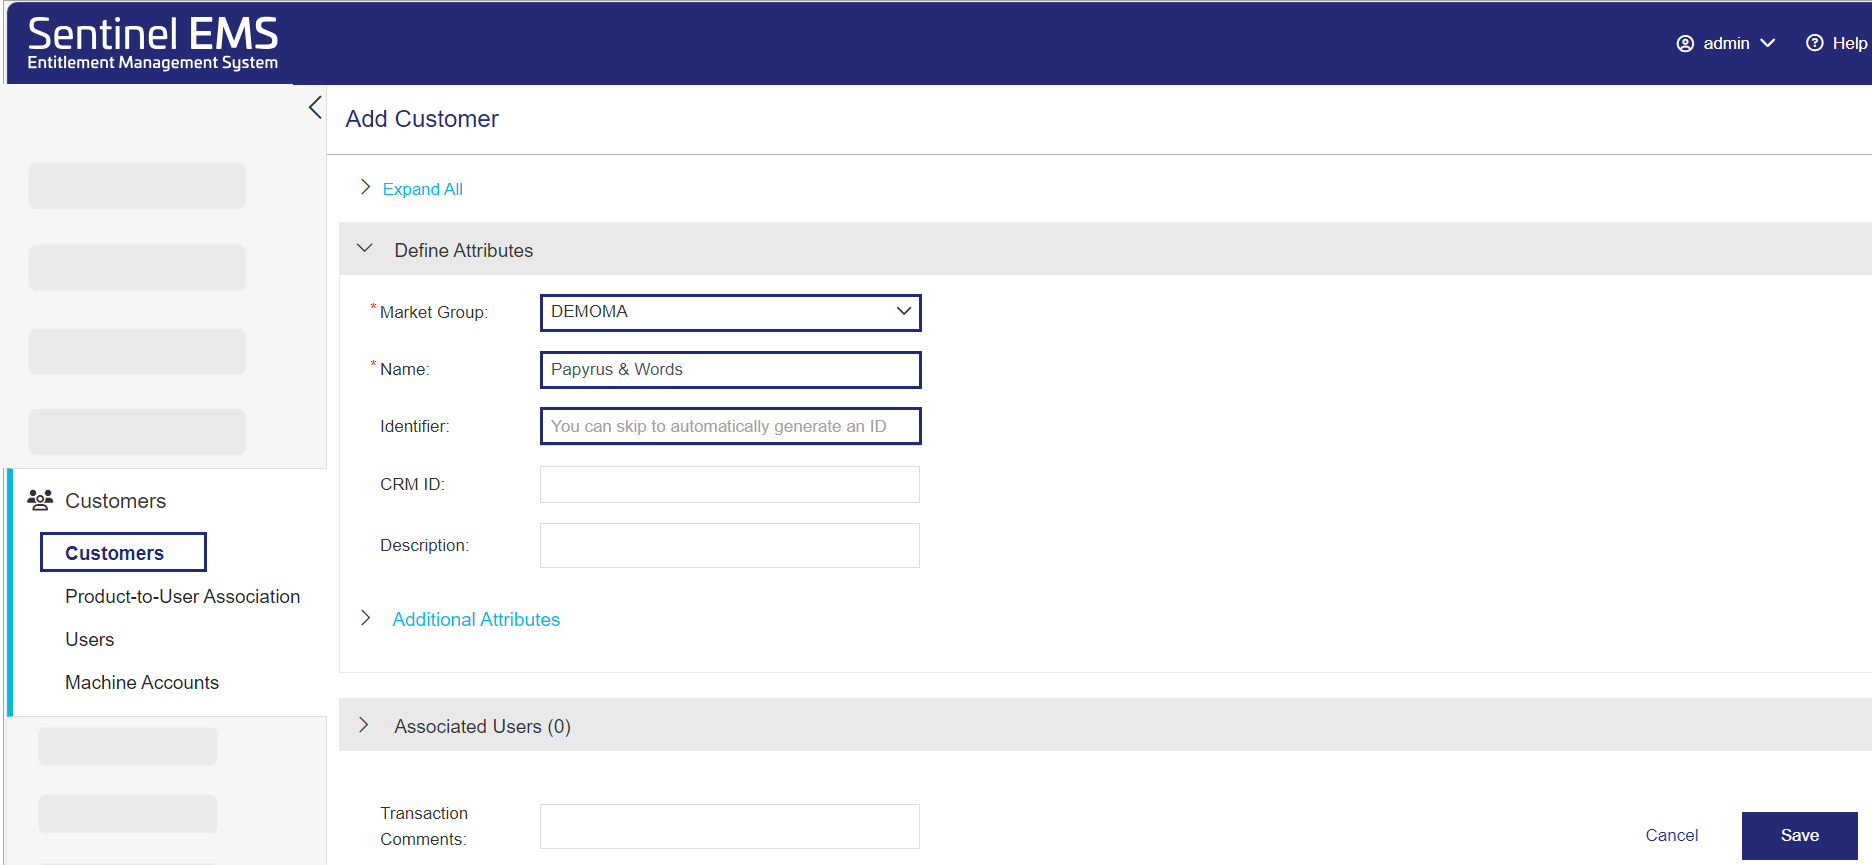
3.In the Add Customer page, if the Market Group list is displayed, select the market group for the namespace that you are using, for example, DEMOMA.
4.In the Add Customer page, in the Name field, enter a name for the customer that you are creating, for example Papyrus & Words. You can enter any customer name that you want.
5.Leave the Identifier blank, so that a customer identifier will be generated automatically when you save the customer.
6.In the Associated Users area, if an administrator user already exists, you can select that user to link to this customer. All types of users are listed here—not just administrator users. You can search by various fields to find the user that you need.
In our case, though, we have not yet created an administrator user. Let's do that now after we save the customer.
7.Click Save.
You've created your customer. Next, you will assign an administrator user to this customer.
Before we continue, let's create an administrator user who will manage
This will save us time when creating an entitlement because the administrator user is automatically assigned to the entitlement when you select the customer. (If several users are associated a customer, you may need to specify the relevant administrator user.)
The administrator user will also automatically receive email notification informing them that the licensed products are ready to share with consumer end users as soon as the entitlement is activated. Administrator users can view and manage only the
1.From the navigation pane, select Customers > Users.
2.In the Users page, click Add User ![]() .
.
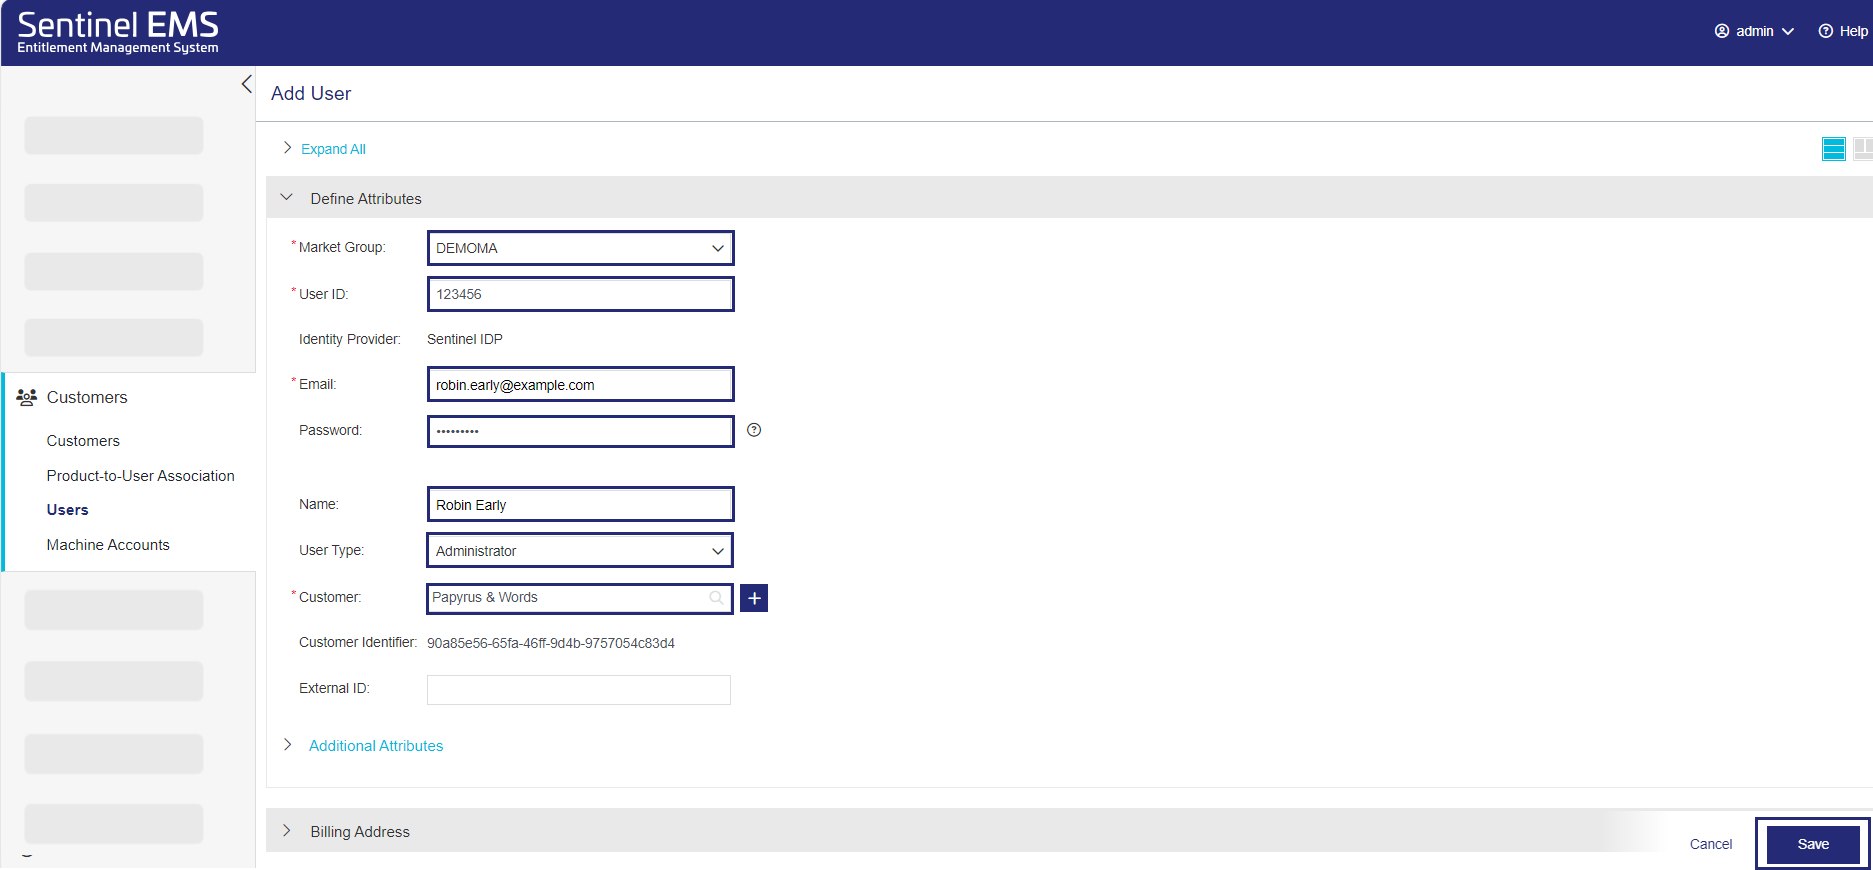
3.In the Add User page, if the Market Group list is displayed, select the market group for the namespace that you are using, for example, DEMOMA.
4.In the Add User page, in the User ID field, enter an identifier for the user that you are creating, such as 123456. You can enter any identifier that you want, including a name or email address.
5.In the Email field, enter your email address, so that you will receive a notification when the entitlement is activated. The image shows an example.
6.In the Password field, enter a password that you will remember. Click the icon to see the criteria.
You can use this password to log on to the Sentinel EMS customer portal to manage
7.In the Name field, enter a name for the administrator user, such as Robin Early. You can enter your own name if you want.
8.Under User Type, select Administrator. Only administrator users can manage
9.In the Customer field, start typing the name of the customer that you created earlier. As you type, a list of suggestions is displayed. Select the relevant entry. This associates the user with the specified customer when you save the customer.
10.Click Save.
You've created your user. In the Users page (not shown), you can expand the user that you just created to view the various user attributes.
Next, you will create entitlement and generate licenses.
Generate a License and Push It to the Cloud
In this section, you generate a license and push that license to Thales' cloud license server manager using Sentinel EMS with Sentinel LDK enforcement.
First you will generate an entitlement to fulfill an order for a specific customer. Then you will use Produce and Push to generate a cloud license for the product features included in the entitlement. The license will automatically be pushed to Thales's service-hosted, cloud license manager server, making it ready to share with the customer's end users. Make sure that you are logged on to the Sentinel EMS vendor portal. ![]() Show me how
Show me how
In this step, you are creating an entitlement.
1.From the navigation pane, select Entitlements.
2.In the Entitlements page, click Add Entitlement ![]() .
.
3.In the Add Entitlement page, under Assign Customer / Channel Partner, set the required fields:
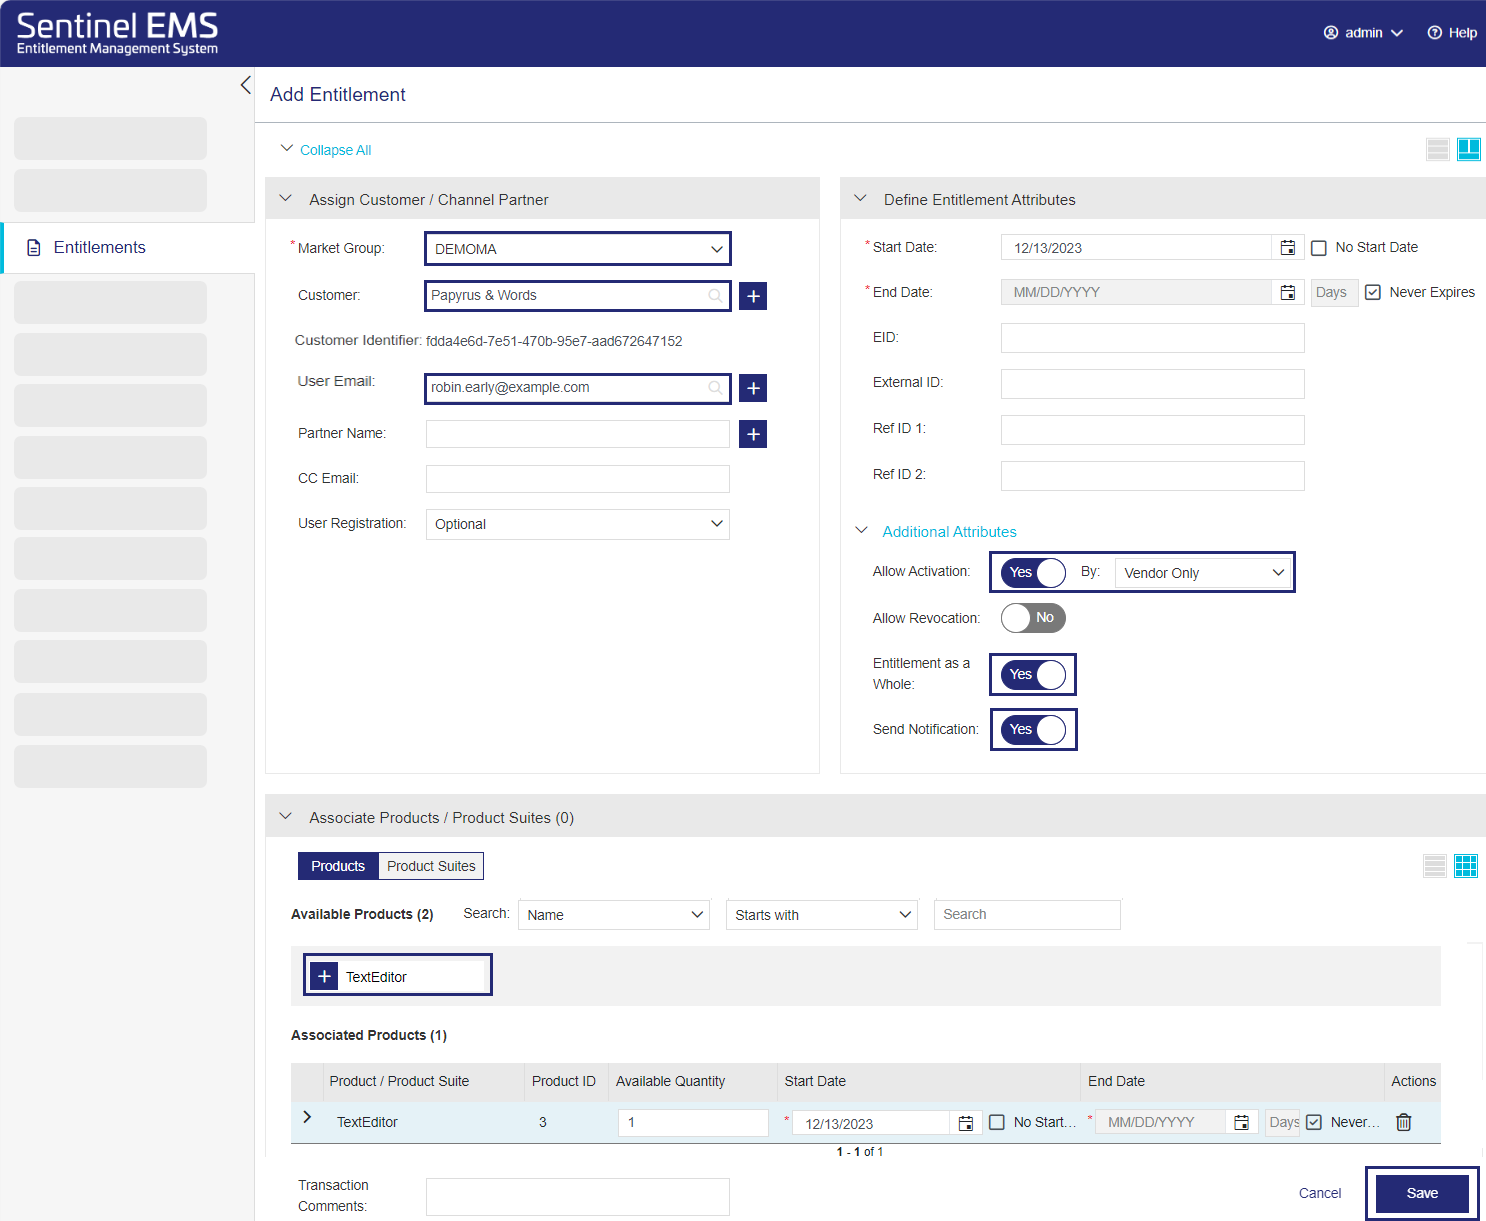
a. If the Market Group list is displayed, select the market group that you are using, for example, DEMOMA.
b. In the Customer field, start typing the name of the customer that you created earlier. As you type, a list of suggestions is displayed. Select the relevant entry. You must specify a customer to use Produce and Push to activate an entitlement.
c. In the User Email field, verify that the email address of the administrator user that is associated with the customer is displayed. Earlier, you defined yourself as the administrator user, so this should be your email address. Specifying the relevant email address enables your organization to delegate license management to the customer via the Sentinel EMS customer portal.
4.Expand Define Entitlement Attributes > Additional Attributes and optionally set one or more of the following.
a. (Optional) Set Allow Activation to Yes and ensure that Vendor Only is selected. This ensures that end users that access the Sentinel EMS customer portal cannot activate the products in the entitlement.
b. (Optional) Set Entitlement as a Whole to Yes. This recommended setting enables you to activate all products at once without the need for selecting each product.
c. (Optional) Set Send Notification to Yes. This sends an email to the administrator user, notifying them that the entitlement is ready for activation.
5.In the Associate Products / Product Suites pane, under Available Products, click the product you created to add it to the Associated Products / Product Suites section. (The Products | Product Suites toggle button is displayed only when both products and product suites are available for use in Sentinel EMS.)
6.In the Available Quantity field, you can retain the default value, 1, or enter a larger value if desired. The available quantity specifies the total number times that the line item (product ) can be activated from this entitlement.
7.Click Save to save the entitlement as a draft. (If you skip this and go to another tab, your input will be lost.)
8.In the Entitlements page, in the Actions column, click ![]() to complete the entitlement.
to complete the entitlement.
(The image shows the Draft status prior to confirmation.)
9.In the confirmation box, click Complete (not shown). The entitlement details are saved. An Entitlement Certificate email is sent to the user email address you entered earlier.
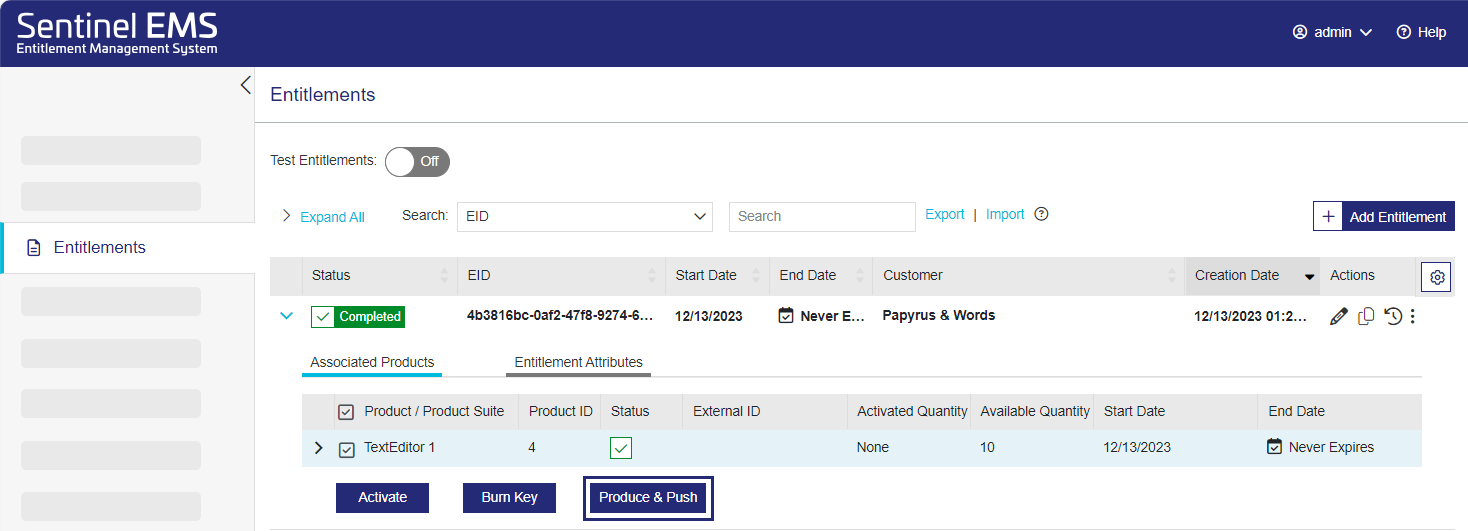
(The image shows the Completed status post-confirmation.)
In the next step, you will
In this step, you generate a cloud license and push the license to the Thales service-hosted, cloud license manager server in a single step.
1.From the navigation pane, select Entitlements.
2.Expand the entitlement you created and click Produce & Push.
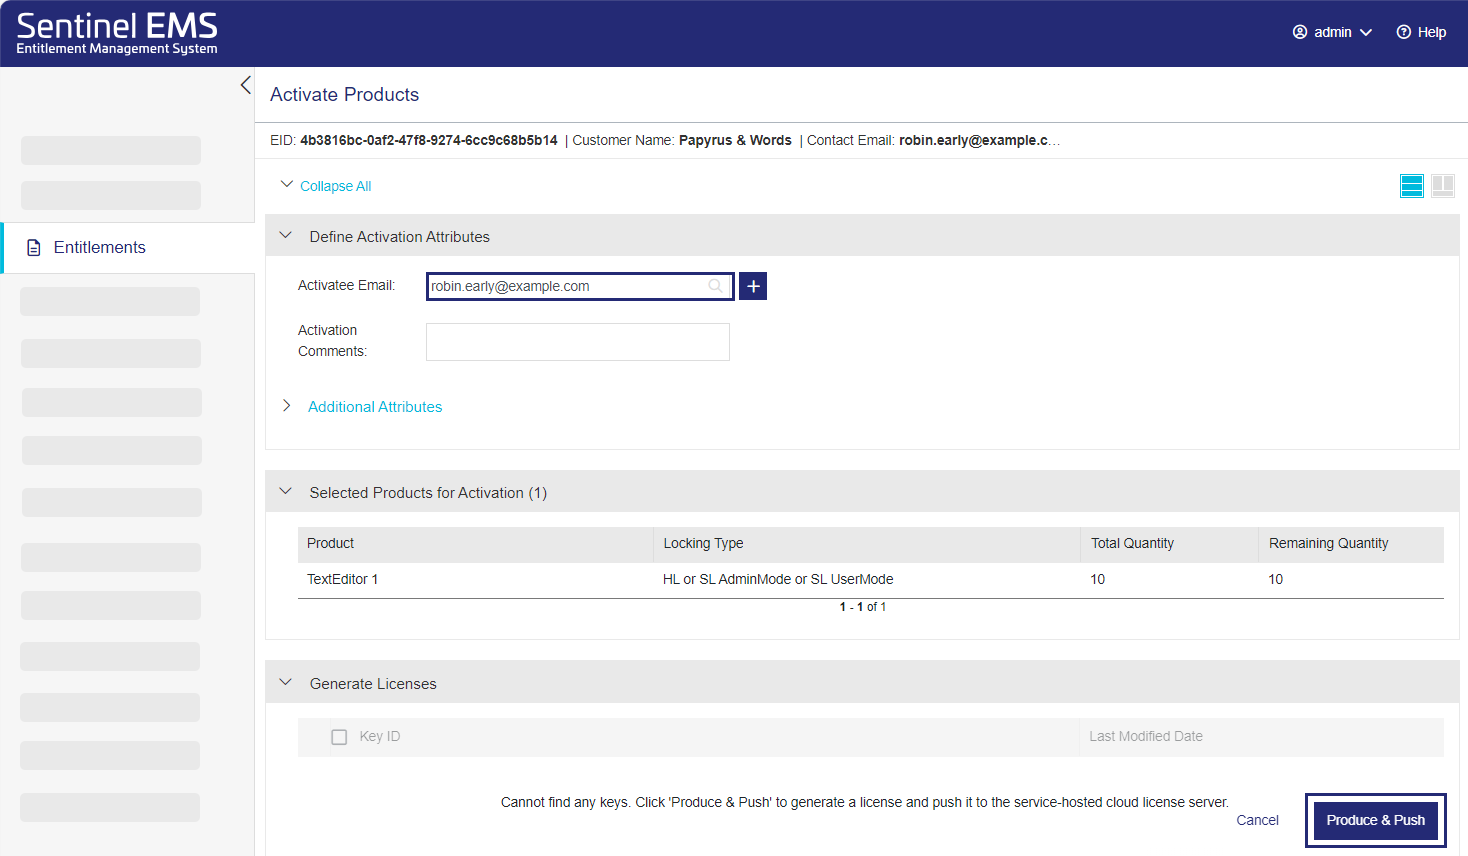
3. In the Activate Products page, verify that the Activatee Email is correct.
4.Click Produce & Push to generate a new key with the required licenses.
TIP If you ever need to update this key, the Generate Licenses area lets you choose between generating a new key or updating the licenses on the existing key.
Unless needed, Thales recommends that you update the existing key. By maintaining a single key for each customer, you limit confusion and ease maintenance over time.
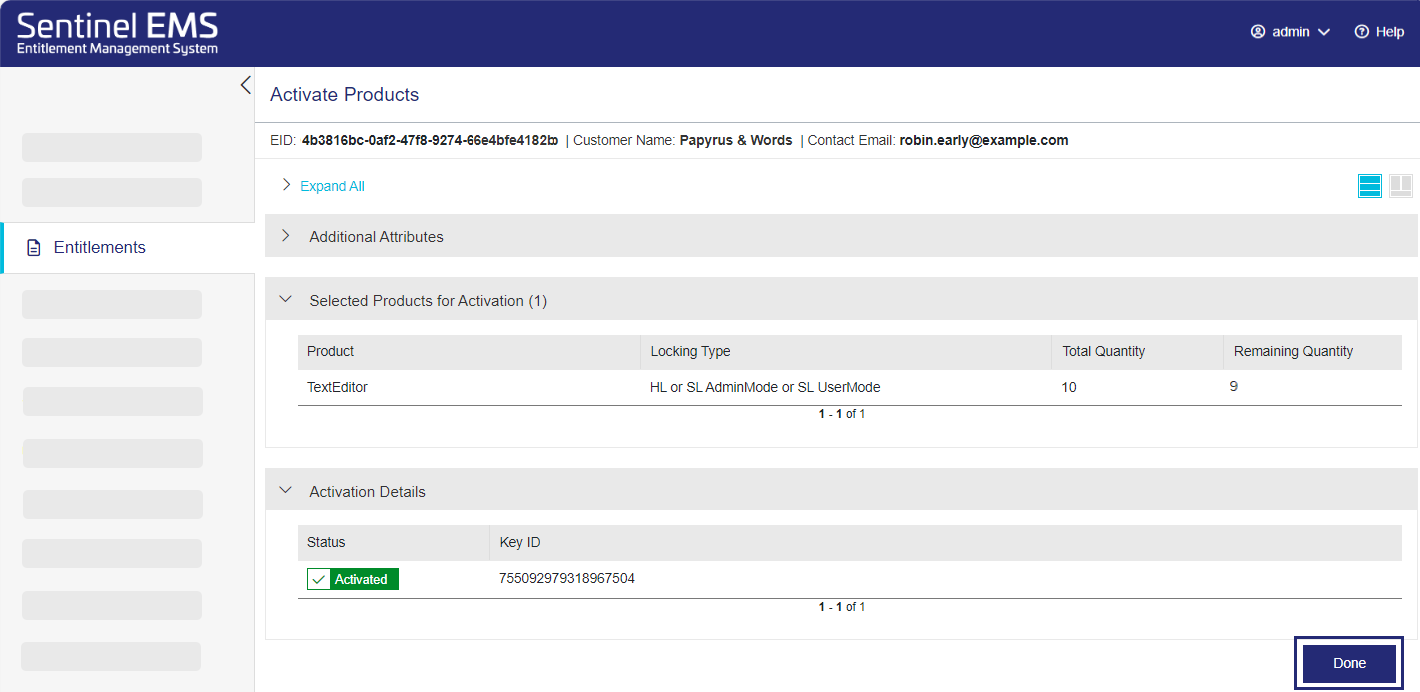
5.The Activate Products page displays information about the products you are activating.
6.Click Done. A license certificate is sent to the activatee email address that you specified earlier.
The license certificate email does not include a license string because the end user machine accesses the cloud license using unique identity credentials instead of a license string.
7.(Optional) View the activation in the Activations page.
From the navigation pane, select Activations. The key is marked as Activated, and the license is now stored on Thales' service-hosted, cloud license manager server.
8.(Optional) View the key in the Sentinel Keys page.
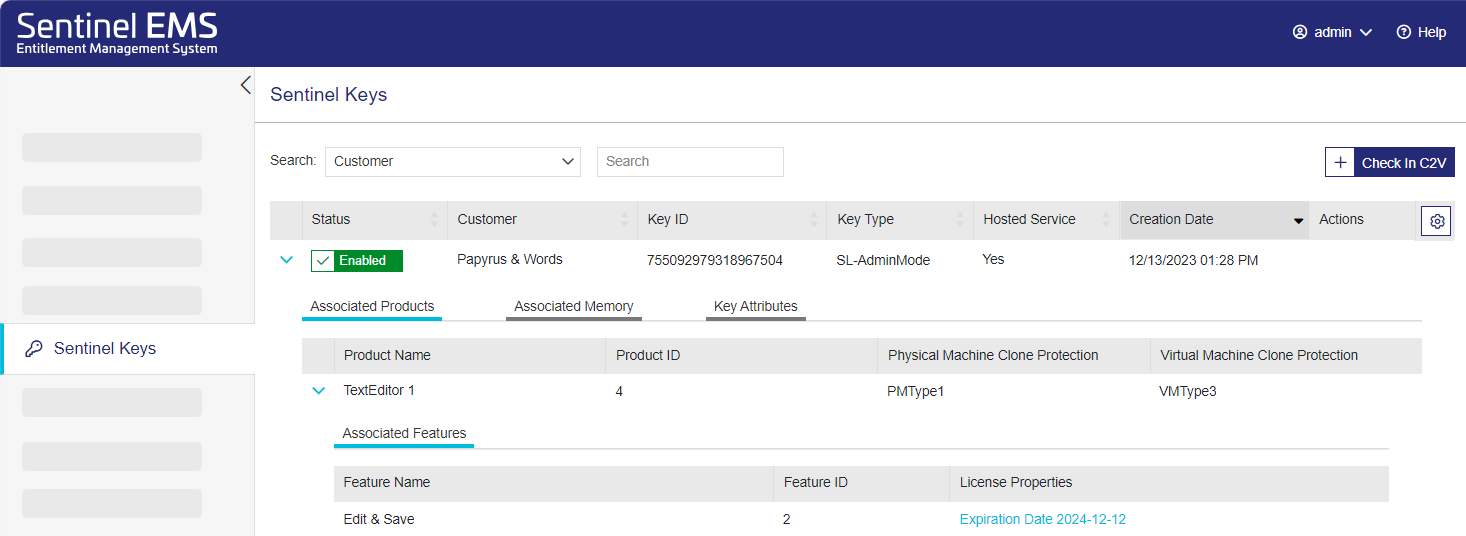
In the navigation pane, click Sentinel Keys. The Status column indicates the status of the Sentinel key.
The Enabled status means that the license was pushed successfully to the cloud license manager server. You can expand the key line item and switch between the tabs to view the associated products and features, associated memory, and key attributes.
TIP When there are multiple keys on the page, you may want to search by customer to locate the key.
Congratulations! You successfully generated a CL (cloud licensing) key.
Define an End User and Associate a Sentinel Key
In this section, you define an end user for the licensed application and associate a Sentinel key with that end user to grant them usage rights. In user-based licensing, the user association process is essential for managing software access, tracking usage, enforcing compliance, and controlling access for each individual user.
In a real-life scenario, you would define as many end users as needed. To enable user-based licensing, each end user must be associated with a customer. After defining end users, you would then associate those users with the entities for which they need access—Sentinel keys or products—or disassociate them from these entities as necessary.
Although this tutorial describes associating users with Sentinel keys, you can also associate users with products. This option is available if the Enable User-Product Association attribute in the Administration Console > General Settings section is set to Yes. You decide whether to associate users with Sentinel keys or products based on your business needs.
•Associate users with Sentinel Keys to achieve the highest level of granular control over user access by tying a user's product access to that unique key. This is the approach used in this tutorial.
•Associate users with products to provide consolidated access to those product across all associated entitlements. All associated users automatically gain access to and can use the products as long as at least one activated entitlement line item includes those products.
Although you can perform this step from either the Sentinel EMS vendor portal or the Sentinel EMS customer portal, this tutorial explains the steps using the Sentinel EMS vendor portal. ![]() Show me how
Show me how
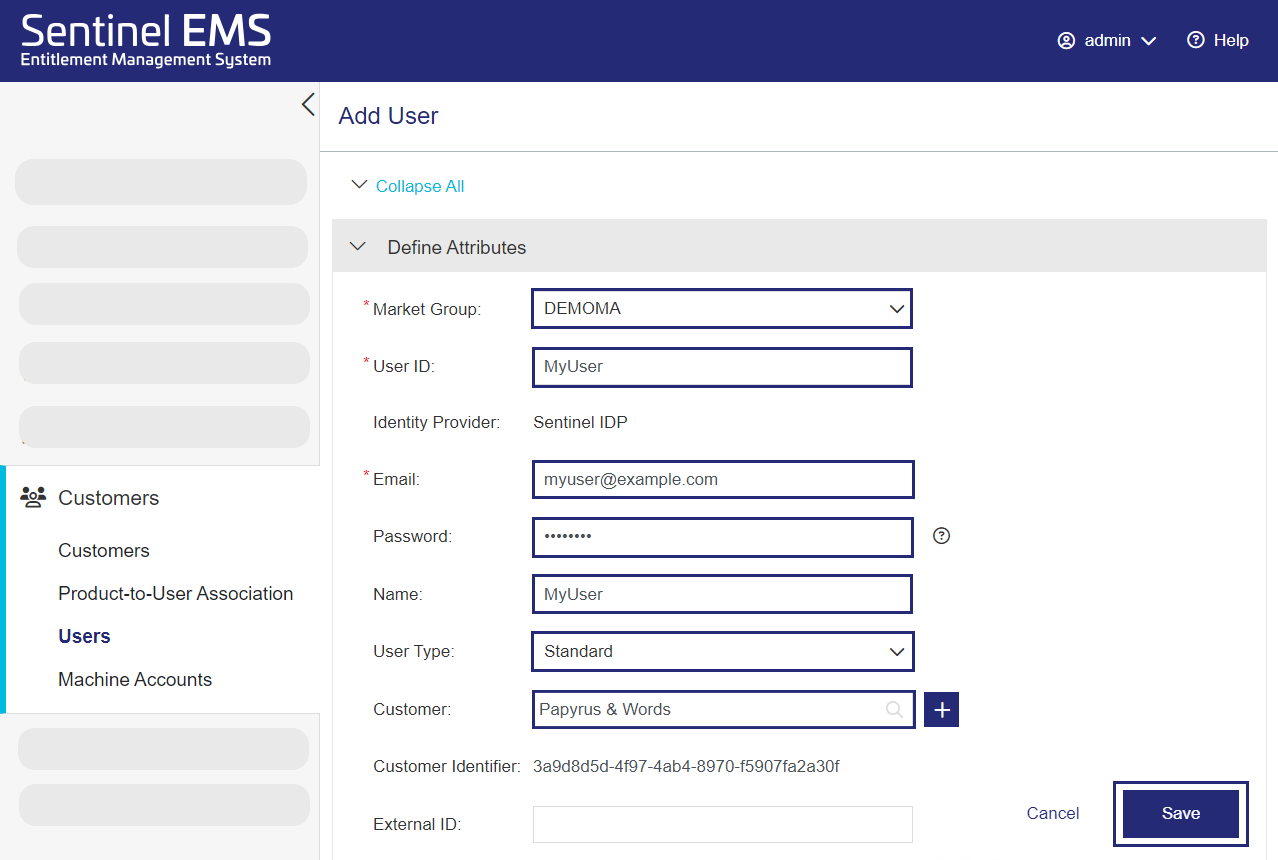
3.In the Add User page, if the Market Group list is displayed, select the market group for the namespace that you are using, for example, DEMOMA.
4.In the User ID field, enter an identifier for the user that you are creating, such as MyUser. You can enter any identifier that you want, including a name or email address.
5.In the Email field, enter an end user email address. To receive a notification when the entitlement is activated, enter an email address to which you have access. (Do not use the administrator email address that you entered earlier.) The image shows an example.
6.In the Password field, enter a password that you will remember. Point to the help icon 
The end user can use this password to log on to the Sentinel EMS customer portal.
7.In the Name field, enter a name for the end user, such as MyUser. You can enter your own name if you want.
8.Under User Type, select Standard.
9.In the Customer field, start typing the name of the customer that you created earlier. As you type, a list of suggestions is displayed. Select the relevant entry. This associates the user with the specified customer when you save the customer.
10.Click Save.
You've created your end user. In the Users page (not shown), you can expand the user that you just created to view the various user attributes.
Next, you will associate a product with the end user.
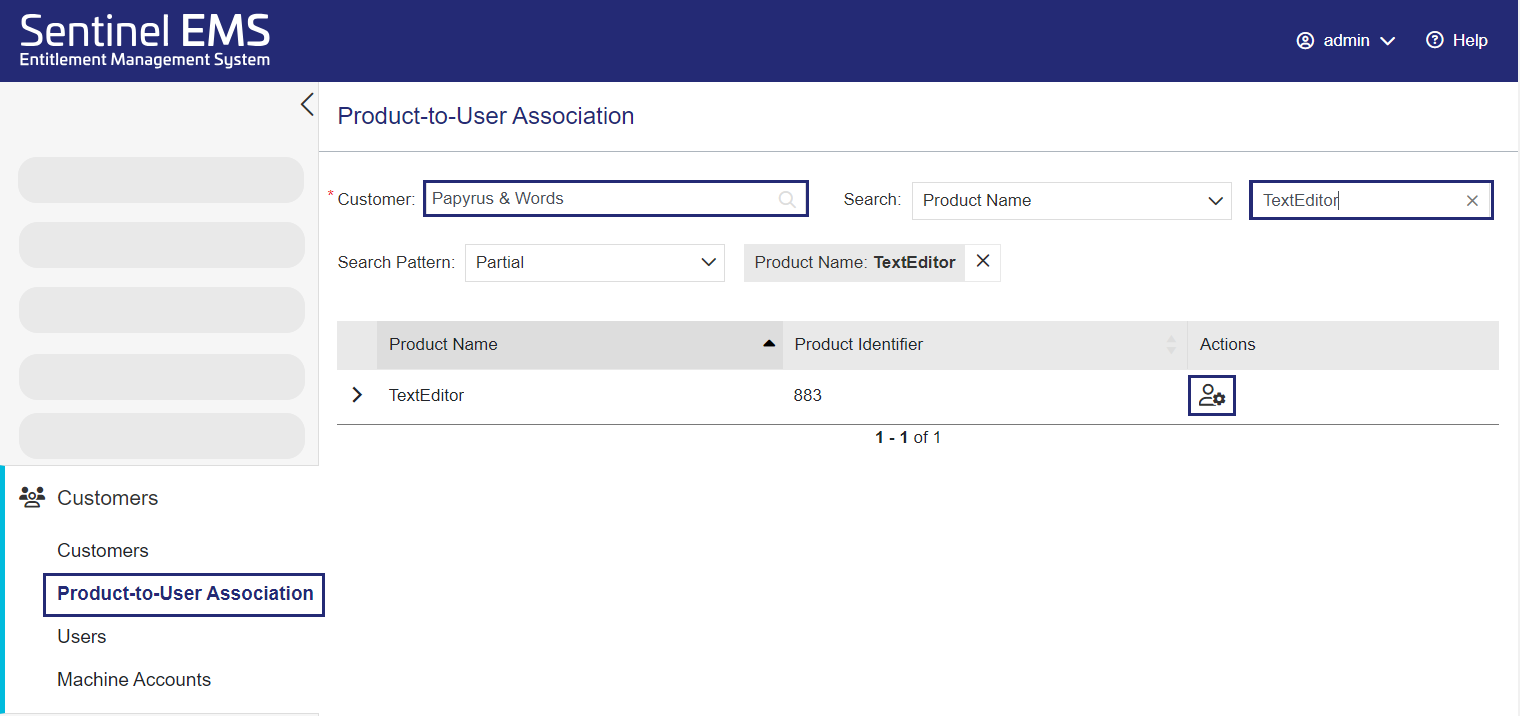
1.From the navigation pane, select Customers > User Associations.
2.In the Customer field, start typing the name of the customer that you created earlier. As you type, a list of suggestions is displayed. Select the relevant entry.
3.(Optional) In the Search box, select Product Name, and enter TextEditor, which is the name of the product in the Sentinel key for which you want to associate with the user. Searching helps you quickly find the relevant item when many items are available.
4.In the Actions column of the product, select Manage User Association ![]() .
.
5.In the Define Attributes pane, if the Associate User With option is displayed (not shown), select Sentinel Key.
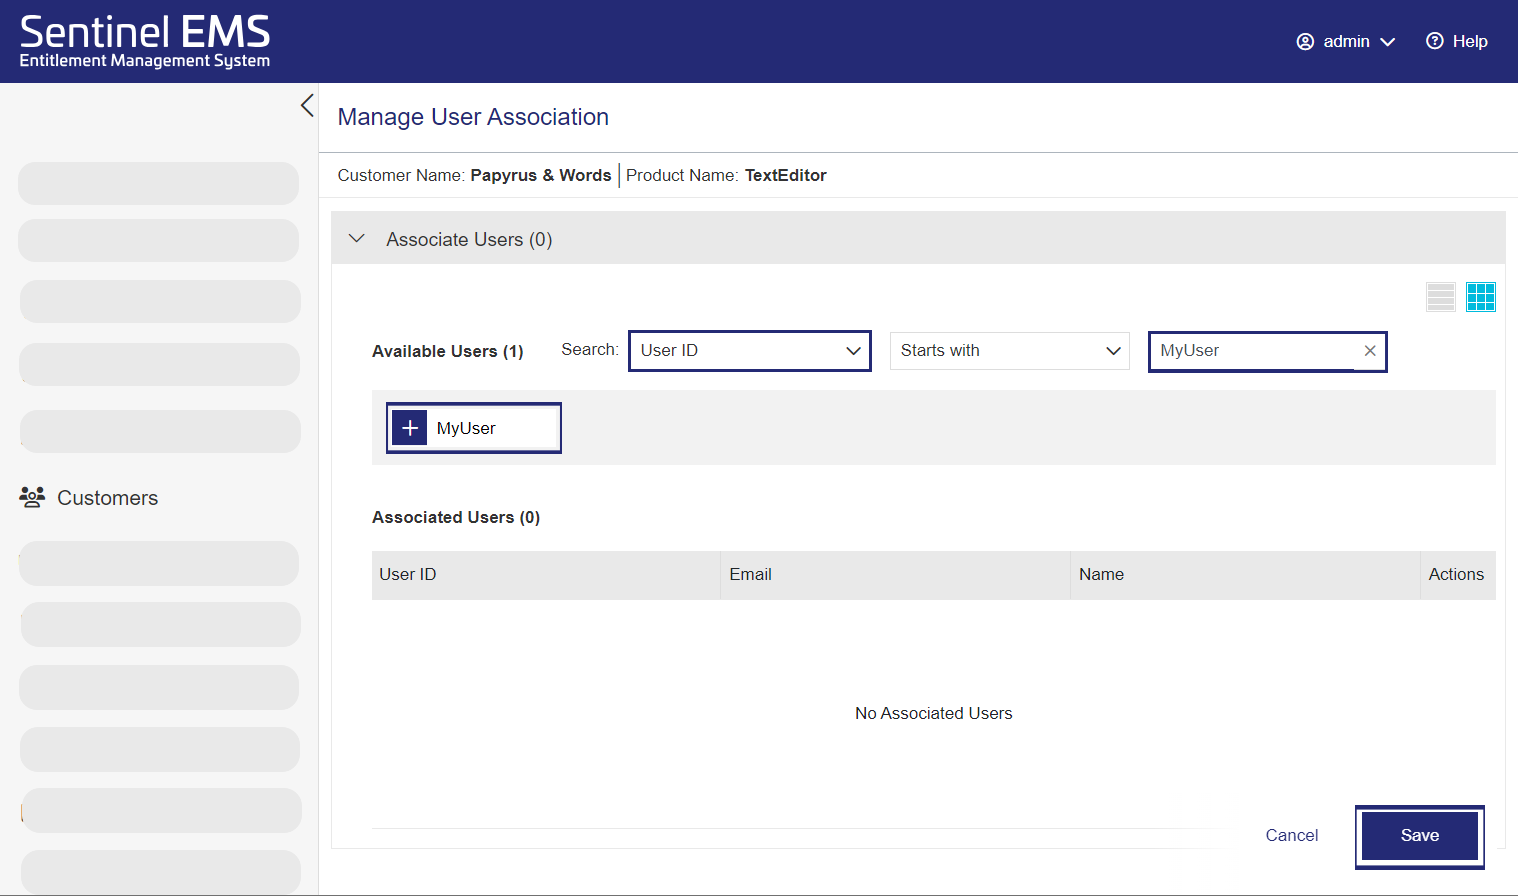
6.In the Available Users pane of the Manage User Association page, click the end user that you created earlier. The user is moved to the Associated Users pane.
7.Click Save.
You've now associated your user with the TextEditor product that is tied to the Sentinel Key ID listed in the Define Attributes pane.
Next, you will set up an OAuth Client.
Set an OAuth Client
In this section, you set OAuth client authentication to enable end users to access your application. The tasks related to configuring the OAuth client are not dependent on other steps performed in Sentinel EMS or Sentinel LDK and can be done at any time.
This tutorial assumes that you have a basic understanding of OAuth. If you are not familiar with OAuth, we recommend reviewing the section describing OAuth in the Sentinel EMS User Guide for Sentinel LDK. To learn more about the hasp_auth.ini file described below, see Sentinel LDK Software Protection and Licensing Guide.
Make sure that you are logged on to the Sentinel EMS vendor portal. ![]() Show me how
Show me how
In this step, you set the OAuth client authentication in Sentinel EMS.
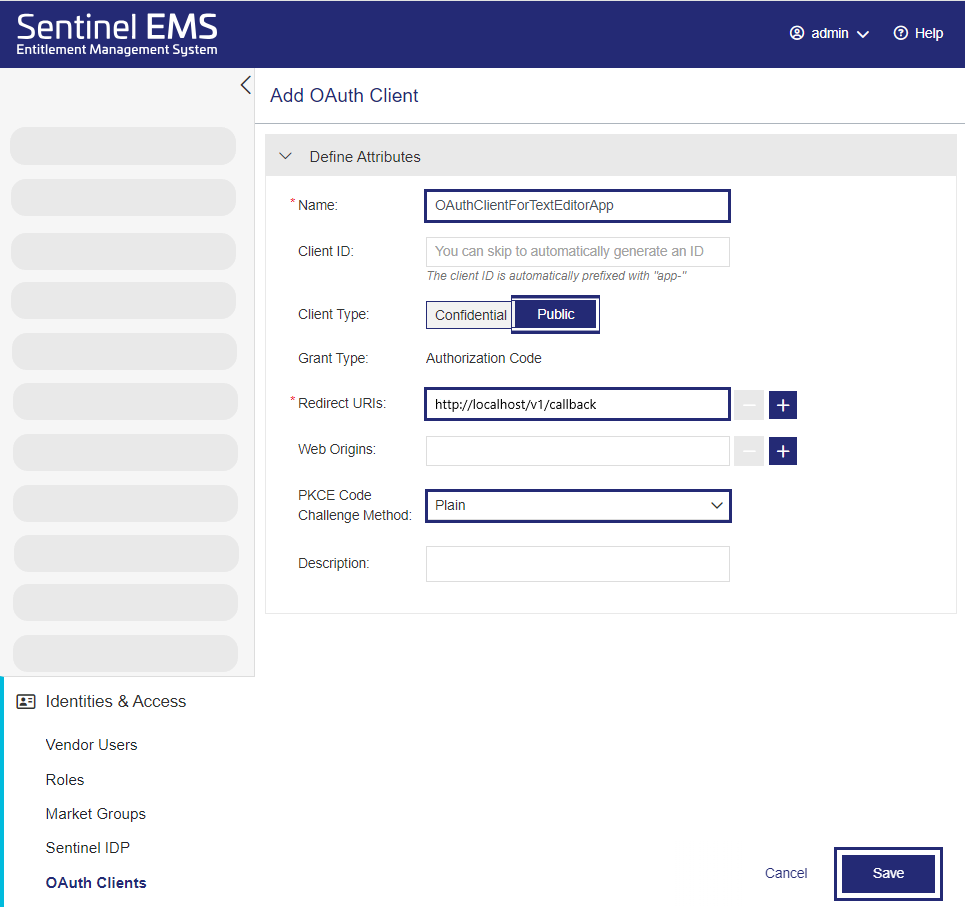
When you create an OAuth client, the attribute values that you set depend on the type of application. In this tutorial, you are providing client access to the TextEditor application, which is a desktop application, so you will apply a public client. For a SaaS application, you would set a confidential client.
For example, if you are setting the OAuth client for a public application, which is suitable for an on-premises or desktop application, you would select the Public client type, set the Redirect URI to http://localhost/<path>, and set the PKCE Code Challenge Method to Plain. Similarly, if you are setting the OAuth client for a confidential application, which is suitable for SaaS applications, you would set the confidential client credentials.
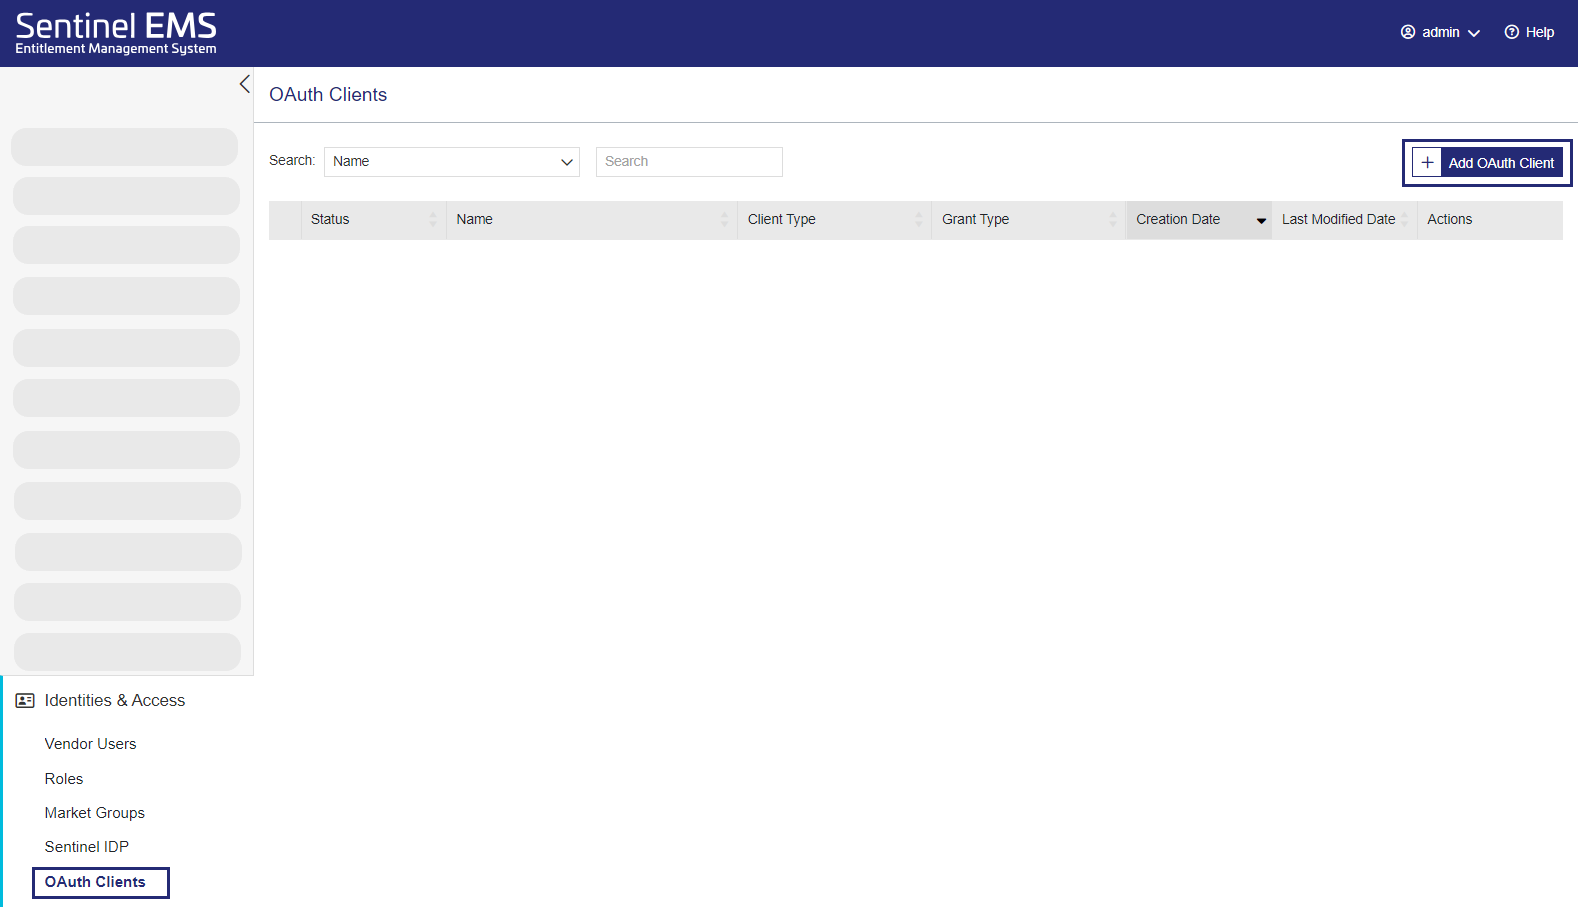
1.From the navigation pane, select Identities & Access > OAuth Clients.
2.In the OAuth Clients page, Click Add OAuth Client .
3.In the Add OAuth Client page, in the Name field, enter a name for the OAuth client that you are creating, such asOAuthClientForTextEditorApp. You can enter any name that you want up to 255 characters.
4.Leave the Client ID field blank. When you click Save, an ID will be generated automatically. Whether you enter a value or enable Sentinel EMS to generate a value for you, the ID is automatically prefixed with "app-", as shown in the example. (If you want to specify a client ID, you can enter alphanumeric characters, underscores, and hyphens.)
5.In the Client Type field, select Public. The Grant Type is automatically set to Authorization Code.
6.In the Redirect URIs field, enter the callback URL where the end user is redirected after successfully authenticating and authorizing the client application, for example: http://localhost/v1/callback
7.Under PKCE Code Challenge Method, select Plain.
8.Click Save.
You've now set an OAuth Client in Sentinel EMS.
Next, you will add the OAuth Client to your application.
Now that you have created your OAuth Client, it is time to add the OAuth Client to your application.
User-based licensing uses OAuth authentication to enable end users to access your application. You set the OAuth client attribute values according to the type of application. TextEditor is a desktop application, which requires you to set a public client type and an authorization code grant type.
1.Navigate to: %ProgramFiles(x86)%\Thales\Sentinel LDK\Redistribute\Authentication Runtime\
2.Copy the following files to the clipboard:
•hasp_auth.ini
•hasp_auth.exe
•welcome.htm
3.Paste these files in the %Program Files (x86)%\Thales\Sentinel LDK\Samples\Tutorial\TextEditor folder.
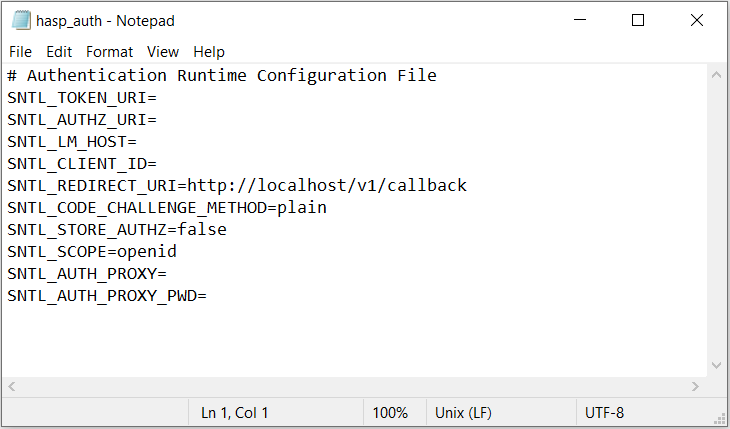
4.Open the hasp_auth.ini file in any text editor and enter the following values for the respective parameters. To learn more about any of these parameters, see the hasp_auth.ini section in Sentinel LDK Software Protection and Licensing Guide.
•SNTL_TOKEN_URI=https://<your-identity-provider-URL>/auth/realms/<realm-ID>/protocol/openid-connect/token
(for example, https://my-idp.example.com/auth/realms12a12aa0-1234-1aa2-1aa2-a123b1234567/protocol/openid-connect/token)
•SNTL_AUTHZ_URI=https://<your-identity-provider-URL>/auth/realms/<realm-ID>/protocol/openid-connect/auth
(for example, https://my-idp.example.com/auth/realms/12a12aa0-1234-1aa2-1aa2-a123b1234567/protocol/openid-connect/auth)
•SNTL_LM_HOST=<your-Sentinel-EMS-URL>
(for example, myorg.example.com)
•SNTL_CLIENT_ID=app-<your-client-ID>
(for example, app-11aaa111-a111-1aaa-1111-11aaaaaaa1aa)
•SNTL_REDIRECT_URI=http://localhost/v1/callback
•SNTL_CODE_CHALLENGE_METHOD=plain
•SNTL_STORE_AUTHZ=false
•SNTL_SCOPE=openid
Optional Parameters
If you do not need to set the following values, you can leave them blank or delete them.
•SNTL_AUTH_PROXY, SNTL_AUTH_PROXY_PWD: Set these values when using a proxy.
•SNTL_LOG_LEVEL: Set this value to generate a log file for troubleshooting.
•SNTL_BROWSER_MODE, SNTL_EMBEDDED_BROWSER_TITLE: Set these values if your application uses an embedded browser.
5.Save and close the hasp_auth.ini file.
6.Verify that the authentication works as expected.
a. Launch TextEditor. If OAuth integration is successful, a sign-in page opens.
b. Enter your credentials and verify that TextEditor opens.
You have successfully integrated OAuth with your application.
Integrate Licensing and Protection
This section is intended only for developers. It's time to protect the TextEditor application by using Sentinel LDK Envelope. Sentinel LDK Envelope utilizes the Sentinel LDK Licensing API to establish a strong binding between the protected software and the license installed in the protection key.
Now that you
TextEditor is already integrated with the necessary Sentinel LDK Licensing API calls to manage (or consume) licenses for the Edit & Save and Print features for this tutorial. You do not need to perform additional integration steps to enable the licensing functionality in this tutorial.
You can review TextEditor’s source code and comments to see how the Edit & Save and Print features are integrated with the Sentinel LDK Licensing API.
1. Navigate to the %ProgramFiles(x86)%\Thales\Sentinel LDK\Samples\Licensing\csharp\TextEditor folder to access the source code.
2.Open EditorForm.cs, for example, to view the source code, as shown in the snippet.
Notice the constants that define the feature IDs for Edit & Save and Print.
When the TextEditor application loads, Sentinel Licensing API validates the licenses for each feature. This best practice ensures that end users can see which features are available for use as soon as they log in to the application. Otherwise, a feature might appear disabled or return an error when a user tries to use it.
In this sample, Sentinel Licensing API logs in to the Edit & Save feature immediately, enabling users to start consuming the license as soon as they open TextEditor.
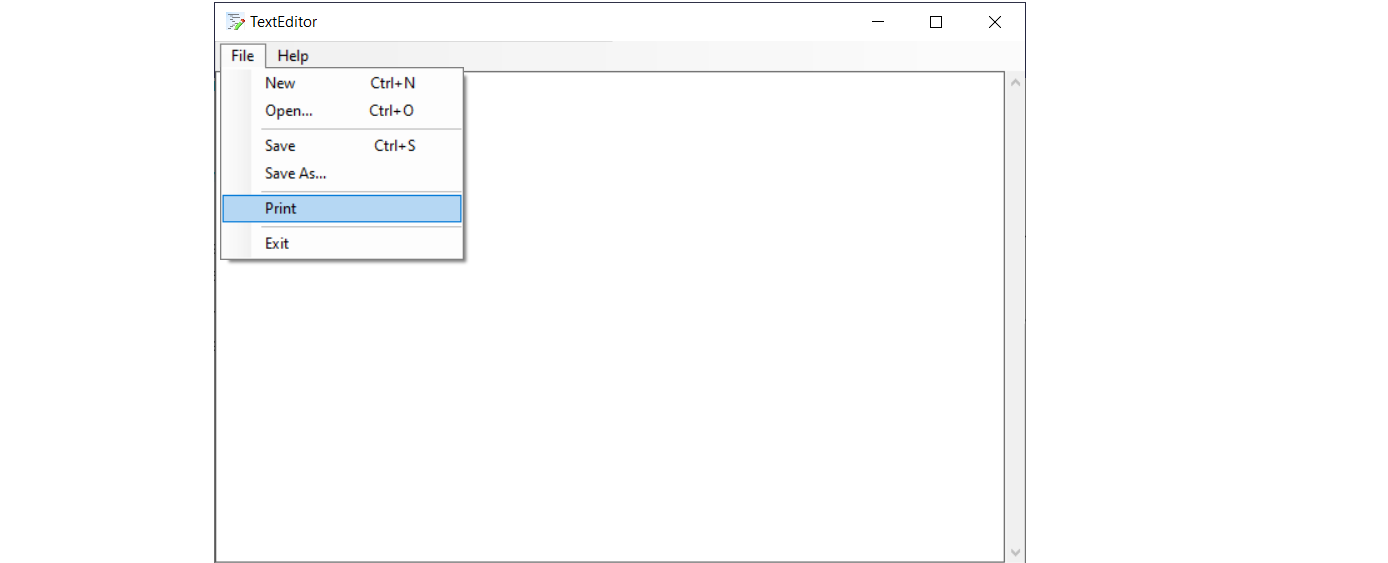
Sentinel Licensing API logs in to the Print feature to consume a license only when a user actually tries to print (not shown). Validating the license when the application loads and logging in to the feature only when needed prevents unnecessary license consumption, which is especially useful for execution count-based licenses.
...

namespace TextEditor
{
    public partial class EditorForm : Form
    {
        private String filePath = String.Empty;
        private static string defaultScope = "<?xml version=\"1.0\" encoding=\"UTF-8\" ?> " +
                                             "<haspscope/> ";
        // Set the constants for the licensed features
        // Sentinel Licensing API uses these constants to determine whether a valid license exists for each feature ID
        // In Sentinel EMS, these same feature IDs must be used to define the features in the catalog
        const int LDK_FEATURE_Edit = 501;
        const int LDK_FEATURE_Print = 502;

        public EditorForm()
        {
            InitializeComponent();
        }

        ...

        private void printToolStripMenuItem_Click(object sender, EventArgs e)
        {
            // Log in to the licensed Print feature
            HaspFeature feature = new HaspFeature(LDK_FEATURE_Print);
            Hasp hasp = new Hasp(feature);

            HaspStatus status = hasp.Login(VendorCode.Code, defaultScope);
            if (HaspStatus.StatusOk == status)
            {
                PrintTxt(this.textBox.Text);
            }
            else
            {
                MessageBox.Show("Print license not found.",
                    "TextEditor",
                    MessageBoxButtons.OK,
                    MessageBoxIcon.Question,
                    MessageBoxDefaultButton.Button2);
            }
        }
        ...

        private void EditorForm_Load(object sender, EventArgs e)
        {
            // Sentinel Licensing API determines if a valid license exists for the Edit & Save feature
            // and logs in to consume the license
            HaspFeature feature = new HaspFeature(LDK_FEATURE_Edit);
            Hasp hasp = new Hasp(feature);

            HaspStatus status = hasp.Login(VendorCode.Code, defaultScope);
            if (HaspStatus.StatusOk != status)
            {
                this.newToolStripMenuItem.Enabled = false;
                this.saveToolStripMenuItem.Enabled = false;
                this.saveAsToolStripMenuItem.Enabled = false;
                this.textBox.ReadOnly = true;
                this.Text = this.Text + " - " + "Viewer Mode";
            }

            // Sentinel Licensing API determines if a valid license exists for the Print feature
            String scope =
                "<?xml version=\"1.0\" encoding=\"UTF-8\" ?> " +
                "<haspscope>" +
                "    <feature id=\"" +
                LDK_FEATURE_Print +
                "\"/>" +
                "</haspscope>";
            String format =
                "<haspformat root=\"hasp_info\">" +
                "    <feature>" +
                "       <attribute name=\"id\" />" +
                "       <attribute name=\"locked\" />" +
                "       <attribute name=\"expired\" />" +
                "       <attribute name=\"disabled\" />" +
                "       <attribute name=\"usable\" />" +
                "    </feature>" +
                "</haspformat>";
            String info = null;

            status = Hasp.GetInfo(scope, format, VendorCode.Code, ref info);
            if (HaspStatus.StatusOk != status)
            {
                this.printToolStripMenuItem.Enabled = false;
            }
        }
    }
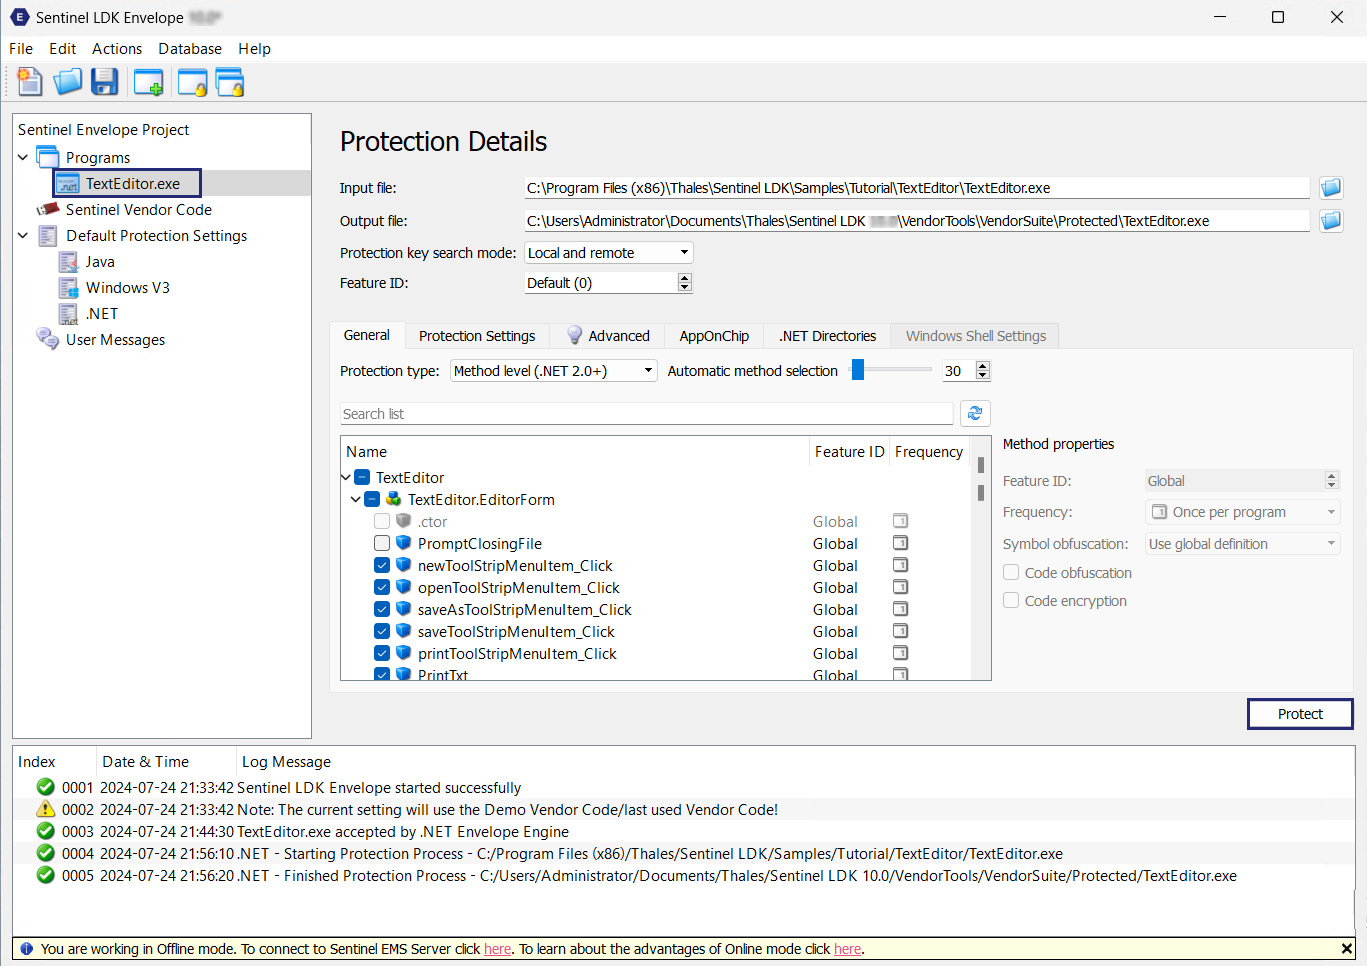
}In this section, you are using Sentinel Envelope to protect the TextEditor application.
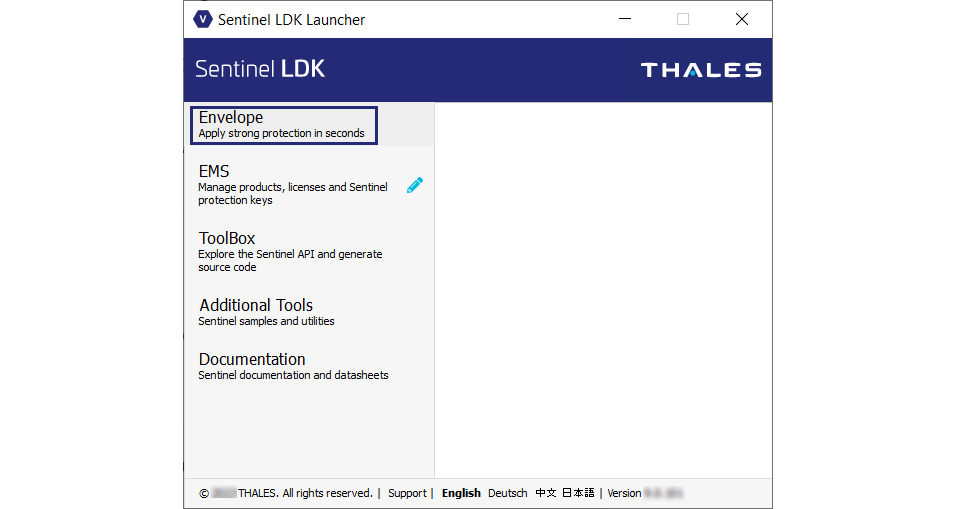
1.From the Start menu, select Sentinel LDK. The Sentinel LDK Launcher opens.
2.Click Envelope to launch Sentinel LDK Envelope. Sentinel LDK Envelope opens to enable you to protect your application or service.
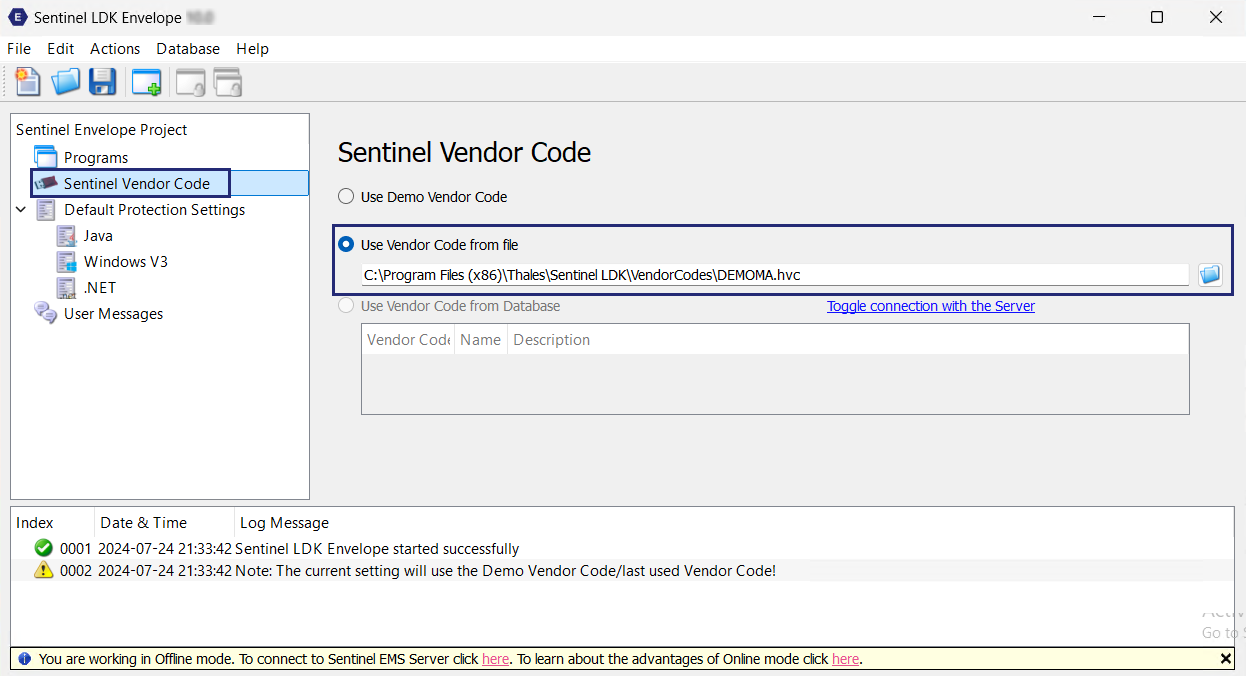
3. In the Sentinel Envelope Project pane, select Sentinel Vendor Code.
4.Select Use Vendor Code from file.
5.If not displayed by default, navigate to %ProgramFiles(x86)%\Thales\Sentinel LDK\VendorCodes\, and select DEMOMA.hvc
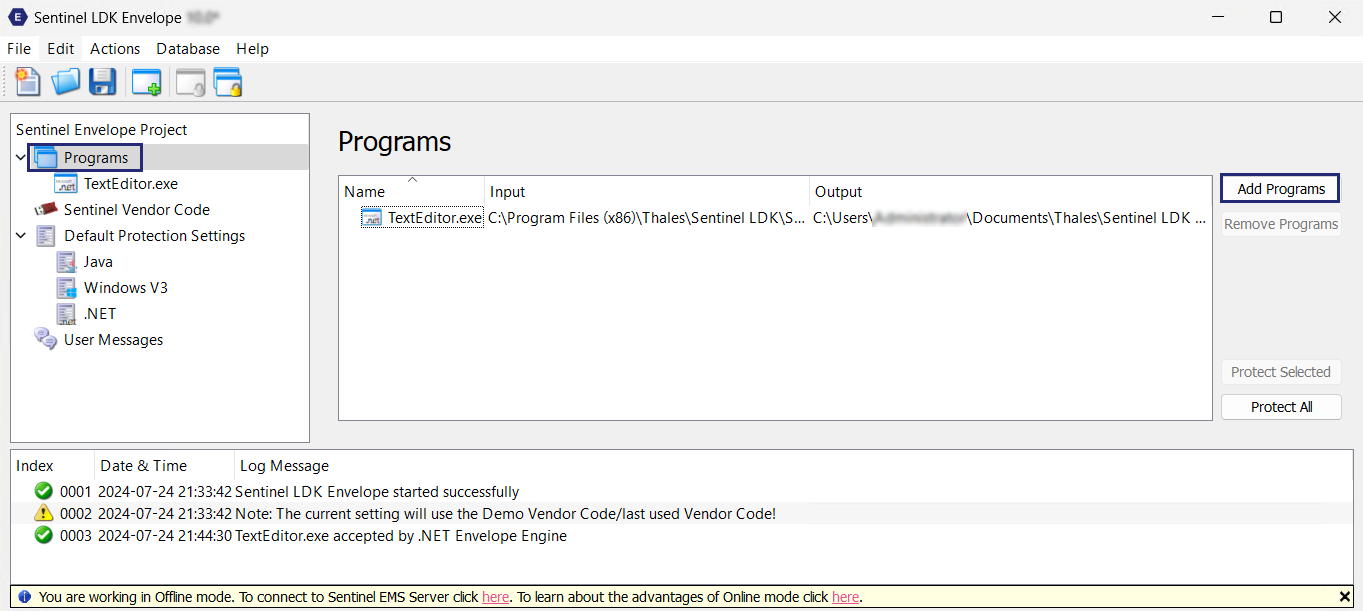
6.In the Sentinel Envelope Project pane, select Programs.
7.On the right side of the Programs pane, click Add Programs.
8.In the Add Programs window (not shown), navigate to the %ProgramFiles(x86)%\Thales\Sentinel LDK\Samples\Tutorial\TextEditor folder.
9.Select TextEditor.exe and click Open. TextEditor.exe is added to the Program list.
10.In the Sentinel Envelope Project pane, under Programs, select TextEditor.exe.
11.At the bottom-right of the Protection Details pane, click Protect. The Protection Status dialog box (not shown) shows the progress and displays a message when the protection is complete.
12.Click Close to close the dialog box when the protection process is complete.
13.Close Sentinel LDK Envelope. You are prompted to save the changes to the current project.
14.Click Save. The Save As dialog box is displayed. In the File Name field, enter Tutorial_TextEditor (or any name of your choice) and click Save.
Now that you have licensed the features and protected the application, it's time to test and validate the licensing and protection. Continue with End User Starts Using the Application / Test Your Application.
End User Starts Using the Application / Test Your Application
Now that the application is ready to use and the customer's end user is associated with your protected application or service
For the purposes of this training, let's assume that you, the developer, want to verify that the application is protected and that the licenses are working correctly.
This step demonstrates how to launch and test the TextEditor application. You can also see how its licenses are used.
1.Before you begin testing, copy the hasp_net_windows.dll file from %ProgramFiles(x86)%\Thales\Sentinel LDK\Samples\Tutorial\TextEditor to the output folder where TextEditor.exe is located.
2.Open the Tutorial_TextEditor folder you created and double-click the protected Texteditor.exe program to launch the TextEditor application.
You can see that the TextEditor application is protected in the following ways:
•The size of a protected application is larger than an unprotected application.
•The application load time of a protected application is slightly longer.
•When you use DEMOMA, a message box opens letting you know that the program is protected with a demo Sentinel protection key.
3.Test the TextEditor application to ensure that the licenses work correctly.
TextEditor should run in editor mode enabling you to add and edit text and to open a text file. Try saving and printing the document.
If TextEditor opens in viewer mode, the text area appears disabled, and you can open a document, but you cannot edit or print it. Verify that the licenses and feature IDs are configured correctly for the Edit & Save and Print features in Sentinel EMS and Sentinel Licensing API.
Congratulations! You licensed and protected the TextEditor application.
Glossary
Let's review the concepts and terminology that you need to know to work with Sentinel LDK enforcement in Sentinel EMS.![]() Show the Glossary
Show the Glossary


