Upgrading from Sentinel Pulse 1.4 to 1.7

For information about the latest version, see the Release Notes.

In this section:

>Before You Upgrade

>Upgrading Sentinel Pulse Package

>Modifying the Sentinel Pulse Input Connection

>Upgrading the Sentinel Pulse App

>Updating the Sentinel Tab to Support Product Variants

>Scheduling Sentinel Pulse Variant Data Generator

Once you have upgraded to Sentinel Pulse 1.7, you must also perform the steps for Displaying Salesforce Account ID in Account Mapping Tab.

Before You Upgrade

Before starting the installation process, please note the following:

>This page contains detailed instructions for upgrading from versions 1.4 to version 1.7.

>Between Sentinel Pulse versions 1.4 and 1.7, version 1.5 was released. This update introduced support for product variants. If you use versionless products in Sentinel EMS, you must also follow the steps in the Updating the Sentinel Tab to Support Product Variants to place the dashboard with Activated Variants table. If you are not using versionless products, you can skip these steps and proceed with the rest of the upgrade process.

Verifying the Sentinel Pulse Version

To confirm which version of Sentinel Pulse is installed on your Salesforce org perform the following steps:

1.In the top-right corner of the screen, click and select Setup.

2.On the left sidebar, in the Quick Find box, enter Installed Packages, and then select Installed Packages.

3.From the installed packages list, search for Sentinel Pulse.

4.Check the version installed under Version Number.

If the version is 1.7, then you are already on the latest version and you do not need to upgrade.

Upgrading Sentinel Pulse Package

Perform the following steps to upgrade the Sentinel Pulse package:

1.Paste the Sentinel Pulse app upgrade link in your web browser. For example,

https://login.salesforce.com/packaging/installPackage.apexp?p0=04t7Q123456pulse3QAA

NOTE   This link is a placeholder and does not lead to the Sentinel Pulse installation. Refer to Sentinel Pulse Order Emails for instructions on obtaining your app installation link.

2.Log in to the Salesforce app using administrator credentials, if not already logged in.

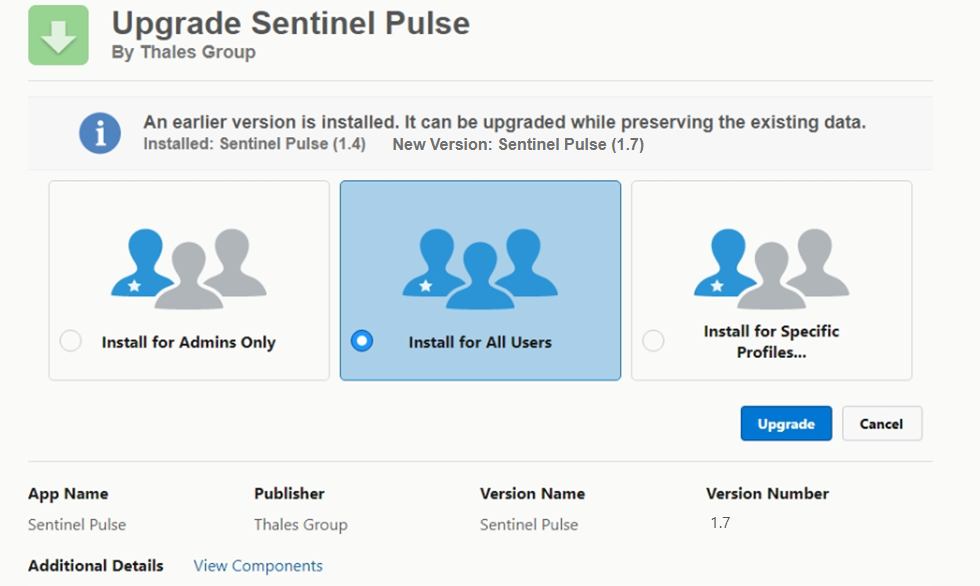
3.Select Install for All Users.

NOTE   You must select Install for All Users so that all the users in your Salesforce org have access to Sentinel Pulse without requiring to manually administer users.

4.Click Upgrade.

5.Click Done.

When the upgrade is complete, you will see the success message on your screen. Also, you will get an email notifying that the upgrade is complete.

Modifying the Sentinel Pulse Input Connection

To modify the Sentinel Pulse Input connection, follow these steps to update the Data Manager settings:

1.In the top-left of the screen, click App Launcher and search for Data Manager.

2.In Data Manager, click Connections.

3.Click the drop downnext to Sentinel Pulse Input under All Connections.

4.Click Edit Objects. The Edit objects for Sentinel Pulse Input screen appears.

5.Edit the ProductData object and select all the columns.

6.Select the VariantTransactionData object and then select all the columns.

7.Click Save.

8.Click Run Now to sync the connections.

Upgrading the Sentinel Pulse App

After successful upgrade of the new package, follow these steps to update the Sentinel Pulse app:

1. From the top-left of the screen, click App Launcher.

2.Search for Analytics Studio and look for Sentinel Pulse.

3.From the top-right, click Update Available to proceed.

4.On the next screen, Click Looks good, upgrade to upgrade. You may click Release Notes to view the list of new features, bug fixes and issues for this release.

5.The next screen displays all the changes that are part of this upgrade. You may also download the file to review the changes. Click Upgrade current app.

6.  Select the It's OK to delete the current app and all assets check box and then click Upgrade app.

When the upgrade is complete, you will see a message on your screen about completion. Also, you will get an email notifying that the upgrade is complete.

Updating the Sentinel Tab to Support Product Variants

If you are using product variants, you must modify the Sentinel tab to display for Entitlement Summary and Activation Trend for all products including product variants.

1.On the Accounts page, click an account from the table to display the details for that account.

2.On the top-right of the page, click the Setup button and select Edit Page.

3.Click within the region under the Entitlement Summary and Activation Trend. From the Dashboard drop-down on the right, select Entitlement and Activation Trend with Variants.

4.Update the following:

Set the height to 700.

Clear the Show Title and Show Header boxes to avoid redundant headers on the home page.

Select to enable Enable Notifications.

5.You need to add a dashboard filter specific to product variants. When complete, click Save.

The Variant Dataset Dashboard Filter

1.Click Add Dashboard Filter.

2.Select the following:

Data Source: Variant Dataset

Data Source Field: Hierarchy Path

Operator: Contains

Object Field: Account ID

Select Locked and Hidden.

3.Click OK.

Scheduling Sentinel Pulse Variant Data Generator

1.Click the drop-down to the right of Sentinel Pulse Variant generator.

2.Select Schedule.

3.Select the Event-based schedule mode.

4.Set Run Schedule After to The Salesforce local connection syncs.