Getting Started with Sentinel RMS—Network Lease Mode
The purpose of this document is to get you started with the licensing workflow of SCL (Sentinel Cloud Licensing) Add-on for RMS. It aims to familiarize you with the following processes—obtaining SDKs of Sentinel RMS and SCL Add-on, provisioning licenses using Sentinel EMS, obtaining license using the SCP service and consuming licenses by building and executing the Sentinel RMS samples for the
The Samples
The
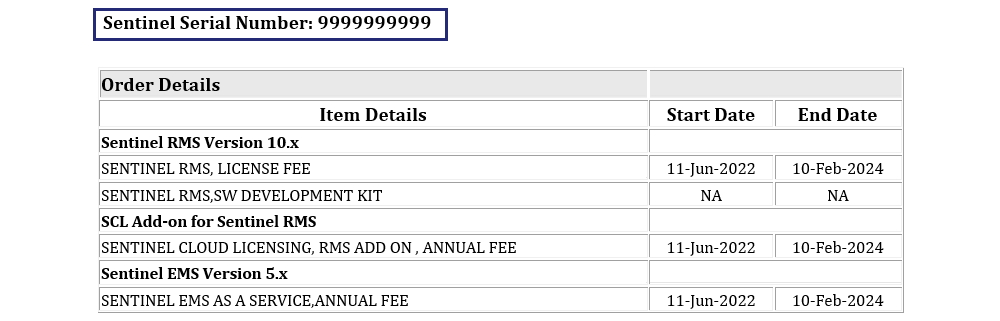
NOTE On placing an order for a Sentinel product, you receive two emails from Thales. The first email is referred to as the Thales Sentinel Order email and the second one as Thales Sentinel Secret Credential email. These emails contain order details, software download links, support details, and other important information.
Prerequisites
The Steps
Follow the steps below to run an SCP-enabled RMS sample application on Windows.
The first step is to download the Sentinel RMS SDK and SCL Add-on zip package from the Sentinel order emails, and install the Sentinel RMS SDK.
Downloading and Installing the Sentinel RMS SDK
NOTE If you are a production customer, refer to the Thales order emails for links to download the SDK. Alternatively, you can log in to your Thales support account and use the available links to download the SDK. If you are an evaluation/trial customer, the SDK download links are present in the trial portal, details of which are shared with you over emails.
1.Open the Thales Sentinel order email. In the Download Details table, click the Download link corresponding to the Sentinel RMS SDK (Windows) field.
2.For trial licenses, clicking the link will directly start the SDK download. For all other licenses, you will be redirected to the Thales Support Portal.
3.Extract RMSSDK10.x.xxxWindows.zip downloaded in the step above.
4.Run the StartHere.exe file and follow the instructions provided with the graphical installation wizard. Note the following:
•One of the screens displayed during the installation is Customer Information dialog box. In this dialog box, type your name, organization name, and the Sentinel Serial Number. You can copy and paste the Sentinel Serial Number from the Thales Sentinel Order email. This serial number is unique for each customer.
•The default Sentinel RMS installation directory is: C:\Program Files (x86)\Thales\Sentinel RMS Development Kit\10.x\
With Sentinel RMS installation, Sentinel RMS License Manager is deployed automatically.
Downloading the SCL Add-on for Sentinel RMS Package
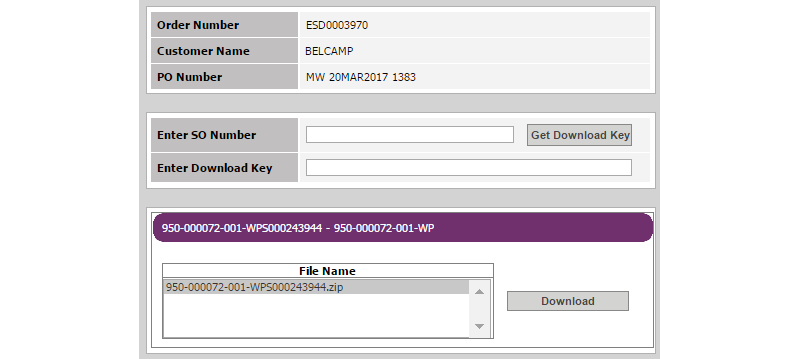
1.Open the Thales Sentinel Order email. In the Download Details table, click the Download link corresponding to the Sentinel Cloud Add-On Package field. This redirects you to a download page on the Thales support portal.
2.Enter the Sales Order (SO) number in the Enter SO Number field. The SO number is available in the subject field of the Thales Sentinel Order email.
3.Click Get Download Key. You will receive an email with the download key on your registered email address. The download key is valid for 24 hours.
4.In the Enter Download Key field, specify the received download key, and click Download. This will start the download of the SCL Add-on for Sentinel RMS package, which is a password-protected archive containing separate packages for different operating systems.
In this step, you connect to the Sentinel EMS Portal using the credentials shared by your Thales representative.
1.Navigate to the URL shared by Thales.
2.Log on using the User ID and Password provided by Thales.
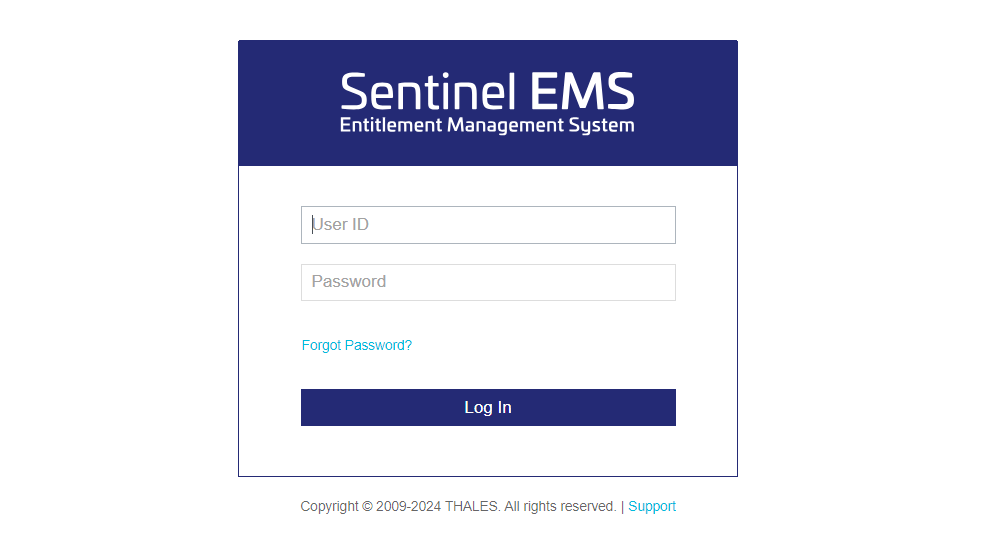
On the first login to Sentinel EMS, the getting started page is displayed which provides links to help you get started with Sentinel EMS. For existing users, the Entitlements page is displayed.
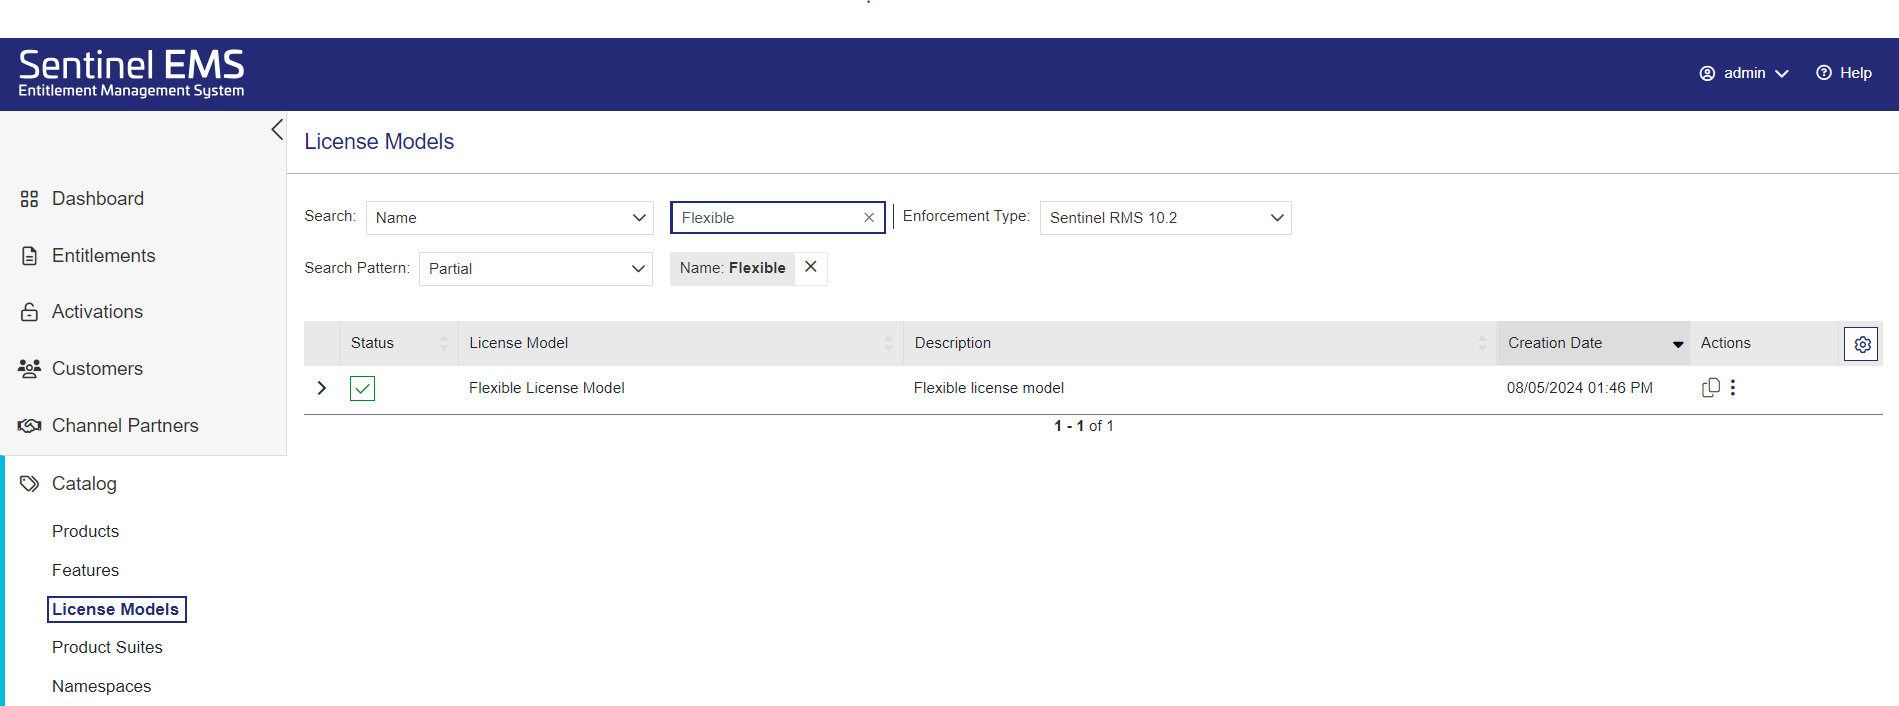
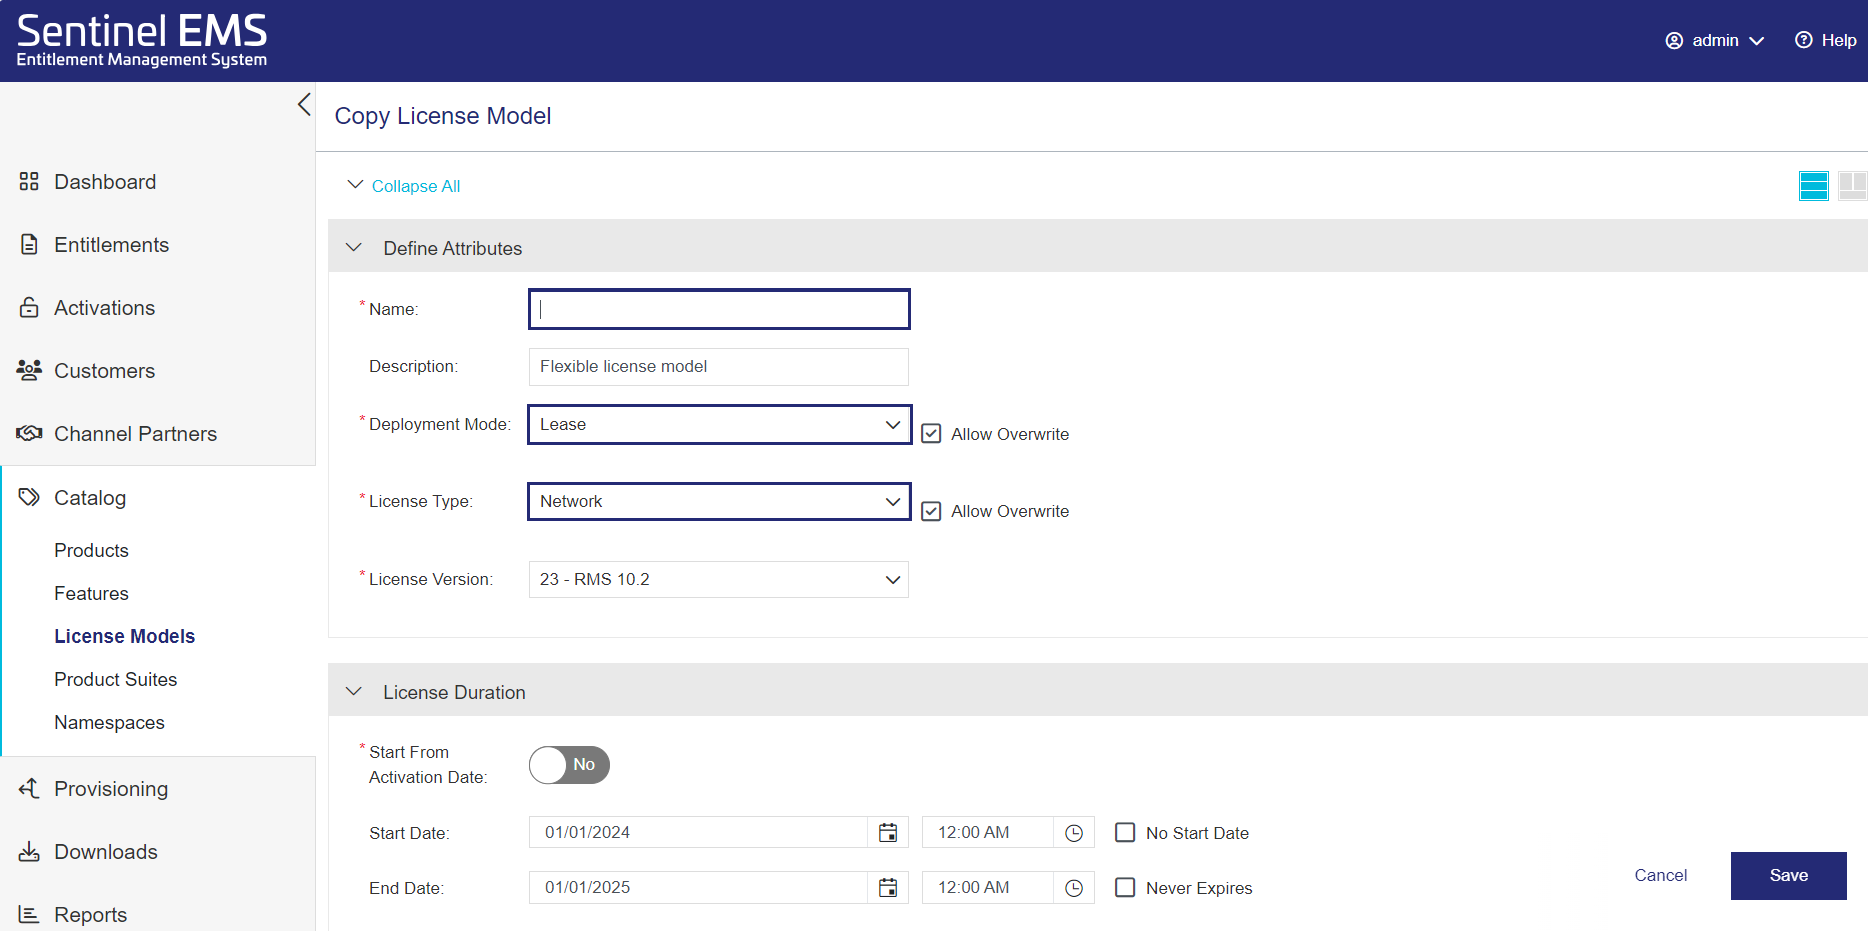
A license model is a combination of various parameters that define how a product can be used by an end user. You need to use the Flexible license model as the base for defining a license for the
1.From the navigation pane, select Catalog > License Models.
2.In the License Models page, search by Name for the Flexible License Model.
3. Under the Actions column, click Copy  .
.
4.In the Copy License Model page, in the Name field, enter any license model name, for example, MyLicense.
5.From the Deployment Mode drop-down, select Lease.
6.From the License Type drop-down, select Network.
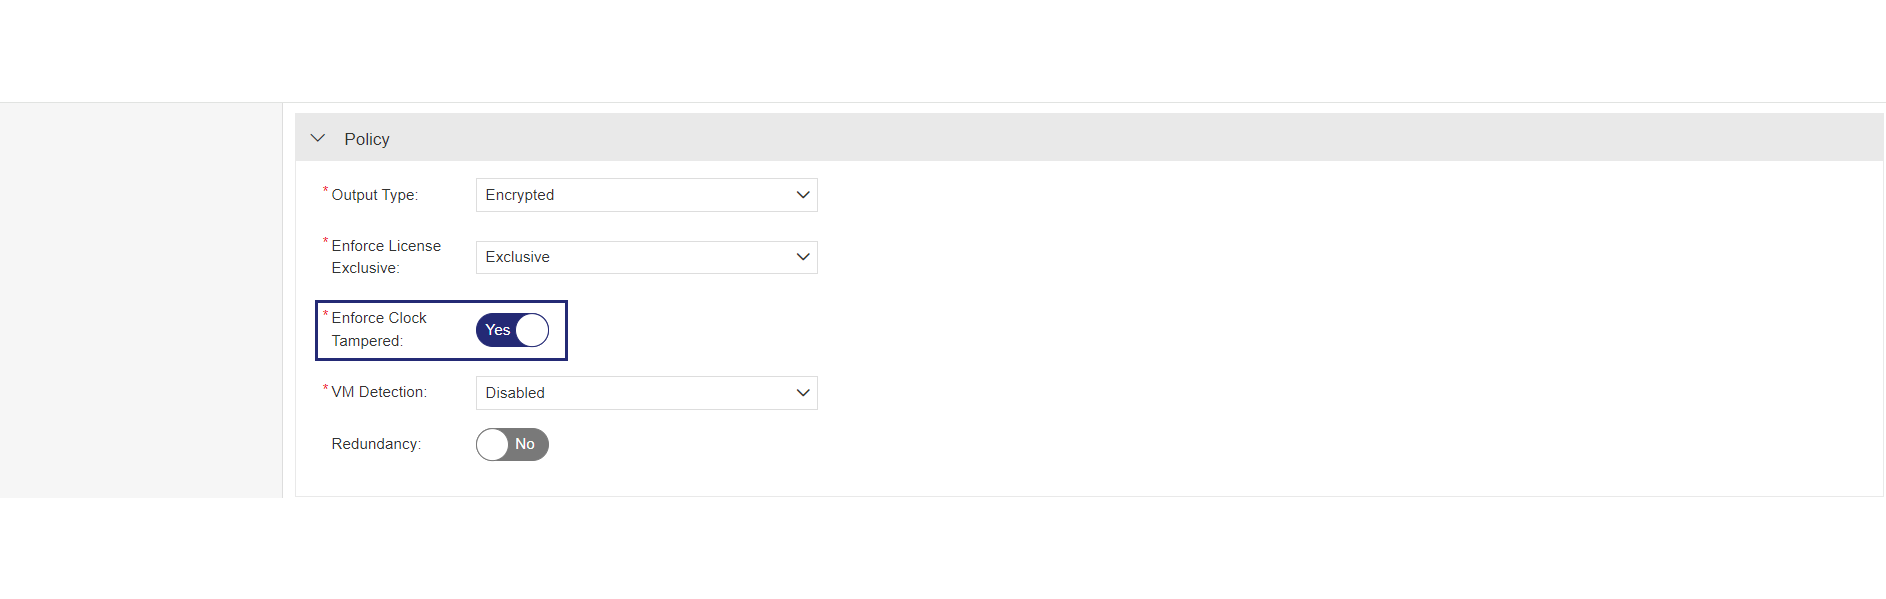
7.Under the Policy section, toggle Enforce Clock Tampered to No. This disables time tampering detection.
8.Under the Cloud Served section, toggle Fingerprint Registration to No. This specifies that the machine registration is not required to consume the entitlement.
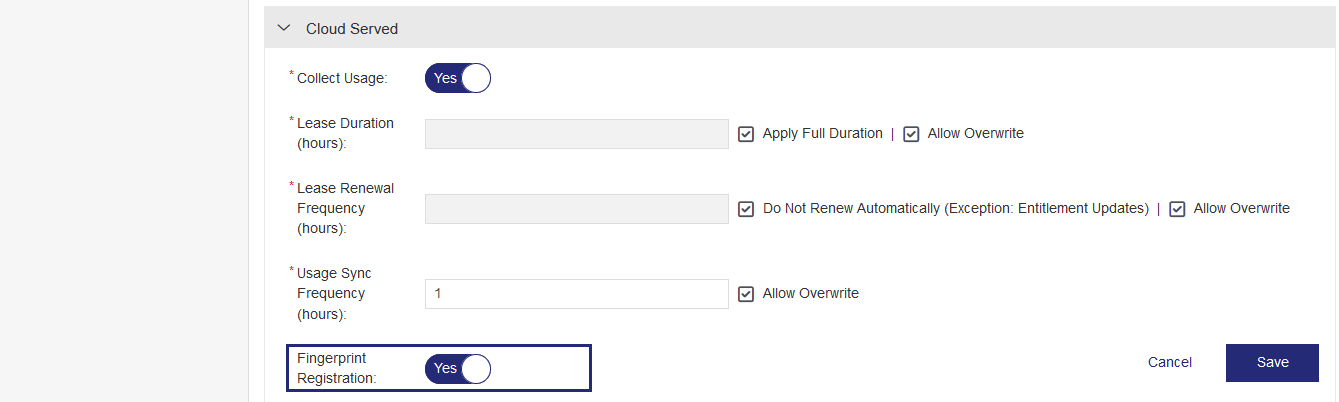
9.Click Save.
You've successfully configured the license model. Next, you will create a feature using this license model.
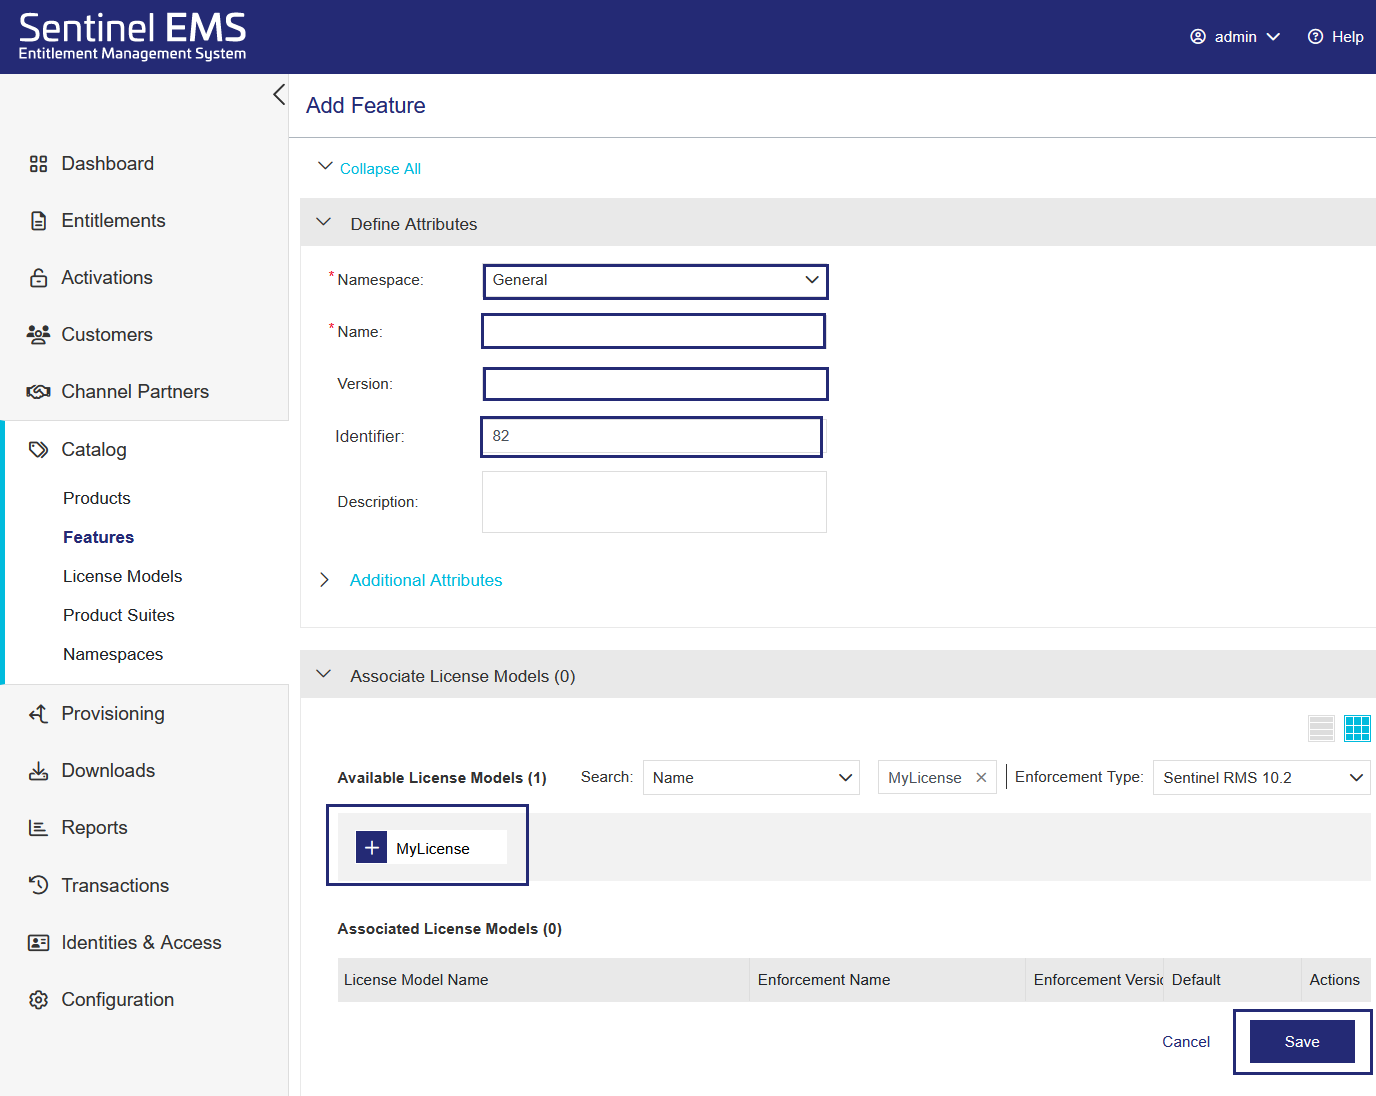
The first step in creating a catalog is defining features.
1.From the navigation pane, select Catalog > Features.
2.In the Features page, click Add Feature.

3.In the Add Feature page, from the Namespace list, select General.
You see the Namespace list only if multiple namespaces are available in the system.
4.In the Name field, enter a feature name, such as Addition.
5.In the Version field, type 1.
6.In the Identifier field, leave the default Identifier for now.
When you create your own features, you can use the default Identifier or apply another Identifier to match an existing feature in one of your company's products. The Identifier must match the feature Identifier in your licensed application.
7.In the Available License Models area of the Associate License Models pane, click the license model you created to add
8.Click Save.
You've created your first feature. Next, you will add the feature to a product.
Now that you created a feature, you can add it to a product. This is known as associating a feature with a product.
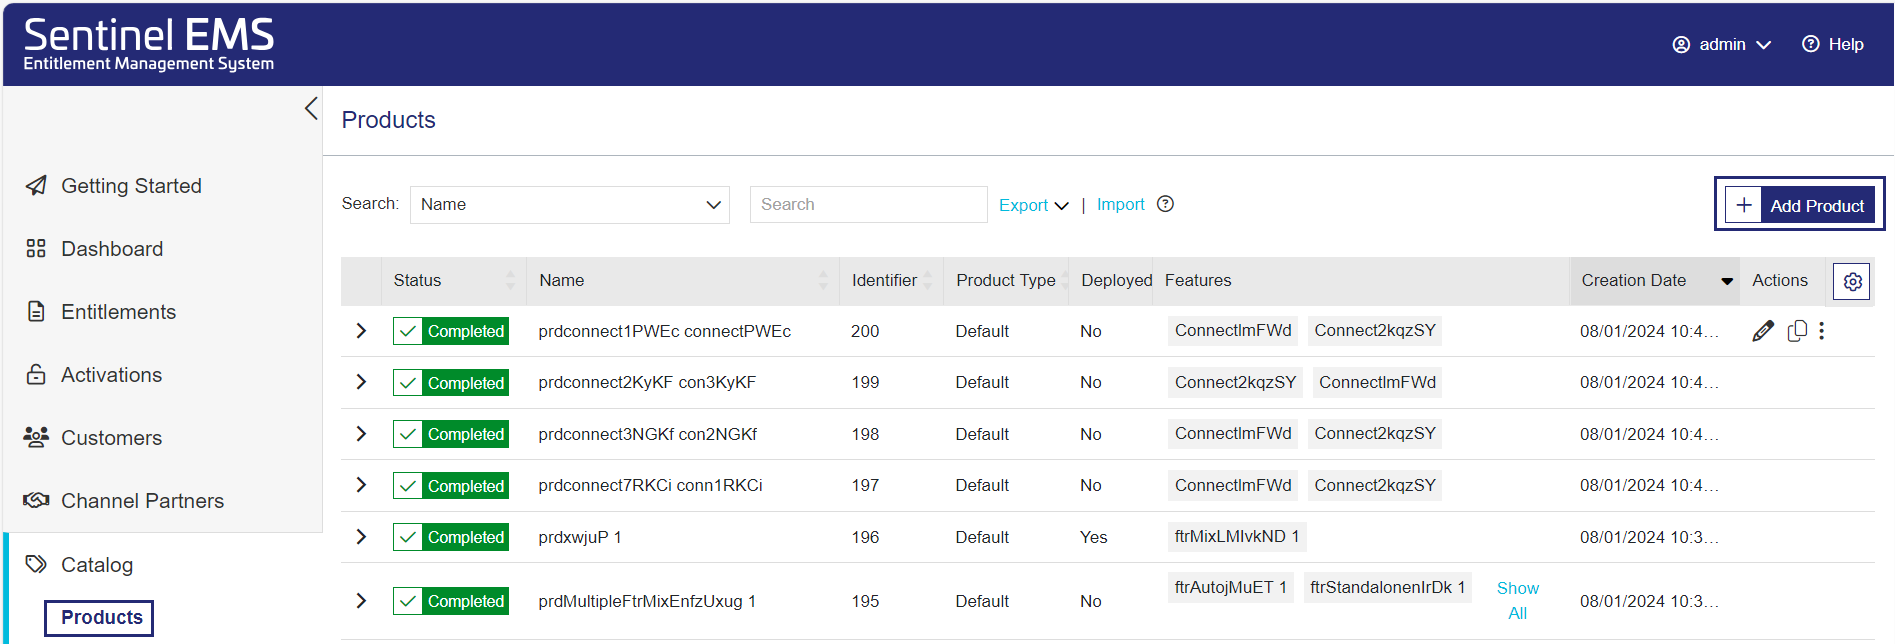
1.From the navigation pane, select Catalog > Products.
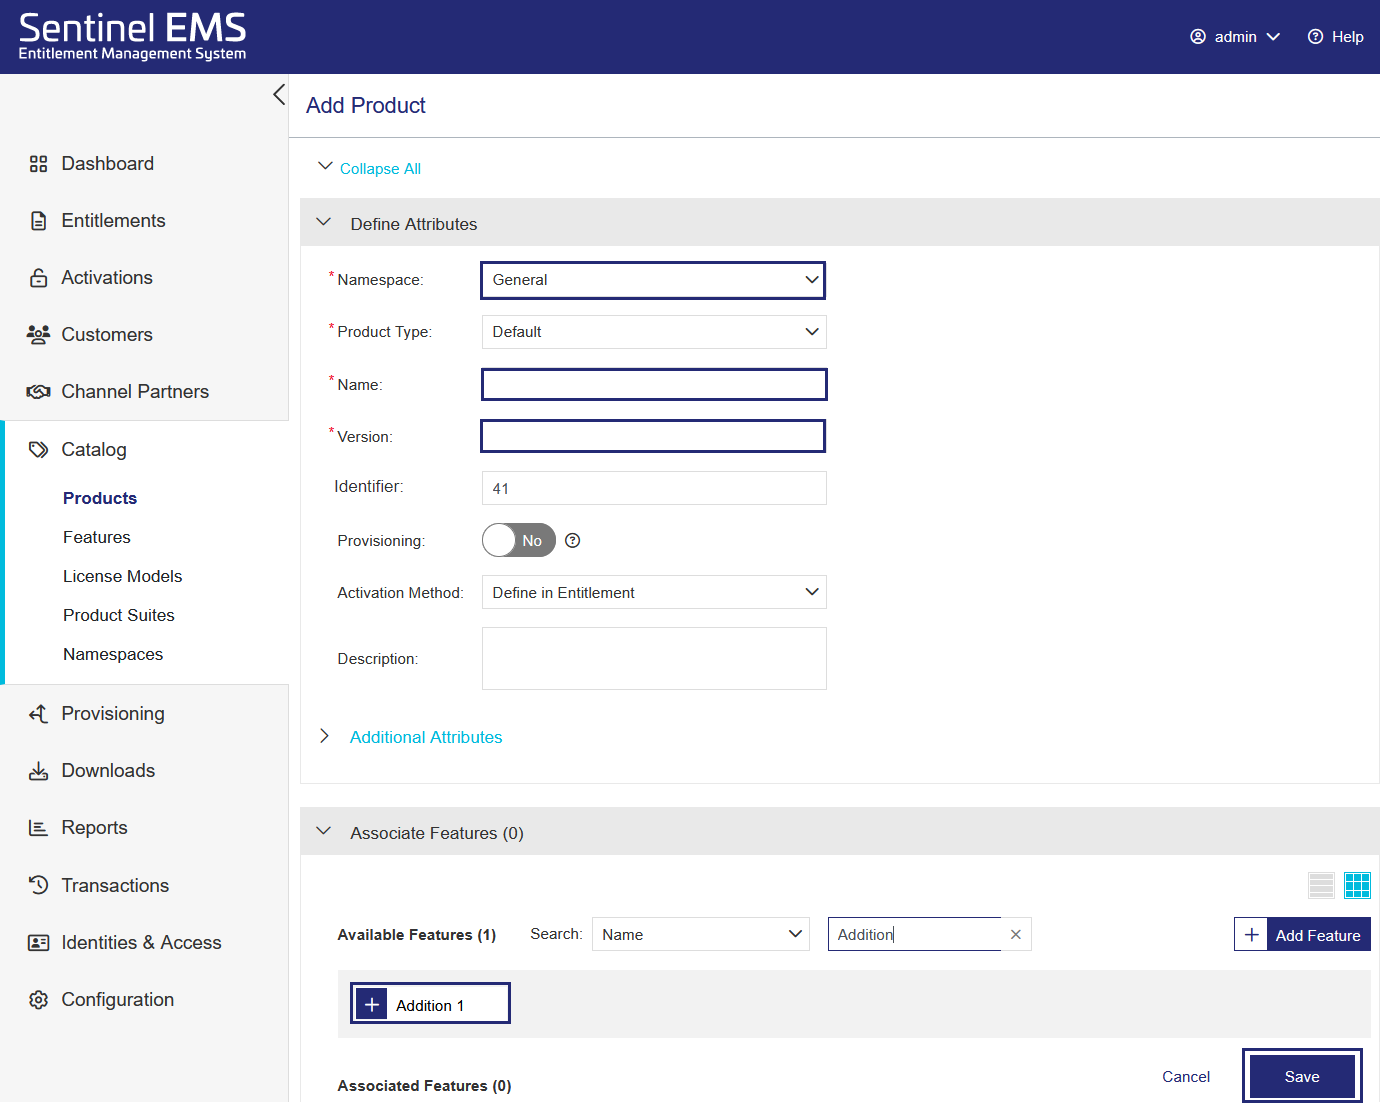
2.In the Products page, click Add Product.
3. In the Add Product page, from the Namespace list, select General.
4.In the Name field, enter any product name, for example, MyProduct.
5.In the Version field, type 1.
6.In the Available Features area of the Associate Features pane, click the feature you created to add it to the Associated Features list.
7.Click Save. The product is created as a draft.
8.In the Products page, for the product you created, in the Actions column, click the Complete  button.
9.In the confirmation box that opens, click Complete (not shown). This makes the product available for distribution.


You've successfully created your first product. Next, you will create an order, known as an entitlement, for the product.
In this step, you are creating an entitlement.
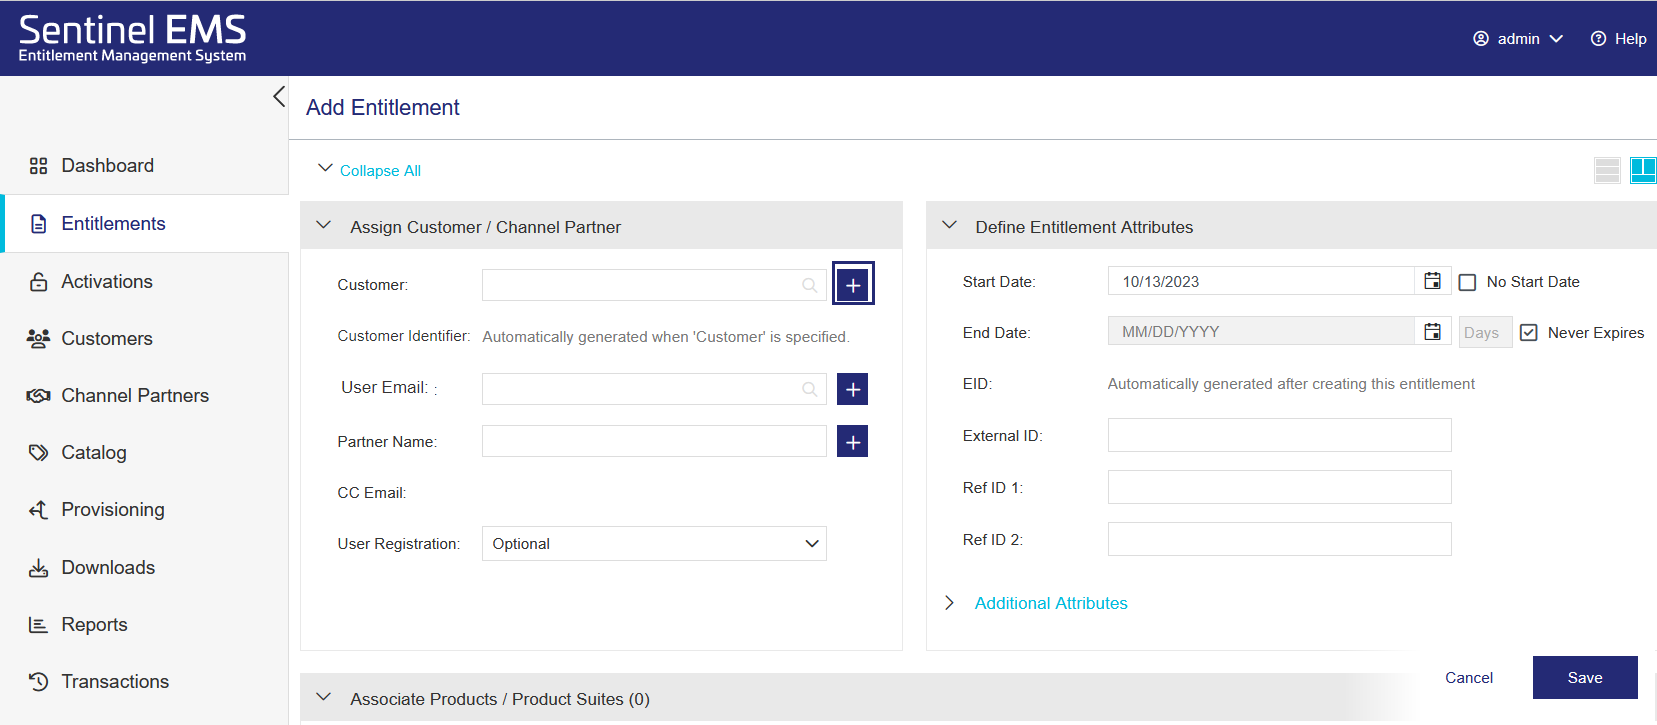
1.From the navigation pane, select Entitlements.
2.In the Entitlements page, click Add Entitlement.

3.Associate this entitlement with a new customer.
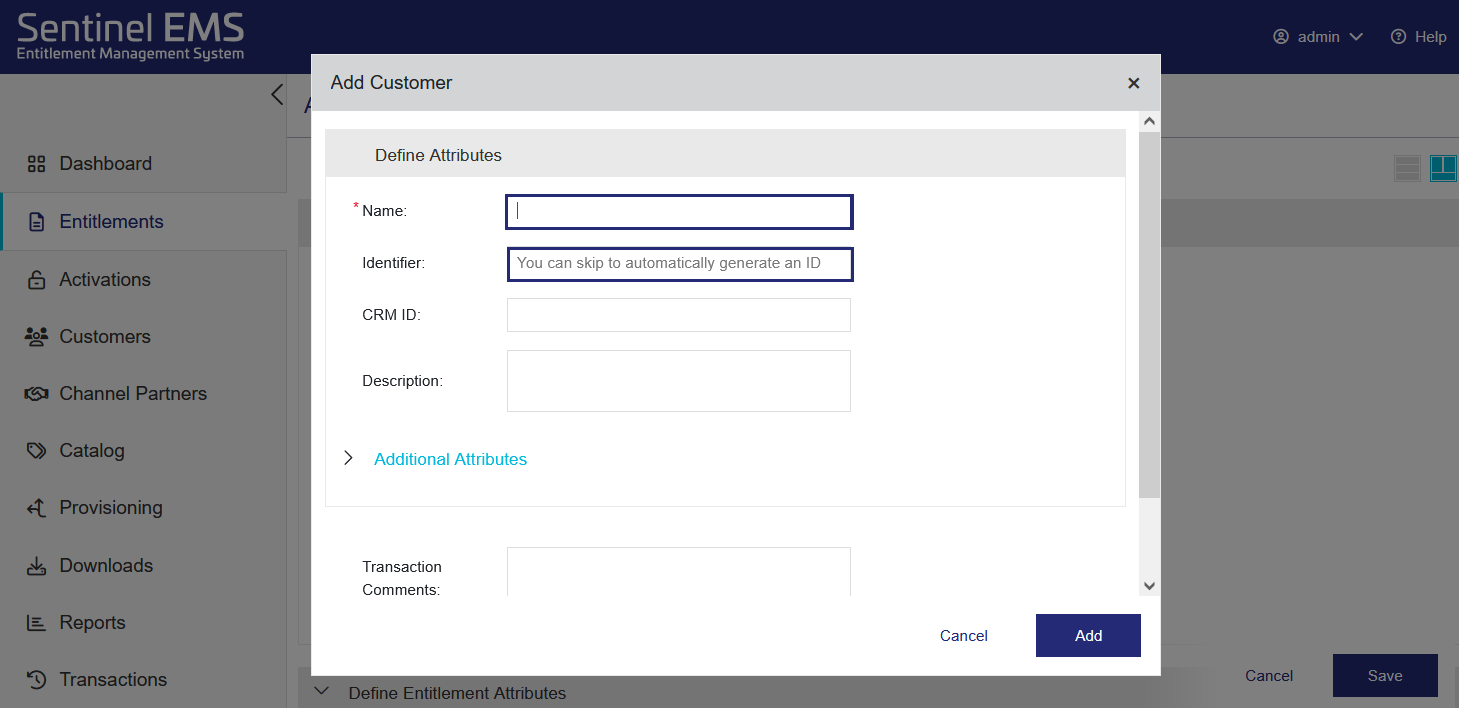
a. In the Add Entitlement page, next to the Customer field, click Add Customer  .
.
Tip: You can also define customers directly from the Customers tab.
b. In the Add Customer dialog box, in the Name field, enter any customer name, for example, MyCustomer.
c.
d. Click Add to finish creating the customer.
4.Add user details to the customer you just created.
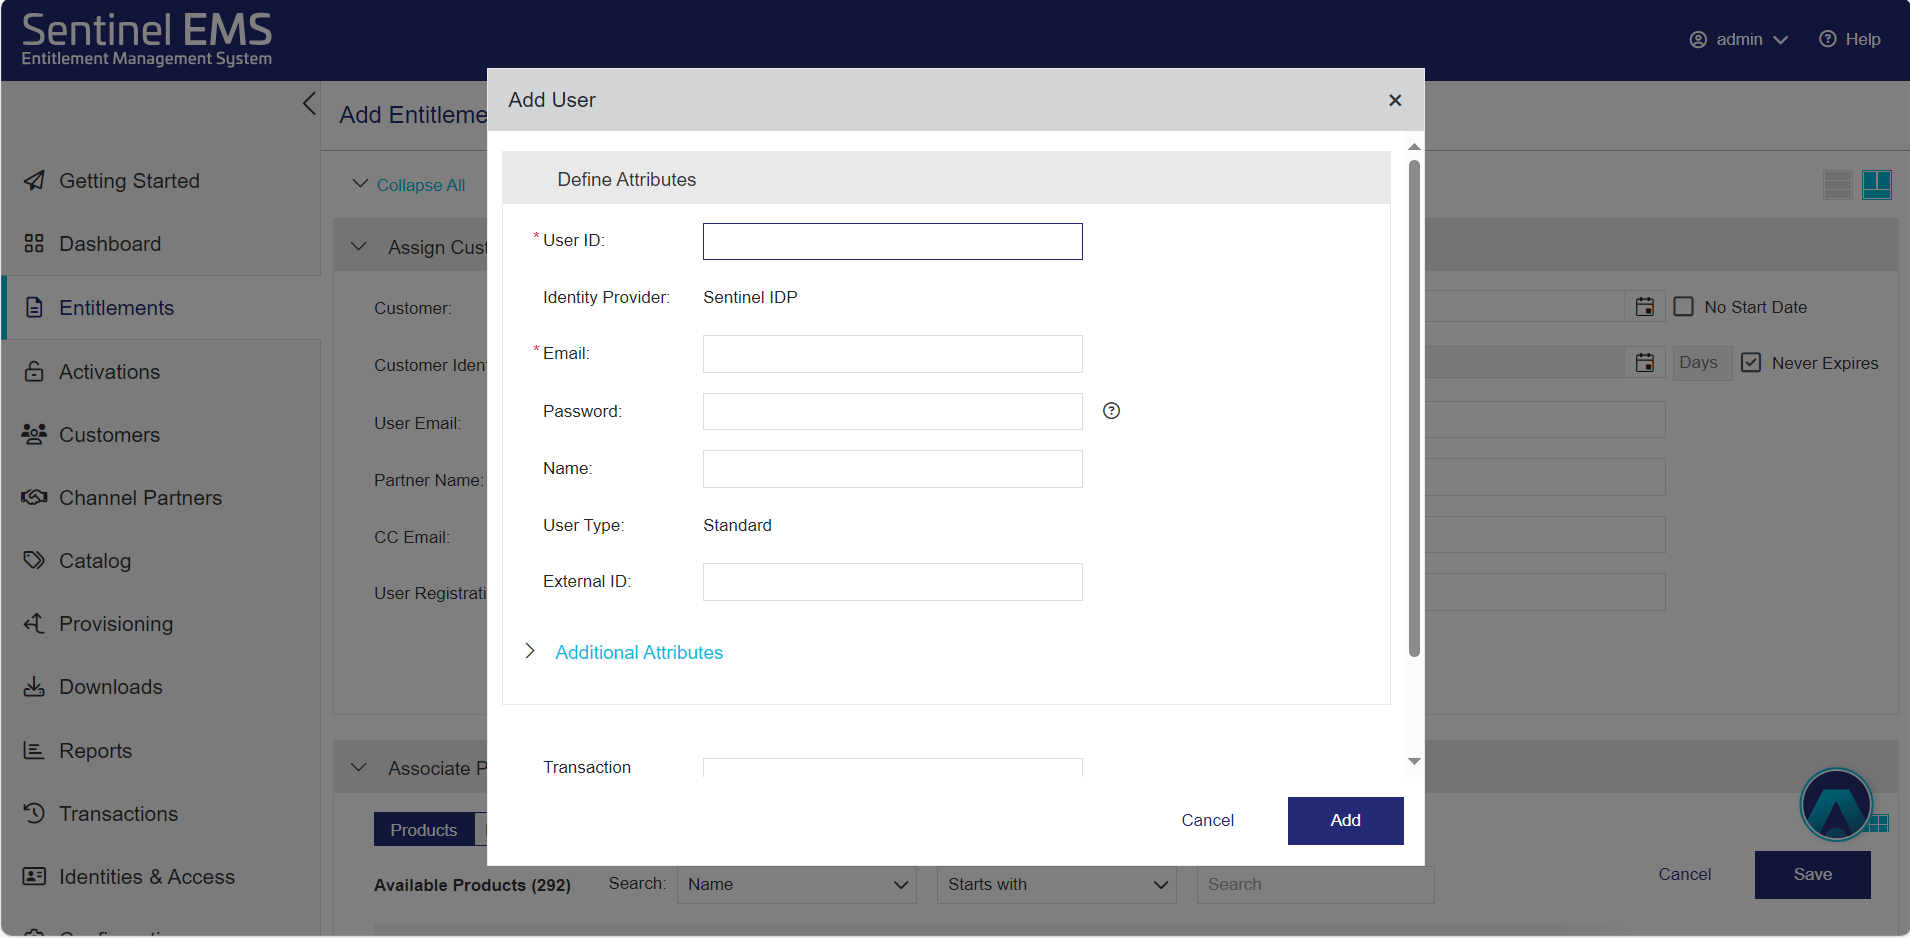
a. In the Add Entitlement page, next to the User Email field, click Add User to open the Add User dialog box.
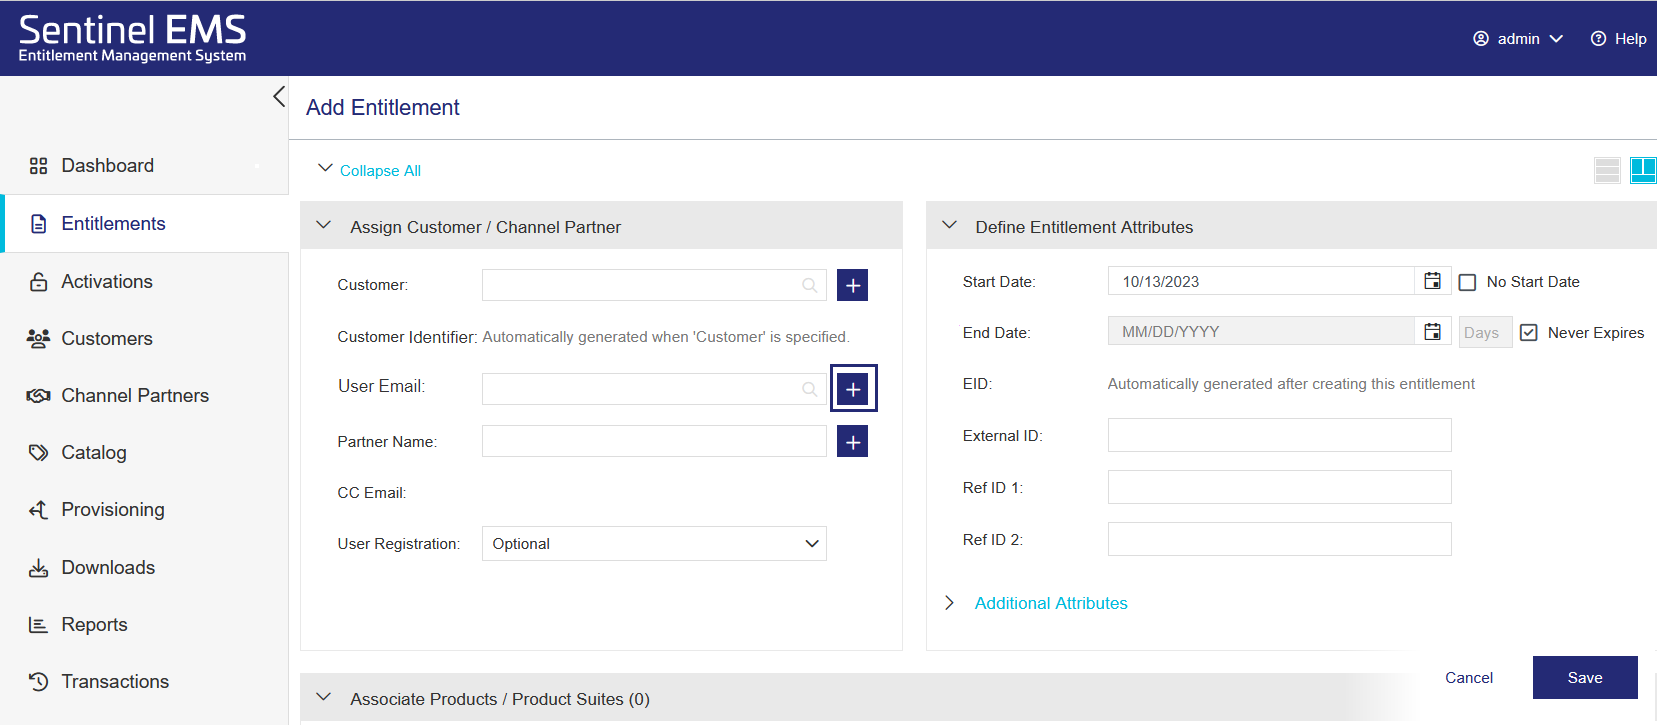
b. In the Email field, add the email address to which the entitlement certificate will be sent.
c. Click Add. The user is created and the user email address is associated with the customer you just created.
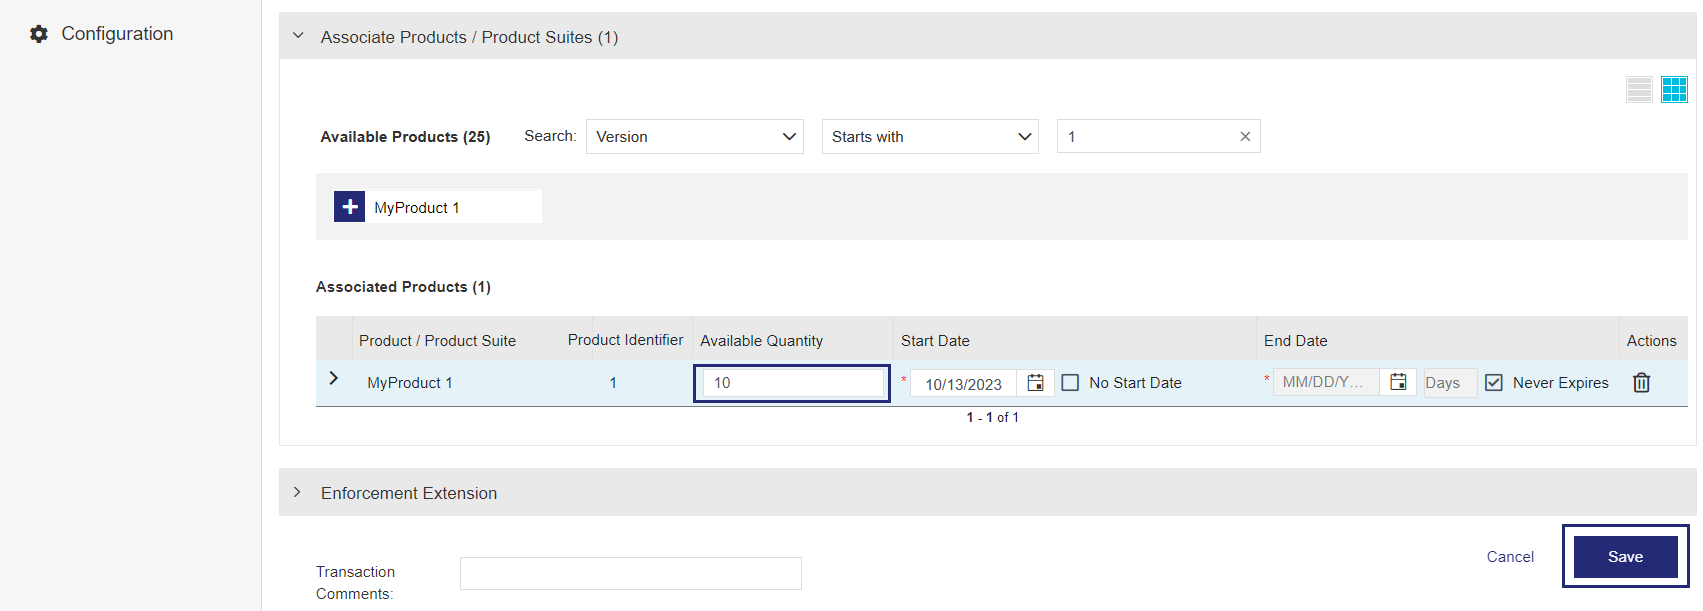
5.In the Associate Products / Product Suites pane, under Available Products, click the product you created to add it to the Associated Products / Product Suites section.

6.
Let's suppose that the customer ordered 10 copies of your product.
In the Available Quantity field, change the value to 10.
7.Click Save to save the entitlement as a draft.
8.In the Entitlements page, in the Actions column, click to complete the entitlement.
(The image shows the Draft status prior to confirmation.)

9.In the confirmation box, click Complete (not shown). The entitlement details are saved. An Entitlement Certificate email is sent to the user email address you entered earlier.
(The image shows the Completed status post-confirmation.)
10.Click OK.
The license is deployed successfully.

For using the licensed application in the network lease mode, you need to install RMS License Manager.
NOTE Administrator privileges are required to install RMS License Manager. By default, the License Manager is installed at the following path on Windows 64-bit machine:
<OSDrive>:\Program Files (x86)\Common Files\Thales\Sentinel RMS License Manager\WinNT\
However, you may specify a different path during the installation process.
To install the RMS License Manager, run the following command:
lservnt.exe –X install
Once this command is executed successfully, RMS License Manager is installed.
To see a list of available command-line arguments for the RMS License Manager, execute the command:
lservnt.exe –X help
To configure SCP:
1.Navigate to the folder containing the SCP configuration file (sntlcloudp_configuration_<Vendor_Alias>.xml).
2.Double click the SCP configuration file to open it, and update the following:
a.Copy the YPS URL from the Thales Sentinel Order emails and specify it in the SCP configuration file. Example:
<YPSaddress value="https://abc.prod.sentinelcloud.com/YPServer" />
b.Set Customer ID to the Customer Identifier value that you entered while creating an entitlement. Example:
<Customer id="MyCustomerID" />
c. In the FingerprintFriendlyName element, set the value to the host name of the
<FingerprintFriendlyName value="host_name"/>
NOTE You will also need to setup the proxy configurations if you are working in a proxy environment. For details on proxy configuration, refer to the Sentinel Cloud Licensing (SCL) Add-on Installation and Configuration Guide.
Logging-related Notes
You need to un-comment the following section in the SCP configuration file to enable logging.
	<!--<LoggingSettings>
		<Logging value ="1"/>
		<LogLevel value ="1"/>
		<LogFilePath value ="scp.log"/>
		<LogFileMode value ="2"/>
		<LogType value ="1"/>
	</LoggingSettings>-->
Logging will be enabled in the error mode that you can change as and when required. The log file (.log) is created in the same folder where the SCP service executable is placed.
You need to install SCP as a service on the same machine where the Sentinel RMS License Manager is installed.
NOTE You need administrator privileges to perform the steps given in this section.
1.Copy the SCP Service (sntlcloudps_[vendor_alias].exe) and the SCP configuration file (sntlcloudp_configuration_[vendor_alias].xml) from the Sentinel Cloud Add-On Windows\Redistributable\SentinelCloudPlugin folder.
If you want to place the SCP executable and configuration files at different locations, you can provide the configuration file path in the SCP_CONFIG_FILEPATH_[vendor_alias] environment variable, or as a command-line parameter.
2.Open the command prompt and run the following command to install the SCP service:
sntlcloudps_[vendor_alias].exe –install
3.To verify the SCP installation, open services manager (Run > services.msc), and check the Sentinel Cloud Plugin Service For [vendor_alias] entry in the list of the services installed on the system.
You can start the RMS License Manager service and the SCP service manually by using the Windows Services Manager. Alternatively, you can use the following commands:
NOTE Administrator privileges are required to install the RMS License Manager and SCP service. Please ensure you have the necessary permissions before proceeding.
To start the RMS License Manager:
lservnt.exe –X start
Once this command is executed successfully, RMS License Manager starts automatically after every system restart.
To start the SCP service:
Starting the SCP service here will fetch the network lease license from the backend to the RMS License Manager.
sntlcloudps_[vendor_alias].exe –start
NOTE If the SCP service is already running, the licenses are fetched according to the renewal frequency defined in the entitlement.
You need to go to the RMS SDK installation and compile the
Steps for C
To compile the sntl_demo.c sample:
1.Open Microsoft Visual Studio as Administrator.
2.Open the Samples32.MSVS2012.sln solution file in Visual Studio. This file is available in the \Samples\C\ folder.
3.(Optional) By default, the feature name is Addition and feature version is 1 in the sample source file. However, if you have created a feature in EMS by a different name and version, you can change the defaults in the sample. To do so:
a.In the Solution Explorer, navigate to the
b.In the source file, change the feature name and feature version to the values defined in EMS.
4.Build the sample. To do so, right-click the
\Samples\C\Out\MSVS2012\x86\Release
\Samples\C\Out\MSVS2012\x86\Debug
Next, you need to run the sample application executable (.exe) to consume licenses. To run the sntl_demo.exe file:
1.Open the command prompt as Administrator.
2.Change the directory to the output folder by running the following command:
cd C:\Program Files (x86)\Thales\Sentinel RMS Development Kit\10.x\Samples\C\Out\MSVS2012\x86\Release
3.Execute the sntl_demo.exe file.
Once the sample compiles and runs, the Console window opens showing the execution results.
Steps for Java
You can compile Java samples by using batch files.
To compile and run the Java sample on Windows:
1.(Optional) By default, the feature name is Addition and feature version is 1 in the sample source file. However, if you have created a feature in EMS by a different name and version, you can change the defaults in the sample. To do so:
a.Go to the directory containing Java samples, which by default is \Samples \Java-Jna (on the RMS SDK installation).
b.Open the sntl_demo.java source file in an editor of your choice.
c.In the source file, change the feature name and feature version to the values defined in EMS.
2.Open the command prompt as admin.
3.Change directory to the path where the Java samples are available.
4.Set the JDK path. Example:
SET JDK=C:\Program Files (x86)\Java\jdk1.8.0_121
5.Run the batch file.
build_sample.bat
All the samples will be compiled, and corresponding class and jar files will be created.
6.Run the sample.
java -jar sntl_demo.jar
Once the sample compiles and runs, the Console window opens showing the execution results.
Steps for .NET
The .NET samples are available for the following languages:
•C#
•VB.NET
1.Open Microsoft Visual Studio as Administrator.
2.Open the Samples.sln solution file in Visual Studio. This file is available in the following folder on the RMS SDK installation:
•For C#:
\Samples\DotNet-Unmanaged\C#
•For VB.NET:
\Samples\DotNet-Unmanaged\VB.NET
3.(Optional) By default, the feature name is Addition and feature version is 1 in the sample source file. However, if you have created a feature in EMS by a different name and version, you can change the defaults in the sample. To do so:
a.In the Solution Explorer, navigate to the
b.In the source file, change the feature name and feature version to the values defined in EMS.
•For C#:
\Samples\DotNet-Unmanaged\C#\bin\x86\Release
\Samples\DotNet-Unmanaged\C#\bin\x86\Debug
•For VB.NET:
\Samples\DotNet-Unmanaged\VB.NET\bin\x86\Release
\Samples\DotNet-Unmanaged\VB.NET\bin\x86\Debug
Next, you need to run the sntl_demo.exe sample application to consume licenses. To run the sntl_demo.exe file:
1.Open the command prompt as Administrator.
2.Change the directory to the output folder containing the sample application executable (.exe):
3.Execute the sample application executable (.exe) file.
Once the sample compiles and runs, the Console window opens showing the execution results.
The Console window displays the sample execution results.
1.
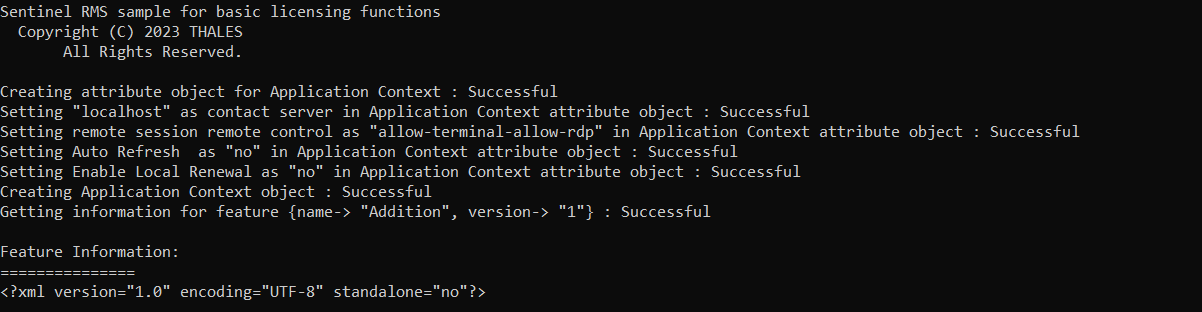
2.When a valid license is present, information about the Addition feature is displayed.
3.Press Enter to call the login API. This requests licenses for the feature you created.
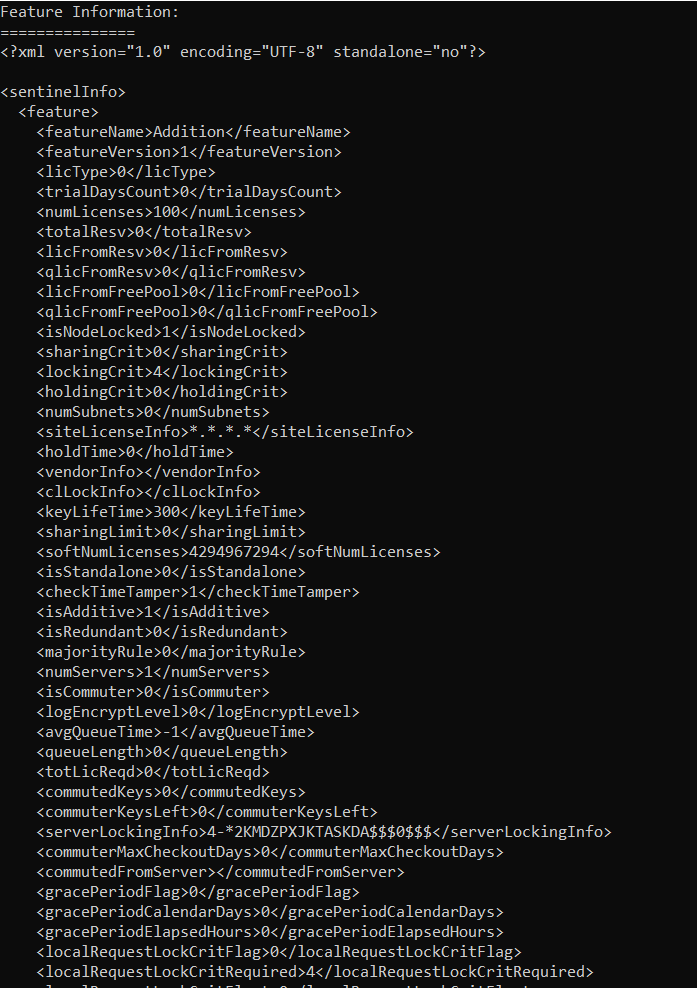
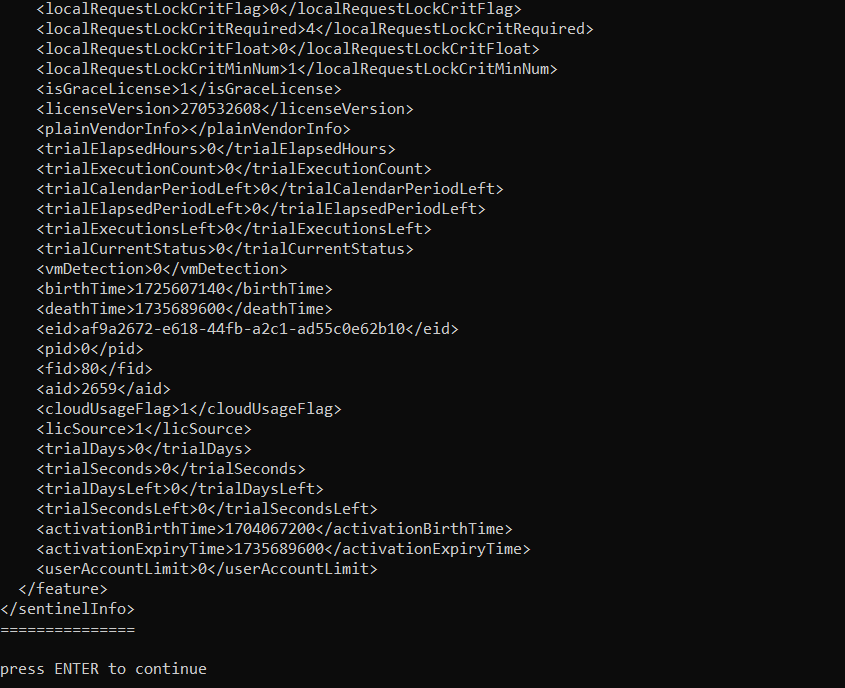
4.Press Enter. The session information is displayed, which is the information for the current license session. Note that a successful license request creates a license session. For example, <tokensInUse> is shown as 1 because one license has been used with the call to the login API.
Next, the refresh API is called to periodically refresh the license and keep the license session alive for a longer period.
Afterward, the logout call is executed to release licenses.
5.Press Enter to close the sample.

Congratulations! You've successfully generated and consumed Sentinel RMS licenses for a