Activation Actions
|
>
|
>New to Sentinel EMS?
>More about Entitlements
|
Actions for Activation
You manage activated licenses using the Activations page, which you access from the navigation pane. The following table lists the actions available for activations:
| Enforcement | Action | Description | ||
|---|---|---|---|---|
|
|
|
Begins a four-step process to perform a revocation. For more information, see Revocation Requests. Use for: Sentinel RMS entitlements—excluding cloud-served lease entitlements. (Although the action button is visible for cloud-served lease entitlements, if you click the button, an error message is displayed. Use Revoke Immediately instead.) |
||
|
|
|
Opens a dialog box in which you can mark the selected activation as "Revoked" instantly. This trust-based option is useful when a user's device is lost, stolen, or damaged, for example. Use for: >
>
>Situations in which you are facing issues with the revocation request process. >Situations in which a feature is not supported for the device or locale used by the customer. What happens when you revoke an activation immediately? The activation is immediately re-credited to the entitlement. No revocation proof is needed from the device on which the license is installed. Therefore, the vendor does not receive proof that something happened to the device or that the end user actually revoked the license. Revoking an activation immediately does not remove the license from the end user's device. It simply enables the device vendor to re-issue the license without affecting the count. This means that if a lost device is later found, the device will still retain the original, usable license. Attributes: >Send Notification: Specifies if an email notification is sent to the entitlement contact when the revocation completes successfully. >Comments: Enter remarks if required. Note: >You can use this action to send the activation ID to the license generator. To do so, enable the Call License Generator On Revoke property in the Administration Console. >You can optionally enter a deactivation code when revoking immediately. This field appears if the Require Deactivation Code property is enabled in the Administration Console. |
||
|
View transaction details of a selected activation. For more information, see Transactions. |
|||
|
|
|
Renew a license. For an activated entitlement, you can renew the end date of associated line item. For more information, see Renewing a Line Item. |
||
|
For a selected activation, opens the entitlement in the Entitlements page. |
|||
|
|
|
View and email the license certificate of the activation. For more information, see Viewing the License Certificate. |
||
|
|
|
When more than one line item is activated, view the license details for all the line items using this action. |
||
|
Manage activatees (the contacts (individual or customer) that generate a license code for products |
|||
|
|
|
Upload the revocation receipts. This action appears for activations with the "Revoke in Progress" status. For more information, see Revocation Requests. For multiple permission tickets generated as a .zip file, the revocation tool generates multiple revocation receipts as a .zip file. This action can be used to upload multiple revocation receipts as a .zip file |
||
|
|
|
Download the permission tickets.This action appears for activations with the "Revoke in Progress" status. For more information, see Revocation Requests. For large feature sets, multiple permission tickets are generated during revocation and using this action can be downloaded as a .zip file. |
||
|
|
|
Confirm the revocation and re-credit the remaining quantity. This option is available for activations with the "Revoke Confirmation Pending" status. After clicking Confirm Revocation, the status changes to "Revocation Confirmed". |
||
|
|
|
Reject the revocation request. |


 Viewing the License Certificate
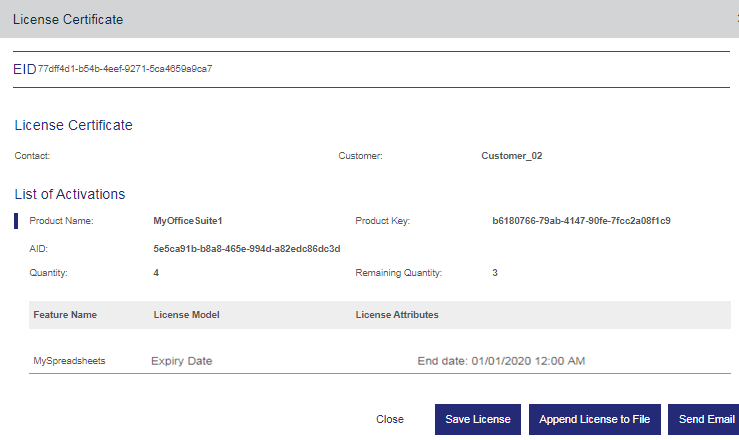
The license certificate contains the details of the entitlement.
To view, save, or email a license certificate for an activation:
1.Select an activation.
2.In the Actions column, click View License Certificate. The license certificate appears:

NOTE
![]() The product key is not available on license certificates for cloud served–lease entitlements.
The product key is not available on license certificates for cloud served–lease entitlements.
3.Click one of the following buttons to perform the given action:
•Send Email: Sends details of the license certificate to the specified email. Sentinel EMS also enables you to select a language, based on the language packs installed to send this email.
•Save License: Enables you to save the license certificate as a file.
•Append License to File: Enables you to append the license certificate details to an existing file.
•Close: Closes the window.
NOTE FOR FIREFOX
When you click Save License, the license certificate (lservrc) file is saved to the default Downloads folder with an .htm extension. Do the following to configure the browser settings to save the file without an extension. (Not required if Firefox is already configured to save files to a location other than the default Downloads folder.)
1.Open the Firefox browser menu and select Options.
2.In the General tab, under Files and Applications > Downloads, select the Save files to option.
3.Specify the location. This will save the file to the specified location without an .htm extension.
Revocation Requests
This is a mode of license revocation where you perform a few steps and the end user (customer) performs the rest. To start the revocation process, you generate the permission tickets and send them to the customer using the Activations page. The customer then performs revocation and uploads (or sends you) the revocation receipts. After the revocation receipts are uploaded, you can confirm or reject the revocation. This four-step process is explained in detail below.
Step 1: Create a Revocation Request
When you create a revocation request for a product, permission tickets are generated. These tickets are required for license revocation on the customer's device. For large feature sets in a single revocation, multiple permission tickets are generated bundled into a .zip file.
To generate the permission tickets:
1.On the Activations page, select the activation to revoke.
2.In the Actions column, click Request to Revoke. The Create Revocation Request dialog box appears:
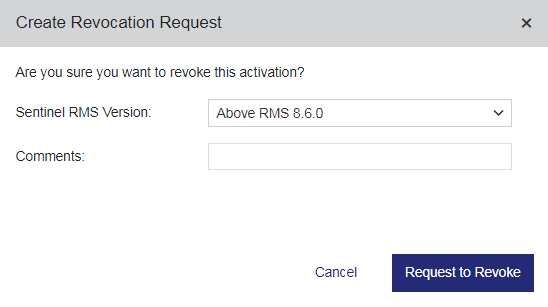
3.Select the Sentinel RMS Version and enter Comments if any. The Sentinel RMS Version is the version of Sentinel RMS on the system that will run the revocation tool to implement revocation.
4.Click Request to Revoke to download the permission tickets. The status of the selected activation changes to Revocation In Progress.
If you need to download the permission tickets again, select the Download Permission Ticket action.
NOTE If a license is locked with multiple criteria, then revocation can be performed only if all the locking criteria match.
Step 2: The Customer Generates a Revocation Receipt
The customer can receive the permission tickets in one of the following ways:
>If the customer's email is specified in the entitlement, the customer receives an email with an attachment containing the permission tickets.
>If the customer's email is not associated with the entitlement, you can save the permission tickets and send them to the customer.
>The customer can log in to Sentinel EMS and download the permission tickets.
Using the permission tickets, the customer needs to generate the revocation receipts with the help of a revocation tool.
Step 3: You or the Customer Uploads the Revocation Receipt
The customer can upload the revocation receipts using the Sentinel EMS portal. Alternatively, the customer can send you the revocation receipts, which you can upload.
A revocation receipt is generated for each corresponding permission ticket. For multiple permission tickets in a .zip file, multiple revocation receipts are generated as a .zip file. The number of revocation receipts generated is always same as the number of permission tickets.
To upload a revocation receipt:
1.On the Activations page, select the activation detail for which revoke has been initiated. This activation must be marked as "Revoke in Progress".
2.In the Actions column, click Upload Revocation Receipt. The Upload Revocation Receipt dialog box appears:

3.Click Select File to browse to the revocation receipt file. For multiple revocation receipts, a.zip file can be uploaded.
4.Enter Comments if required.
5.Click Upload. The Revocation in Progress status changes to Revocation Confirmed if the Auto Confirm attribute is set to "True". Otherwise, the status changes to "Revoke Confirmation Pending".
Step 4: Confirm or Reject the Revocation
You can confirm or reject the revocation after uploading the revocation receipt.
To confirm a revocation:
1.On the Activations page, select the activation detail for which revocation receipt has been uploaded.
2.In the Actions column, click Confirm. In the Re-credit Revoked Quantity field, specify a quantity that you want to re-credit to the customer. The value will be added to the remaining quantity of the product. The re-credit quantity cannot be more than the activation quantity.
To reject a revocation:
1.On the Activations page, select the activation detail for which revocation receipt has been uploaded.
2.In the Actions column, click Reject Revocation.
 Viewing and Applying the License File (V2CP)
When you activate an entitlement, the output is a file that can be sent to the customer by email. This file is known as a Vendor-to-Customer Package (V2CP) file.
To view the V2CP file:
1.From the navigation pane, select Activations to view the Activations page.
2.Expand the required activation.

3. Click the ![]() Download button. The lservrc.v2cp file is downloaded to your default downloads folder.
Download button. The lservrc.v2cp file is downloaded to your default downloads folder.
4.Open the lservrc.v2cp file with any text editor.
To apply the V2CP file:
1.Locate the lservrc.v2cp file.
2.On the target machine, apply the lservrc.v2cp file using Sentinel Admin Control Center or a utility that you provide to your customers.
Managing Activatees
You manage activatees by clicking the Manage Activatees action button for a selected record on the Activations page. The Manage Activatees action opens the Manage Activatees page displayed below:

The Managing Activatees page can be used to perform the following actions:
>Add and associate activatees
>Mark an activatee as default
>Delete an associated activatee
>Disable an associated activatee
>Enable an activatee that was previously marked as "disabled".
Adding and Associating Activatees
The Add Activatees button on the Manage Activatees page is used for adding and associating an activatee. The page to add and associate an activatee is given below:
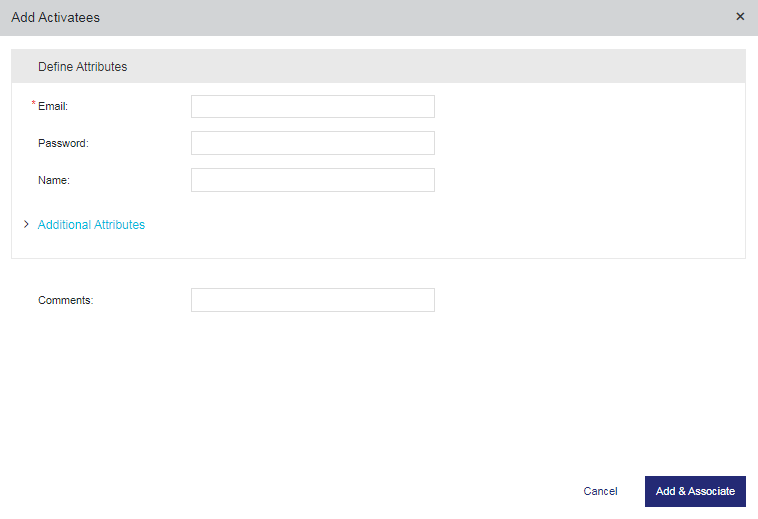
The following table explains the activatee attributes:
| Attributes | Description | Required/Optional | Valid Values |
|---|---|---|---|
|
Specify the activatee. Email of the contact, who performs the activation. |
Required | A valid contact email. | |
| Password | Password the activatee (contact) uses to log on to Sentinel EMS portal. | Optional | A valid password. |
| Name | Name of the activatee (contact). | Optional | |
|
Additional Attributes |
|||
| Ref ID 1 | Reference identifier that identifies the activatee in an external system. | Optional |
>Unique across Sentinel EMS for all activatees >Alphanumeric >0 to 100 characters |
| Ref ID 2 | Reference identifier that identifies the activatee in an external system. | Optional |
>Alphanumeric >0 to 100 characters |
| Phone | Telephone number of the activatee. | Optional |
0 to 100 characters |
| Language |
Display language for the activatee. Select a language from the available languages to specify a language other than English. Automatically generated emails (for example, entitlement certificate, license certificate) are sent to the activatee in this language. Also, when the activatee logs on to the Sentinel EMS, the pages displayed are in the selected language. |
Required | The options displayed depend on the language packs installed for Sentinel EMS. |
| Company Website | URL of the company website | Optional | A valid URL |
|
Billing and Shipping Address Attributes Billing Address |
|||
| Street/PO Box | Street address or the post office box details of the activatee for billing statements (for example credit card statements). | Optional | 0 to 100 characters |
| City | City of the activatee. | Optional | 0 to 30 characters |
| State/Province | State of the activatee. | Optional | 0 to 30 characters |
| Country | Country of the activatee. | Optional | 0 to 30 characters |
| ZIP Code / Postal Code | ZIP or postal code of the activatee. | Optional | 0 to 20 characters |
| Use as Shipping Address |
>Select Yes to use the same address for both billing and order shipment. > Select No to expand the pane and specify a different Shipping Address for receiving orders. |
Yes OR No |
|
Actions for Managing Activatees
The following table lists the actions available for managing activatees:
| Action | Description | ||
|---|---|---|---|
|
Deletes the activatee. You can delete an activatee to remove its association with the activation. |
||
|
Disables the activatee. | ||
|
Re-enables an activatee that is marked as disabled. |

