Creating Entitlements
Entitlement Status
The Status attribute available on the Entitlements page specifies the following status of an entitlement:
>Draft: When an entitlement is first created it is saved as a draft that you can edit or delete.
>Enabled: A draft entitlement must be marked as complete before it can be activated. The status of an entitlement changes to "enabled" when it is marked as "complete".
>Disabled: A disabled entitlement cannot be updated
>Closed: Indicates that the entitlement is permanently disabled and no action can be performed on it. You cannot enable a closed entitlement.
Prerequisites for Creating an Entitlement
The following are the prerequisites for creating an entitlement:
>Permission to create entitlements, for example, the Order Taker role.
>Access to the required products
>
![]() For entitlements containing products whose licenses will be activated for the first time, each product must include at least one associated feature or memory file.
For entitlements containing products whose licenses will be activated for the first time, each product must include at least one associated feature or memory file.
>
![]() For entitlements containing products that are used for license updates, only product attributes are required. Products can also include associated features and memory files as needed.
For entitlements containing products that are used for license updates, only product attributes are required. Products can also include associated features and memory files as needed.
Creating an Entitlement
You create an entitlement from the Entitlements page.
To create an entitlement:
1.From the navigation pane, select Entitlements to view the Entitlements page.
2.Ensure that the Test Entitlement Mode is set as needed.
•For production purposes, set Test Entitlements to Off.
•For testing purposes, set Test Entitlements to On.
3.Click the Add Entitlement button. The Add Entitlement page opens.
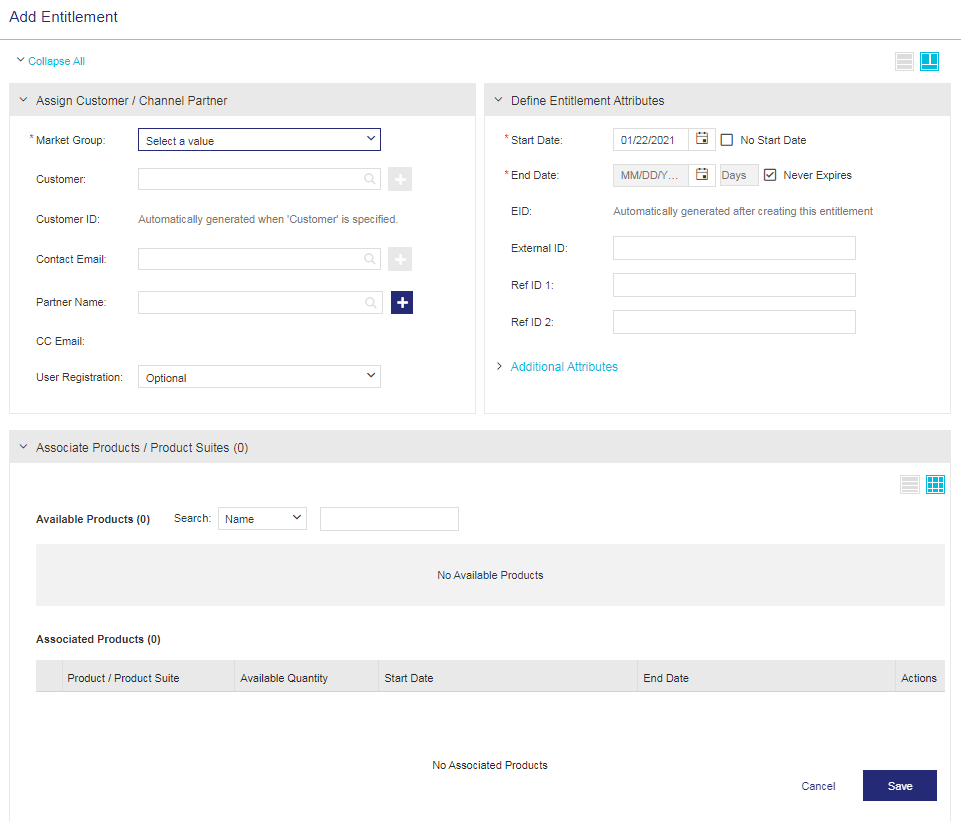
4.Assign Customers, Contacts, Channel Partners, and Market Groups.
5.Define Entitlement Attributes.
6.Associate Products and Product Suites. Products
a.In the Associate Products / Product Suite pane, click the products
TIP You can filter the displayed list using the Search parameters, which are based on product
![]() If both products
If both products
b.In the Associated Products
c.Expand each product to view and modify the Associated Features as needed.
–(Optional) Click the Configure Features button to display a multiple-feature configuration bar in the first row. Then click the check box for the features whose attributes you want to define or modify. Using the options in the bar, configure the settings for all selected features as needed. Despite its name, this bar is available for single features, as well.
–(Optional) Click the Configure License Model button to modify the license model attributes as needed. Then click Save to close the window.
d.
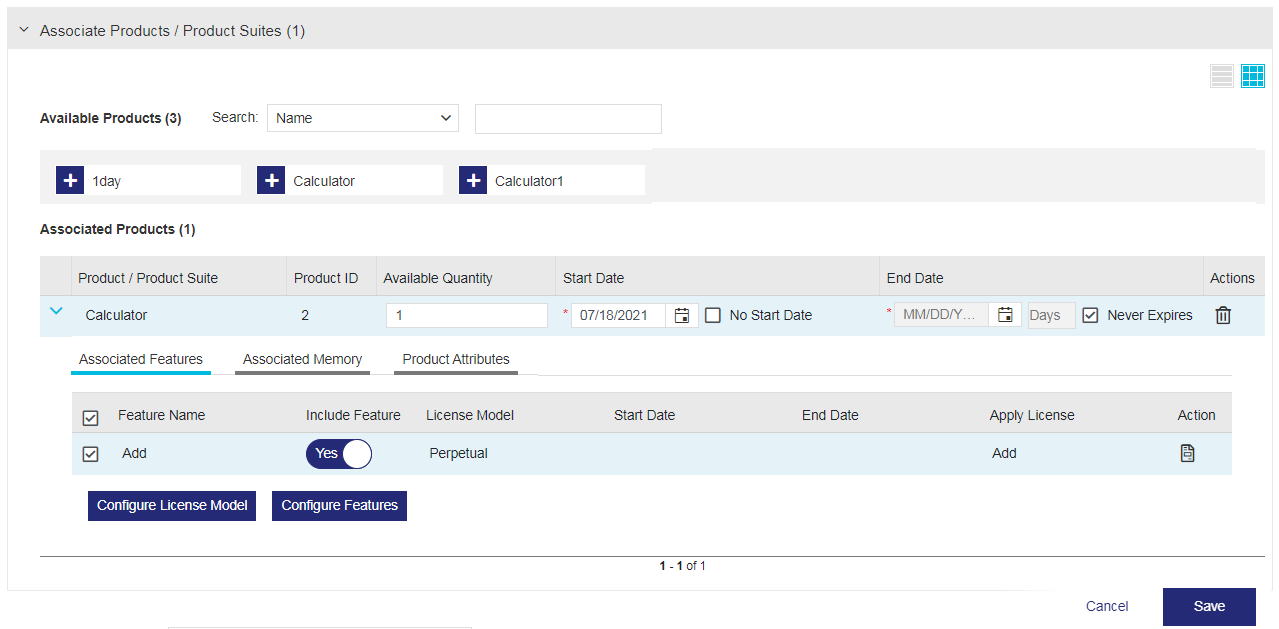
![]() Click the Associated Memory tab to view and configure as needed.
Click the Associated Memory tab to view and configure as needed.
e.Click the Product Attributes tab to view and configure as needed.
7.
![]() Fill in any remaining fields as needed. The remaining fields depend on the product and license model configuration.
Fill in any remaining fields as needed. The remaining fields depend on the product and license model configuration.
8.
![]() (Optional) If memory files are associated, click the Associated Memory tab to view them. If Allow Overwrite was selected during product creation, you can modify the text as needed.
(Optional) If memory files are associated, click the Associated Memory tab to view them. If Allow Overwrite was selected during product creation, you can modify the text as needed.
9.Click Save to save the entitlement as draft. The entitlement is added to the list of entitlements. By default, the entitlement is added to the top of the list, but this may change according to the grid sorting rules.
10.Do one of the following:
•Finalize the entitlement and make it available for activation![]() Complete in the Actions column.
Complete in the Actions column.
•Create a batch entitlement by following the steps in Configuring a Batch Entitlement.
Assign Customers, Contacts, Channel Partners, and Market Groups
The Assign Customer / Channel Partner pane displays the attributes that are used to specify the ownership details of an entitlement. You can use this pane to specify the customer, contact, channel partner, and market group details. The following table explains the attributes that are available in this pane.
| Attribute | Description | Required/Optional | Valid Values |
|---|---|---|---|
|
Market Group (Visible only if the logged-in user is associated with more than one market group) |
List of Market Groups to which the logged in user (customer or contact) belongs. Each market group specifies a target market for specific catalog elements and their entitlements. Users can work only with catalog elements and entitlements in their own market group. If the logged in user is associated with only one market group, then the system automatically picks the logged in user's market group. If the logged in user is not associated with any market group, then the system uses a default value that is not visible to the user. |
Required |
>Any market group in the list >Any market group in the list that is allocated for the required enforcement |
| Customer |
Name of the customer. This attribute is not case-sensitive. Entering the first few characters displays the matching entries. Select a customer from the displayed list or click the |
Optional
|
>Alphanumeric >1 to 500 characters |
| Customer ID | The customer ID defined in Sentinel EMS is displayed automatically. This field is disabled and cannot be modified. |
Mandatory for: >
>
|
>Unique >Alphanumeric |
| Contact Email | Email of the contact. Enter the first few characters to display the matching entries. Select a contact email from the displayed list or click the |
Optional |
>Valid email address |
| Partner Name | Name of the channel partner. Entering the first few characters, displays the matching entries. Select a channel partner from the displayed list or click the |
Optional |
>Alphanumeric >1 to 24 characters |
| CC Email |
Displays the additional email addresses to which the entitlement confirmation email must be sent. You can edit the value only if the CC Email Change Allowed property is set to Yes in the Administration Console. For more information, see the Administration Console. |
Optional |
>Up to 15 email addresses >Add email addresses by typing or by selecting from auto-complete. Press Enter after each manually entered email address. |
| User Registration |
Specifies whether end user registration is required. |
Required |
>Mandatory: The end user must provide registration details when logging on using the EID or product key. >Optional: The end user is prompted to provide registration information or to register later. >None: The user registration page does not appear. |
Define Entitlement Attributes
Entitlement-related attributes are specified in the Define Entitlement Attributes pane, described below.
| Attribute | Description | Required/Optional | Valid Values |
|---|---|---|---|
|
Start date for the entitlement. See also: No Start Date check box
Note: If the entitlement start date is in the future, then activation is not allowed. |
Required |
A start date entered manually or selected from the calendar | |
| No Start Date check box |
Excludes the start date. Select this check box for licenses that need to support embedded devices that do not have a system clock, for example.
Note: >If license model dates are not configured during entitlement creation, then the end date will be one year after the current date. >If license model dates are configured during entitlement creation, then the end date will be the same as the one defined during configuration. >The value that is assigned to the No start date check box while configuring a license model in an entitlement overrides the value defined for the No start date check box while creating the license model using Copy. >
|
Optional | (Selected or Cleared) |
|
End date for the entitlement. To specify an end date, do one of the following: >Click the calender button and select the end date. The number of days for the entitlement is automatically calculated and displayed. >In the Days box, enter the number of days for the entitlement. The end date is automatically calculated and displayed.
Note: You cannot activate an entitlement if the Start Date is in the future or if the End Date has passed. |
Required |
An expiry date or Never Expires check box | |
| Days |
The number of days during which the entitlement can be activated. The end date is automatically calculated and displayed. |
Optional |
Maximum: 3650 |
|
Indefinitely extends the end date. |
Optional |
(Selected or Cleared) | |
|
EID |
Entitlement ID. A unique identifier for an entitlement. If not provided, Sentinel EMS automatically generates an EID after creating an entitlement. You can modify the EID only if the Allow Manual Creation of EID and PKID check box is selected in the Administration Console. |
Optional
|
>Alphanumeric <5.5Preview> >Special characters > 6 to 60 characters >Cannot contain spaces |
|
External ID |
External reference identifier that uniquely identifies the entitlement in an external system. |
Optional |
>Unique across Sentinel EMS for all entitlements. >0 to 60 characters |
|
Ref ID 1 |
Reference identifier that identifies the entitlement in an external system. |
Optional |
>0 to 100 characters |
|
Ref ID 2 |
Reference identifier that identifies the entitlement in an external system. |
Optional |
>0 to 100 characters |
|
Additional Attributes |
|||
|
<5.5Preview> If Allow Activation is set to Yes, allows the specified type of user to activate the entitlement.
You set the type of user in the By box. |
Required |
Allow Activation: Yes OR No Default: Yes
By: >All Users (Default): Any user that has access to the entitlement can activate the entitlement. Vendor users require activation role permissions. >Vendor Only: Vendor users with activation role permissions can activate the entitlement. On the Sentinel EMS customer portal, the entitlement is visible, but cannot be activated. |
|
|
|
If set to Yes, allows the user to revoke the entitlement. If revocation is allowed, the user can return the license for a product or product suite* after activation. Note: >
>
|
Required |
Yes OR No Default: Yes ( |
|
Specifies that all products that are part of this entitlement are activated at the same time.
The following conditions must be met to activate an entitlement as a whole: > The activation method of all line items in the entitlement must be the same. >The quantity of all line items must be same. >All line items must have the same Fixed Quantity. > All line items must use the same enforcement. >
>
>
•
•
•
>
>
>
>
>
|
Required |
Yes OR No Default:
|
|
|
Send Notification |
Send a notification to the contact email after the entitlement is created. |
Required |
Yes OR No Default: Yes |
Associate Products and  Product Suites
Use the Associate Products / Product Suites pane displayed below to associate products
|
NOTE Although Include Feature is available in the Associated Features pane, this functionality is not supported for Sentinel Fit. For best results, leave the setting as is. 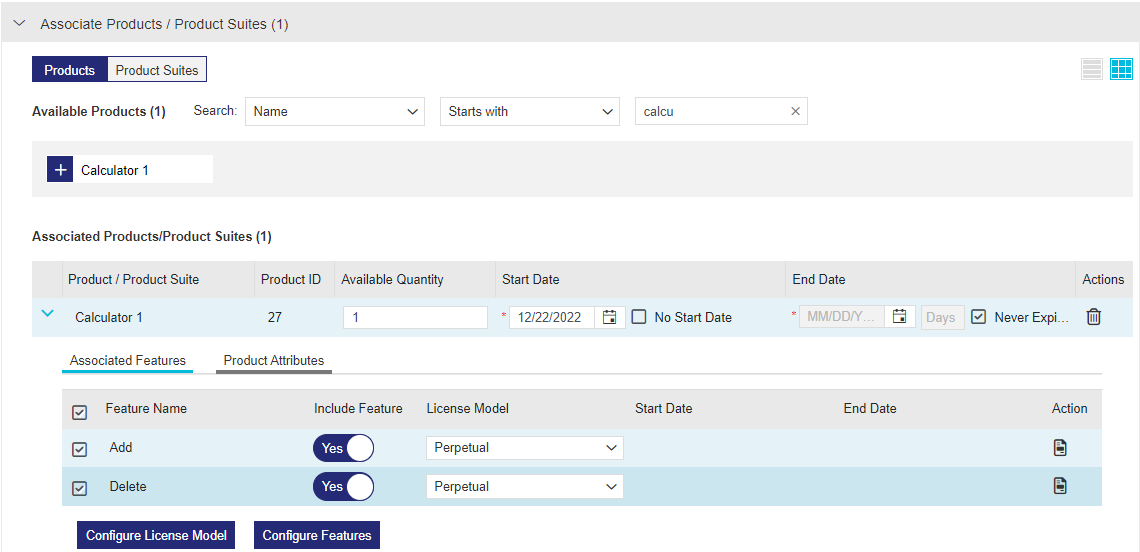
|
Line Item Attributes
Product-
| Attribute | Description | Required/Optional | Valid Values |
|---|---|---|---|
| Product / Product Suite | Name of the associated product |
Required | Read-Only |
| Product ID | Numeric identifier for the product. | Required | Read-Only |
| Available Quantity |
Total number of available activations. You must use the same value in all line items for: >
|
Required |
An integer > 0 or Unlimited |
| Start Date |
The date (day, month, and year) before which the licensed software cannot be run. By default, the start date for an associated product You can specify different dates for a product by modifying the date in the line item. >If a start date is defined in the license model, then this date is also displayed for the entitlement. However, if the license model start date is earlier than the current date, then the current date is displayed as the start date. >You can select a start date that is earlier than the current date. |
Required |
Do one of the following: >Enter a valid date. >Select the No Start Date check box check box to exclude the start date. |
| End Date |
The date (day, month, and year) after which the licensed software cannot be run. By default, the end date for an associated product You can specify different dates for a product by modifying the date in the line item. If the license model end date is a future date, then that end date is displayed by default as the end date for the product. |
Required |
Do one of the following: >Enter a valid date. >Enter the maximum number of days. >Select the Never Expires check box check box to extend the end date indefinitely. |
|
Actions > |
Removes the association with the entitlement. The product |
Optional | N/A |
 Delete
Associated Features
Feature-related attributes are specified in the Associated Features tab, described below.
| Attribute | Description | Required/Optional | Valid Values |
|---|---|---|---|
| Feature Name | Name of the associated feature. | Required | Read-Only |
|
|
Toggle button that specifies if a feature is included in the entitlement. <5.5Preview>
|
Required | Yes or No |
| License Model |
The license model associated with the feature. If more than one license model is associated with the feature, you can select the required license model from the list. |
Required |
A valid license model |
| Start Date |
The date (day, month, and year) before which the licensed feature cannot be run. By default, the start date for an associated product You can specify different dates for a product by modifying the date in the line item. >If a start date is defined in the license model, then this date is also displayed for the entitlement. However, if the license model start date is earlier than the current date, then the current date is displayed as the start date. >You can select a start date that is earlier than the current date. |
Required |
Do one of the following: >Enter a valid date. >Select the No Start Date check box check box to exclude the start date. |
| End Date |
The date (day, month, and year) after which the licensed feature cannot be run. By default, the end date for an associated product You can specify different dates for a product by modifying the date in the line item. If the license model end date is a future date, then that end date is displayed by default as the end date for the product. |
Required |
Do one of the following: >Enter a valid date. >Enter the maximum number of days. >Select the Never Expires check box check box to extend the end date indefinitely. |
|
|
Specifies how to apply the license model attributes to the feature. If the license model was set to Define in Entitlement when creating the product, you must set the value in this field. |
Required |
One of the following: Add. Adds the license model attributes to the feature. Overwrite. Modifies the license model attributes associated with the feature. For example, you may want to modify the expiration date or replace the number of days until the license expires. |
|
Action > |
Button used to open the Configure License Model dialog box. Enables you to view and configure the license model associated with the selected feature.
Tip: In the Associated Features pane, you can select the check box for one or more features and click the Configure License Model button to configure and apply the same license model to all selected features simultaneously.
|
Optional | N/A |
 Configure License Model
 Associated Memory
Memory-related attributes are specified in the Associated Memory tab.
| Attribute | Description | Required/Optional | Valid Values |
|---|---|---|---|
| File Name | A descriptive name of the memory file. | Required | Read-Only (Set when creating the Memory file.) |
| File ID |
Integer that identifies the memory file and is used by your application to refer to that file. |
Required | Read-Only (Set when creating the Memory file.) |
| File Type | Type of data stored in the memory file. | Required | Read-Only (Set when creating the Memory file.) |
| Offset | The hexadecimal starting point of the memory file. | Optional |
Read-Only (Set when creating the Memory file or when you Associate Memory Files with a product.) |
| Size (Bytes) |
Size of the memory file in bytes. |
Optional
|
Read-Only (Set when creating the Memory file or when you Associate Memory Files with a product.) |
| Text |
The memory data in text format. You can add or edit text if the Allow Overwrite check box was selected when creating the product containing the memory file. NOTE The combined value of Text and Offset must not exceed the memory file Size (Bytes). |
Optional |
Read-Only (Set when creating the Memory file or when you Associate Memory Files with a product.) OR Text with a maximum size that does not exceed the following: User-defined memory: >Sentinel SL keys: 65535 bytes >Sentinel HL key version 6.x keys: 65535 bytes >Sentinel HL key version 4.x keys: 25944 bytes Default memory: >Default (Read/Write): 4032 bytes* >Default (Read-Only): 2048 bytes* |
| Apply Memory |
Specifies how to attach the memory file to the product. Sentinel EMS applies memory files in the order in which they are added to the product. |
Required |
Read-Only (Set to one of the following when you Associate Memory Files with a product.): >Add >Overwrite >Delete For more information about these values, see Apply Memory. |
Product Attributes
Product-related attributes are specified in the Product Attributes tab.
>Sentinel RMS Product Attributes
>Sentinel LDK Product Attributes
Sentinel RMS Product Attributes
The displayed attributes depend on the product settings, including license and locking attributes. Some of the product attributes are described in the following table.
| Attribute | Description | Required/Optional | Valid Values |
|---|---|---|---|
| Activation Method |
The value of the Activation Method appears as specified during product creation. You can update the value as needed: >Fixed. The provided quantity can be consumed in multiple activations, and each activation will consume a specified fixed quantity. Fixed is the default value if the Activation Method was set to Define in Entitlement when the product was created. >Partial. The provided quantity can be consumed in multiple activations. Each activation reduces the total number of available activations by the quantity activated. >Full. The user must activate the entire quantity provided in one activation. >Unlimited. The user can perform an unlimited number of activations for the product. (Not supported for cloud-served lease entitlements.)
Note: The Activation Method value must be identical for all line items for: > |
Required |
One of the following: >Fixed >Partial >Full > Unlimited |
| Fixed Quantity |
The fixed number of licenses to consume in each activation. Visible only if the Activation Method is set to Fixed. Default: 1 |
Required | Number from 1 to the maximum quantity of activations |
| Available Quantity | The total number of licenses available for activation. | Required |
Maximum quantity of activations |
Sentinel LDK Product Attributes
| Attribute | Description | Required/Optional | Valid Values |
|---|---|---|---|
| Activation Method |
Specifies whether a finite or unlimited number of activations is available. >Fixed. The provided quantity can be consumed in multiple activations, and each activation will consume the specified fixed quantity. By default, the Fixed quantity is 1. >Unlimited. The user can perform an unlimited number of activations for the product. Default: Fixed |
Required | Fixed or Unlimited |
| Locking Type | The Locking Type value specified during product creation. | Required | Read-Only |
| Rehost | The Rehost value specified during product creation. If Define in Entitlement was specified, you must set the value in this field. | Required |
One of the following: >Enable >Disable >Leave As Is |
Test Entitlement Mode
Sentinel EMS enables you to work in the Test Entitlements mode for testing purposes. (Not recommended for use with production devices.) From the navigation pane, select Entitlements to view the Entitlements page. You can set the Test Entitlements toggle button to "On" to create and work with test entitlements. The Test Entitlements mode is switched off by default.

NOTE When working with test entitlements, real entitlements are not listed (and vice versa). To move back to real entitlements, set the Test Entitlements mode back to "Off".
You can use test entitlements to verify that:
>License models, features, products
>Entitlements are being generated successfully.
>Entitlement certificates and license certificates are generated correctly and are sent to the end user.
>The license code generated works for the products.
The following is true for test entitlements:
>You can create test entitlements for products
>
![]() You cannot create a test entitlement for versionless products.
You cannot create a test entitlement for versionless products.
>
![]() You cannot deploy a test entitlement for lease-based products.
You cannot deploy a test entitlement for lease-based products.
>You can delete a test entitlement.
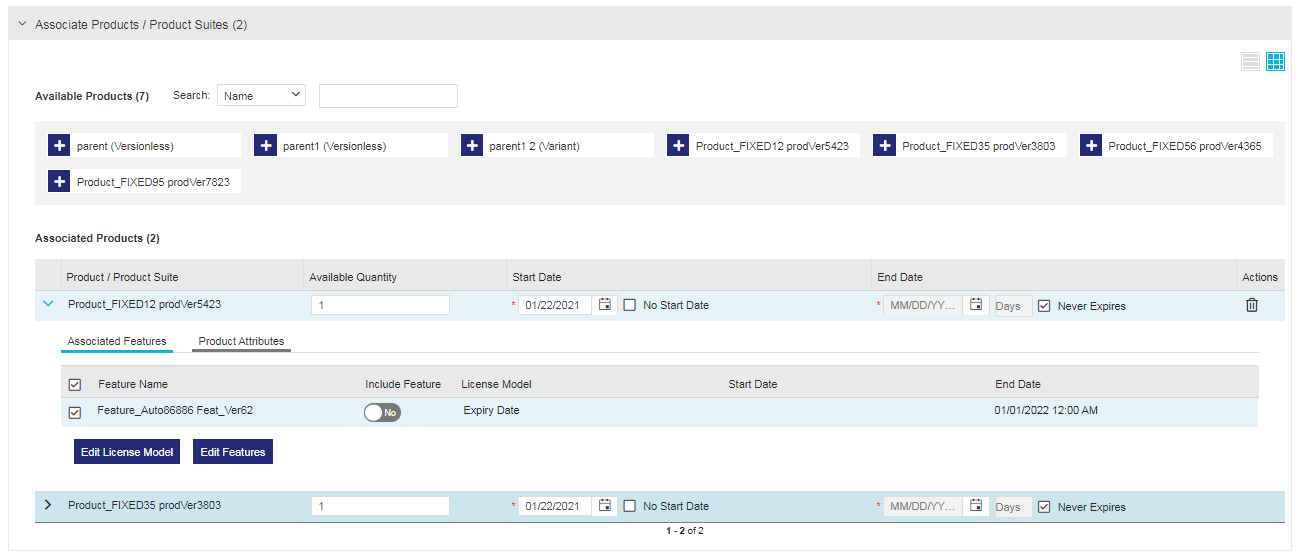
Entitlements for Versionless Products
Versionless products are created to support dynamic entitlements in Sentinel EMS.
To create an entitlement for versionless product:
1.Create a versionless product. For details, see Creating a Product.
2.Create its variants as required. For details, see Creating a Variant for a Versionless Product.
3.Create an entitlement using the Entitlements page. For details, see Creating an Entitlement.
4.During entitlement creation, use the Associate Products / Products Suite pane to associate the versionless product. All variants of the versionless product will be automatically available during activation.
5.Save the entitlement.
Important points to remember when creating an entitlement for versionless products are:
>A versionless product must have variants associated with it, before an entitlement can be created for it.
>An entitlement cannot be created by combining versionless products and variants as line items.
>An entitlement cannot be created by combining versionless products and default products as line items.
>An entitlement can be created for multiple versionless products that belong to a common namespace.
>When an existing Sentinel RMS license model is associated with a variant, it uses the default values of the license attributes to define the licensing terms. An existing Sentinel RMS license model must be copied and its attributes customized as required before it is associated with a variant.
For example, the Flexible License Model, which is used to create lease licenses has the default value "Network" for its attribute "License Type". The Flexible License Model can be associated with a variant to define a Network type lease license. Alternately, to create a "Standalone" lease license, the Flexible License Model has to be copied and the attribute "License Type" has to be changed to "Standalone" in the copied license model. The new license model can then be associated with the variant.
>License model attributes are not displayed for entitlements with versionless products. At the time of activation, depending on the variant selected, the license model attributes are applied from its definition.
>If the Copy License Date from Line Item in the Administration Console and the Start From Activation Date license model attribute of a versionless product are both set to No then the license duration of the line item is the sum of the date of activation and the license model duration.
>The activation method for versionless products is derived from the variant at the time of activation.
Named Entitlements for Connected License Model
Sentinel EMS enables you create entitlements that can be associated with named users. These entitlements are called named entitlements. Named entitlements can only be created for features that implement Connected license models. Once deployed, a named entitlement generates a named user license, which gives exclusive licensing rights to user names specified in the software license. The named user license is issued for known user names.
To create a named entitlement:
1.Create a feature that contains the Connected license model.
2.Create a product that contains the feature of Connected license model type.
NOTE A product can be included as a line item multiple times within the same cloud-connected entitlement.
3.Start to create an entitlement. For details, see Creating an Entitlement.
4.In the Associate Product / Product Suite pane, add a product that contains the feature with the Connected license model type.
5.Expand the product you added and select Product Attributes.
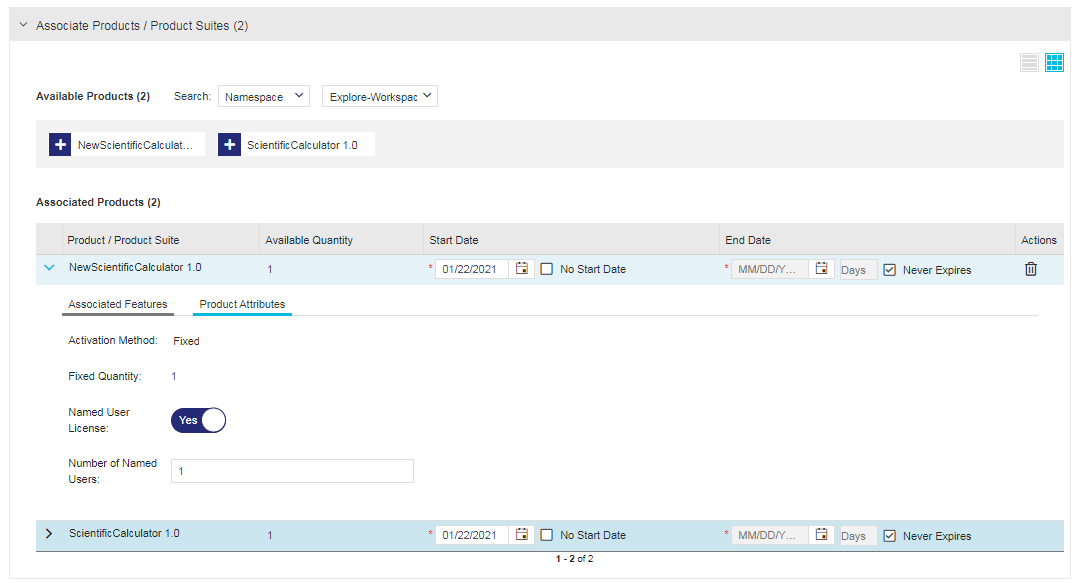
Set the following:
•Named User License: Set to Yes to specify a named user association for the entitlement that is being created.
•Number of Named Users: Specify the number of named users you want to associate with the line item (Maximum: 25000). (This attribute is displayed only when Named User License is set to Yes.
6.Click Save to save the named entitlement as a draft.
7.In the Entitlements page, mark the entitlement as "complete" by clicking the Complete action button. For details, see Actions for Entitlements
8.Activate the line item. For details, see Activating a Product. A Named User Management tab is visible after the line item is activated:

NOTE You can associate named users with line items in an entitlement using the Named User Management tab only after the entitlement is deployed.
9.Add named users to the entitlement. For details, see Managing Named Users.
Lease-based Entitlements or Cloud-Served Lease Entitlements
An entitlement that enables you to generate a lease license is called a lease-based entitlement. A lease license that is valid up to a time in the future and is delivered in several installments. These installments are then delivered and consumed sequentially.
Sentinel EMS enables you use the Flexible License Model to create lease-based entitlements also known as cloud-served lease entitlements.
NOTE User can set fingerprint registration as optional for lease-based entitlements. If the Redundancy option is enabled for lease-based entitlements then fingerprint registration is mandatory.
To create a cloud-served lease entitlement:
1.Create a feature using the Flexible License Model.
2.Create a product that contains the feature of Flexible License Model type.
3.Create an entitlement using the Entitlements page. For details, see Creating an Entitlement.
NOTE Entitlement as a Whole is set to No by default to support the activation of a lease-based entitlement at the line item level. You can specify that all products and product suites that are part of the entitlement are activated at the same time by setting the Entitlement as a Whole option to Yes.
4.During entitlement creation, add the product that you created in step 2.
5.Specify the Activation Method as Fixed or Full.
6.Specify the Quantity for each product.
7.Save the entitlement.
Important points to remember when creating a cloud-served lease entitlement:
>A product can be included as a line item multiple times within the same entitlement.
>Activation of lease-based entitlements is done using the Sentinel Cloud Plug-in (SCP). The Activate button used to activate entitlements is not available for cloud-served lease entitlements.
>Activation at line item level is supported for cloud-served lease entitlements.
>Activation method supported for leased licenses is as follows:
•Full activation is supported for redundant lease licenses.
•Fixed and Full activation is supported for non-redundant lease licenses.
>The EID attribute does not support special characters (/,\,$,!,@,#,*), space and internationalized characters (such as Japanese, German, Chinese font set) for cloud served licenses.
>A product with deployment type cloud-served lease cannot be added twice to a lease-based entitlement.
>To make an entitlement with an optional fingerprint, set Fingerprint Registration to No while copying the license model, or clear this entitlement level attribute during entitlement creation.
>Fingerprint registration is supported at the line item level if Entitlement as a Whole is set to No.
Connected Entitlements for Cloud LM (License Manager) Deployment
Sentinel EMS enables you to use the Flexible License Model to create connected entitlements using the cloud LM (License Manager) deployment mode.
To create a cloud-served connected entitlement:
1.Create a feature using the Flexible License Model where deployment mode is Cloud Served - Cloud LM.
2.Create a product that contains the feature of Flexible License Model type.
3.Create an entitlement using the Entitlements page. For details, see Creating an Entitlement.
4.During entitlement creation, add the product that you created in step 2.
5.Specify the Activation Method.
6.Specify the Quantity for each product.
7.Save the entitlement.
Important points to remember when creating a cloud-served connected entitlement:
>A product can be included as a line item multiple times within the same entitlement.
>Activation of connected entitlements is enforced in cloud and can be consumed from anywhere.
>The EID attribute does not support special characters (/,\,$,!,@,#,*), space and internationalized characters (such as Japanese, German, Chinese font set) for cloud served licenses.
Entitlement to Support Redundancy Using Flexible License Model
Redundancy is supported using the Redundant Node Locked and the Flexible License Model in Sentinel EMS. You can use either of the license models to create an entitlement and generate a license that supports redundancy.
To create an entitlement that provides support for redundancy using Flexible License Model:
1.Create a feature using Flexible License Model.
2.Create a product that contains the above created feature.
3.Create an entitlement using the Entitlements page. For details, see Creating an Entitlement.
NOTE For redundant lease licenses, set Activation Method to Full.
4.Add the product that you created in step 2.
5.Specify Quantity. For cloud-served lease, the quantity is 1.
6.In the Enforcement Extensions pane, set Redundancy to Yes.
7.Set the Redundancy Majority Rule option to Yes to enable the majority rule. For more details, see Flexible License Model.
8.In Redundant Servers, enter the number of servers (from 3 to 11).
9.Save the entitlement.
Important points to remember when creating an entitlement that supports redundancy using the Flexible License Model:
>Full activation is supported for redundant lease licenses.
>Redundancy attributes such as Redundancy, Redundancy Majority rule and Redundant Servers are consolidated at entitlement level.
>Redundancy attributes cannot be modified once entitlement has been marked as "complete".
>Enabling the Redundancy Majority Rule is not mandatory but it is recommended for better security.
>If Redundancy Majority Rule is enabled then cloud-served lease licenses can only be consumed if the number of servers that meet this majority rule specified in the entitlement are registered and running.
>If Redundancy Majority Rule is enabled then On premise - Served licenses can only be consumed if the number of servers that meet this majority rule specified in the entitlement are running.
>Locking criteria type is the same across all redundant servers.
>Fingerprint registration is mandatory for lease-based entitlements if Redundancy is enabled.
Entitlement to Support Redundancy Using Redundant Node Locked License Model
Another method for an entitlement to support redundancy is by using the Redundant Node Locked license model.
To create a an entitlement that provides support for redundancy using Redundant Node Locked license model:
1.Create a feature using the Redundant Node Locked license model.
2.Create a product that contains this feature.
3.Create an entitlement using the Entitlements page. For details, see Creating an Entitlement.
4.Add the product of that contains the feature of Redundant Node Locked license model type.
5.Click the > button to expand the associated product details.
6.Under Product Properties, modify the number of servers in Num Servers if required.
7.Click Edit License Model to modify the licensing attributes. (The redundancy attributes Allow Redundancy and Enforce Majority Rule are available under Policy pane in the Edit License Model window.)
8.Save the entitlement.
Important points to remember when creating an entitlement that supports redundancy using Flexible License Model:
>Redundancy attribute, Num Servers is specified at line item level.
>The Majority Rule attribute is specified at the license model level.
>Redundancy attributes cannot be modified once entitlement has been marked as "complete".
>Enabling the Redundancy Majority Rule is not mandatory but it is recommended for better security.
>If Redundancy Majority Rule is enabled then licenses can only be consumed if the number of servers that meet the majority rule specified in the entitlement are running.
>Locking criteria type can be different for each redundant server.
 Entitlements Using Sentinel Fit Enforcement
Sentinel Fit enforcement provides support for the Perpetual and Expiry Date license models. Sentinel Fit is designed to manage features and capabilities in hardware systems as well as corporate network applications.
To create a Sentinel Fit entitlement:
1.Create a feature using the Expiry or Perpetual license model. For details, see Creating a Feature.
2.Create a product that contains the feature you created in step 1. For details, see Products.
3.In the Entitlements page, create an entitlement that contains the product you created in step 2.
4.Under Associated Products:
•Modify the product values as needed.
•Click the > button to expand the product details and modify as needed.
•Click Edit License Model to modify the license model attributes as needed.
•Click Edit Features to modify the feature attributes as needed.
5.Click Save to create the entitlement. The new entitlement is saved as a draft and is displayed at the top of the entitlements list.