Entitlement Actions
|
>Editing an Entitlement Marked as Complete >Viewing an Entitlement Certificate >Split and Transfer Entitlements >Managing Fingerprints for Entitlements |
>New to Entitlements?
>Want to Create an Entitlement?
|
Actions for Entitlements
The following table lists the actions available for entitlements:
| Action | Description | ||
|---|---|---|---|
|
Mark an entitlement as "complete" to finalize it and make it available for activation. Note: >An entitlement must contain at least one product >An entitlement marked as "complete" cannot be deleted. >Start From Activation Date and License Duration (days) license model attributes are disabled after an entitlement is marked as "complete". |
||
|
Update existing entitlement information. See Editing an Entity to understand how to edit an entity. Note: >For a draft entitlement, the attributes to edit are same that appear while creating a new entitlement. See Define Entitlement Attributes for detailed information on these attributes. >For information on how to edit entitlements marked as complete, see Editing an Entitlement Marked as Complete. >For a "complete" entitlement, which is not associated with a customer or a contact, the market group attribute cannot be modified. |
||
|
Copy the information from an existing entitlement to create a new one. Note: >The new entitlement is created with a different entitlement ID. > The new entitlement appears at the top of the list. >The new entitlement is saved as a draft. You can edit the entitlement before marking it as "complete". |
||
|
Delete a test or draft entitlement. Note: >You can delete an entitlement only if it is marked as a draft. >You can delete a test entitlement that is marked as either draft or complete. |
||
|
View transaction details of a selected entitlement. For details, see Transactions. |
||
|
View and email the entitlement certificate of the entitlement. For details, see Viewing an Entitlement Certificate. |
||
|
View activations that are already performed for a entitlement. Refer to Activations for details. |
||
|
View previous revocation requests for an entitlement. |
||
|
View and associate downloads with the product within the entitlement using the Downloads page. This action is visible to users with "View" permissions on downloads. To link a download with a product: 1.In the Actions column, select View Downloads to open the Downloads page. 2.Follow the steps in Creating a Download to create and associate a download with a product in an entitlement. |
||
|
Split and/or transfer unused quantity in an entitlement to other customers or channel partners. For details, see Split and Transfer Entitlements. NOTE
|
||
|
Disables an entitlement that is marked as "complete". Note: >The details of a disabled entitlement cannot be modified. >A disabled entitlement cannot be activated. >A disabled entitlement cannot be revoked. |
||
|
Enables an entitlement that has been disabled. Note: Enabling a disabled entitlement restores all the line items of the entitlement to their previous state (same as before disable). |
||
|
Permanently disables an entitlement by marking it closed. Note: An entitlement that has been marked "closed" is permanently disabled and no modification action can be performed on the entitlement. |
||
|
Manage fingerprints for lease-based entitlements and on-premises entitlements. For a customer, you can register the fingerprints of the machines that will be using the entitlements. A machine can be registered for one or more entitlements. Also, an entitlement can be registered for one or more machines. This option of fingerprint registration is available in Sentinel EMS portal (including customer portal) and also in REST APIs. For more information, see Managing Fingerprints for Entitlements |
||
|
Configure a batch job. This action is only available for entitlements that are in draft state. For more information, see Configuring a Batch Entitlement. |


NOTE
![]() The Named User Management tab, which appears for deployed cloud-connected entitlements, allows you to manage named users. For details, see Managing Named Users.
The Named User Management tab, which appears for deployed cloud-connected entitlements, allows you to manage named users. For details, see Managing Named Users.
Editing an Entitlement Marked as Complete
When modifying an entitlement marked as complete, consider the following:
>Start Dates and End Dates
•You cannot change the end date of an entitlement to precede any of its products' start date.
•You can change the end date of an entitlement to "Never expires".
>User Registration (only for activated entitlements)
•You can change an existing user registration value from "Optional" to "None" or "None" to "Optional".
•You cannot change an existing user registration that is marked as "Mandatory".
>Entitlement as a Whole
•You cannot change the Entitlement as a Whole value from "Yes" to "No" and vice versa.
>If you are logged in as a channel partner, the following conditions are true:
•A channel partner can only modify customer, contact and channel partner details of the entitlement to which it is associated. Other fields appear disabled.
•A channel partner can add new customers and contacts for an entitlement if the Allow Channel Partner to Create Customers property is enabled in the Administration Console. For more information on the Allow Channel Partner to Create Customers property, refer to the Administration Console.
•A channel partner can associate a customer with an entitlement only if no customer is previously associated with that entitlement. After a customer is associated, the channel partner cannot further modify it.
• If a customer is associated with an entitlement, the channel partner can modify the customer's contact for the entitlement. The updated contact must also belong to the associated customer.
•A channel partner can associate other channel partners with an entitlement.
>
![]() For cloud entitlements, entity association panes are not available during edit.
For cloud entitlements, entity association panes are not available during edit.
>
![]() The line items of a cloud-served entitlement are not visible and can be modified only after the entitlement has been activated.
The line items of a cloud-served entitlement are not visible and can be modified only after the entitlement has been activated.
>
![]() Customers cannot be modified when they are associated with entitlements that are created using the Flexible License Model (where deployment mode is cloud-served lease) or the Connected License Model.
Customers cannot be modified when they are associated with entitlements that are created using the Flexible License Model (where deployment mode is cloud-served lease) or the Connected License Model.
>
![]() The associated customer or the customer identifier of an associated customer of lease-based entitlements cannot be modified if the value of Deployment Type is On-premise Served, License Version is 21 (or later), and Cloud Usage is Yes. This is because the entitlement is deployed on cloud.
The associated customer or the customer identifier of an associated customer of lease-based entitlements cannot be modified if the value of Deployment Type is On-premise Served, License Version is 21 (or later), and Cloud Usage is Yes. This is because the entitlement is deployed on cloud.
![]()
 Renewing a Line Item
For an entitlement that has been marked as "complete" or activated, you can renew the associated line items.
To renew a line item:
1.In the entitlement row, click the Edit action button to open the Edit Entitlement page.
2.In the Associate Products
3.Under Quantity, specify the quantity to recharge in the given field and use the Add and Subtract buttons to increase or decrease the quantity of given line item by the value entered in the field. Also, if you enter 0 (zero) then there is no change in the recharge quantity.
![]() Recharge is available only for line items that are set to a numerical quantity (not Unlimited).
Recharge is available only for line items that are set to a numerical quantity (not Unlimited).
NOTE
![]() For all cloud-served lease licenses, the remaining available quantity is always 0 after activation, therefore you cannot decrease the quantity when reconfiguring these entitlements.
For all cloud-served lease licenses, the remaining available quantity is always 0 after activation, therefore you cannot decrease the quantity when reconfiguring these entitlements.
4.Enter the new end date in the End Date. While specifying an End Date for a line item, note the following:
•You cannot change the end date of the line item to precede any of its products' start date.
•You can change the end date of a line item indefinitely by selecting Never Expires.
NOTE
![]() You can click Configure License Model for a line item to edit its licensing terms. All changes to the attributes at license model level require license regeneration.
You can click Configure License Model for a line item to edit its licensing terms. All changes to the attributes at license model level require license regeneration.
5.
![]() Set Regenerate License to "Yes" to refresh the previously activated licenses.
Set Regenerate License to "Yes" to refresh the previously activated licenses.
NOTE
![]() The Regenerate License option appears only for activated entitlements. You can renew a line item using the Renew License action available in the Activations page. See Activation Actions, for more information.
The Regenerate License option appears only for activated entitlements. You can renew a line item using the Renew License action available in the Activations page. See Activation Actions, for more information.
6.Save the entitlement.
Viewing an Entitlement Certificate
The entitlement certificate contains the details of the entitlement.
![]() For a versionless product, the entitlement certificate also displays information about its variants.
For a versionless product, the entitlement certificate also displays information about its variants.
To view and email an entitlement certificate for an entitlement marked as "complete":
1.In the Actions column, hover over an entitlement marked as "complete".
2.Click the View Certificate action button. The entitlement certificate appears as shown:
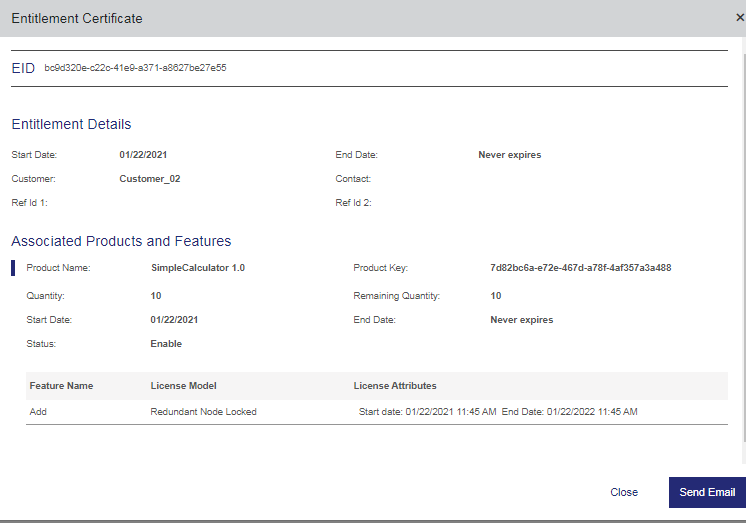
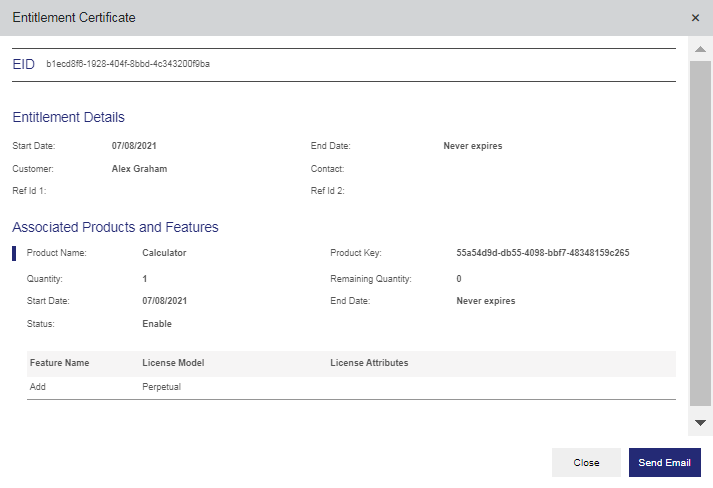
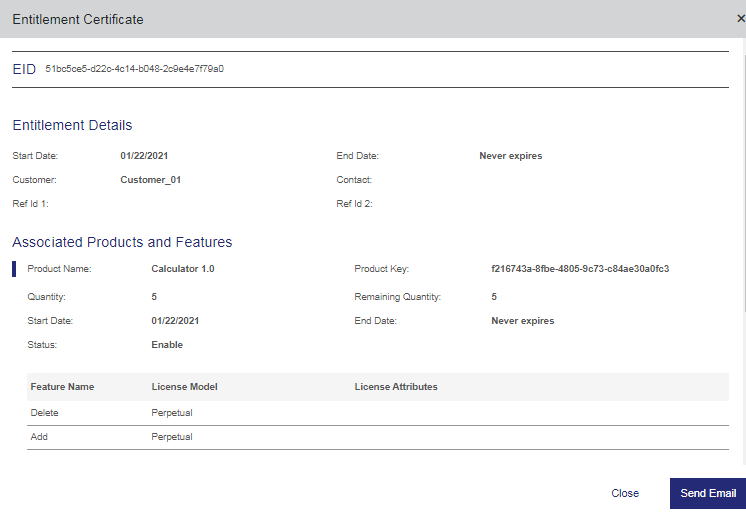
3.Click Send Email. The Send Email pop-up appears.
4.In the Send Email pop-up:
a.Specify the email address where the entitlement certificate must be sent. You can enter up to 15 email addresses. Press Enter after each email address.
b.Select another language if required. The language options that appear in the list depend on the language packs installed on your system.
c.Click Send. The entitlement certificate is sent to the specified email address in the selected language.
NOTE
![]() The product key is not available in Cloud Served – Lease entitlement certificates.
The product key is not available in Cloud Served – Lease entitlement certificates.
Split and Transfer Entitlements
You can split and/or transfer the existing quantity of an entitlement to other customers or channel partners. You can split the available activation quantity of an existing entitlement and transfer it to another party (customer, contact, or channel partner). This helps to better allocate and utilize an entitlement.
The following is applicable for Split/Transfer action:
>An entitlement can be split for all products or for selected products, based on the available quantity.
>A split entitlement can be assigned to a same customer/contact or a different customer/contact or none.
>For customers or contacts associated to a market group, the split or transfer of an entitlement can be done only within the market group of the customer or contact.
>Channel partner can be updated or added in Split/Transfer.
>You can split and then transfer an entitlement when the activation method used is
>
![]() Entitlements using the Full activation method can only be transferred in their entirety because this method is always activated as a whole.
Entitlements using the Full activation method can only be transferred in their entirety because this method is always activated as a whole.
>Entitlements using the Unlimited activation method cannot be split and can only be transferred because no quantity is specified.
>
![]() Entitlements for cloud-connected deployment mode cannot be split, but they can be transferred.
Entitlements for cloud-connected deployment mode cannot be split, but they can be transferred.
>
![]() Specifying a customer is not mandatory for lease-based entitlements during Split/Transfer.
Specifying a customer is not mandatory for lease-based entitlements during Split/Transfer.
>During Split/Transfer, if you are a channel partner, the following conditions are true:
•A channel partner can only Split/Transfer an entitlement to which it is associated.
•A channel partner can add new customers and contacts for an entitlement during Split/Transfer if the Allow Channel Partner to Create Customers property is enabled in the Administration Console. For more information on the Allow Channel Partner to Create Customers property, refer to the Administration Console.
•A channel partner can associate other channel partners with an entitlement during Split/Transfer.
To perform Split/Transfer on an entitlement:
1.In the Actions column, hover over and select an entitlement that is marked as "complete".
2.Click the Split/Transfer action. The Split/Transfer Entitlement page appears.
![]()
3.Enter the Customer Name, Contact Email, Channel Partner, External ID, or CC Email as required. You can also leave the fields blank. These fields specify the owner for the new (split) entitlement. For details about these attributes, see Assign Customers, Contacts, Channel Partners, and Market Groups
4.In Define Entitlement Attributes, under Additional Attributes, enable Send Notification to send email to the new owner (specified as the contact email) of the entitlement.
5.For a line item, enter the quantity to be transferred in the Transfer Quantity field. This value must be less than or equal to the Remaining Quantity of the product.
NOTE The transfer quantity must be a multiple of the fixed quantity for product line items with the Fixed activation method.
6.Click Save. The entitlement page displays the details of the new split entitlement and the details of the existing entitlement that has been split.
Managing Fingerprints for Entitlements
This section includes:
>What is a Machine Fingerprint?
>Adding and Associating a Fingerprint Using the Manage Fingerprints Option
>Overriding the Fingerprint for On-Premises Licenses Property
What is a Machine Fingerprint?
A machine fingerprint is the information collected about a device for the purpose of identification. Using the machine fingerprints, the licenses obtained for an entitlement can be locked to specific permitted systems such as, clients, application servers, or both. If the locking information embedded in the license code does not match with the system, the licensed software fails to run on the system.
The systems can be identified using the following machine fingerprints:
>Standard (such as IP address, host name, or disk ID). For greater security and flexibility, the licenses can be locked to more than one standard locking criterion.
>Custom system identifiers. When the standard locking criteria seem inappropriate for locking licenses, a custom criterion, such as the display card, can be identified and implemented by the vendor. The fingerprint data can be up to 64-bytes long.
The Fingerprint XML
When using Sentinel EMS, you need to upload an XML fingerprint file. This XML fingerprint file can be generated using Sentinel RMS Run-time API. For more information, refer to the API reference guides, which are located under Sentinel RMS guides. A sample XML fingerprint file is given below:
<?xml version="1.0" encoding="UTF-8"?>
<sentinelInfo>
  <fingerprint type="SentinelRMS" checksum="222BFD00DE6AE316">
    <criteria>
      <name>ID Prom</name>
      <selector>0x1</selector>
      <hash />
    </criteria>
    <criteria>
      <name>IP Address</name>
      <selector>0x2</selector>
      <hash>9C6DE1C09F4264DA</hash>
    </criteria>
    <criteria>
      <name>Disk ID</name>
      <selector>0x4</selector>
      <hash>EF4D819A49B793D9</hash>
    </criteria>
    <criteria>
      <name>Host Name</name>
      <selector>0x8</selector>
      <hash>7E2FD5A3C26279C3</hash>
    </criteria>
    <criteria>
      <name>Ethernet Address</name>
      <selector>0x10</selector>
      <hash>B5D8CB26BD967E51</hash>
      <hash>7B70D029CF384F96</hash>
    </criteria>
    <criteria>
      <name>Network IPX</name>
      <selector>0x20</selector>
      <hash />
    </criteria>
    <criteria>
      <name>Network Serial</name>
      <selector>0x40</selector>
      <hash />
    </criteria>
    <criteria>
      <name>Portable Serv</name>
      <selector>0x80</selector>
      <hash />
    </criteria>
    <criteria>
      <name>Custom</name>
      <selector>0x100</selector>
      <hash />
    </criteria>
    <criteria>
      <name>CPU Id</name>
      <selector>0x200</selector>
      <hash />
    </criteria>
    <criteria>
      <name>Custom Ex</name>
      <selector>0x400</selector>
      <hash />
    </criteria>
    <criteria>
      <name>Hard Disk Serial</name>
      <selector>0x800</selector>
      <hash>4A36846A9B34732A</hash>
      <hash>8AF28595C751A404</hash>
    </criteria>
    <criteria>
      <name>CPU Info</name>
      <selector>0x1000</selector>
      <hash>FF870FB84BDC86BC</hash>
    </criteria>
    <criteria>
      <name>UUID</name>
      <selector>0x2000</selector>
      <hash>D762B2B99AB4FA96</hash>
    </criteria>
  </fingerprint>
</sentinelInfo>
Adding and Associating a Fingerprint Using the Manage Fingerprints Option
You manage fingerprints for a customer using the Manage Fingerprints option, which is available for entitlements that are marked as completed and that are associated with a customer. After a fingerprint is added, it is available for the customer and can be associated with the customer's entitlements and line items.
Following are a few important points when adding and associating fingerprints:
>For entitlements created using versionless products, fingerprint association is set at the variant level. A fingerprint associated with one variant cannot be associated with another variant of the same versionless product in an entitlement. This means that only one variant of a versionless product can be fetched to a machine at a time.
>For on-premises licenses, fingerprint management settings can be handled at a global level, but can also be overridden at the entitlement level.
The Fingerprint for On-premises Licenses property is available in the Administration Console and is used to control the global setting of making fingerprint registration available for on-premises licenses. This property can also be overridden at entitlement level from the Enforcement Extensions pane while creating an entitlement. For versionless entitlements, this property can be overridden for a variant at the product level from the Enforcement Extensions pane. For information on overriding this property, see Overriding the Fingerprint for On-Premises Licenses Property
NOTE It is recommended not to enable Fingerprint for On-premises Licenses if device locking is enabled.
>For lease-based licenses, fingerprint management settings are handled as follows:
• The Fingerprint Registration property is defined in the Enforcement Extensions section at the entitlement level. For versionless entitlements, the Fingerprint Registration property is defined for a variant at the product level in the Enforcement Extensions section .
•Fingerprint registration is mandatory if redundancy is enabled.
> The conditions required for using the Manage Fingerprints option are described in the following table:
| Entitlement Type | Entitlement is marked as completed | Customer is associated | Fingerprint for On-premises Licenses is Yes in Administration Console | Fingerprint for On-premises Licenses is Yes at entitlement level |
Fingerprint for On-premises Licenses is Yes at product level (for variants) |
Fingerprint Registration is Yes at entitlement level |
Fingerprint Registration is Yes at product level (for variants) |
|---|---|---|---|---|---|---|---|
| Lease-based entitlements |

|
|
N/A | N/A | N/A |
|
N/A |
| On-premises entitlements |
|
|
|
|
N/A | N/A | N/A |
| Versionless lease-based entitlements |
|
|
N/A | N/A | N/A | N/A |
|
| Versionless on-premises entitlements |
|
|
|
N/A |
|
N/A | N/A |
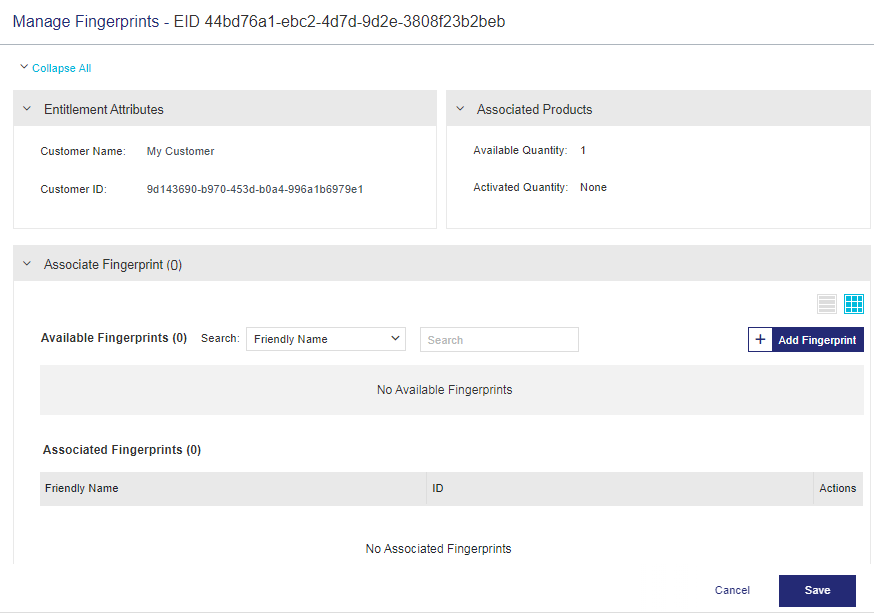
To add and associate a fingerprint from the Manage Fingerprints page:
1.Open the Manage Fingerprints page in one of the following ways:
•On the Entitlements page, in the Actions column for an entitlement, click Manage Fingerprints. The Manage Fingerprints page appears:
•When activating products in an entitlement, click the Manage Fingerprint button. For detailed instructions, see Activating Entitlements Using Fingerprints.
2.In the Associated Product pane, select the product to which you want to associate the fingerprint.
3.In the Associate Fingerprint pane, click Add Fingerprint. The Add Fingerprint dialog box appears:
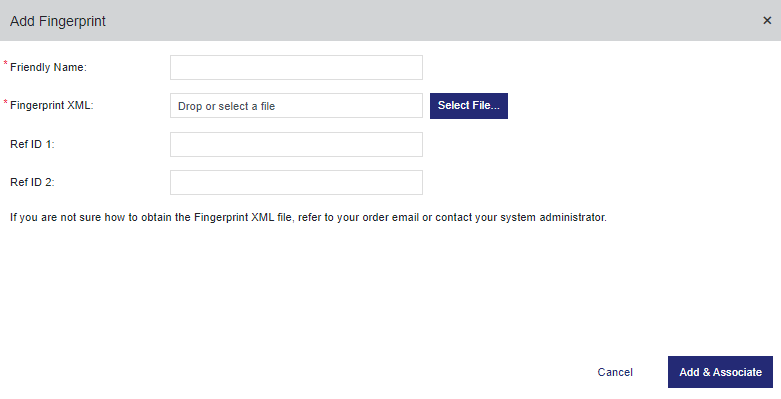
The following table explains the attributes in the Add Fingerprint dialog box.
| Attribute | Description | Required/Optional | Valid Values |
|---|---|---|---|
| Friendly Name | A name for the machine fingerprint to make it easier to identify and use the fingerprint file. | Required |
Alphanumeric |
| Fingerprint XML |
The XML file containing the machine fingerprint. Click Select File to upload the fingerprint XML file. TIP You can obtain the fingerprint XML file using the Sentinel RMS Run-time API. For details, refer to the API reference guides, which are located under Sentinel RMS guides. |
Required | A fingerprint XML file |
| Ref ID 1 |
Reference identifier that identifies the feature in an external system. |
Optional |
>Alphanumeric >0 to 100 characters |
| Ref ID 2 |
Reference identifier that identifies the feature in an external system. |
Optional |
>Alphanumeric >0 to 100 characters |
4.Click Add & Associate. The fingerprint is added for the customer and associated with the entitlement:
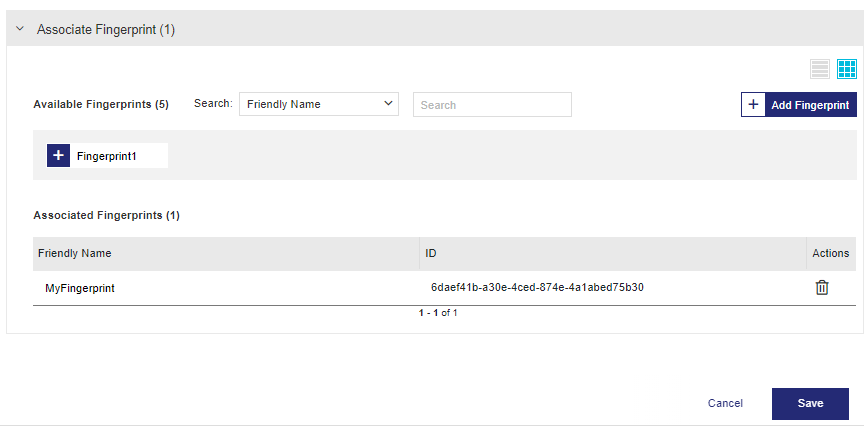
If Registered Quantity is displayed, this a mandatory field except when the Activation Method is the Fulltype. For lease-based entitlements, the default value of the Registered Quantity is based on the activation method:
•Partial: Default value is 1 but it can be updated. You can increase or decrease the Registered Quantity between 1 and the total quantity.
•Fixed: Default is the fixed quantity specified but it can be updated. The Registered Quantity should be a multiple of the Fixed Quantity and less than or equal to the total quantity.
•Full: Default is the full quantity specified and it cannot be modified.
Under Actions, you can click ![]() to remove an associated fingerprint from the Associated Fingerprints list.
to remove an associated fingerprint from the Associated Fingerprints list.
5.Click Save.
Overriding the Fingerprint for On-Premises Licenses Property
The Fingerprint for On-premises Licenses property is available in the Administration Console to enable or disable fingerprints as a locking mechanism globally for on-premises licenses. This property can be overridden at the entitlement level.
To override the Fingerprint for On-Premises Licenses property at entitlement level:
1.On the Entitlements page, click Add Entitlement to create a new entitlement.
2.From the Select Product pane, select a line item of on-premises type. The Fingerprint for On-premises Licenses is visible in the Enforcement Extension pane and can be modified:
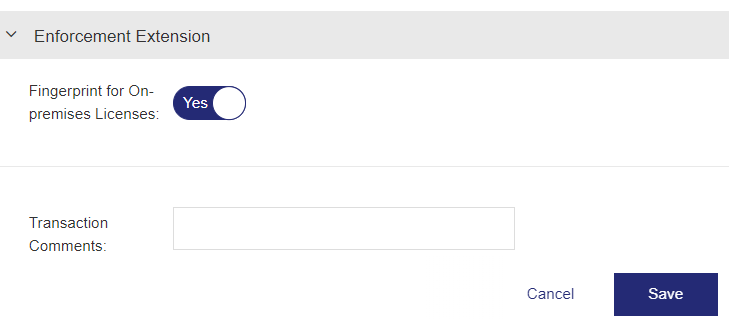
3.Click Save.
To override the "Fingerprint for On-Premises Licenses" property for a variant of a versionless product:
1.From the Products page, in the Actions column for a versionless product, click the ![]() Add Variant button. The Add Variant page opens.
Add Variant button. The Add Variant page opens.
2.In the Enforcement Extensions pane, the Fingerprint for On-premises Licenses property is visible and can be modified:
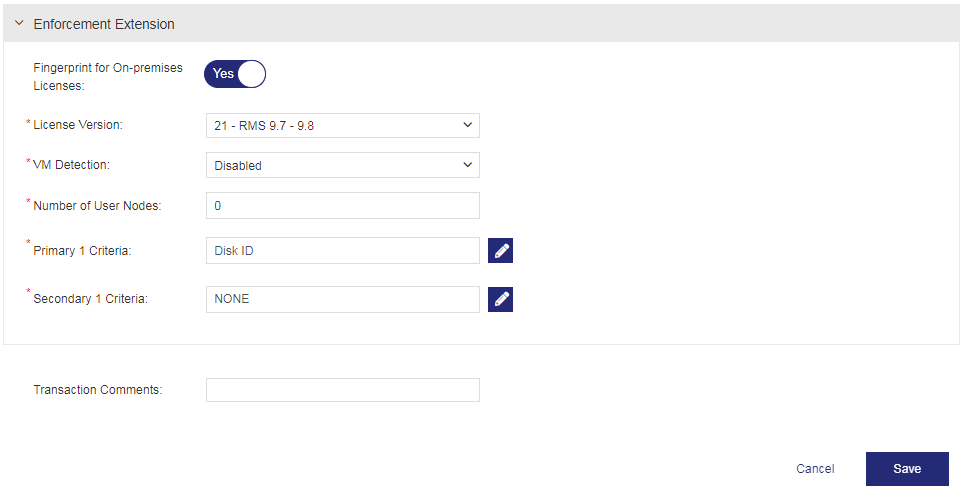
3.Click Save.
Configuring a Batch Entitlement
With Sentinel EMS, you can create entitlements as a batch. This enables you to create large batches of products with the entitlement details eliminating the need for small, and low-volume production cycles.
To configure an entitlement as a batch:
1.Create a draft entitlement with the product specifications as required.
2.In the Actions column, click Configure Batch, for the entitlement for which you want to create a batch. The Add Batch Entitlement page appears:
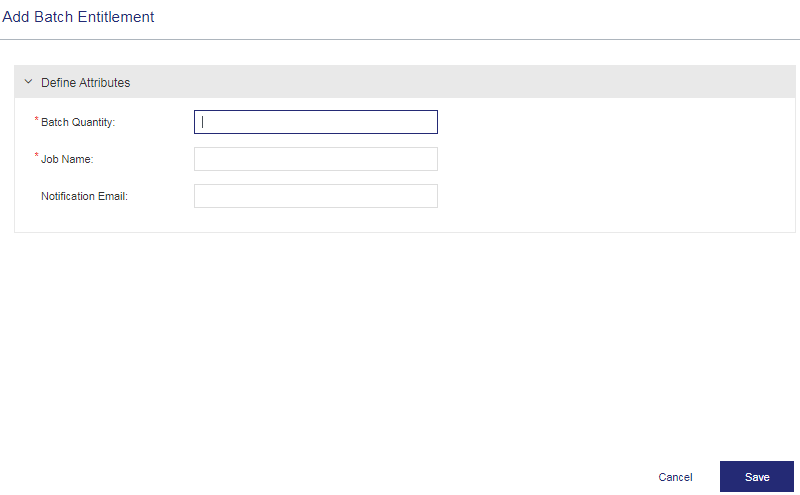
3.Enter the attribute details for the batch entitlement.
| Attribute | Description | Required/Optional | Valid Values |
|---|---|---|---|
| Batch Quantity | Number of entitlements to be created in the batch job. | Required |
>Numeric >1 to 1000 |
| Job Name | The name for the batch job to identify the set of entitlements being created. | Required |
>Alphanumeric >0 to 500 characters |
| Notification Email | Email address to which the notification with the batch job details is to be sent. | Optional |
>Valid email |
4.Click Save. A success message is displayed stating that the batch entitlement is created and can be accessed through the Job Queue.
5.Navigate to Transactions > Job Queue to view the details of the batch entitlement. For details, see Job Queue.
Managing Named Users
The Named User Management tab appears for deployed cloud-connected entitlements. The edit action on this page enables you to add, delete, and import the named users in a line item of an entitlement. The Named User Management tab is available if all of the following conditions are true:
>The entitlement contains one or more line items of the Connected license model type.
>The Named User License product attribute for the line item is set to "Yes" during entitlement creation.
>The entitlement line item is deployed.
To manage named users:
1.For an entitlement line item, navigate to the Named User Management tab.

2.Click the Edit action button for the line item to open the Manage Named Users page.
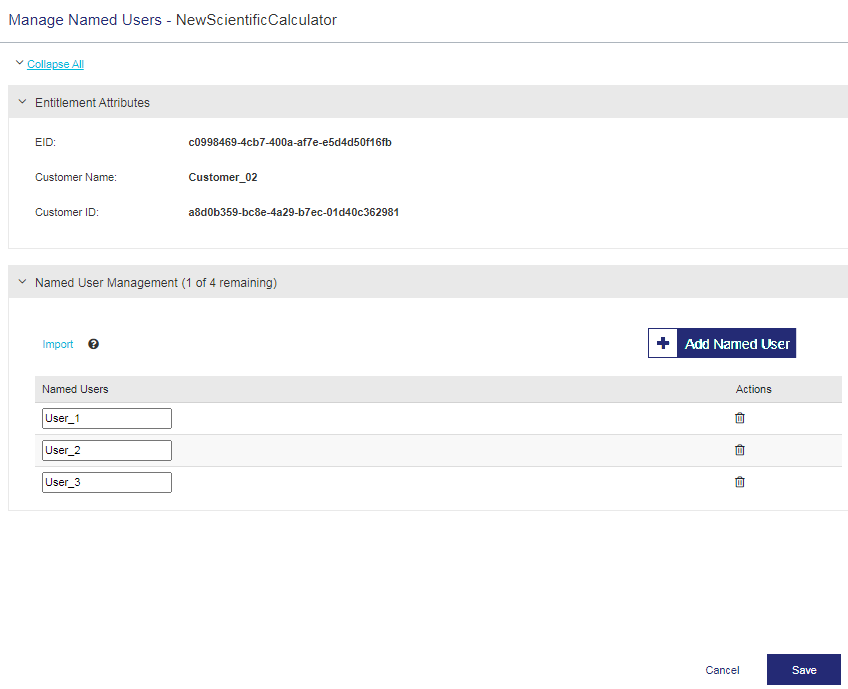
The following table describes the tasks that can be performed using this page:
| Component | Description |
|---|---|

|
Click this button to display a text field and enter the named user. |

|
Click this link to import a named user list through a CSV file. |

|
Click this button to delete the selected named user. |
3.Click Save to save the named user details.