Activations
What is an Activation?
An activation refers to a method of generating a license code for a product
![]()
![]() Sentinel EMS also enables you to assign a device
Sentinel EMS also enables you to assign a device
Who is an Activatee?
An activatee is the contact (individual or customer) having the ownership of the activation. In other words, an activatee is the contact who performs the activation. Sentinel EMS enables you to associate an activatee during activation using the Activation Email attribute. Refer to the following table to understand when activatee (Activation Email) is a required field:
| User Registration | Software Vendor User Login | End User Login | Product Key / EID login |
|---|---|---|---|
| None | Activatee is optional | Activatee is optional | Activatee is optional |
| Optional | Activatee is optional | Activatee is optional | Activatee is optional |
| Mandatory | Activatee is required | Activatee is required | Activatee is required |
See Managing Activatees for more information on working with activatees.
Activation Status
The Status attribute on the Activations page specifies the status of an activation. The following values are available:
>Activated: The line item is activated. License was generated.
>
![]() Renewed: The activation is renewed.
Renewed: The activation is renewed.
>
![]() Rehosted: The activation was rehosted.
Rehosted: The activation was rehosted.
>
![]() Revocation in Progress: The revocation process has started. The permission ticket was generated.
Revocation in Progress: The revocation process has started. The permission ticket was generated.
>
![]() Revoke Confirmation Pending: The revocation receipt was uploaded. Confirmation from the software vendor is pending.
Revoke Confirmation Pending: The revocation receipt was uploaded. Confirmation from the software vendor is pending.
>
![]() Revocation Confirmed: Revocation was done successfully. The revocation credit is added to the total activation credit of the customer.
Revocation Confirmed: Revocation was done successfully. The revocation credit is added to the total activation credit of the customer.
Prerequisites for Activations
The following are the prerequisites for activations:
>The user must have Add permissions for the Activation Management role.
>The entitlement must be marked as "complete".
>The Allow Activation attribute of the entitlement must be set to "Yes". For details, see Define Entitlement Attributes.
>In the line item:
•The available quantity must be more than zero.
•The start date must not be in the future.
•The end date must not be in the past.
 Sentinel RMS-Specific Prerequisites for Activations
>For locked licenses, the locking code of the end user's machine must be available.
>For cloud-served entitlements, the activatee must be specified, and the activatee email must belong to a customer with a customer ID.
>For on-premises entitlements using Flexible License Model, where the value of Deployment Type is On-premise Served, License Version is 21 (or later), and Cloud Usage is Yes, a customer must be specified for an entitlement before the entitlement can be activated.

Sentinel LDK-Specific Prerequisites for Activations
To enable end users to perform self-service, online activation through the Sentinel EMS customer portal:
>The Sentinel Run-time Environment must be installed on the end user computer. To achieve this, distribute Sentinel Run-time Environment together with your application. For example, your application might call the Sentinel Run-time Environment installer. For instructions, see Sentinel LDK Installation Guide.
>Sentinel EMS must be configured to work with Sentinel Admin Control Center as described below:
a.Open Sentinel Admin Control Center (http://localhost:1947).
b. In the Sentinel Admin Control Center > Options area, click Configuration.
c.In the Configuration for Sentinel License Manager page, click the Network tab.
d.In the EMS URL area, add the domain for Sentinel EMS. (Do not include a trailing "/" at the end of the URL.)
Example: http://localhost:8080/ems
e.Click Submit.
To activate a product using a C2V file:
You must have access to the C2V file that was generated on the end user's machine.
Activating a Product
You can activate products
To activate a product:
1.Navigate to the Entitlements page.
2.Select and expand the entitlement that you want to activate.
3.Select the line items of the entitlement that you want to activate.
4.Click Activate. The Activate Product page appears as shown:
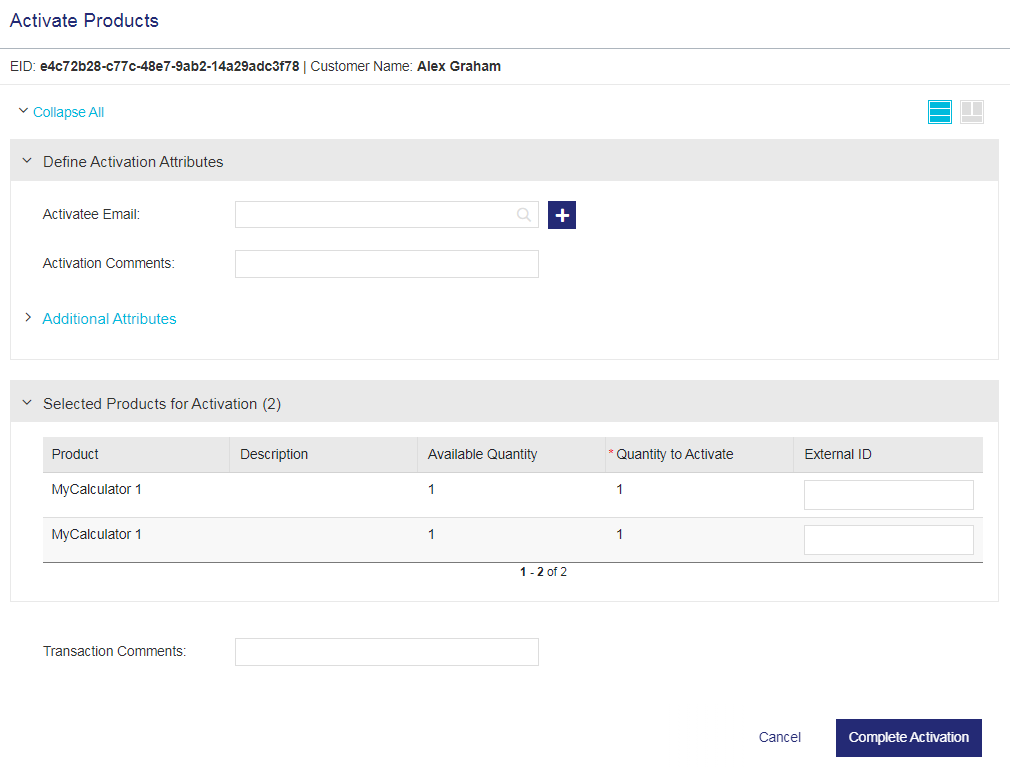
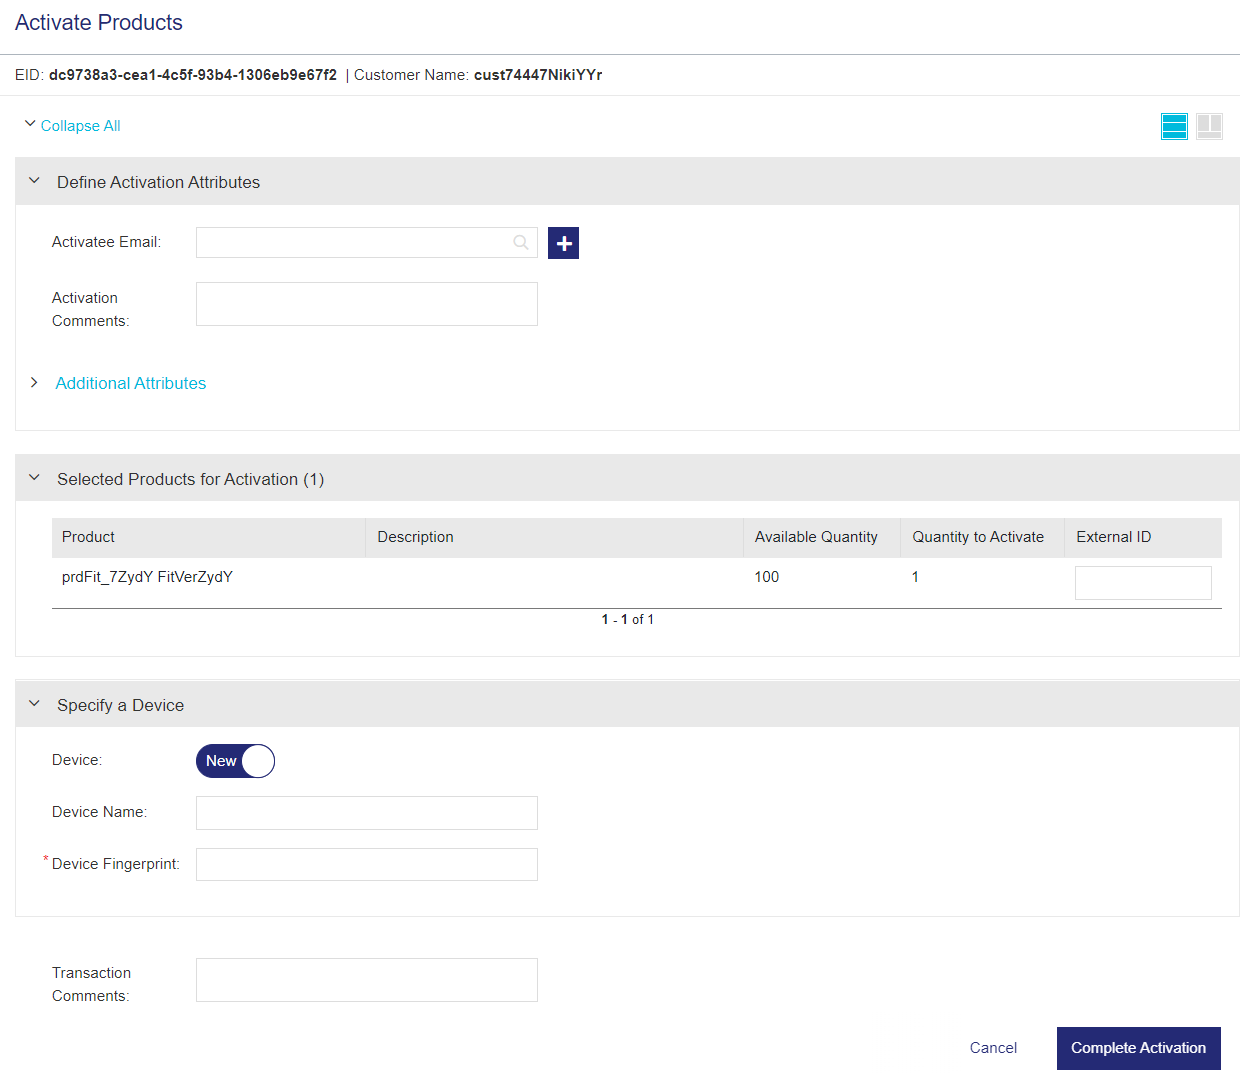
5.Specify the Activation Attributes. For details, see Define Activation Attributes.
6.
![]() Specify the Product Quantity. For details, see Define Product Quantity.
Specify the Product Quantity. For details, see Define Product Quantity.
7.
![]() Specify the Locking Criteria. For details, see Define Locking Criteria.
Specify the Locking Criteria. For details, see Define Locking Criteria.
8.
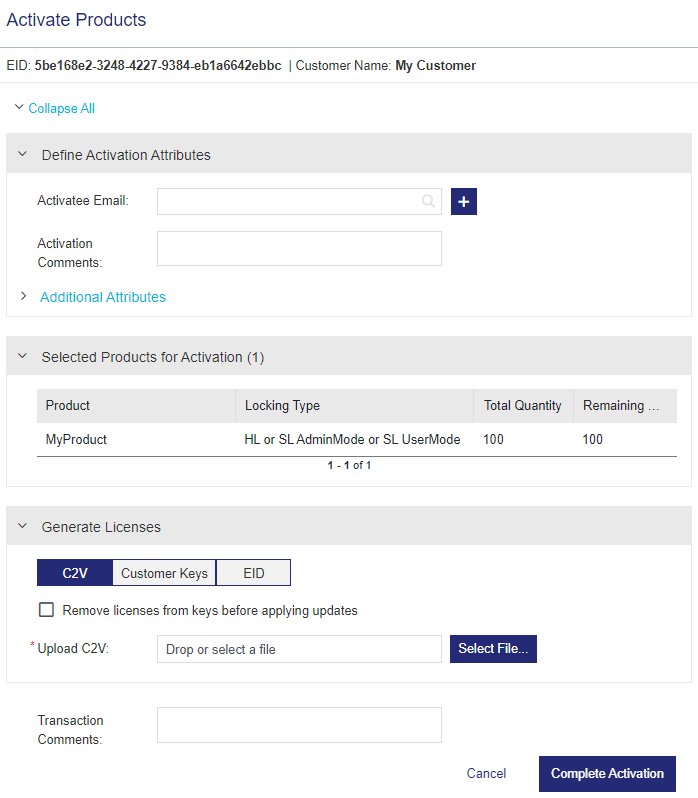
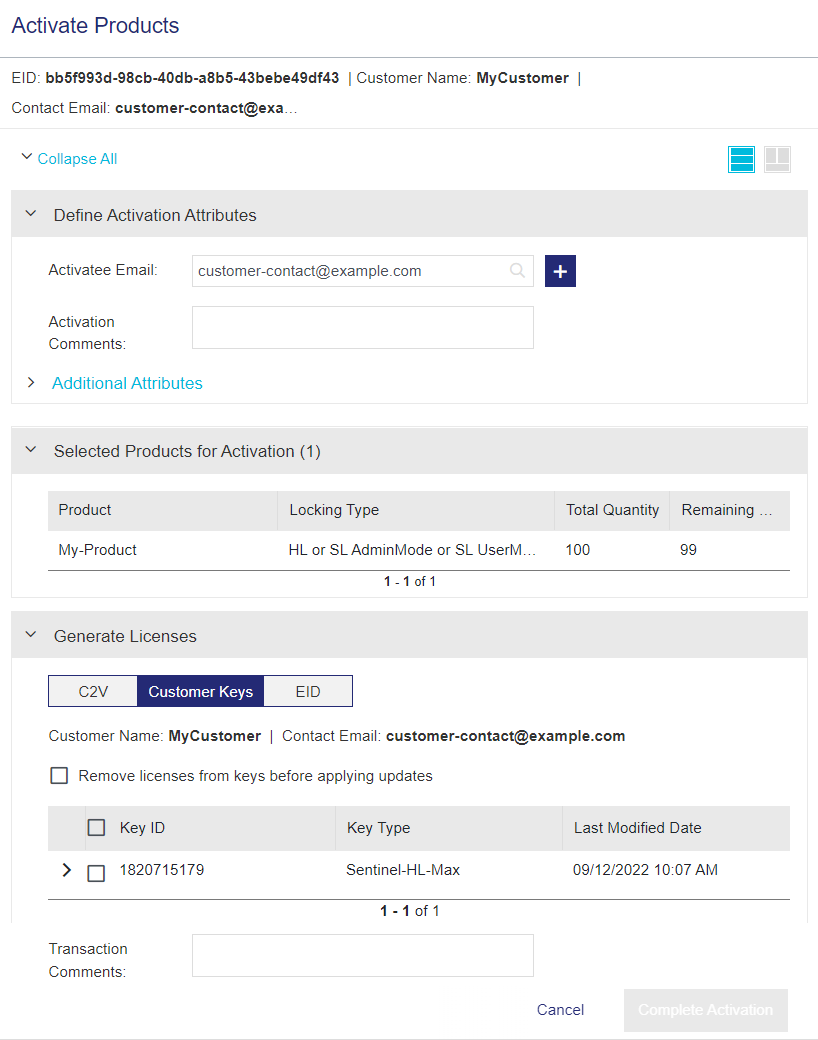
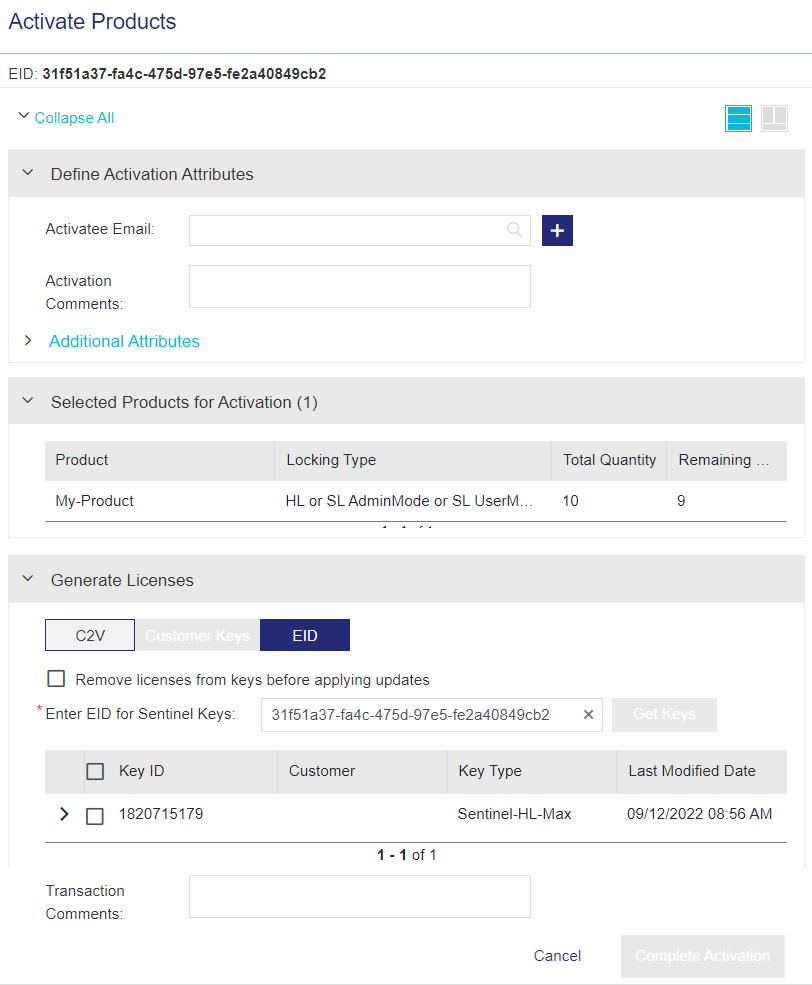
![]() In the Generate Licenses pane:
In the Generate Licenses pane:
a.Select C2V, Customer Keys, or EID, depending on how you want to activate the selected products.
| If you selected... | Do this... | Useful if... | ||||
|---|---|---|---|---|---|---|
| C2V |
In the Upload C2V box, specify the location of the C2V file received from the customer. You can drag and drop the C2V file or browse to the and select the file. The selected C2V file is shown as "C2V" (not the C2V file name). |
You have access to the C2V file for the customer's machine. | ||||
| Customer Keys |
Select one or more Sentinel keys for which you want to activate the products. You can expand each line item to view the associated products, associated memory files, and key attributes. For details on any of these properties, see Sentinel Key Attributes. When you select a customer key, the Complete Activation button is enabled. |
The entitlement is assigned to a customer, and you do not have access to the C2V file for the customer's machine, or you prefer to use Sentinel keys to generate a license. This option is available only if the entitlement is assigned to a customer and at least one Sentinel key is associated with that customer. |
||||
| EID |
|
The entitlement is not assigned to a customer, and you do not have access to the C2V file for the customer's machine, or you prefer to use Sentinel keys to generate a license. This option locates the Sentinel keys that are already associated with the entitlement. This enables you to activate products in entitlements that use other attributes, such as External ID, Ref ID or Contact Email, to link entitlements to customers whose details are stored in an external system, for example. |
b.(Optional) Select the Remove licenses from keys before applying updates check box to clear any pre-existing licenses from the selected keys.
9.Click Complete Activation to activate the product and generate the license certificate.
Define Activation Attributes
Activation-related attributes are specified in the Define Activation Attributes pane, described below.
| Attribute | Description | Required/Optional | Valid Values | |
|---|---|---|---|---|
| Activatee Email |
Email address of the contact (individual or customer) who is responsible for or performs the activation. You can click |
See table under Who is an Activatee? |
>A valid email address >Cannot contain: spaces and \ () [] : ; “ <> >Cannot start with a '.' >Cannot contain double .. >Cannot contain double @@ >
|
|
| Activation Comments | Comments to include in the activation. | Optional |
Maximum: 500 characters |
|
| Time Zone |
The time zone specified for this activation. By default, the start date and the end date of a license belonging to a customer are calculated according to the customer's time zone. You can specify another time zone to override the existing customer time zone. For example, the license being generated may require a different validity period than the one specified by the existing customer time zone. The activation time zone overrides the customer time zone and the licenses are generated accordingly. This change is limited to the current activation and does not modify the time zone specified for the customer. |
Required | For a list of time zone values, refer to the Sentinel EMS REST API Guide. | |
| Send Notification | Send email notification to the entitlement contact after activation. | Required | Yes OR No | |
Define Product Quantity
| Enforcement | Attribute | Description | Required/Optional | Valid Values |
|---|---|---|---|---|
|
|
Variants (only for versionless products) |
Variant of the versionless product is selected to specify the version to activate. Depending on the selected variant, the system displays the locking attributes. |
List of variants of the versionless product. |
|
|
|
Quantity to Activate |
The quantity to activate. User input is required only if the activation method of the line item is Partial or Fixed. For Fixed, input should be in a multiple of Fixed Quantity. Activation Methods: >Full: The entire remaining quantity will be zero after activation. NOTE You can activate a line item of an entitlement only once if its Activation Method is Full. Renewing the license to increase the quantity and adding a new fingerprint will not allow you to consume the additional quantity. >
>Partial: After activation, the remaining quantity will be the total quantity subtracted by the quantity input by the user. >Fixed: After activation, the entire remaining quantity will be the total quantity subtracted by the fixed quantity. |
Input must be according to the specified activation method of the line item and the available quantity. | |
|
|
External ID | External reference identifier that uniquely identifies the line item in an external system. | Optional |
>Unique >Alphanumeric >8 to 60 characters |
 Define Locking Criteria
The displayed locking criteria depends on the license model and Sentinel EMS configuration settings.
Enter the hexadecimal locking codes of the end user's machine against the locking criteria. Similar locking criteria are not repeated. Sentinel EMS supports the following types of license locking: client locked, server locked, and client-server locked.
| Enforcement | Attribute | Description | Required/Optional | Valid Values |
|---|---|---|---|---|
|
|
Device |
The device being associated can be: >New: A new device name for the locking information to associate the activation. >Existing: An existing device to associate with the activation. See Device-Friendly Name for more information. |
Required |
New OR Existing |
|
|
Device Name |
The friendly representation of the locking information of a device. Enter at least the first character of the device name to search for an existing device. See Device-Friendly Name for more information. |
Required |
>Unique for an activatee >4 to 255 characters |
|
|
Device Fingerprint | The unique identifier for the device. | Required | Device fingerprint |
|
|
Device Enabled | When using Sentinel Fit, the device is always activated for use with the licensed software. | N/A | True |
Activating Entitlements for Versionless Products
When a user activates a dynamic entitlement containing a versionless product, the user selects the required variant from the list of available variants for that versionless product.
Following are the important points to remember while activating a versionless product:
>Activating a versionless product enables you to select from several of its variants. On the Activate Product page, the Define Product Quantity section enables you to select variants, as shown below:

>Activation method for variants is Fixed, Partial, or Full.
>Depending on the selected variant, the system displays the locking attributes.
>Whenever a new feature is added to a deployed versionless product, a new license certificate is generated after entitlement activation.
>There is no pre-allocated quantity defined for a variant. A quantity limit is allocated as a whole for the versionless product and can be used to activate any of its variants. Therefore, the quantity of license that are activated for a variant is determined by the customer and is not pre-defined for any of the variants.
>The customer can reallocate the quantity freed by revoking the license of one variant to activate another.
>With changing requirements, new variants can be created independently and made available to the customer in an existing entitlement for activation. This is also known as future key activation.
Future Key Activation
To quickly adapt to ever changing business requirements, software vendors must often add new features to existing products and entitlements. To future-proof the business, vendors can leverage the future key activation process to accommodate additional features into future activations, without having to issue new entitlements. If a new feature is added to a variant after an initial activation, then all future activations of the same versionless entitlement will automatically include the additional feature.
This enables you to incrementally add and deliver new features to the customers without generating the new entitlements. A future key helps accommodate the missing features into the license.
Activating Multiple Line Items Across Entitlements
You can activate multiple entitlements simultaneously by activating multiple line items across several entitlements. When you activate multiple entitlements simultaneously, all license strings can be sent to a specified email address.
Prerequisite: The Multiple Entitlement Activation property must be enabled in the Administration Console.
Support information:
To activate multiple line items across entitlements:
1.Navigate to the Entitlements page.
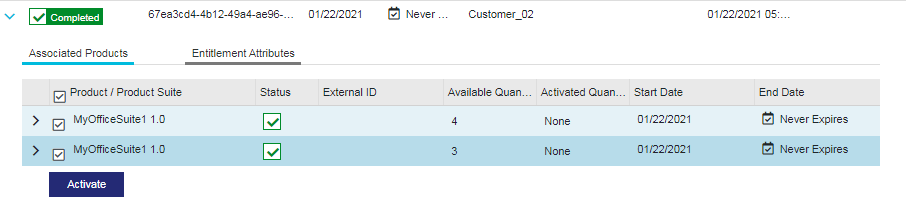
2.Expand a completed entitlement and, under Associated Products, select the check boxes for the line items in the entitlements that you want to activate together.
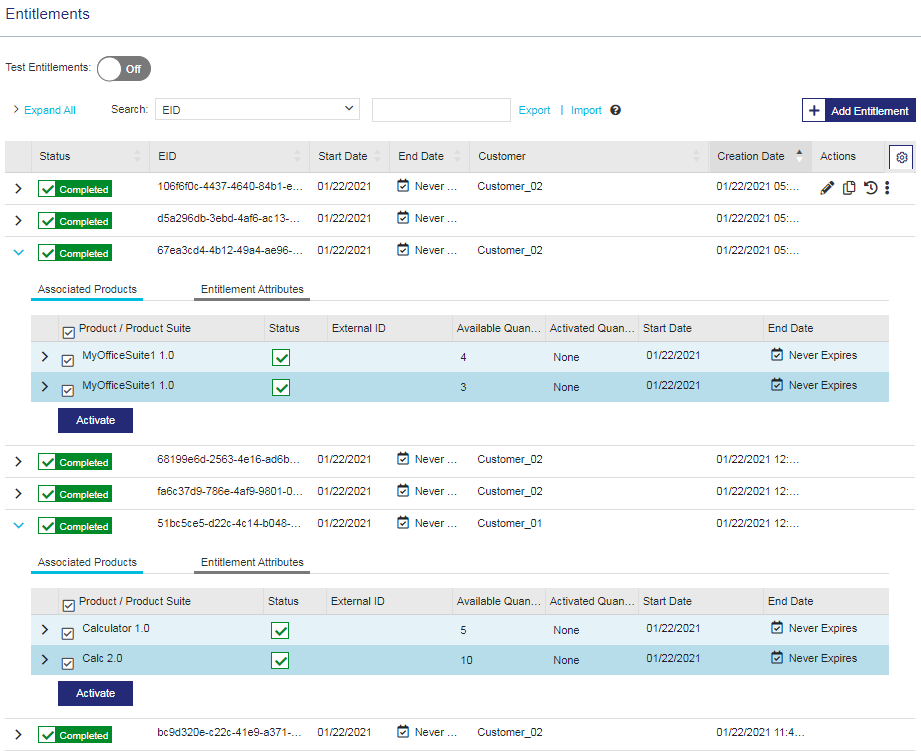
3.At the bottom of the screen, click Activate.
4.If multiple locking criteria are specified for the selected line items, select a single locking criterion in the message box that opens.
5.In the Activate Product Keys page that opens, enter the Activatee Email and other activation attributes as required. For more information, see Define Activation Attributes.
6.Click Complete Activation.
Activating Multiple Line Items in a Single Entitlement
You can activate more than one line item in an entitlement simultaneously.
To activate multiple line items in a single entitlement:
1.Navigate to the Entitlements page.
2.Expand a completed entitlement and, under Associated Products, select the check boxes for the line items that you want to activate together.
•All line items must be activated together for:
–Entitlements where Entitlement as a Whole is set to "Yes"
–
![]() Cloud-served entitlements
Cloud-served entitlements
•Multiple line items must have the same locking
3.Click Activate.
4.In the Activate Product Keys page, enter the Activatee Email and other activation attributes as required. For more information, see Define Activation Attributes.
5.Click Complete Activation.
Activating Entitlements Using Fingerprints
A machine fingerprint is the information collected about a device for the purpose of identification. Using machine fingerprints, the licenses that are obtained for an entitlement can be locked to specific permitted systems including clients, application servers, or both. If the locking information embedded in the license code does not match the system data, then the licensed software fails to run on the system.
Systems can be identified using the machine fingerprint criteria, such as IP address, host name, disk ID, and so on. For greater security and flexibility, licenses can be locked to more than one standard locking criterion.
Following are a few important points when adding and associating fingerprints:
>You can associate the same fingerprint with one or more products in an entitlement.
>When Entitlement as a Whole is specified for the entitlement, the entitlement is treated as a single entity even if it contain several products. For such entitlements, a fingerprint is registered at the entitlement level and not for the individual products.
>Some entitlements include several variants of a single product. For such entitlements, you register fingerprints at the variant level of the entitlement instead of at the product level. You must register a unique fingerprint for each variant of a product.
To activate products by adding and associating a fingerprint:
1.Navigate to the Entitlements page.
2.Expand a completed entitlement and, under Associated Products, select the check box for every line item that you want to activate using a fingerprint.

3.In the bottom-right corner of the page, click Activate. The Activate Products page appears.

4.In the Specify Locking Criteria section, do one of the following:
•If a fingerprint is already associated with the selected product, enter the value in the Fingerprint box. As you start typing, you can select from the list of suggestions that is displayed.
OR
•Click the Manage Fingerprint button and follow the instructions in Adding and Associating a Fingerprint Using the Manage Fingerprints Option. Then complete the activation. This is useful if you want to associate multiple fingerprints with a product or manage existing fingerprints.
OR
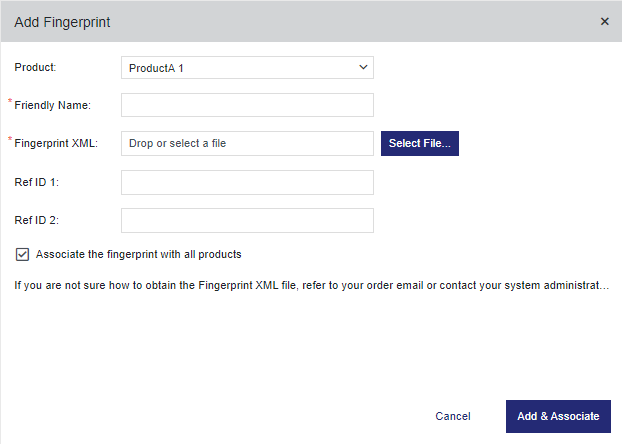
•Click  (Add & Associate Fingerprint) to open the Add Fingerprint dialog box. This is useful if the product is not yet associated with any fingerprint.
The Add Fingerprint dialog box has different options depending on the entitlement details, as shown in the following examples:
The first example shows the dialog box that is displayed when activating one of several products. You can select a product from the list. (If only one product is being activated, then the product name is shown as read-only.)
If the entire quantity is being activated simultaneously, for example, if only one activation is available or if the entitlement is set to Entitlement as a Whole, then the following dialog box appears:
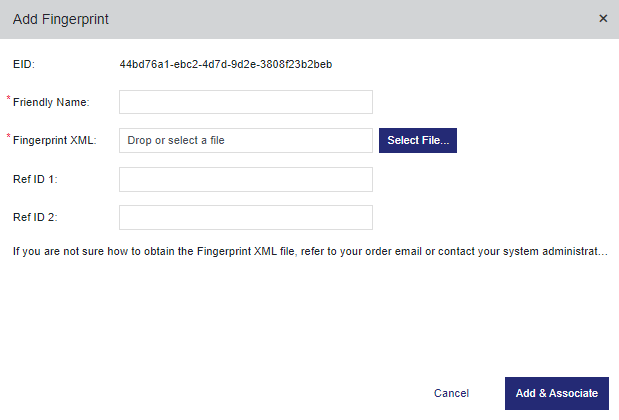
The following table explains the attributes in the Add Fingerprint dialog box.
| Attribute | Description | Required/Optional | Valid Values | |
|---|---|---|---|---|
|
One of the following: |
Product
|
The name of the product to which you are associating the fingerprint file. If you are activating multiple products at the same time, you can select the relevant product from the displayed list. TIP If you want to apply the same fingerprint file to all of the products being activated simultaneously in this entitlement, select the Associate the fingerprint with all products check box, described below. |
Required |
One of the following: > Read-only product name (when a single product is selected for activation) >Any product in the list (when multiple products are selected for activation) |
| EID | The EID for the entitlement that contains the products being activated. | Required |
Read-only EID |
|
| Friendly Name |
A name for the machine fingerprint to make it easier to identify and use the fingerprint file. |
Required |
Alphanumeric |
|
| Fingerprint XML |
The XML file containing the machine fingerprint. Click Select File to upload the fingerprint XML file. TIP You can obtain the fingerprint XML file using the Sentinel RMS Run-time API. For details, refer to the API reference guides, which are located under Sentinel RMS guides. |
Required |
A fingerprint XML file |
|
| Ref ID 1 | Reference identifier that identifies the feature in an external system. | Optional |
>Alphanumeric >0 to 100 characters |
|
| Ref ID 2 | Reference identifier that identifies the feature in an external system. | Optional |
>Alphanumeric >0 to 100 characters |
|
|
Associate the fingerprint with all products check box |
Select this check box to associate the fingerprint with all of the products being activated simultaneously in this entitlement. Available only if you are activating multiple products at the same time. |
Optional |
Selected or cleared |
|
After you fill in the required information, click Add & Associate to apply the association. If the fingerprint is not displayed in the Fingerprint box, start typing the friendly name and select it from the list of suggestions.
5.Click Complete Activation.
Activating Cloud - Served Lease Entitlements
After a cloud-served lease entitlement is created and marked as completed, it can be activated using the Sentinel Cloud Plug-in (SCP).
SCP integrates with the Sentinel RMS components to provide cloud licensing capabilities. For more information on SCP, refer to the Sentinel EMS and Sentinel RMS Solution Guide.
Following are the important points to remember while activating cloud-served lease entitlements:
>You can activate a line item of a lease-based entitlement only once if its Activation Method is Full. Renewing the license to increase the quantity and adding a new fingerprint will not allow you to consume the additional quantity.
>A tolerance of 15 minutes is provided for activation of lease-based entitlements to bridge the time gap of the client machine time that might be set ahead of the license server machine time.
For example, a client machine time is - 2:40 PM 10th June, and the license server time is - 2:30 PM 10th June. In this case, without the tolerance time, a lease-based license fetched for the client machine will have the start time of 2:40 PM and the license server will not load the license string as the license will be considered as a future-dated license. The tolerance time of 15 minutes is subtracted from the activation start time to ensure that the license fetched for the client machine has a valid start time and the license server generates a license string for it.
Future Key Activation
Future start date activation can be performed for line items of lease-based entitlements. Future start date activation means that line items can be activated before line item start date. This includes renewed line items. A customer who has renewed a license can activate it as soon as it is renewed and does not have to wait until the start date of the renewed line item.
An example of future key activation for lease-based entitlements is given below:
If a leased-based license has a duration of 90 days and the following line item details:
|
Product Name: Product A Start Date: 1 Jan 2020 Lease Duration: 90 Days |
|
| Feature Name | Start Date |
| Feature 1 | 1 March 2020 |
| Feature 2 | 1 July 2020 |
So, if 1 January 2020 is the current date and a lease is requested on the current date, then:
>Feature 1 can be consumed because its start date, 1 March 2020, lies between 1 January 2020 + 90 Days (lease duration)
>Feature 2 cannot be consumed because its start date, 1 July 2020, does not meet the lease duration window from the current date.
Future start date activation enables you to incrementally add and deliver new features to the customers without generating the new entitlements. After renewal, a future key helps accommodate the missing features into the license.
Activating Connected Entitlements for Cloud LM (License Manager) Deployment
You can activate a connected entitlement or Cloud LM Deployment using the Sentinel EMS vendor portal. See Activating a Product for the steps to activate a product. Contact administrators of customers can also activate their connected entitlements for Cloud LM Deployment using the customer portal. After an entitlement is activated, the license is deployed on the cloud and is available for consumption.
Consumption of a Connected License Deployed on Cloud LM (License Manager)
A customer needs an active internet connection and an authorization (auth) token to consume the connected licenses deployed on cloud LM. Sentinel EMS enables customers to manage access to these authorization (auth) tokens using registration tokens. After activation, you or a contact administrator can create these tokens for customers, who can make them available to all their licensed application consumers of a connected license. When a connected license is being consumed, it creates a session. These sessions can be managed by a contact administrator through the customer portal. For more information about the contact administrator's role in managing tokens and sessions through the customer portal, see the Guide to the Sentinel EMS Customer Portal.
Burning a Product Key
You can write (burn) an entitlement to connected Sentinel HL keys.
Prerequisites for Burning a Key
>Sentinel Run-time Environment must be installed on the computer on which you are burning the key. For instructions, see Sentinel LDK Installation Guide.
>The required Sentinel HL keys must be connected.
>Sentinel EMS must be configured to work with Sentinel Admin Control Center as described below:
a.Open Sentinel Admin Control Center (http://localhost:1947).
b. In the Sentinel Admin Control Center > Options area, click Configuration.
c.In the Configuration for Sentinel License Manager page, click the Network tab.
d.In the EMS URL area, add the domain for Sentinel EMS. (Do not include a trailing "/" at the end of the URL.)
Example: http://localhost:8080/ems
e.Click Submit.
To burn a Sentinel HL key:
1.Navigate to the Entitlements page.
2.Select and expand the entitlement that you want to activate.
3.Select the line items that you want to activate. If the Locking Type is one of the Sentinel HL key types, the Burn Key button is enabled.
4.Click Burn Key. The Activate Products page opens.
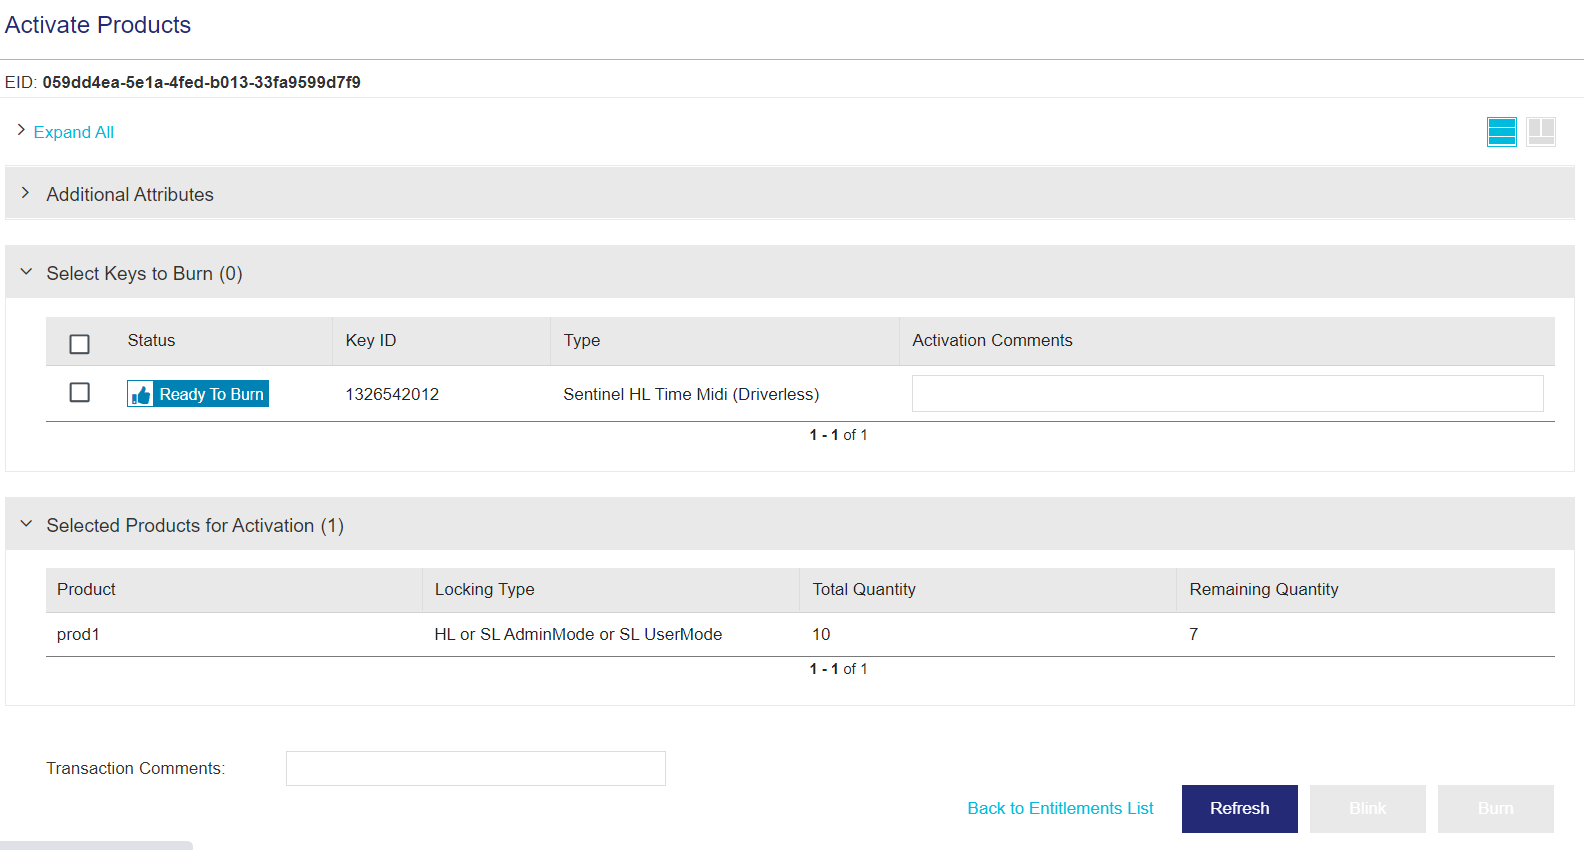
5.Modify the Additional Attributes, if needed.
6.If the required keys are not listed in the Select Keys to Burn pane, click Refresh to display them.
7.To locate keys, click Blink. The LED of the selected keys blinks for five seconds.
8.Select a key and click Burn. The entitlement is written to the Sentinel HL key and the production totals (Total Quantity and Remaining Quantity) are updated. The key is marked as Burned.
Reprinting Multiple Activations
You can reprint multiple activations together in a single receipt. A Reprint button is visible when multiple activations are available on the Activations page. Clicking the Reprint button allows you to send multiple activation details to a maximum of 15 contacts in a language specified by you.
To reprint multiple activations together in a single receipt:
1.Navigate to the Activations page.
2.Click Reprint. The Reprint dialog box opens.
3.Click Send Email. The Send Email dialog box opens.
4.Enter the relevant Email Address. You can enter up to 15 contacts separated by a comma (,).
5.Select the Language.
6.Click Send.
Rehosting
Rehosting is the process of marking a selected activation as revoked and generating a new license in its place. For example, you may want to rehost an activated license that is locked to a specific device to enable a user to move the license to another device. You can revoke an existing activation and specify new locking criteria for the new license by rehosting the activation.
You can rehost one or more activations simultaneously. A Rehost button is visible when activations are selected on the Activations page.
NOTE
![]() When you rehost an activation for Sentinel Fit, the license is not removed from the original device. Use this option only if you want to copy the existing license and lock it to another device. Otherwise, if you only want to re-issue the license without affecting the count, use Revoke Immediately.
When you rehost an activation for Sentinel Fit, the license is not removed from the original device. Use this option only if you want to copy the existing license and lock it to another device. Otherwise, if you only want to re-issue the license without affecting the count, use Revoke Immediately.
To rehost an activation:
1.Navigate to the Activations page.
2.Select the activations that you want to rehost.
3.Click Rehost. The Rehost Activation page opens:
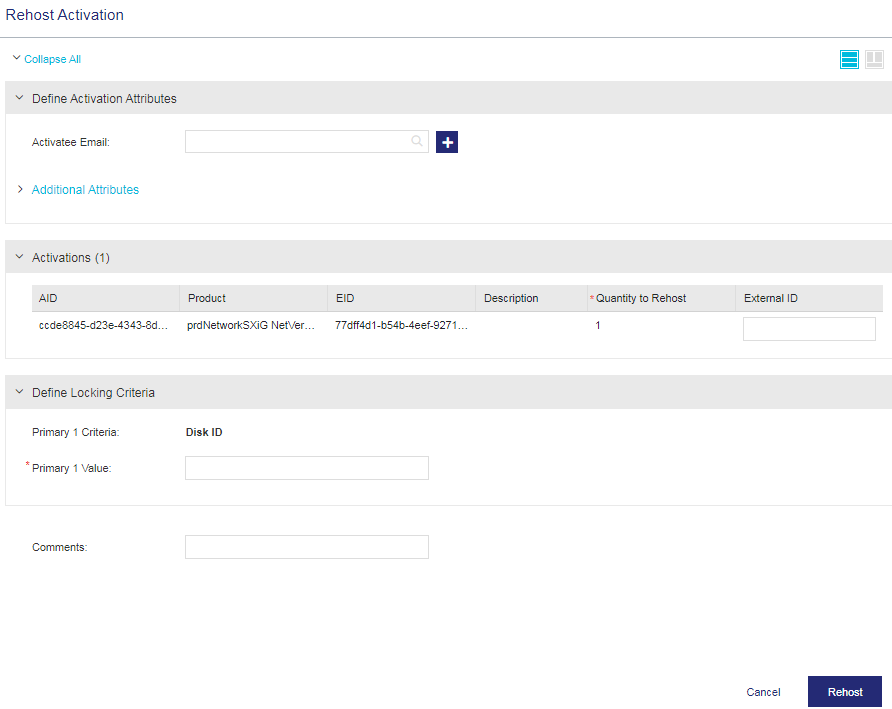
4.Enter the Activatee Email and other activation attributes as required. For more information on these attributes, see Define Activation Attributes.
5.Click Rehost.
NOTE After the rehosting process is complete, the activation status is Activated for the new activations and Rehosted for the existing activations that were revoked.