
Entitlements
NOTE The Entitlements page is available only when you log in using EID or User Credentials.
An entitlement defines your rights to use a software package or service. An entitlement is an order for products
>
Product
>
Quantity of the products
> Duration for which an entitlement is valid.
>Whether you can activate an entitlement.
>Whether you must activate the entire quantity of products in an entitlement at once, as a single entity.
The Entitlements Page
In the navigation pane, click Entitlements to open the Entitlements page.
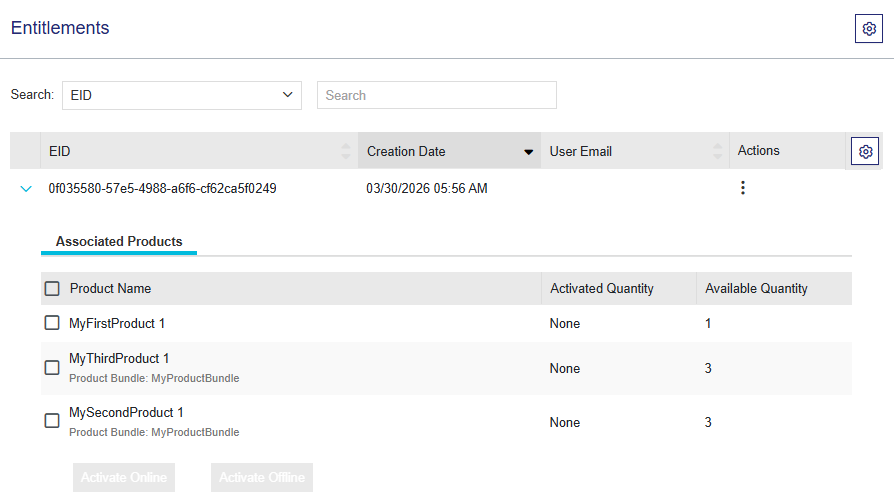
For information on how to activate an entitlement, see Activations.
In this section:
>Viewing Entitlement Information
>Search Parameters for Entitlements
>Viewing an Entitlement Certificate
>Splitting and Transferring Entitlements
>Configuring the Columns to Display
Viewing Entitlement Information
For each entitlement, there are several details available on the Entitlements page. The following table explains these entitlement details:
Search Parameters for Entitlements
NOTE Available only when you use Login Using User Credentials.
You can use the search bar available on the Entitlements page to filter the listed entitlements based on the following search parameters:
>EID: Entitlement ID of an entitlement.
>Product Name: Name of a product associated with an entitlement.
For information on how to search, see Searching for an Entity.
Actions for Entitlements
The Actions column provides additional options for each entitlement in the table.
| Action | Description |
|---|---|
| View Certificate | View and email the entitlement certificate of the entitlement. For details, see Viewing an Entitlement Certificate. |
| View Activations |
View activations that are already performed for an entitlement. For details, see Activations. |
| View Downloads |
View the downloads associated with the product within the entitlement using the Downloads page. For details, see Downloads. |
| Split/Transfer |
(Available for Channel Partners) You can split the existing quantity of an entitlement to create a new entitlement. You can also transfer this split quantity of the entitlement to another customer or a user associated with the customer. This capability helps you better allocate and utilize entitlements. For details, see Splitting and Transferring Entitlements. |
Viewing an Entitlement Certificate
The entitlement certificate contains the details of the entitlement.
To view and email an entitlement certificate for an entitlement:
1.In the Actions column, click  (More Actions), and then click View Certificate. The entitlement certificate appears as shown:
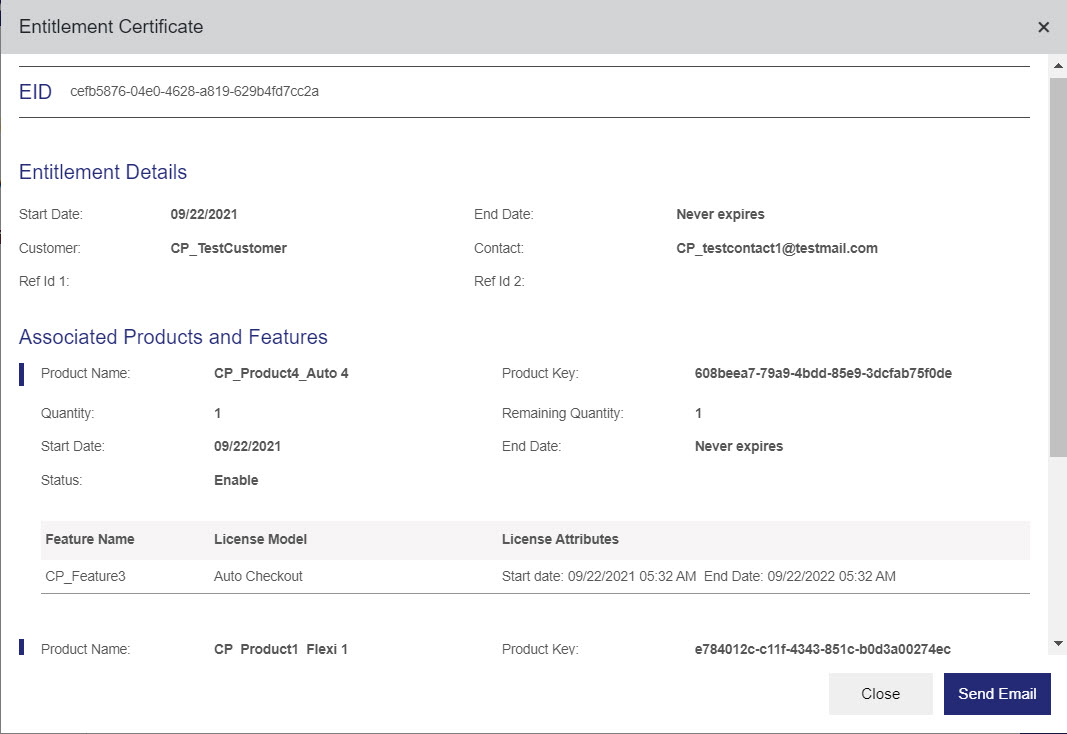
2.Click Send Email. The Send Email pop-up appears:
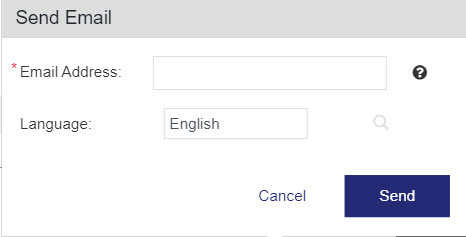
3.Enter the Email Address to specify where the entitlement certificate must be sent. If a user for the entitlement exists, then the email address of the user is displayed here by default.
4.Select another Language if required.
5.Click Send. The entitlement certificate will be sent to the specified email address in the language selected.
Splitting and Transferring Entitlements
NOTE Relevant only for channel partners.
Split and transfer enables you to split the available quantity in an entitlement and transfer it to another customer or user. This helps you better allocate and utilize entitlement quantities.
The resulting split entitlement can be assigned to a different customer or user.
To perform Split/Transfer on an entitlement:
1.In the Actions column, click (More Actions), and then click Split/Transfer. The Split/Transfer Entitlement page opens.
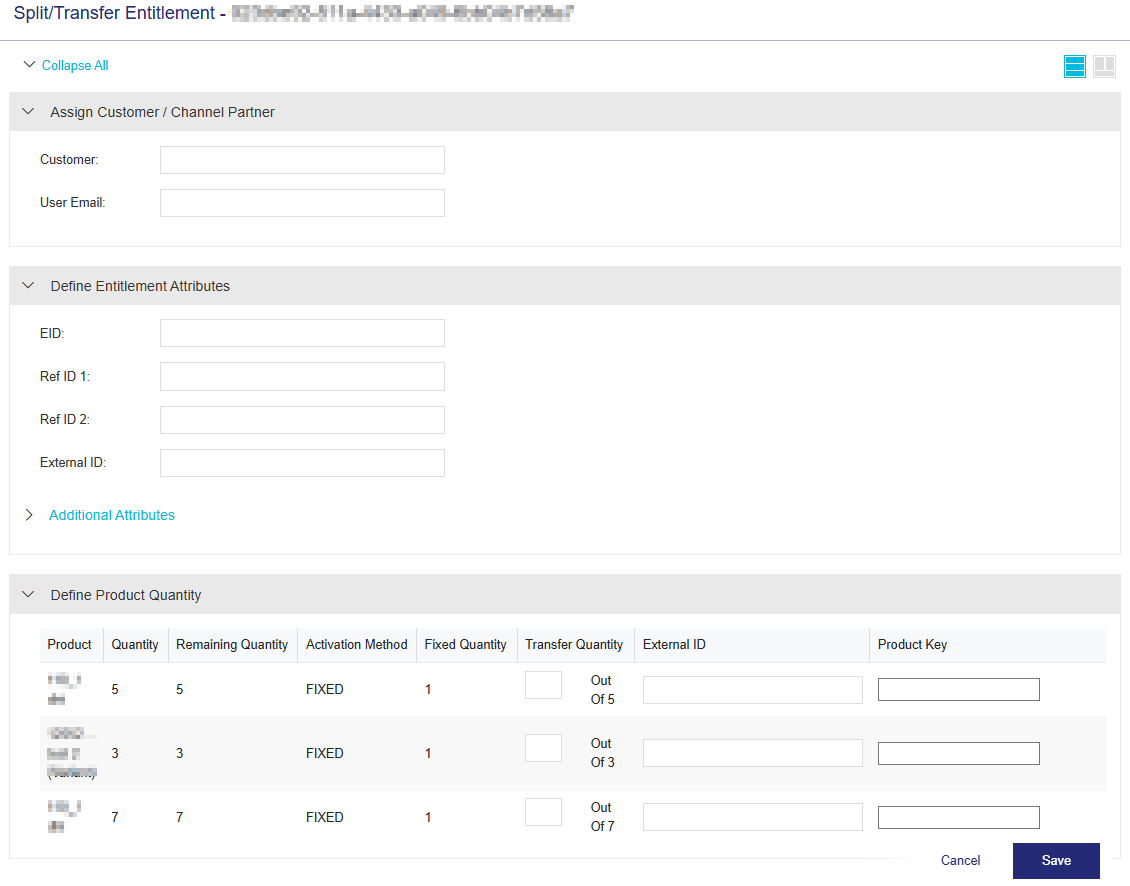
2.In the Split/Transfer Entitlement page, enter the following information:
| Attribute | Description | Required/Optional |
|---|---|---|
| Assign Customer | ||
| Customer |
Name of the customer to whom the split entitlement is assigned. |
Optional |
| User Email |
Email of the user to whom the split entitlement is assigned. |
Optional |
|
Define Entitlement Attributes |
||
| EID |
Unique ID that identifies the entitlement. |
Read-only OR Optional |
| Ref ID 1 | Reference identifier that identifies the entitlement in an external system. | Optional |
|
Ref ID 2 |
Reference identifier that identifies the entitlement in an external system. | Optional |
| External ID | External reference identifier that uniquely identifies the entitlement in an external system. | Optional |
| Additional Attributes | ||
| Send Notification | Sends an email notification to the specified user after the entitlement is split and a new entitlement is created. |
Yes OR No Default: Yes |
|
Define Product Quantity |
||
| Product | Name of the product. | Read-only |
| Quantity | Total quantity of the product. | Read-only |
| Remaining Quantity | Product quantity available for activation. | Read-only |
| Activation Method | The method of defining and allocating the quantity of licenses available for the product in an entitlement. | Read-only |
| Fixed Quantity | The identical number of licenses consumed for every activation. | Read-only |
| Transfer Quantity |
Product quantity to be transferred to the new entitlement. The value must be less than or equal to the remaining quantity of the product. |
Required |
| External ID | External reference identifier that uniquely identifies the product in an external system. | Optional |
| Product Key | Unique string that identifies the product in the entitlement. | Read-only OR Optional |
NOTE Depending on the configuration:
>You may or may not be able to select or add Customers and Users.
>The option to provide EID and Product Key values may or may not be available.
3.Click Save. Sentinel EMS creates a new entitlement with the split quantities, transfers it to the assigned customer / user, and the original entitlement is updated with the remaining quantities.
Configuring the Columns to Display
NOTE Relevant only for vendor administrators who log in to the Sentinel EMS customer portal to perform configuration-related activities.
You can show or hide, and reorder the entity attributes that you want to display as columns on the page, and select the default grid column sorting as needed.
You can configure the column display based on the selected customer login type.
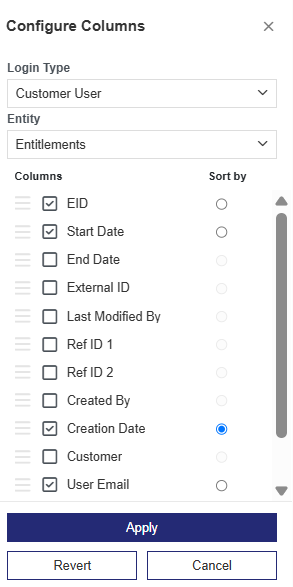
The Columns list shows all configurable entity columns. The selected checkboxes identify the columns that are currently displayed for the entity.
To configure the grid data for an entity or inner grid:
1.Navigate to the Entitlements page.
2.Click the Configure Columns tool located next to the Actions column. The available columns for the entity display.
3.Select a login type from the Login Type list. The available options are:
•EID: Log in using your entitlement ID (EID).
•PKID: Log in using your product key ID (PKID).
•Customer User (default): Log in using your customer user credentials.
•Customer Admin: Log in using your customer administrator credentials.
•Channel Partner User: Log in using your channel partner user credentials.
•Vendor Admin: Log in using your vendor administrator credentials.
4.From the Entity list, select the entity for which you want to configure the grid columns:
•Entitlements — for the main grid columns.
•Associated Products — for the associated products sub-grid columns.
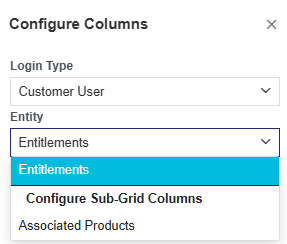
Your selection displays the corresponding columns, which you can configure for both the main grid and the inner sub-grid columns.
5.Select the checkboxes for the columns that you want to display. Clear the checkboxes for the columns that you want to remove from the display.
6.Under Sort by, select the radio button next to an attribute to sort the grid by that column.
7.To reorder the columns, drag and drop the relevant columns to the required locations.
8.Click Apply to save the changes. You must make at least one change to enable the Apply button. This saves the changes for all login types in a single action.
9.(Optional)The Revert button is enabled when any configuration option differs from its default setting. Click Revert to reset the column configuration to the default settings. Reverting discards all previous customizations, including changes made in earlier sessions.
10.(Optional) Click Cancel to close the page without saving your changes.
Activate Using the 'Activate Online' Button
Online product activation is the process where you activate the product on the same machine (computer or other device) where you intend to use the activated product. When the activation process is complete, no further action is required.
To perform online product activation:
1.Do one of the following based on your login method.
| Entitlement ID |
If you logged in with an EID, the Entitlements page opens automatically with the product details already expanded. Select the products you want to activate. |
| Product Key ID |
If you logged in with a PKID, the Products page opens automatically with the product details already expanded. You do not need to select anything. |
| User Credentials |
If you logged in with an user ID or email address and password: a.Navigate to the Entitlements page. b.If more than one entitlement is available, expand the relevant entitlement. c.Select the products that you want to activate. |
NOTE If you select multiple products that cannot be activated together, the button to activate the products is disabled.
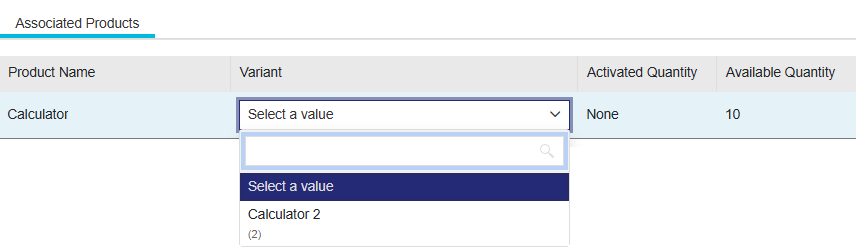
2.If the Variant column is displayed, expand the entitlement or product, if needed, and select the relevant variant from the Variant list.
3.Click Activate Online. The Activate Products page opens.
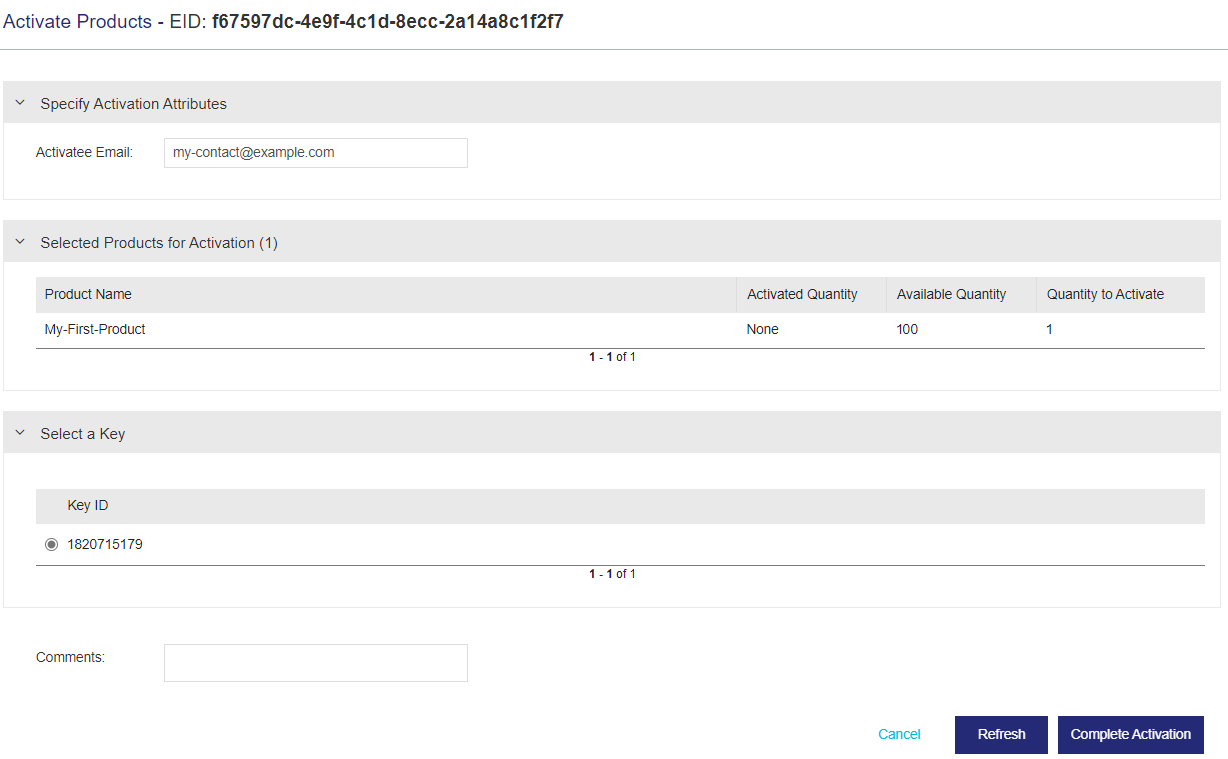
4.Enter the Activatee Email. This is the email address of the individual who performs the activation.
5.(Optional) In the Activation Description box, enter any comments that you want to save with this activation.
6.In the Select a Key section, select a Key ID from the list of key IDs displayed. If the required keys are not listed in the Select a Key section, click Refresh to display them.
7.Click Complete Activation to generate and automatically apply the license file (V2CP) to the selected key. A V2CP file (Vendor-to-Customer Package file) contains licensing information and updates for the activated product.
8.(Optional) In the bottom right corner of the post-activation page, click Download License and save the V2CP license file for future reference. V2CP files can safely be sent using regular email.
Activate Using the 'Activate Offline' Button
Offline product activation is the process where you may activate the product on one machine (computer or other device) and use the activated product on another machine. This offline process requires you to provide a C2V (Customer-to-Vendor) file, which is generated on the target machine where you will be using the product license. When you complete the activation process, a V2CP (Vendor-to-Customer Package) license file is generated. To use the product, you must transfer the V2CP file to the target machine and apply the license.
To perform offline product activation:
1.Do one of the following based on your login method.
| Entitlement ID |
If you logged in with an EID, the Entitlements page opens automatically with the product details already expanded. Select the products you want to activate. |
| Product Key ID |
If you logged in with a PKID, the Products page opens automatically with the product details already expanded. You do not need to select anything. |
| User Credentials |
If you logged in with an user ID or email address and password: a.Navigate to the Entitlements page. b.If more than one entitlement is available, expand the relevant entitlement. c.Select the products that you want to activate. |
NOTE If you select multiple products that cannot be activated together, the button to activate the products is disabled.
2.If the Variant column is displayed, expand the entitlement or product, if needed, and select the relevant variant from the Variant list.
3.Click Activate Offline. The Activate Products page opens.
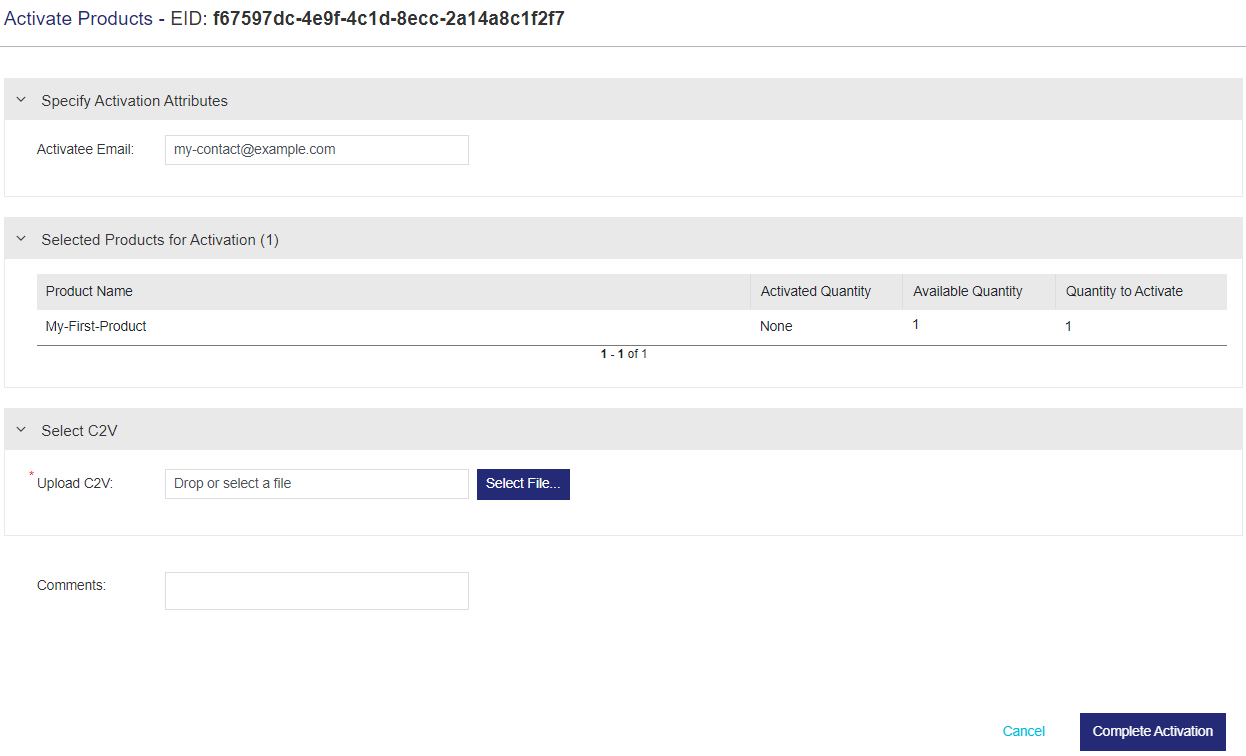
4.Enter the Activatee Email. This is the email address of the individual who performs the activation.
5.(Optional) In the Activation Description box, enter any comments that you want to save with this activation.
6.In the Select C2V section, for Upload C2V, click Select File to browse and upload the C2V file. A C2V file is a Customer-to-Vendor file that is generated on the target machine where you will use the licensed product. The C2V file contains information or data about that machine. C2V files can be safely sent using regular email. If needed, contact your system administrator for information on how to generate a C2V file.
7.Click Complete Activation to generate the license file (V2CP). A V2CP file is a Vendor-to-Customer Package file that contains licensing information and updates for the activated product.
8.In the bottom right corner of the post-activation page, click Download License to download the V2CP file.
You can also use the Download action available on the Activations page to download the V2CP file. For details, see Actions for Entitlements.
9.Transfer the V2CP file to the target machine. V2CP files can safely be sent using regular email.
10.Apply the downloaded V2CP file on the machine where the C2V file was generated according to the instructions you received for the entitlement. For example, you may have been instructed to use Sentinel Admin Control Center or another utility. If needed, contact your system administrator for information on how to apply the V2CP file.
Activate Using the 'Activate Cloud License' Button (missing or bad snippet)
NOTE Relevant only for customer administrator and channel partner users.
When you activate products using Activate Cloud License option, you generate a cloud license (CL key) and push the license to the Thales service-hosted, cloud license manager server in a single step.
After performing Activate Cloud License, the customer's administrator user can create machine accounts for end users, view the list of activated products, and manage the list of registered machines on which each end user can access protected applications.
Each time you use Activate Cloud License, a single activation is performed. The activation is then deducted from the total quantity.
To activate products using Activate Cloud License:
1.Log in to Sentinel EMS customer portal using your user credentials.
2.Navigate to the Entitlements page.
3.Select and expand the entitlement that you want to activate.
4.Select the products that you want to activate.
NOTE If you select multiple products that cannot be activated together, the button to activate the products is disabled.
5.If the Variant column is displayed, expand the entitlement or product, if needed, and select the relevant variant from the Variant list.
6.Click Activate Cloud License. The Activate Products page opens.
7.Enter the Activatee Email. This is the email address of the individual who performs the activation. If a customer's administrator user is associated with your customer, the Activatee Email field is pre-populated with their email address. You can modify or remove the email address if needed.
8.(Optional) In the Activation Description box, enter any comments that you want to save with this activation.
9.(Optional) Set Send Notification to:
•Yes: Sends an email notification to the activatee email provided, otherwise to the user email defined in the entitlement after activation.
•No: Disables a notification so that an email cannot be sent to the activatee.
10.In the Selected Products for Activation section, specify the quantity to activate if needed.
11.In the Generate Licenses pane, do one of the following:
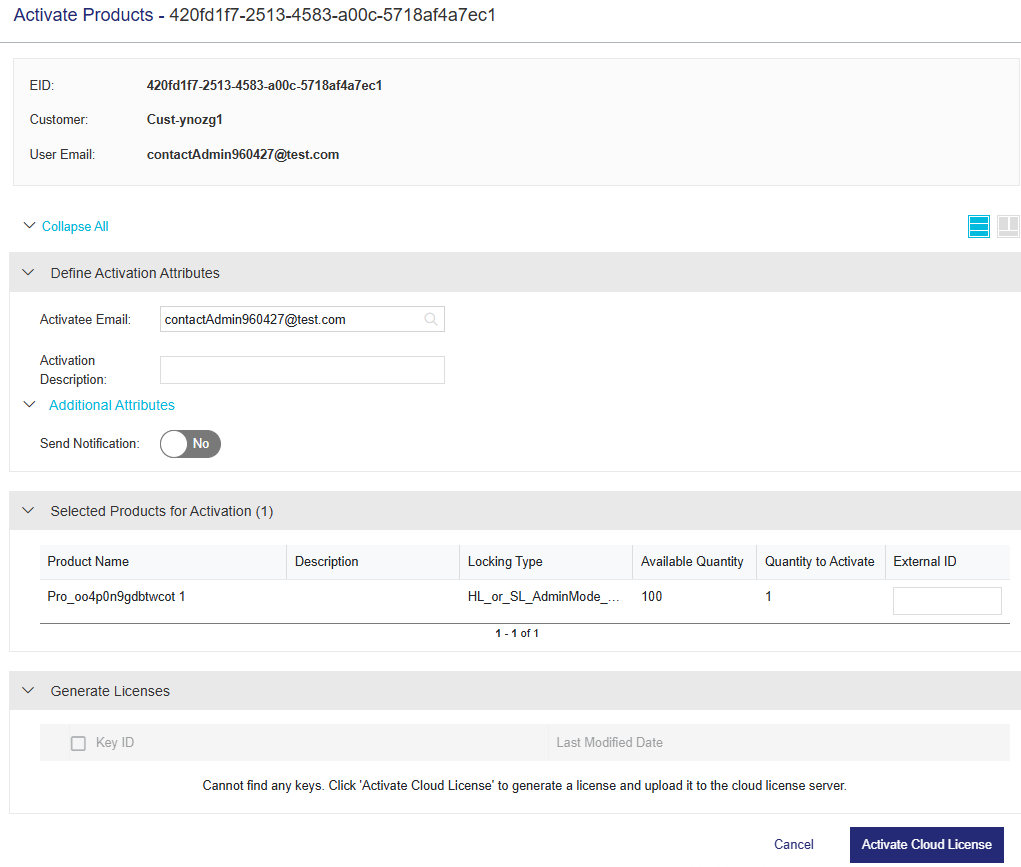
•First-time license generation. If this is the first time that you are generating a CL key using Activate Cloud License, a message in the Generate Licenses pane informs you that there are no CL keys yet for this customer.
Click Activate Cloud License. The CL key is generated and pushed to the Thales service-hosted, cloud license manager server. You can see the newly added key in the Activation Details area, which displays the status of the key and the key ID.
•Subsequent license generation. If Activate Cloud License was performed at least once, then the Generate Licenses pane lists the generated CL keys.
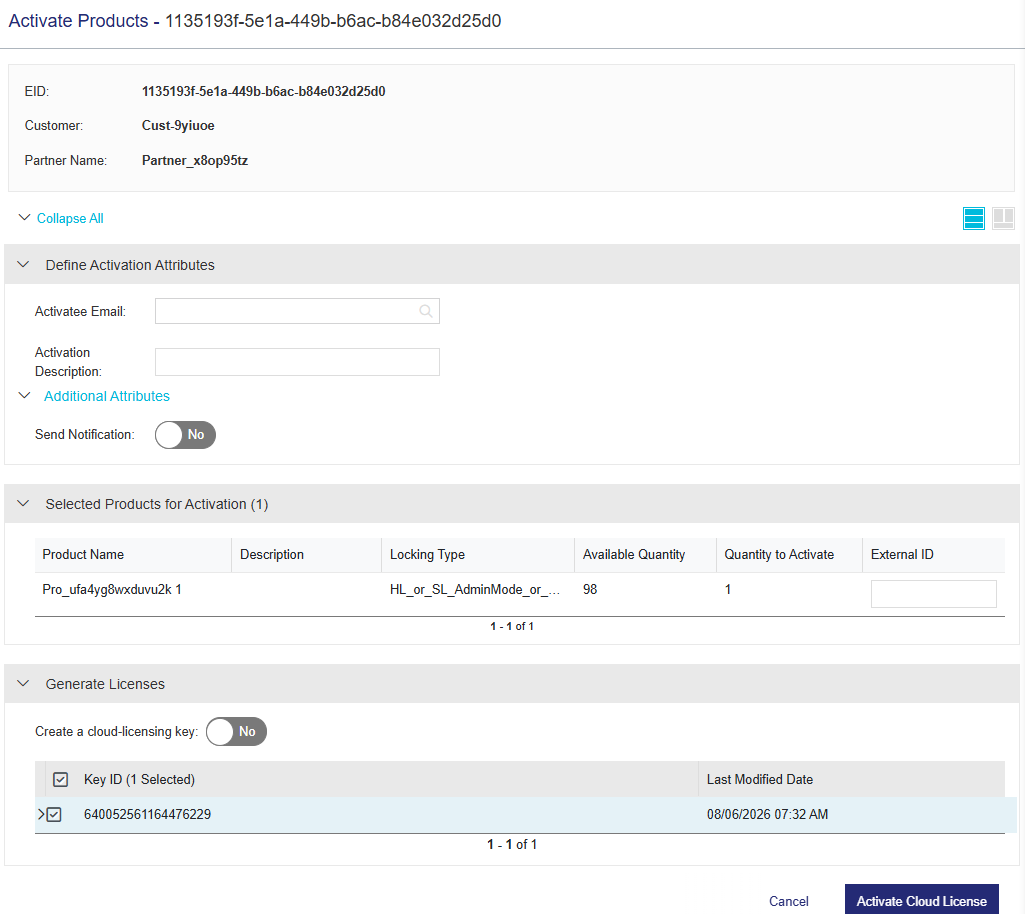
Do one of the following:
Apply the license to the existing key. (Generally, only one key is required per customer. If you see multiple keys, you can apply the updates to all relevant keys.)
i.Select the required key. You can expand each line item to view the associated products, associated memory files, and key attributes.
ii.Click Activate Cloud License. The CL key is updated and pushed to the Thales service-hosted, cloud license manager server.
Otherwise:
Only if required, set Create a cloud-licensing key to Yes to create another CL key. Although you can create multiple CL keys for the same customer, we recommend that you create a single CL key for each customer for ease of maintenance.
NOTE You can generate up to 100 CL keys for a customer. If you attempt to create a new CL key after reaching this limit, an error is displayed. To continue, select an existing CL key.
12.Click Done. If the activatee email address was provided, then a license certificate is sent to the activatee. The license certificate email does not include a license string because the license is applied automatically without the need for user input. Instead of a license string, the end user's machine can access the cloud license directly using the installed identity credentials.
Activating Variants of a Product
Available only for products that contain variants. This option may not be available for the selected entitlement or product.
A product may offer several variants. You select from the required variant when activating the product. The system displays the relevant attributes on the Activations page based on your selection.
You can find the instructions for activating a variant of a product in the relevant activation sections on this page.