Managing Customers
To open the Customers tab, select Customers > Customers. The left pane displays a list of all Customers and provides the following information about each Customer:
| Status |
Current status of the Channel Partner:
|
| Type |
Channel Partner type: |
| Name | The name of the Customer who placed the order. |
| Ref ID | Reference ID of the Channel Partner in another system. |
 Disabled
 Individual or
  Company
The right pane displays customer information, billing details, shipping details, and a list of associated contacts.
To define a Customer:
See Creating a Customer.
To view the details of a Customer:
In the left pane of the Customers tab, select a Customer. The details are displayed in the right pane.
To filter and search the Customers list:
1.In the Customers tab, specify a search criterion, such as, Customer, CRM ID, Ref ID, and E-mail Contains or Customer Ref ID.
2. Enter a complete or partial search string in the search box. For details on the types of searches available, see Wild Card Search.
NOTE Wild card searches are not supported for the E-mail Contains criterion.
3.Click  . The relevant search results are displayed.
To manage Customers:
In the Customers tab, do any of the following:
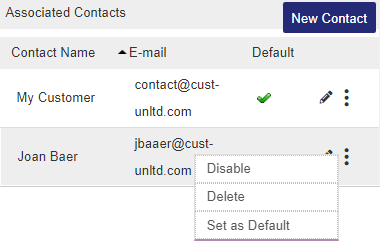
To manage associated contacts for Company-type Customers:
In the Associated Contacts pane (located in the bottom-right of the Customers tab), add or edit the associated contacts as needed.
| Click: | To: |
|---|---|
| New Contact |
Create a Contact for a Company-type Customer. This task does not appear for Individual-type Customers. See Creating or Updating a Contact for a Company-type Customer. |
|
|
Disable or enable a Contact. Disabled Contacts cannot login to Sentinel LDK-EMS. |
|
|
View and edit the properties of the selected Contact. See Creating or Updating a Contact for a Company-type Customer. |
|
|
Delete the selected Contact. You cannot delete Contacts that are included in Entitlements. |
|
|
Mark the selected Contact as the default Contact for the Customer. |