Entitlements
NOTE The Entitlements page is available only when you log in using EID or User Credentials.
An entitlement defines your rights to use a software package or service. An entitlement is an order for products
>
Product
>
Quantity of the products
> Duration for which an entitlement is valid.
>Whether you can activate an entitlement.
>Whether you must activate the entire quantity of products in an entitlement at once, as a single entity.
The Entitlements Page
In the navigation pane, click Entitlements to open the Entitlements page.

For information on how to activate an entitlement, see Activations.
In this section:
>Viewing Entitlement Information
>Search Parameters for Entitlements
>Viewing an Entitlement Certificate
>Managing Fingerprints for Entitlements
Viewing Entitlement Information
For each entitlement, there are several details available on the Entitlements page. The following table explains these entitlement details:

Search Parameters for Entitlements
NOTE Available only when you use Login Using User Credentials.
You can use the search bar available on the Entitlements page to filter the listed entitlements based on the following search parameters:
>EID: Entitlement ID of an entitlement.
>Product Name: Name of a product associated with an entitlement.
>Product Bundle Name: Name of a product bundle associated with an entitlement.
>Product Bundle External ID: External ID of the product bundle associated with an entitlement.
For information on how to search, see Searching for an Entity.
Actions for Entitlements
The Actions column provides additional options for each entitlement in the table.
| Action | Description |
|---|---|
| View Certificate | View and email the entitlement certificate of the entitlement. For details, see Viewing an Entitlement Certificate. |
| View Activations |
View activations that are already performed for an entitlement. For details, see Activations. |
| View Downloads |
View the downloads associated with the product within the entitlement using the Downloads page. For details, see Downloads. |
| Manage Fingerprints |
Manage fingerprints for entitlements. This action appears only for entitlements that allow fingerprint registration as a mechanism for locking your licenses. You can register the fingerprints of the machines that will be using the entitlements. A machine can be registered for one or more entitlements. In addition, an entitlement can be registered for one or more machines. For more information, see Managing Fingerprints for Entitlements. |
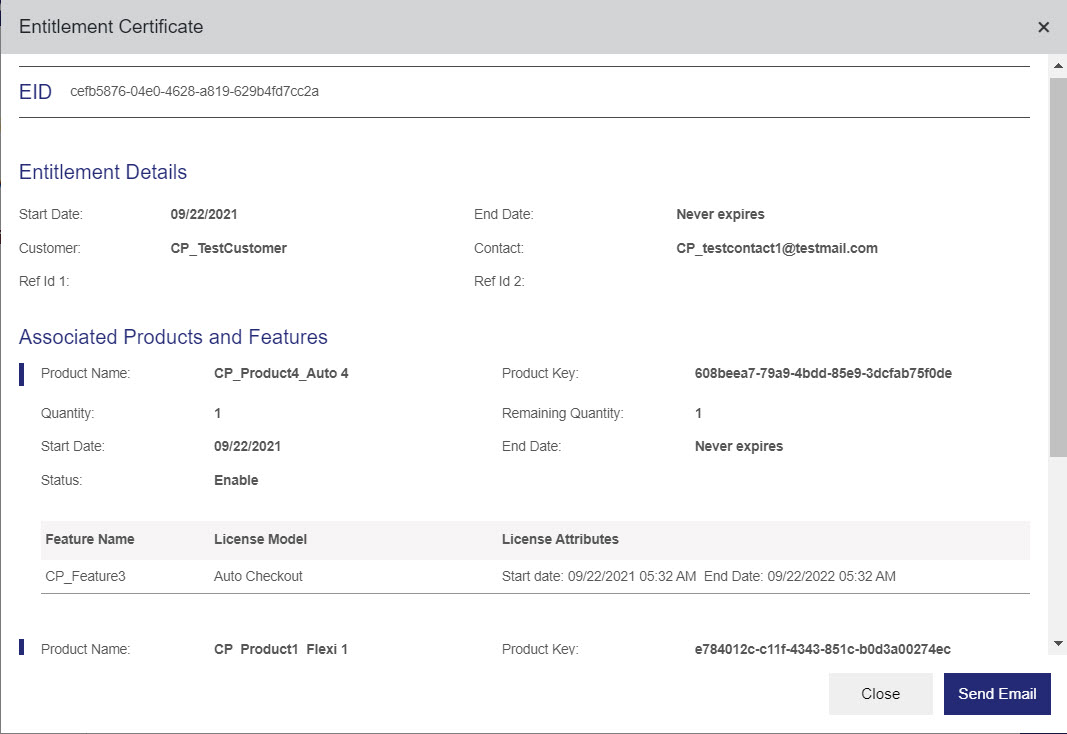
Viewing an Entitlement Certificate
The entitlement certificate contains the details of the entitlement.
To view and email an entitlement certificate for an entitlement:
1.In the Actions column, click  (More Actions), and then click View Certificate. The entitlement certificate appears as shown:
2.Click Send Email. The Send Email pop-up appears:
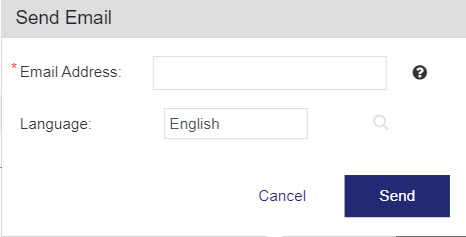
3.Enter the Email Address to specify where the entitlement certificate must be sent. If a user for the entitlement exists, then the email address of the user is displayed here by default.
4.Select another Language if required.
5.Click Send. The entitlement certificate will be sent to the specified email address in the language selected.
Managing Fingerprints for Entitlements
You can add and remove associated fingerprints using the Manage Fingerprints page. This lets you associate multiple fingerprints with the same product, if the product is used on multiple devices, for example. The Manage Fingerprints option is available only for entitlements that allow fingerprint registration as a mechanism for locking your licenses.
A machine fingerprint contains information that is collected from a device for the purpose of identifying that device. To run licensed software on a device, the fingerprint data embedded in the license must match the fingerprint data of the device.
Fingerprint criteria can include the IP address, host name, disk ID of a machine, and so on. For greater security and flexibility, licenses can be locked to more than one standard locking criterion. When using the customer portal, you will need to upload an XML file for fingerprint registration.
NOTE Contact your system administrator for information on how to generate an XML file for fingerprint registration.
Following are a few important points when adding and associating fingerprints:
>If an entitlement contains more than one product, then you must register a fingerprint for each individual product. You can register the same fingerprint for multiple products.
>Some entitlements are treated as a single entity even when they contain several products. For such entitlements, you register fingerprints at the entitlement level and not for the individual products.
>Some entitlements include several variants of a single product. For such entitlements, you register fingerprints at the variant level of the entitlement instead of at the product level. You must register a unique fingerprint for each variant of a product.
TIP You can also add and associate a fingerprint when activating a product. For details, see Activating a Product Using Fingerprint Locking.
To add and associate a fingerprint using the Manage Fingerprints page:
1.Open the Manage Fingerprints page in one of the following ways:
•In the Actions column for an entitlement, click Manage Fingerprints. The Manage Fingerprints page opens, as shown in the following example.
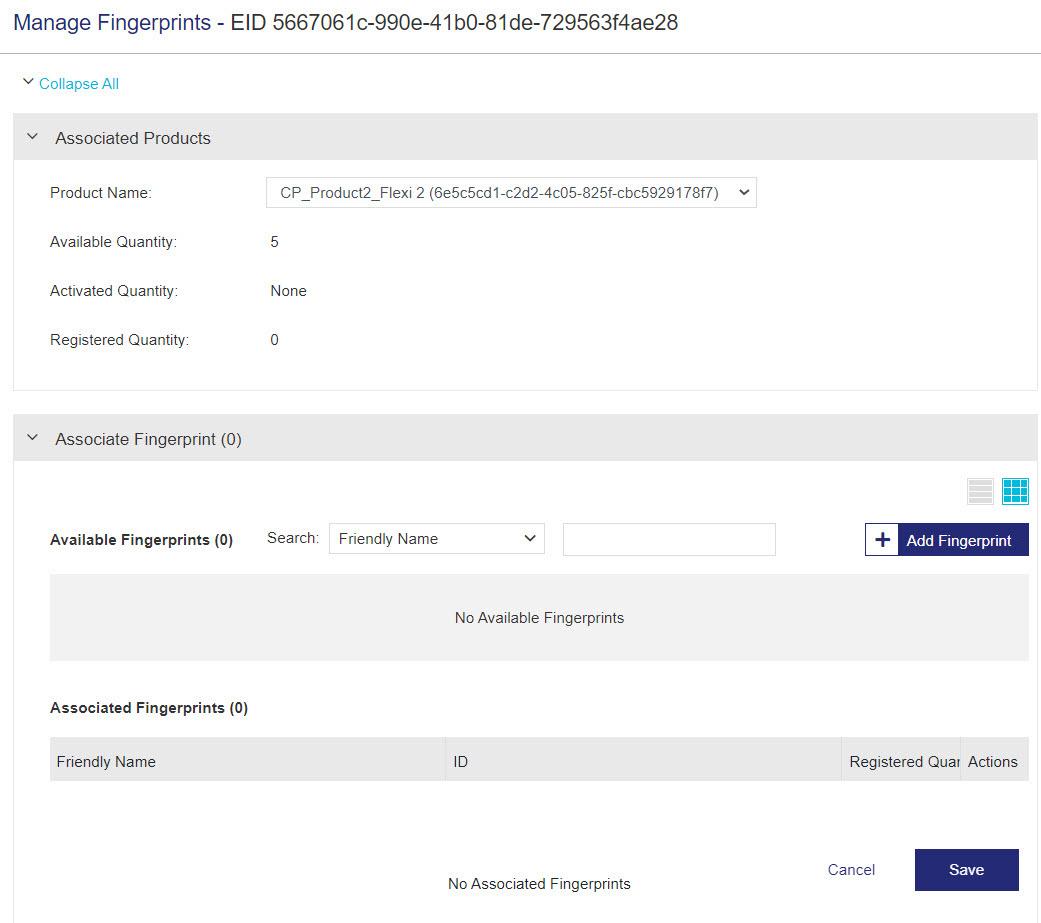
(Different content may be displayed in the Associated Products pane, depending on the configuration.)
•When activating products in an entitlement, click the Manage Fingerprint button. For detailed instructions, see Activating a Product Using Fingerprint Locking.
2.If the Associated Products pane contains the Product Name list, select the product that you want to associate the fingerprint with. Otherwise, skip to the next step.
3.In the Associate Fingerprint pane, click Add Fingerprint. The Add Fingerprint dialog box appears:
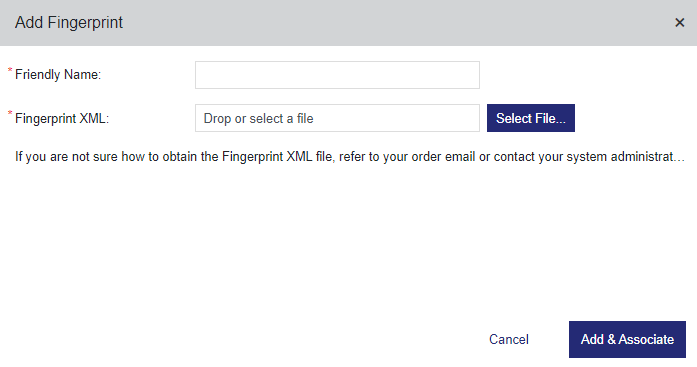
The following table explains the attributes in the Add Fingerprint dialog box.
| Attribute | Description | Required/Optional |
|---|---|---|
| Friendly Name |
A name for the machine fingerprint to make it easier to identify and use the fingerprint file. |
Required |
| Fingerprint XML |
The XML file containing the machine fingerprint. Click Select File to upload the fingerprint XML file. |
Required |
4.Click Add & Associate. The fingerprint is added and associated with the entitlement, as shown in the following example.
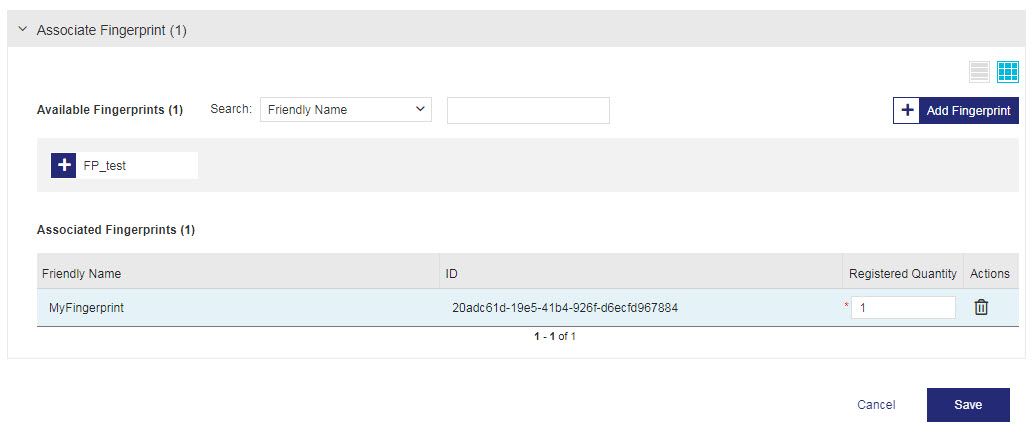
(Different content may be displayed in the Associated Fingerprints pane, depending on the configuration.)
Under Actions, you can click ![]() to remove an associated fingerprint from the Associated Fingerprints list.
to remove an associated fingerprint from the Associated Fingerprints list.
5.Click Save.
Managing Named Users
The Named User Management tab is available if:
> Named users can be associated with the entitlement, and
> The entitlement is activated.
You can click the Edit button in the Action column to add, delete, and import named users for a product in an entitlement.
To manage named users:
1.Expand the relevant entitlement, and, for the relevant product, navigate to the Named User Management tab.
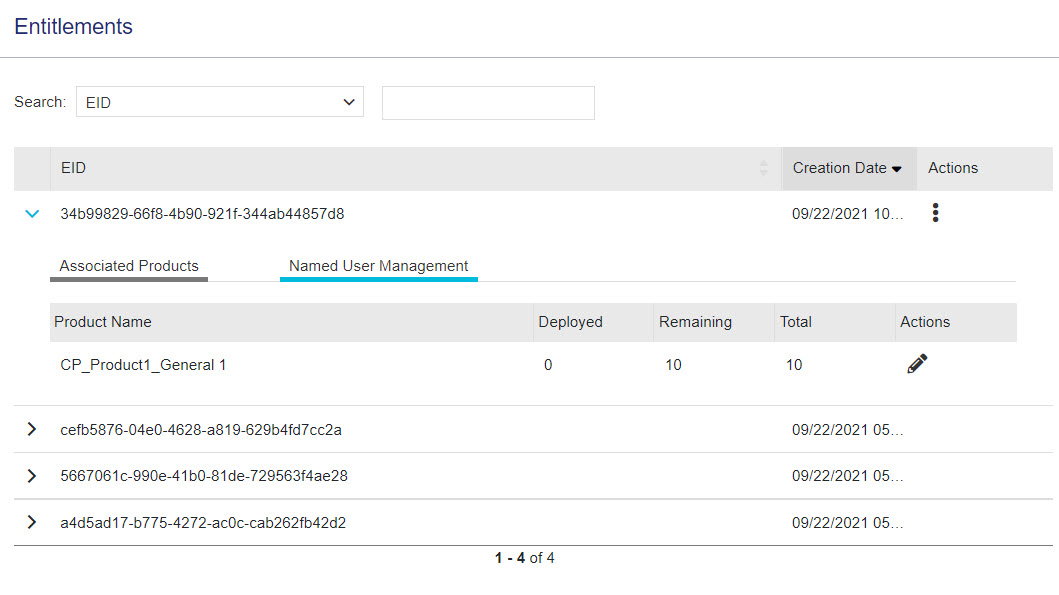
2.In the Actions column, click ![]() Edit to open the Manage Named Users page.
Edit to open the Manage Named Users page.
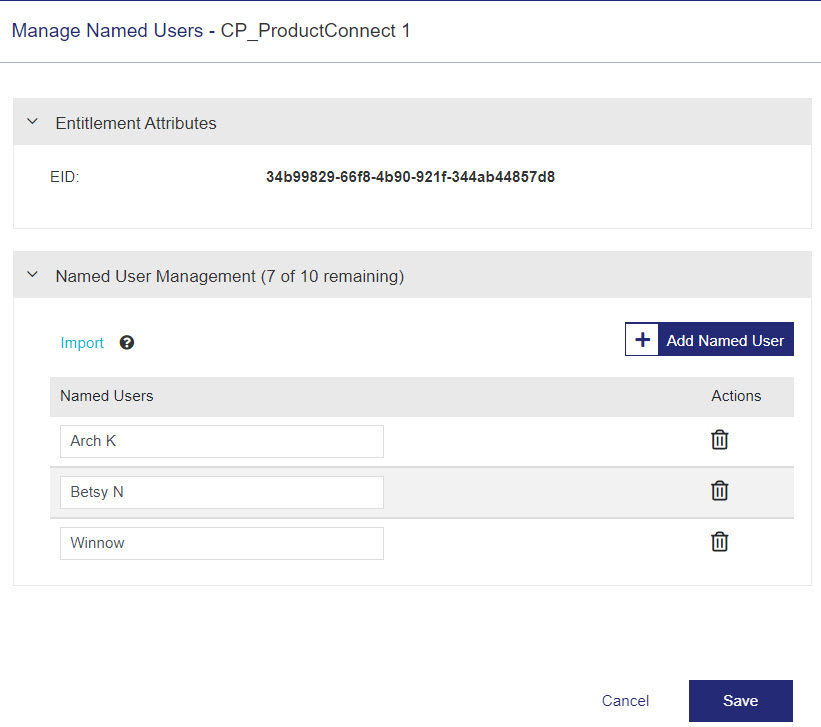
The following table describes the tasks that you can perform using this page:
| Component | Description | ||
|---|---|---|---|

|
Click this button to display a text field and enter the named user. | ||

|
Click this link to import a named user list from a CSV file. You can download a sample CSV for importing named users by clicking Named Users User_1 User_2 User_3 User_4 User_5 The CSV for import must contain the header, Named User, followed by a list of user names. |
||
|
Click this button to delete the selected named user. |
 (contextual help icon). A sample CSV is given below:
3.Click Save to save the named user details.
Configuring the Grid
NOTE Relevant only for vendor administrators who log in to the Sentinel EMS customer portal to perform configuration-related activities.
You can show or hide the entity attributes that you want to display as columns on the page, and select the default grid column sorting as needed. For details on configuring the grids, see
Activate Using the 'Activate' Button
This section describes how to activate products using the Activate button.
In this section:
>Activating a Product Using Standard Locking Criteria
>Activating a Product Using Fingerprint Locking
>Activating a Product Using Device Locking
>Activating Variants of a Product
Activating a Product Using Standard Locking Criteria
Standard locking criteria may include the IP Address, Disk ID, Host Name, Ethernet Address, Hard Disk Serial Number, UUID, CPU Info String, and so on. You can activate a product by providing the values of the locking criteria specified during activation. You may be asked to provide values for more than one locking criterion during product activation.
To activate a product using standard locking criteria:
1.Do one of the following based on your login method.
| Entitlement ID |
If you logged in with an EID, the Entitlements page opens automatically with the product details already expanded. Select the products you want to activate. |
| Product Key ID |
If you logged in with a PKID, the Products page opens automatically with the product details already expanded. You do not need to select anything. |
| User Credentials |
If you logged in with an user ID or email address and password: a.Navigate to the Entitlements page. b.If more than one entitlement is available, expand the relevant entitlement. c.Select the products that you want to activate. |
NOTE If you select multiple products that cannot be activated together, the button to activate the products is disabled.
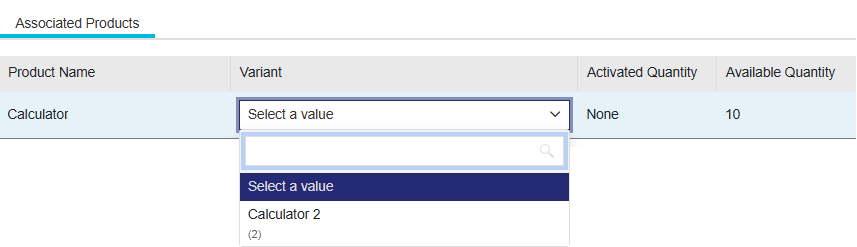
2.If the Variant column is displayed, expand the entitlement or product, if needed, and select the relevant variant from the Variant list.
3.Click Activate. The Activate Products page opens.

4.Enter the Activatee Email. This is the email address of the individual who performs the activation.
5.(Optional) In the Activation Description box, enter any comments that you want to save with this activation.
6.Specify the Time Zone. By default, the start date and the end date of a license are calculated according to your time zone, but you can specify another time zone to override the existing one.
For example, the generated license may require a different validity period than the one specified by the existing time zone.
7.Set Send Notification to:
•Yes: Sends an email notification to the activatee email provided, otherwise to the to the user email defined in the entitlement after activation.
•No: Disables a notification so that an email cannot be sent to the activatee.
8.In the Define Locking Criteria section, enter the locking value for each locking criterion listed.
9.Click Complete Activation to generate the license string and view the license certificate.
Activating a Product Using Fingerprint Locking
A machine fingerprint contains information that is collected from a device for the purpose of identifying that device. To run licensed software on a device, the fingerprint data embedded in the license must match the fingerprint data of the device.
Fingerprint criteria can include the IP address, host name, disk ID of a machine, and so on. For greater security and flexibility, licenses can be locked to more than one standard locking criterion. When using the customer portal, you will need to upload an XML file for fingerprint registration.
NOTE Contact your system administrator for information on how to generate an XML file for fingerprint registration.
Following are a few important points when adding and associating fingerprints:
>If an entitlement contains more than one product, then you must register a fingerprint for each individual product. You can register the same fingerprint for multiple products.
>Some entitlements are treated as a single entity even when they contain several products. For such entitlements, you register fingerprints at the entitlement level and not for the individual products.
>Some entitlements include several variants of a single product. For such entitlements, you register fingerprints at the variant level of the entitlement instead of at the product level. You must register a unique fingerprint for each variant of a product.
To activate a product using a fingerprint as the locking criteria:
1.Do one of the following based on your login method.
| Entitlement ID |
If you logged in with an EID, the Entitlements page opens automatically with the product details already expanded. Select the products you want to activate. |
| Product Key ID |
If you logged in with a PKID, the Products page opens automatically with the product details already expanded. You do not need to select anything. |
| User Credentials |
If you logged in with an user ID or email address and password: a.Navigate to the Entitlements page. b.If more than one entitlement is available, expand the relevant entitlement. c.Select the products that you want to activate. |
NOTE If you select multiple products that cannot be activated together, the button to activate the products is disabled.
2.If the Variant column is displayed, expand the entitlement or product, if needed, and select the relevant variant from the Variant list.
3.Click Activate. The Activate Products page opens.
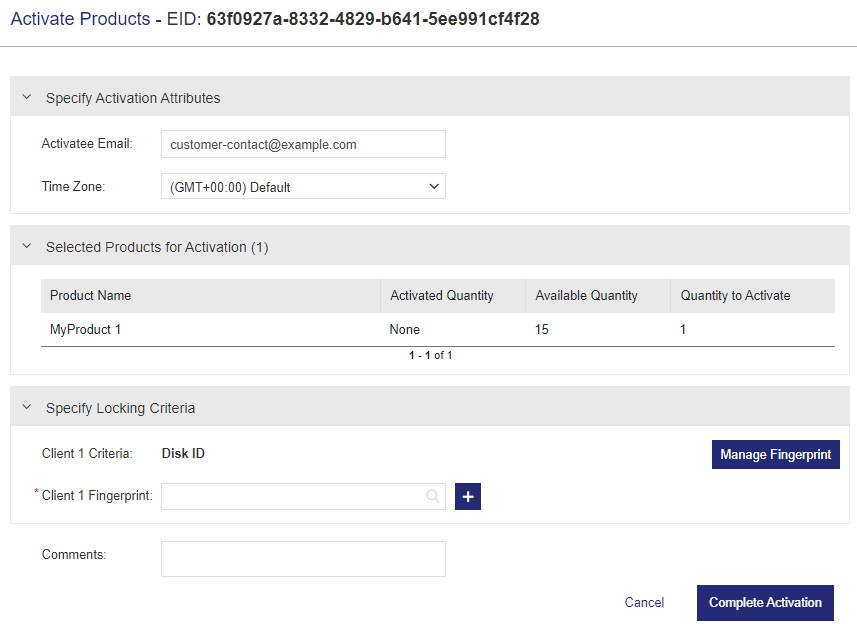
4.Enter or update the Activatee Email, if needed. This is the email address of the individual who performs the activation.
5.(Optional) In the Activation Description box, enter any comments that you want to save with this activation.
6.Specify the Time Zone. By default, the start date and the end date of a license are calculated according to your time zone, but you can specify another time zone to override the existing one. This is useful, for example, if the generated license requires a different validity period than the one specified by the existing time zone.
7.Set Send Notification to:
•Yes: Sends an email notification to the activatee email provided, otherwise to the to the user email defined in the entitlement after activation.
•No: Disables a notification so that an email cannot be sent to the activatee.
8.In the Define Locking Criteria section, do one of the following:
•If a fingerprint is already associated with the selected product, then enter the "friendly name" of the fingerprint in the Fingerprint box. As you start typing, you can select from the list of suggestions that is displayed.
OR
•Click the Manage Fingerprint button and follow the instructions in Managing Fingerprints for Entitlements. Then complete the activation. This is useful if you want to associate multiple fingerprints with a product or manage existing fingerprints.
OR
•Click  (Add & Associate Fingerprint) to open the Add Fingerprint dialog box. This is useful if the product is not yet associated with any fingerprint.
The Add Fingerprint dialog box has different options depending on the entitlement details, as shown in the following examples.
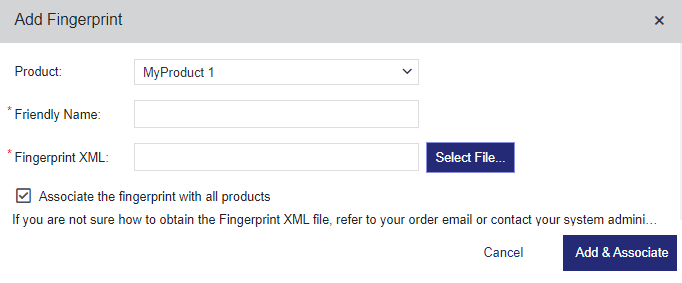
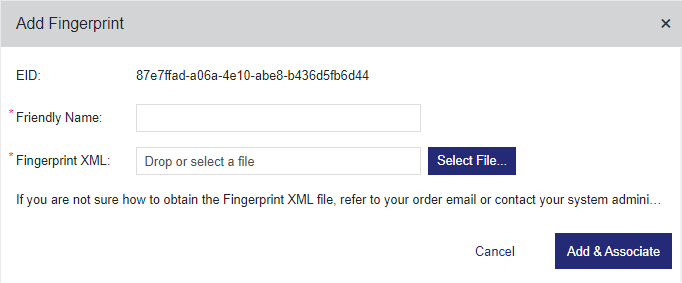
The following table explains the attributes in the Add Fingerprint dialog box.
| Attribute | Description | Required/Optional | |
|---|---|---|---|
|
One of the following: |
Product
|
The name of the product to which you are associating the fingerprint file. If you are activating multiple products at the same time, you can select the relevant product from the displayed list. TIP If you want to apply the same fingerprint file to all of the products being activated simultaneously in this entitlement, select the Associate the fingerprint with all products check box described below. |
Required |
| EID | The EID for the entitlement that contains the products being activated. | Required | |
| Friendly Name |
A name for the machine fingerprint to make it easier to identify and use the fingerprint file. |
Required | |
| Fingerprint XML |
The XML file containing the machine fingerprint. Click Select File to upload the fingerprint XML file. |
Required | |
|
Associate the fingerprint with all products check box |
Select this check box to associate the fingerprint with all of the products being activated simultaneously in this entitlement. Available only if you are activating multiple products at the same time. |
Optional | |
After you fill in the required information, click Add & Associate to apply the association. If the fingerprint is not displayed in the Fingerprint box, start typing the friendly name and select it from the list of suggestions.
9.Click Complete Activation to generate the license string and view the license certificate.
Activating a Product Using Device Locking
Some product licenses are intended for use with devices. For example, products licenses for embedded devices. To activate such products and generate device-specific licenses, you have to provide device-related locking information during activation.
To activate a product using device locking:
1.Do one of the following based on your login method.
| Entitlement ID |
If you logged in with an EID, the Entitlements page opens automatically with the product details already expanded. Select the products you want to activate. |
| Product Key ID |
If you logged in with a PKID, the Products page opens automatically with the product details already expanded. You do not need to select anything. |
| User Credentials |
If you logged in with an user ID or email address and password: a.Navigate to the Entitlements page. b.If more than one entitlement is available, expand the relevant entitlement. c.Select the products that you want to activate. |
NOTE If you select multiple products that cannot be activated together, the button to activate the products is disabled.
2.If the Variant column is displayed, expand the entitlement or product, if needed, and select the relevant variant from the Variant list.
3.Click Activate. The Activate Products page opens.
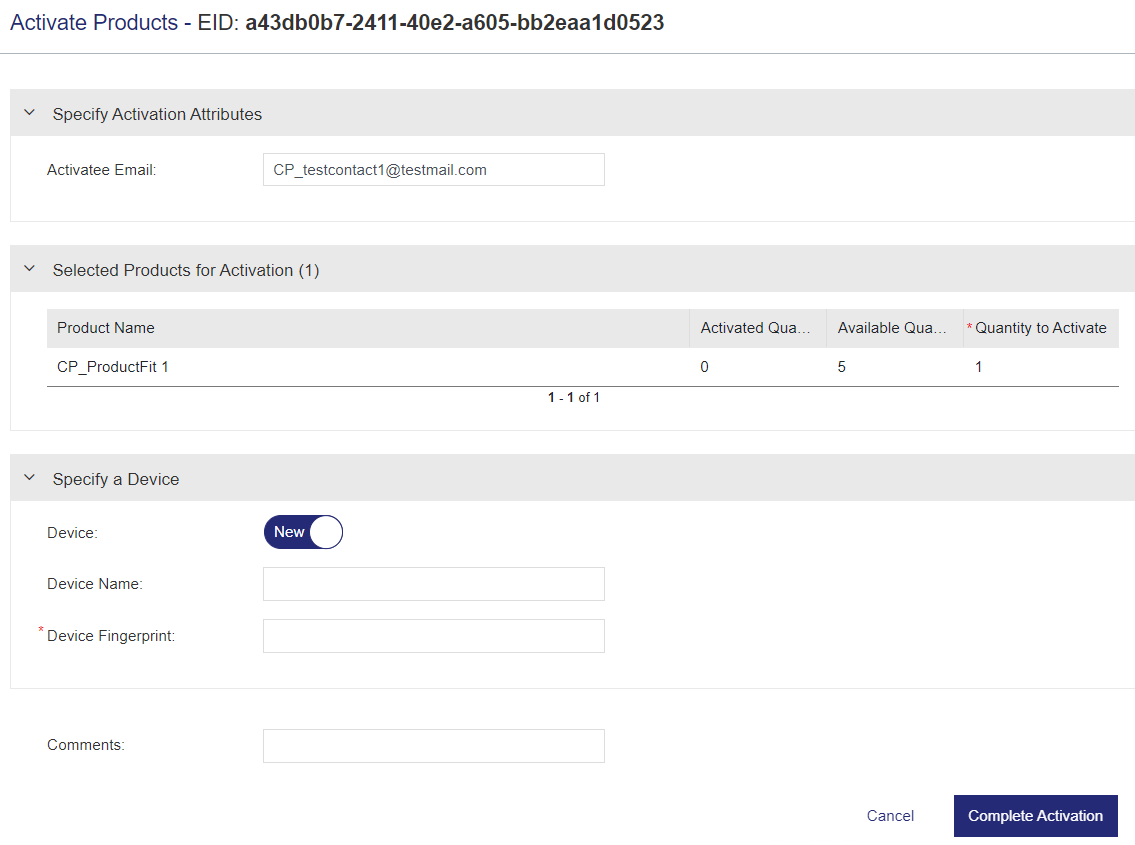
4.Enter the Activatee Email. This is the email address of the individual who performs the activation.
5.(Optional) In the Activation Description box, enter any comments that you want to save with this activation.
6.Set Send Notification to:
•Yes: Sends an email notification to the activatee email provided, otherwise to the to the user email defined in the entitlement after activation.
•No: Disables a notification so that an email cannot be sent to the activatee.
7.In the Specify a Device section, select Device as one of the following:
>New: A new device name for the locking information to associate the activation.
>Existing: An existing device to associate with the activation.
8.Enter the Device Name and Device Fingerprint (for New).
OR
Enter an existing Device Name or Device Fingerprint (for Existing). Enter at least the first character of the device name to search for an existing device.
NOTE A Device Name is a friendly representation of the locking information of a device.
9.Click Complete Activation to generate the license string and view the license certificate.
Activate Using the 'Activate Online' Button
Online product activation is the process where you activate the product on the same machine (computer or other device) where you intend to use the activated product. When the activation process is complete, no further action is required.
You can choose this option if the Activate Online button is available for the product you want to activate.
To perform online product activation:
1.Do one of the following based on your login method.
| Entitlement ID |
If you logged in with an EID, the Entitlements page opens automatically with the product details already expanded. Select the products you want to activate. |
| Product Key ID |
If you logged in with a PKID, the Products page opens automatically with the product details already expanded. You do not need to select anything. |
| User Credentials |
If you logged in with an user ID or email address and password: a.Navigate to the Entitlements page. b.If more than one entitlement is available, expand the relevant entitlement. c.Select the products that you want to activate. |
NOTE If you select multiple products that cannot be activated together, the button to activate the products is disabled.
2.If the Variant column is displayed, expand the entitlement or product, if needed, and select the relevant variant from the Variant list.
3.Click Activate Online. The Activate Products page opens.
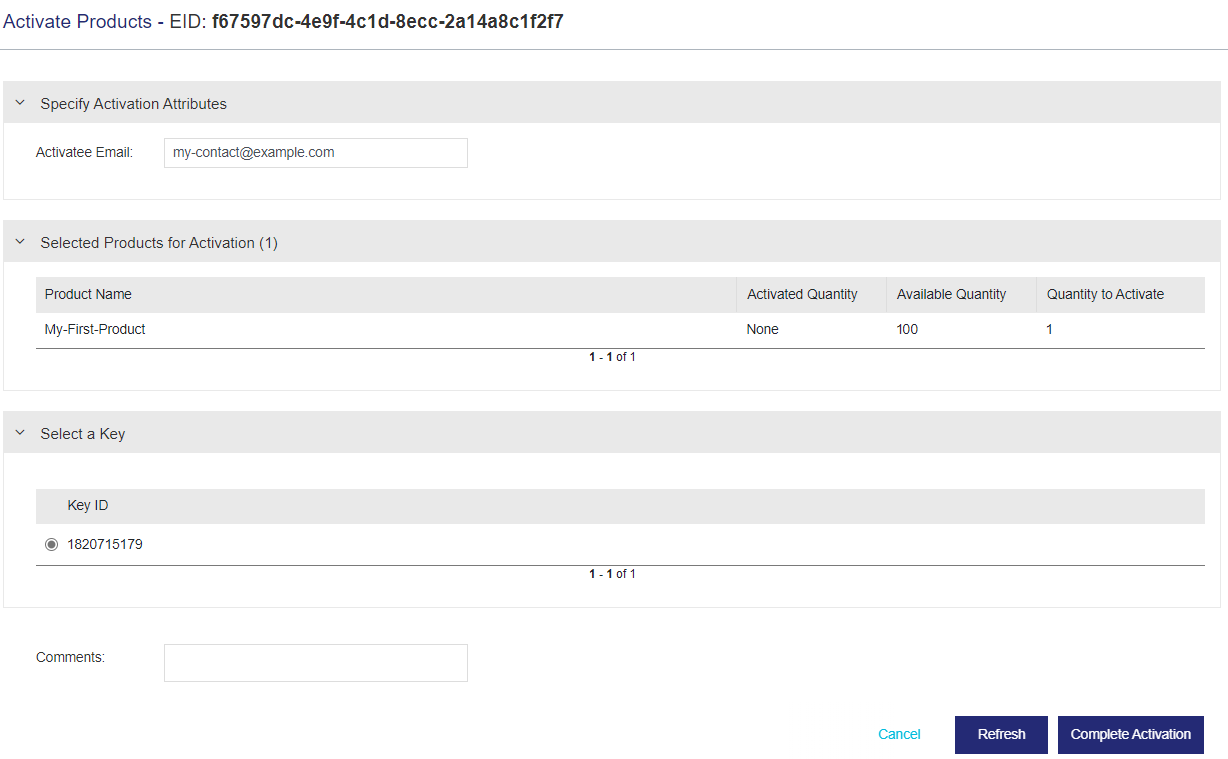
4.Enter the Activatee Email. This is the email address of the individual who performs the activation.
5.(Optional) In the Activation Description box, enter any comments that you want to save with this activation.
6.In the Select a Key section, select a Key ID from the list of key IDs displayed. If the required keys are not listed in the Select a Key section, click Refresh to display them.
7.Click Complete Activation to generate and automatically apply the license file (V2CP) to the selected key. A V2CP file (Vendor-to-Customer Package file) contains licensing information and updates for the activated product.
8.(Optional) In the bottom right corner of the post-activation page, click Download License and save the V2CP license file for future reference. V2CP files can safely be sent using regular email.
Activate Using the 'Activate Offline' Button
Offline product activation is the process where you may activate the product on one machine (computer or other device) and use the activated product on another machine. This offline process requires you to provide a C2V (Customer-to-Vendor) file, which is generated on the target machine where you will be using the product license. When you complete the activation process, a V2CP (Vendor-to-Customer Package) license file is generated. To use the product, you must transfer the V2CP file to the target machine and apply the license.
You can choose this option if the Activate Offline button is available for the product you want to activate.
To perform offline product activation:
1.Do one of the following based on your login method.
| Entitlement ID |
If you logged in with an EID, the Entitlements page opens automatically with the product details already expanded. Select the products you want to activate. |
| Product Key ID |
If you logged in with a PKID, the Products page opens automatically with the product details already expanded. You do not need to select anything. |
| User Credentials |
If you logged in with an user ID or email address and password: a.Navigate to the Entitlements page. b.If more than one entitlement is available, expand the relevant entitlement. c.Select the products that you want to activate. |
NOTE If you select multiple products that cannot be activated together, the button to activate the products is disabled.
2.If the Variant column is displayed, expand the entitlement or product, if needed, and select the relevant variant from the Variant list.
3.Click Activate Offline. The Activate Products page opens.
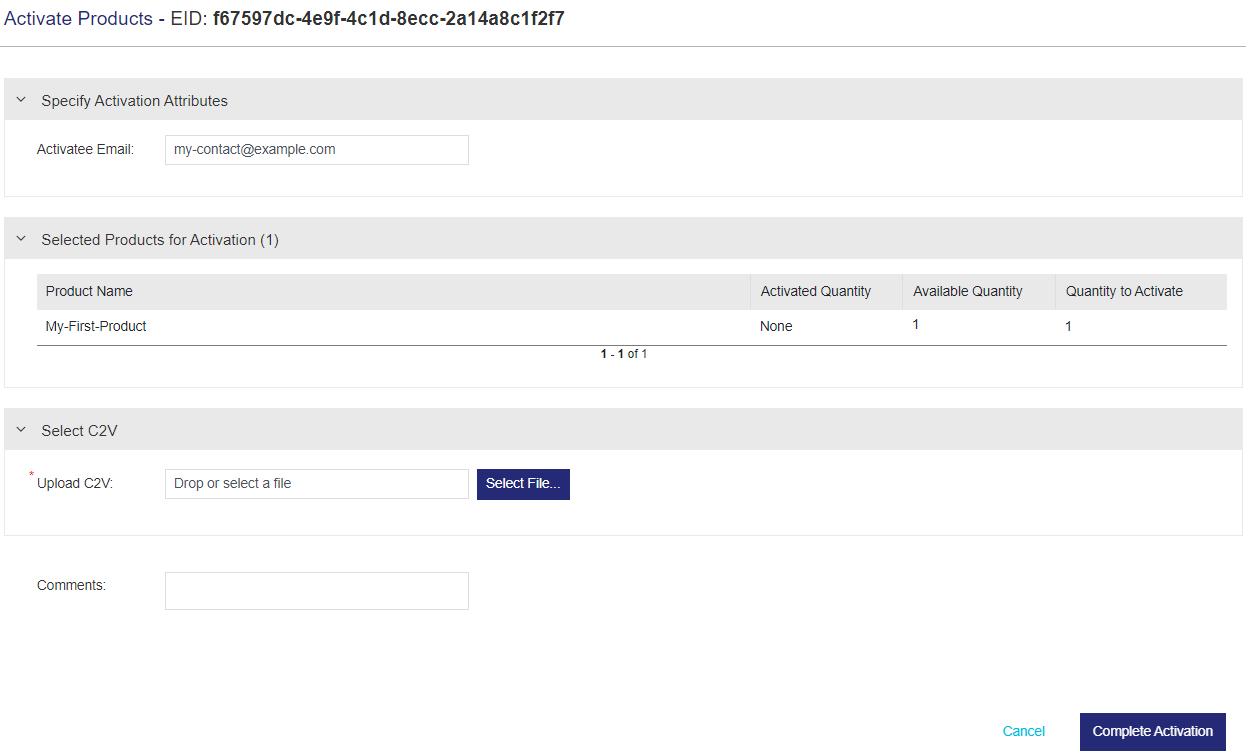
4.Enter the Activatee Email. This is the email address of the individual who performs the activation.
5.(Optional) In the Activation Description box, enter any comments that you want to save with this activation.
6.In the Select C2V section, for Upload C2V, click Select File to browse and upload the C2V file. A C2V file is a Customer-to-Vendor file that is generated on the target machine where you will use the licensed product. The C2V file contains information or data about that machine. C2V files can be safely sent using regular email. If needed, contact your system administrator for information on how to generate a C2V file.
7.Click Complete Activation to generate the license file (V2CP). A V2CP file is a Vendor-to-Customer Package file that contains licensing information and updates for the activated product.
8.In the bottom right corner of the post-activation page, click Download License to download the V2CP file.
You can also use the Download action available on the Activations page to download the V2CP file. For details, see Actions for Entitlements.
9.Transfer the V2CP file to the target machine. V2CP files can safely be sent using regular email.
10.Apply the downloaded V2CP file on the machine where the C2V file was generated according to the instructions you received for the entitlement. For example, you may have been instructed to use Sentinel Admin Control Center or another utility. If needed, contact your system administrator for information on how to apply the V2CP file.
Activating Variants of a Product
Available only for products that contain variants. This option may not be available for the selected entitlement or product.
A product may offer several variants. You select from the required variant when activating the product. The system displays the relevant attributes on the Activations page based on your selection.
You can find the instructions for activating a variant of a product in the relevant activation sections on this page.
Automatic Product Activation
Products that use lease-based licenses are activated automatically and do not require any action. The Activate button appears disabled for these types of products. You can view the activated products in the Activations page.
NOTE Contact your system administrator for information on automatic product activation of lease-based entitlements.