Activations
What is an Activation?
An activation refers to a method of generating a license (or license code) for a product
![]()
![]() Sentinel EMS also enables you to assign a device
Sentinel EMS also enables you to assign a device
Sentinel EMS enables you to perform an activation even before the start date of the line item has been reached, so that you can generate and apply a license in advance. Even though you apply the license in advance, the license takes effect only on its start date. This avoids a delta while using a current license and applying the new one, and ensures that the license cannot be misused if activated earlier.
Who is an Activatee?
An activatee is the user (individual or customer) that "owns" and therefore, performs the activation. Sentinel EMS enables you to associate an activatee during activation using the Activatee Email attribute.
For details on whether you must associate an activatee with an activation, see Activatee Email.
For more information on working with activatees, see Managing Activatees.
Prerequisites for Activations
The following are the prerequisites for activations:
>A role that includes Activation Management permissions. At minimum, you need the Add permission. For details, see Roles.
>The entitlement must be marked as "complete".
>When activating multiple products simultaneously, the products must meet the same conditions defined for Entitlement as a Whole.
TIP To verify that the products that you plan to activate all belong to the same enforcement, expand the entitlement and, under Associated Products, expand each product. Then, in the Associated Features tab, click the license model link and look at the Enforcement Technology value.
>The Allow Activation attribute of the entitlement must be set to "Yes". For details, see Define Entitlement Attributes.
>In the line item:
•The available quantity must be more than zero.
•The end date must not be in the past.
 Sentinel RMS-Specific Prerequisites for Activations
>For locked licenses, the locking code of the end user's machine must be available.
>For cloud-served entitlements, the activatee must be specified, and the activatee email must belong to a customer with a customer identifier.
>For on-premises entitlements using Flexible License Model, where the value of Deployment Mode is On-premises, License Version is 21 (or later), and Cloud Usage is Yes, a customer must be specified for an entitlement before the entitlement can be activated.

Sentinel LDK-Specific Prerequisites for Activations
Installation prerequisites to enable end users to perform self-service, online activation through the Sentinel EMS customer portal:
>The Sentinel Run-time Environment must be installed on the end user computer. To achieve this, distribute Sentinel Run-time Environment together with your application. For example, your application might call the Sentinel Run-time Environment installer. For instructions, see Sentinel LDK Installation Guide. For the minimum required Sentinel Run-time Environment version, see the RTE and Sentinel EMS Integration section in the Sentinel LDK with Sentinel EMS Release Notes.
>Sentinel EMS must be configured to work with Sentinel Admin Control Center as described below:
a.Open Sentinel Admin Control Center (http://localhost:1947).
b. In the Sentinel Admin Control Center > Options area, click Configuration.
c.In the Configuration for Sentinel License Manager page, click the Network tab.
d.In the EMS URL area, add the domain for Sentinel EMS. (Do not include a trailing "/" at the end of the URL.)
Example: http://localhost:8080/ems
e.Click Submit.
Installation prerequisites to activate or update a product using a C2V file:
>
This applies to updating all key types—Sentinel HL and Sentinel SL (including CL).
>You must have access to the C2V file that was generated on the end user's machine.
Activation Status
The Status attribute for an activation can be one of the following:
>Activated: The line item is activated. License was generated.
>
![]() Renewed: The activation is renewed.
Renewed: The activation is renewed.
>
![]() Revocation in Progress: The revocation process has started. The permission ticket was generated.
Revocation in Progress: The revocation process has started. The permission ticket was generated.
>
![]() Revocation Confirmation Pending: The revocation receipt was uploaded. Confirmation from the software vendor is pending.
Revocation Confirmation Pending: The revocation receipt was uploaded. Confirmation from the software vendor is pending.
>
![]()
![]() Revocation Confirmed: Revocation completed or synced successfully. The revoked quantity is deducted from the Activated Quantity and returned to the Available Quantity of the entitlement, ready for reuse.
Revocation Confirmed: Revocation completed or synced successfully. The revoked quantity is deducted from the Activated Quantity and returned to the Available Quantity of the entitlement, ready for reuse.
>
![]()
![]() Rehosted: The activation is rehosted.
Rehosted: The activation is rehosted.
>![]() Activation in Progress: The license generation is pending from the cloud. This state is applicable only for the Connected (Cloud LM) mode.
Activation in Progress: The license generation is pending from the cloud. This state is applicable only for the Connected (Cloud LM) mode.
>![]() Renewal in Progress: The license renewal is pending from the cloud. This state is applicable only for the Connected (Cloud LM) mode.
Renewal in Progress: The license renewal is pending from the cloud. This state is applicable only for the Connected (Cloud LM) mode.
NOTE
![]() The search for expired licenses and licenses available for renewal is available only from the Sentinel EMS REST API reference.
The search for expired licenses and licenses available for renewal is available only from the Sentinel EMS REST API reference.
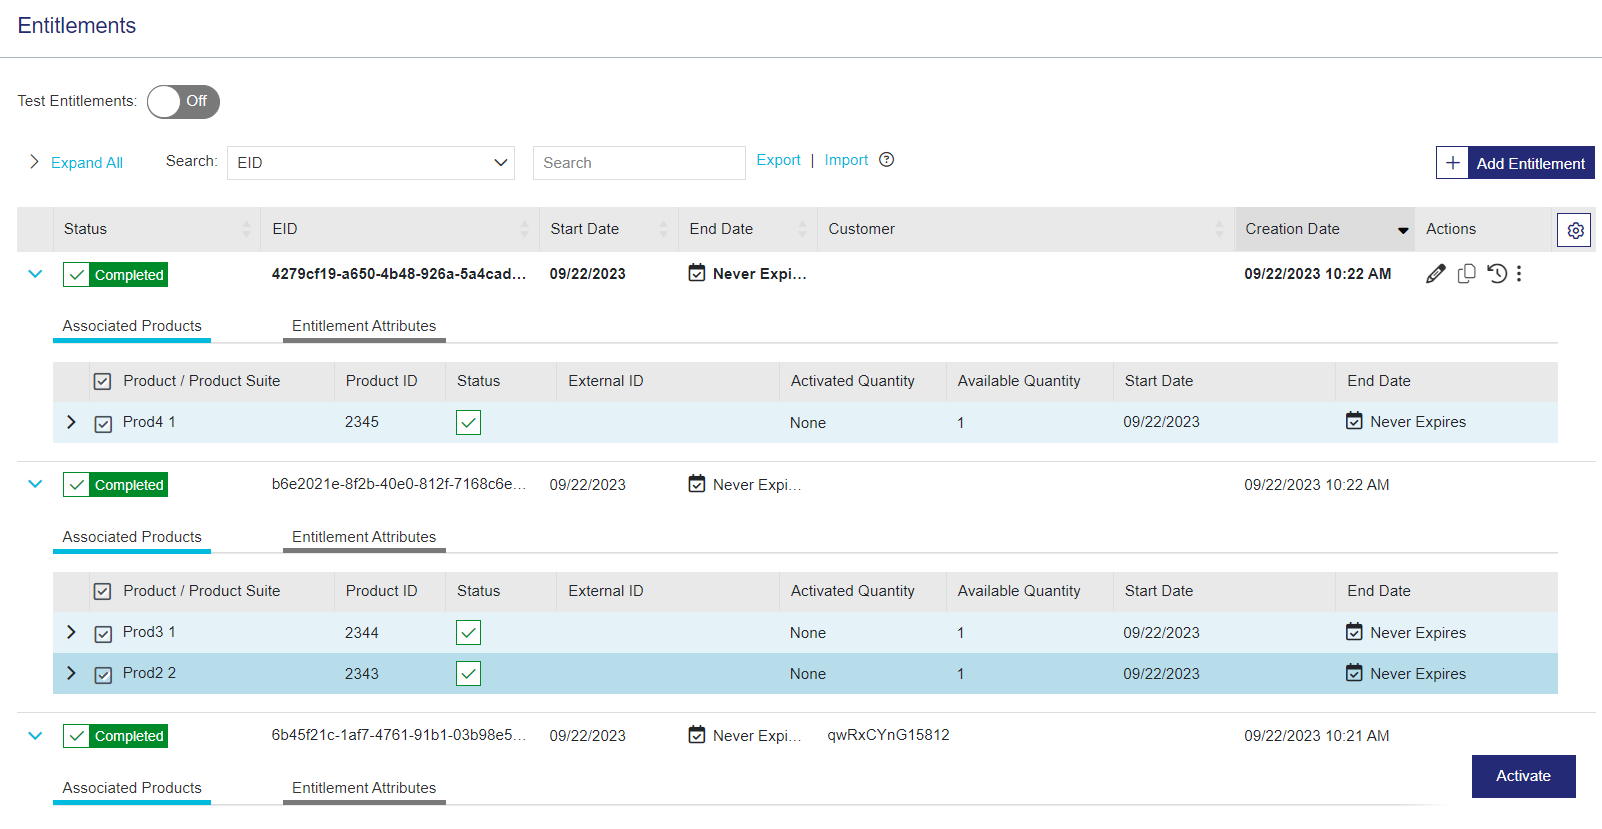
Activating a Product
You can activate products
To activate a product:
1.Navigate to the Entitlements page.
2.Select and expand the entitlement that you want to activate.
3.Select the line items of the entitlement that you want to activate.
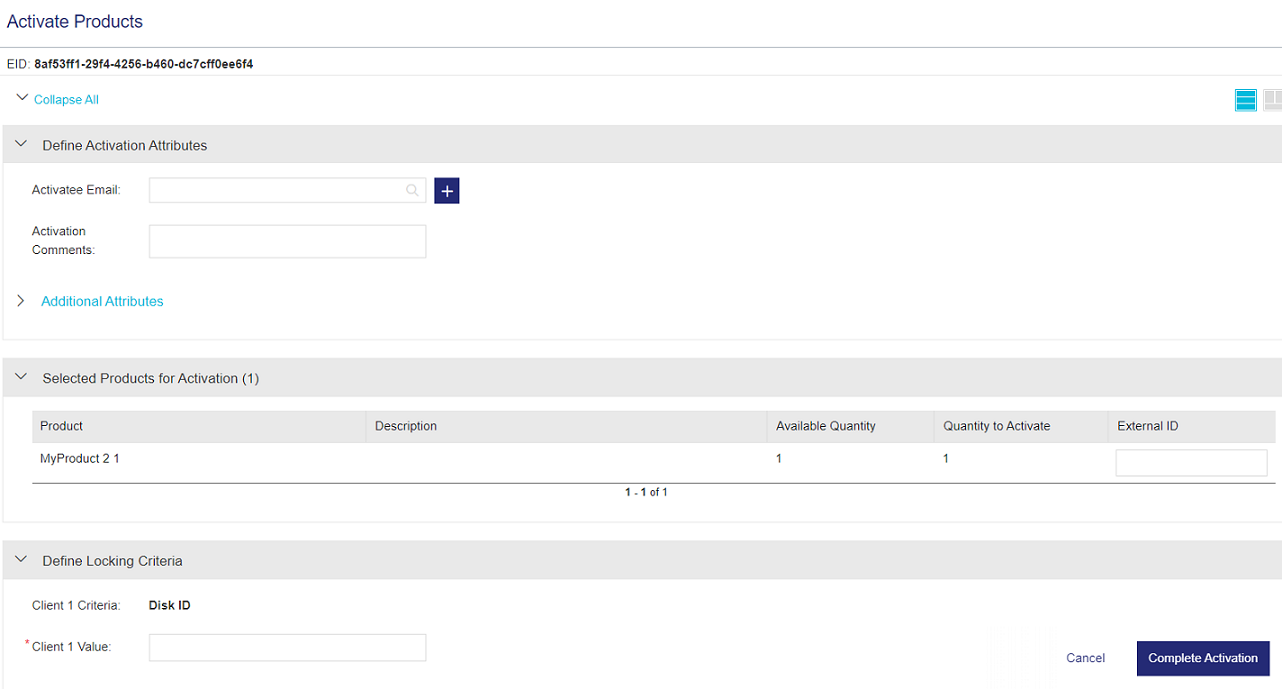
4.Click Activate. The Activate Product page appears as shown:
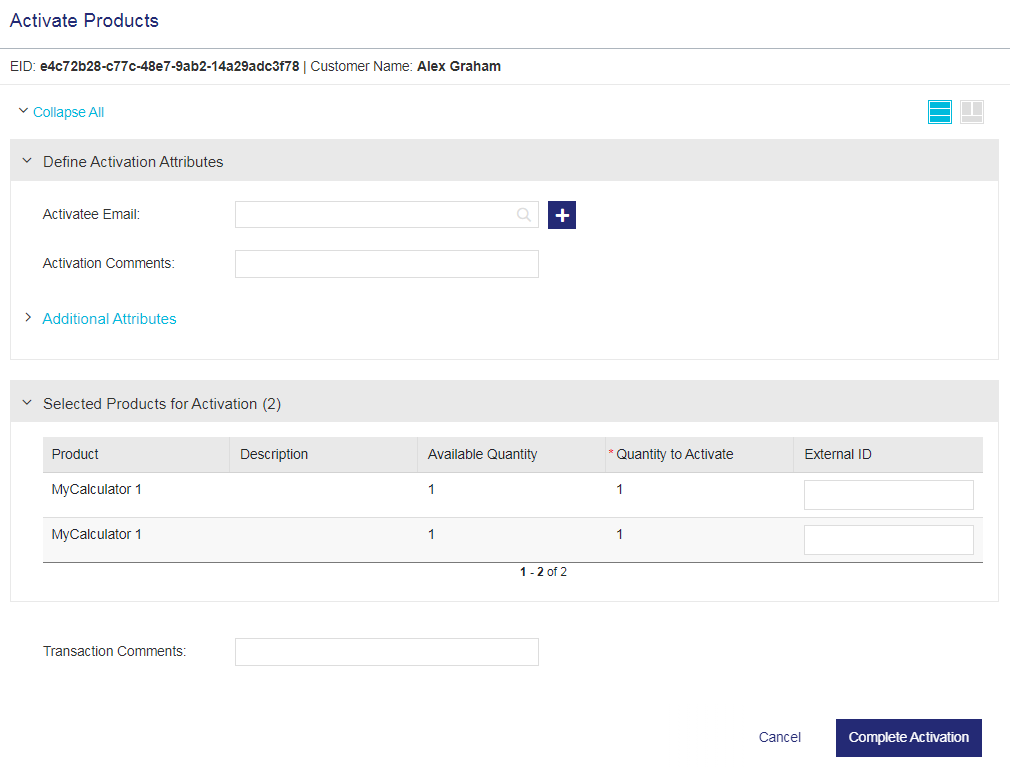
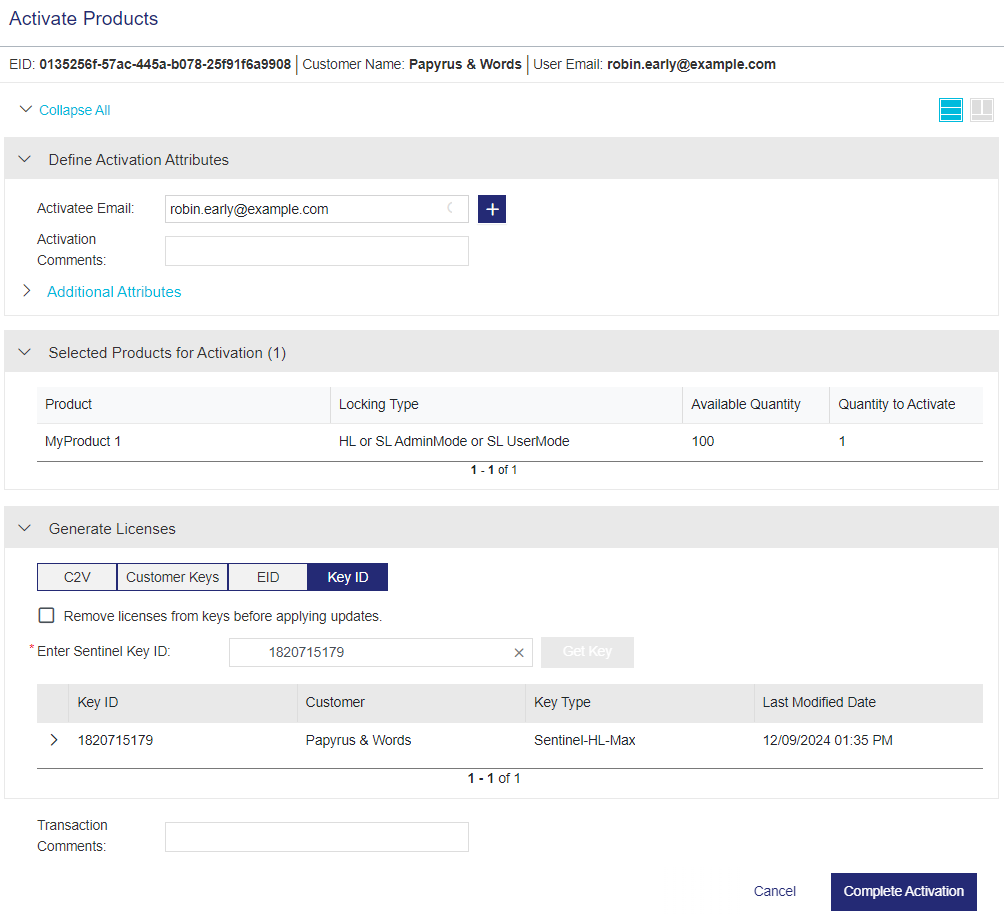

5.In the Define Activation Attributes pane, specify the Activation Attributes. For details, see Define Activation Attributes.
6.
![]()
![]() In the Selected Products for Activation pane, specify the product attributes, such as Quantity to Activate, the Variant name (relevant only for versionless products), and External ID, if any. For details, see Define Product Attributes.
In the Selected Products for Activation pane, specify the product attributes, such as Quantity to Activate, the Variant name (relevant only for versionless products), and External ID, if any. For details, see Define Product Attributes.
7.
![]() In the Define Locking Criteria pane, specify the Locking Criteria. For details, see Define Locking Criteria.
In the Define Locking Criteria pane, specify the Locking Criteria. For details, see Define Locking Criteria.
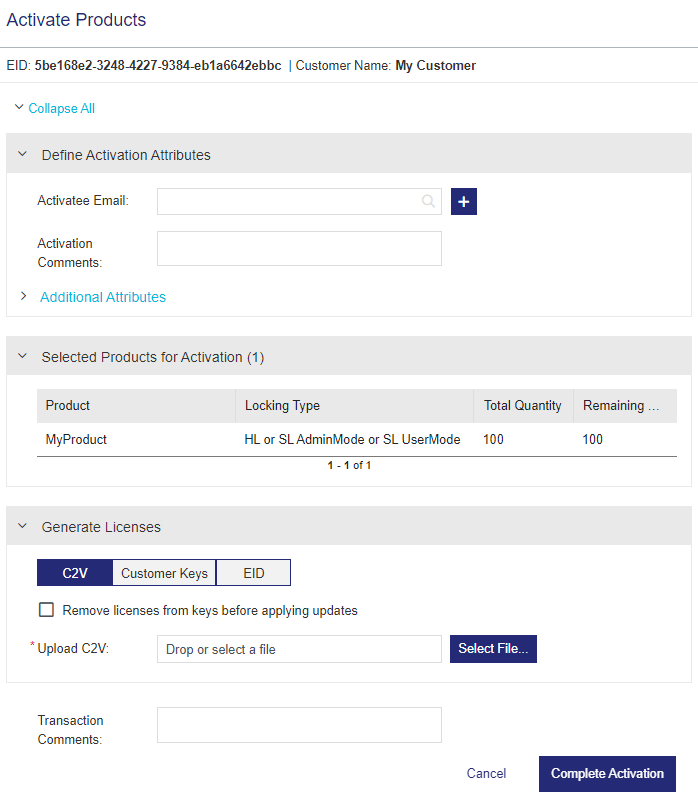
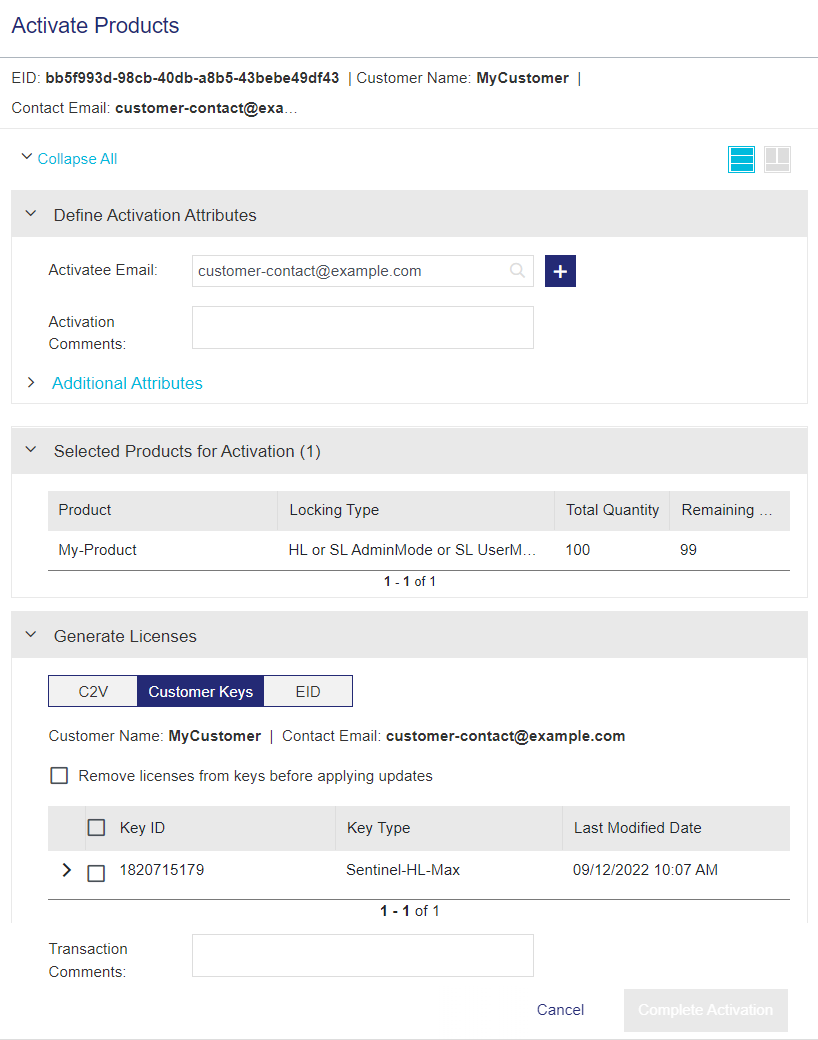
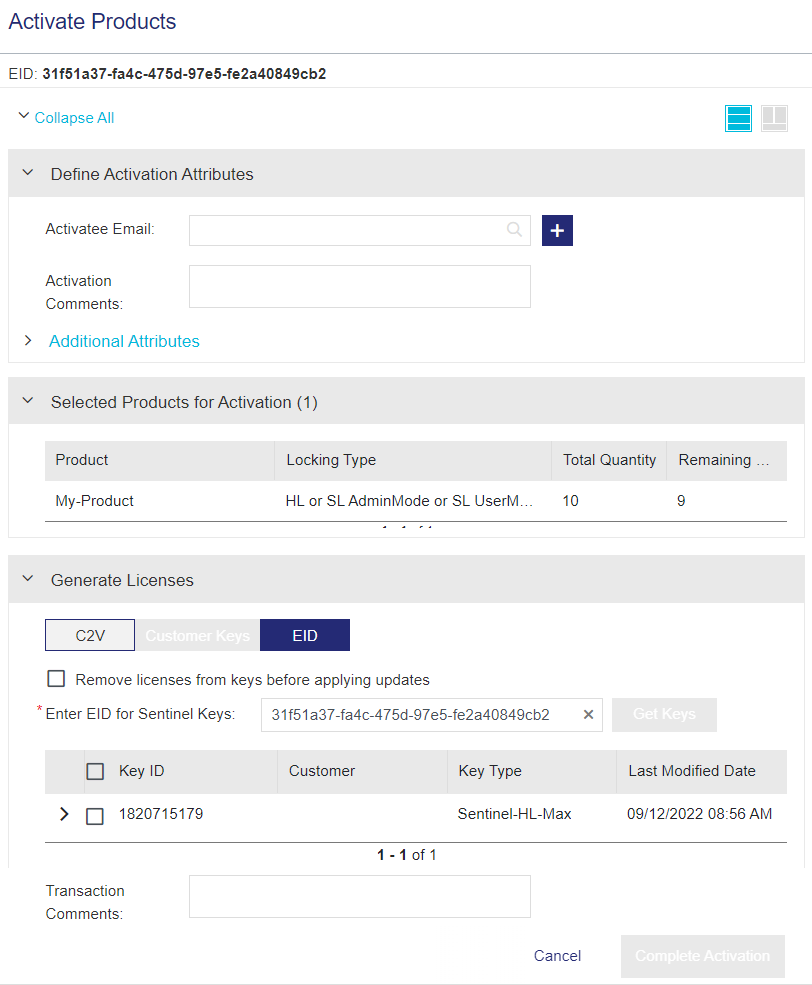
8.
![]() In the Generate Licenses pane:
In the Generate Licenses pane:
a.Select C2V, Customer Keys, EID, or Key ID, depending on how you want to activate the selected products.
| If you selected... | Do this... | Useful if... | ||||
|---|---|---|---|---|---|---|
| C2V |
In the Upload C2V box, specify the location of the C2V file received from the customer. You can drag and drop the C2V file or browse to and select the file. The selected C2V file is displayed as "C2V" (not the C2V file name). |
You have access to the C2V file for the customer's machine. | ||||
| Customer Keys |
Select one or more Sentinel keys for which you want to activate the products. You can expand each line item to view the associated products, associated memory files, and key attributes. For details on any of these properties, see Sentinel Key Attributes. When you select a customer key, the Complete Activation button is enabled. |
The entitlement is assigned to a customer, and you do not have access to the C2V file for the customer's machine, or you prefer to use Sentinel keys to generate a license. This option is available only if the entitlement is assigned to a customer and at least one Sentinel key is associated with that customer. |
||||
| EID |
|
The entitlement is not assigned to a customer, and you do not have access to the C2V file for the customer's machine, or you prefer to use Sentinel keys to generate a license. This option locates the Sentinel keys that are already associated with the entitlement. This enables you to activate products in entitlements that use other attributes, such as External ID, Ref ID, or User Email, to link entitlements to customers whose details are stored in an external system, for example. |
||||
|
Key ID |
Enter the ID for the Sentinel key for which you want to generate licenses. Then click Get Key. The data is populated in the grid, and you can expand the key to view the associated products and features, associated memory data, and the attributes of the key. |
You know the Sentinel key ID for which you want to generate license updates. For example, suppose a channel partner contacts you asking to create an entitlement update for one of their customers. If the channel partner shares the Sentinel key ID with you, you can update the entitlement and then activate the updated entitlement to generate the updated license. You can then share the V2CP file with the channel partner, who forwards this file to their customer. The customer can then apply the license update locally. This sample scenario might include the following steps: 1.The channel partner activates the original entitlement for their customer using the Sentinel EMS customer portal. They then apply the license to a Sentinel HL key using the resultant V2CP file and subsequently send the Sentinel HL key to the customer. 2.After using the license for almost a year, the customer contacts the channel partner asking to extend their license for another year. 3.The channel partner asks the customer for their Sentinel key ID and passes this information to you, so that you can create an entitlement update and generate an updated license for them. 4.You activate the entitlement update using the Sentinel key ID that you received from the channel partner, and send the generated V2CP file to the channel partner with the updated license. 5.The channel partner forwards the V2CP file to their customer who then applies the updates to their Sentinel HL key. |
b.(Optional) Select the Remove licenses from keys before applying updates checkbox to clear any pre-existing licenses from the selected keys. This might be useful, for example, if features or products have been discontinued. This option does not clear data from the key memory. When this checkbox is selected, any pre-existing products on the key are updated according to the entitlement. For example, if Apply License is set to Add or Overwrite, then the license attributes are added or overwritten accordingly instead of being removed. For details, see Apply License.
6.Click Complete Activation to activate the product and generate the license certificate.
Define Activation Attributes
You define the activation-related attributes in the Define Activation Attributes pane.
(This section describes how to define activation attributes when activating a product. To view the list of attributes that are included after a license is successfully activated, see Viewing Activation Attributes.)
| Attribute | Description | Required/Optional | Valid Values | |
|---|---|---|---|---|
| Activatee Email |
Email address of the user (individual or customer) who is responsible for or performs the activation. You can click
|
Required only for the following: >When User Registration is set to Mandatory in an entitlement. >
See also: Who is an Activatee? |
>A valid email address >Cannot contain: spaces and \ () [] : ; “ <> >Cannot start with a '.' >Cannot contain double .. >Cannot contain double @@ >
|
|
| Activation Description |
Description to include in the activation. ( |
Optional |
Maximum: 500 characters |
|
|
|
The time zone specified for this activation. By default, the start date and the end date of a license belonging to a customer are calculated according to the customer's time zone. You can specify another time zone to override the existing customer time zone. For example, the license being generated may require a different validity period than the one specified by the existing customer time zone. The activation time zone overrides the customer time zone and the licenses are generated accordingly. This change is limited to the current activation and does not modify the time zone specified for the customer. |
Required | For a list of time zone values, refer to the Sentinel EMS REST API Guide. | |
| Send Notification | Sends a notification to the user email defined in the entitlement after activation. | Required | Yes OR No | |
Define Product Attributes
You define the product quantity-related attributes in the Selected Products for Activation pane.
| Enforcement | Attribute | Description | Required/Optional | Valid Values |
|---|---|---|---|---|
|
|
Variants (only for versionless products) |
Variant of the versionless product is selected to specify the version to activate. Depending on the selected variant, the system displays the locking attributes. | Required |
Select from the list of variants of the versionless product. |
|
|
Quantity to Activate |
The quantity to activate. > >
Depending on the activation method defined in the entitlement, the following occurs after activation: >Fixed: •
•
>Unlimited: After activation, the remaining quantity is "Unlimited". >Partial: After activation, the remaining quantity is the total available quantity minus the quantity specified in this field. >Full: After activation, the remaining quantity is zero. You can activate a line item of an entitlement only once.
For more information, see Renewing Line Items and Renew License action. |
Required |
|
|
|
External ID |
External reference identifier that uniquely identifies the line item in an external system. |
Optional |
>8 to 60 characters >Alphanumeric >Must be unique |
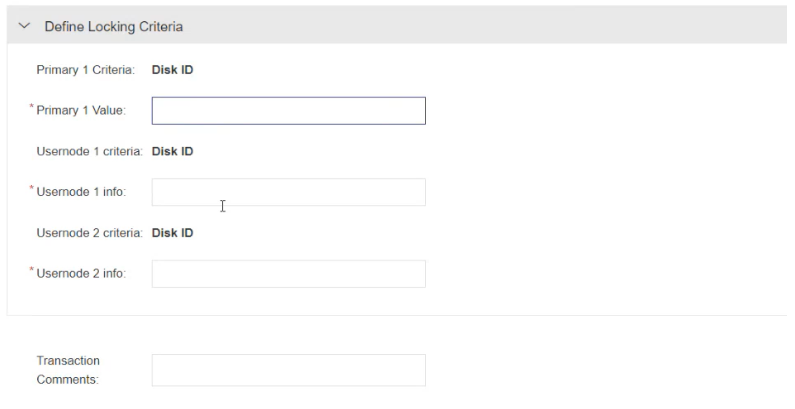
 Define Locking Criteria
The displayed locking criteria depends on the license model and Sentinel EMS configuration settings.
Enter the hexadecimal locking codes of the end user's machine against the locking criteria. Similar locking criteria are not repeated. Sentinel EMS supports the following types of license locking: client locked, server locked, and client-server locked.
| Enforcement | Attribute | Description | Required/Optional | Valid Values |
|---|---|---|---|---|
|
|
Device |
The device being associated can be: >New: A new device name for the locking information to associate the activation. >Existing: An existing device to associate with the activation. See Device-Friendly Name for more information. |
Required |
New OR Existing |
|
|
Device Name |
The friendly representation of the locking information of a device. Enter at least the first character of the device name to search for an existing device. See Device-Friendly Name for more information. |
Required |
>4 to 255 characters >Must be unique for an activatee |
|
|
Device Fingerprint | The unique identifier for the device. | Required | Device fingerprint |
|
|
Device Enabled | When using Sentinel Fit, the device is always activated for use with the licensed software. | N/A | True |
Activating and Revoking Product Bundles
You activate and revoke licenses for products in product bundles as described in Activating a Product. When doing so, consider the following:
>Packaged product bundles:
•Activation: You must activate all products at the same time.
•Revocation: You can revoke products separately, but you must first revoke all products before you can activate the products in the product bundle again.
>Discrete product bundles:
•Activation: You can activate individual products independently or all at once.
•Revocation: You can revoke individual products separately.
For more information, see Activation.
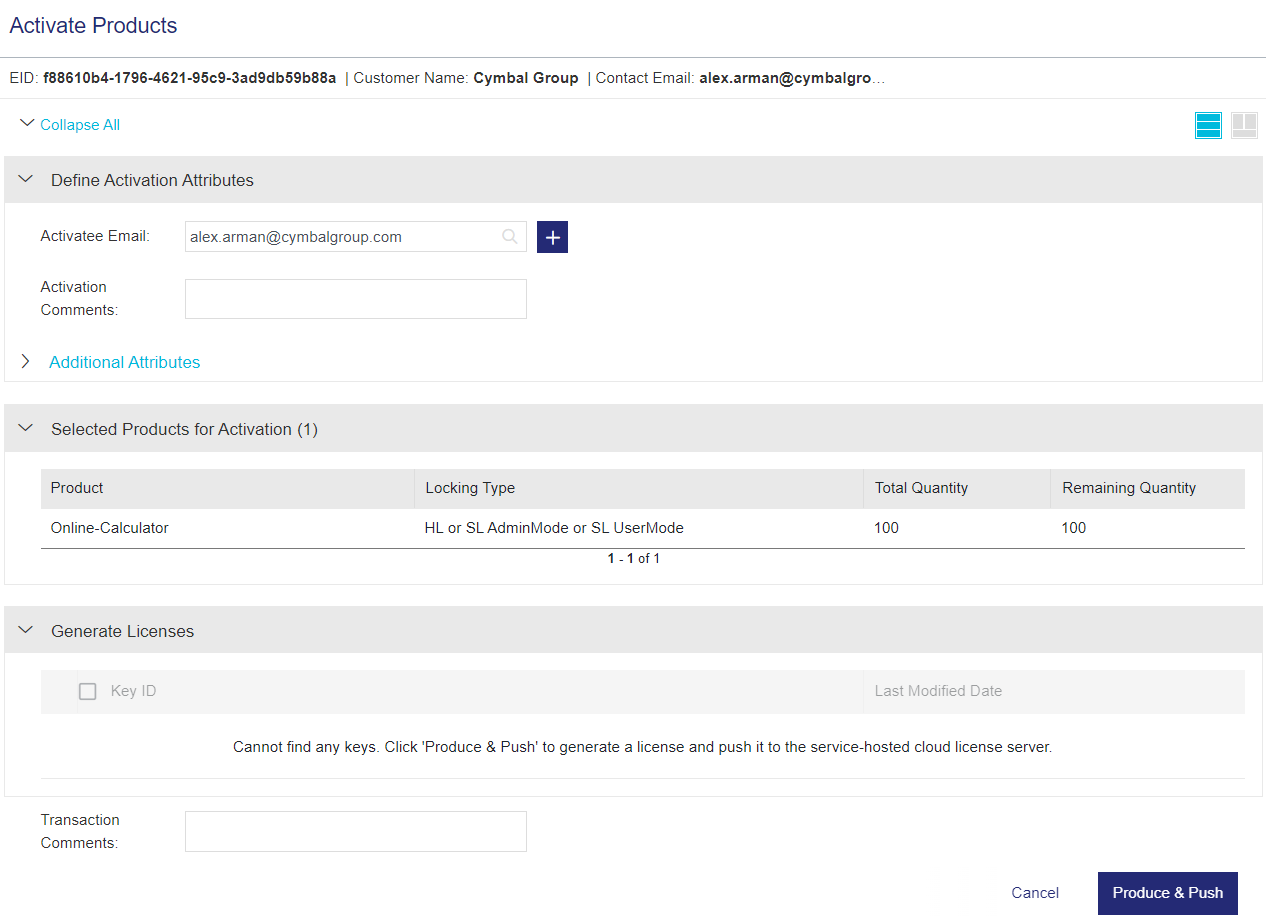
Produce and Push
When you activate products using produce and push, you generate a cloud license and push the license to the Thales service-hosted, cloud license manager server in a single step.
After produce and push is performed, the vendor or the customer's administrator user can create machine accounts for end users, so that end users can access the protected application as soon as they receive their unique identity credentials and the protected application.
On the Sentinel EMS customer portal, a customer's administrator user can create and manage machine accounts for end users, view the list of activated products, and manage the list of registered machines on which each end user can access protected applications. The vendor can also perform these tasks on the Sentinel EMS vendor portal.
Each time you use produce and push, a single activation is performed. The activation is then deducted from the total quantity.
Prerequisites for Produce and Push
>Sentinel LDK CL must be available to Sentinel EMS. For details on the various ways to consume cloud licenses that are produced and pushed, see User-Based Licensing and Machine Accounts.
>The entitlement must:
• Be assigned to a customer. For details, see Customers.
•Include a customer's administrator user that is associated with that customer. Required only if you plan to delegate user-based licensing or machine account management to the customer via the Sentinel EMS customer portal. For details, see Users.
>The products in the entitlement must:
•Use one of the SL_AdminMode locking types. For details, see Locking Type.
•Include features whose license model supports concurrency on a network and specifies the required number of concurrent instances. For details, see Configure License Model and Sentinel LDK Enforcement - License Models.
To activate products using Produce and Push:
1.Navigate to the Entitlements page.
2.Select and expand the entitlement that you want to activate.
3.If the entitlement is not configured as Entitlement as a Whole, then select the product line items that you want to activate. Otherwise, skip to the next step.
The Produce & Push button is enabled if the Locking Type is one of the Sentinel SL AdminMode key types.
4.Click Produce & Push. The Activate Products page opens.
5.In the Define Activation Attributes pane, modify the attributes if needed.
If the customer's administrator user is associated with this customer (recommended), then the Activatee Email value is pre-populated with the email address of the user that handles User-Based Licensing or Machine Accounts for this customer. For details, see User Type. You can modify or remove the email address from this box if needed.
6.In the Define Product Attributes pane, specify the quantity to activate if needed.
7.In the Generate Licenses pane, do one of the following:
•If this is the first time that you are generating a CL key using produce and push, a message in the Generate Licenses pane informs you that there are no CL keys yet for this customer.
Click Produce & Push. The CL key is generated and pushed to the Thales service-hosted, cloud license manager server. You can see the newly added key in the Activation Details area, which displays the status of the key and the key ID.
•If produce and push was performed at least once, then the Generate Licenses pane lists the generated CL keys.
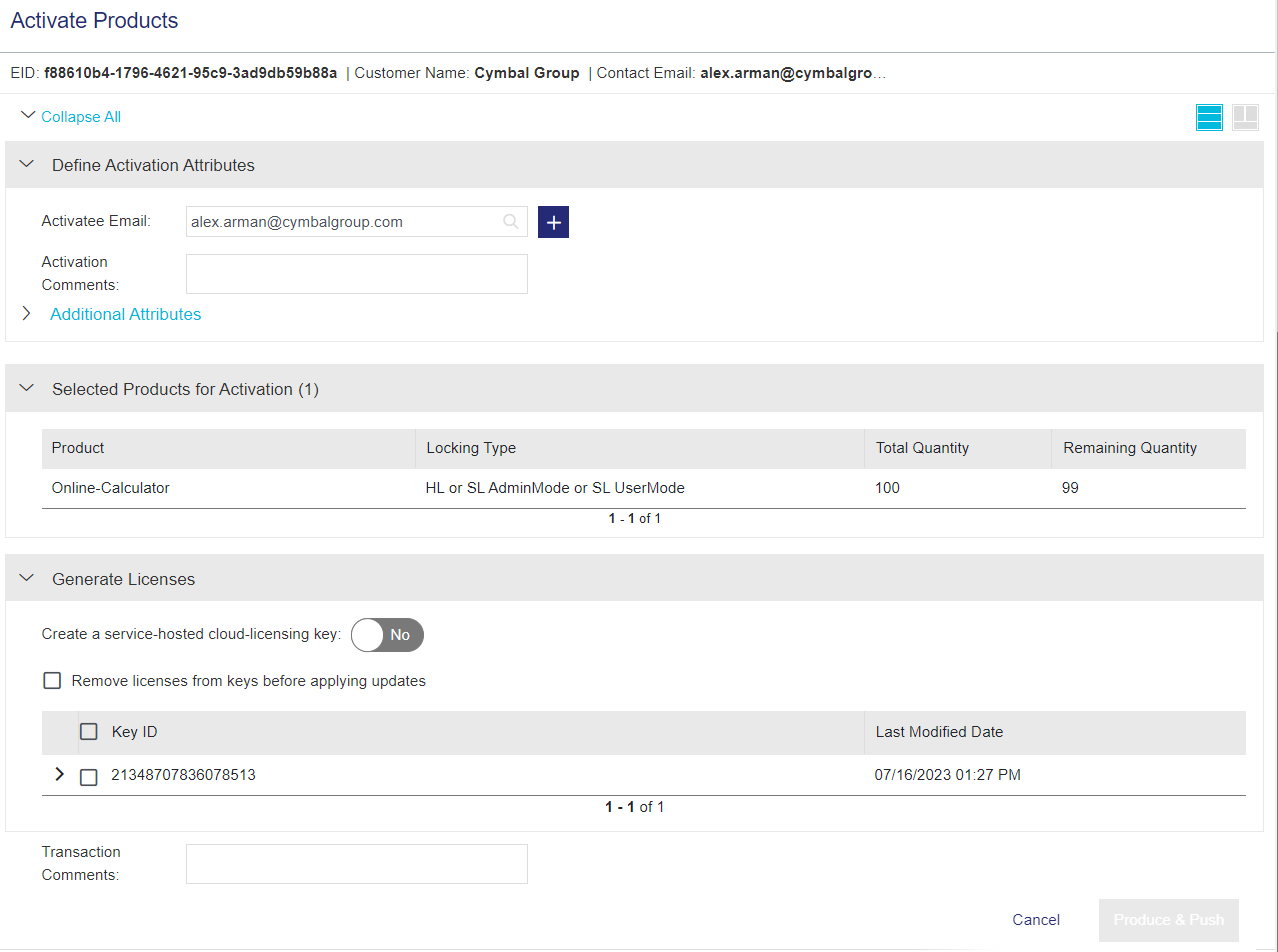
Do one of the following:
Apply the license to the existing key. (Generally, only one key is required per customer. If you see multiple keys, you can apply the updates to all relevant keys.)
i. Select the required key. You can expand each line item to view the associated products, associated memory files, and key attributes. For details on any of these properties, see Sentinel Key Attributes.
ii.(Optional) Select the Remove licenses from keys before applying updates checkbox to clear any pre-existing licenses from the selected keys. This might be useful, for example, if features or products have been discontinued. This option does not clear data from the key memory. When this checkbox is selected, any pre-existing products on the key are updated according to the entitlement. For example, if Apply License is set to Add or Overwrite, then the license attributes are added or overwritten accordingly instead of being removed. For details, see Apply License.
iii.Click Produce & Push. The CL key is updated and pushed to the Thales service-hosted, cloud license manager server.
Otherwise:
Only if required, set Create a service-hosted cloud-licensing key to Yes to create another CL key. Although you can create multiple CL keys for the same customer, we recommend that you create a single CL key for each customer for ease of maintenance.
8.Click Done. If the activatee email address was provided, then a license certificate is sent to the activatee. The license certificate email does not include a license string because the license is applied automatically without the need for user input. Instead of a license string, the end user's machine can access the cloud license directly using the installed identity credentials.
The generated key is displayed on the Activations page. Navigate to the Sentinel Keys page to view the key and check its status. If you do not know the key ID, you may want to search by customer to locate the key. Keys are pushed asynchronously, so, rarely, there may be a delay, which is indicated by the Out-of-Sync status. ![]() Synchronize button in the Actions column.
Synchronize button in the Actions column.
9.(Optional) You or the customer's administrator user can now create a machine account to notify the end user that the protected application containing the activated products is available for use. For details, see Machine Accounts.
Burning a Product Key
You can write (burn) an entitlement to connected Sentinel HL keys.
Prerequisites for Burning a Key
>Sentinel Run-time Environment (RTE) must be installed on the computer on which you are burning the key. For instructions, see Sentinel LDK Installation Guide. For the minimum required Sentinel Run-time Environment version, see the RTE and Sentinel EMS Integration section in the Sentinel LDK with Sentinel EMS Release Notes.
>
>Sentinel EMS must be configured to work with Sentinel Admin Control Center as described below:
a.Open Sentinel Admin Control Center (http://localhost:1947).
b. In the Sentinel Admin Control Center > Options area, click Configuration.
c.In the Configuration for Sentinel License Manager page, click the Network tab.
d.In the EMS URL area, add the domain for Sentinel EMS. (Do not include a trailing "/" at the end of the URL.)
Example: http://localhost:8080/ems
e.Click Submit.
To burn a Sentinel HL key:
1.Navigate to the Entitlements page.
2.Select and expand the entitlement that you want to activate.
3.Select the line items that you want to activate. If the Locking Type is one of the Sentinel HL key types, the Burn Key button is enabled.
4.Click Burn Key. The Activate Products page opens.
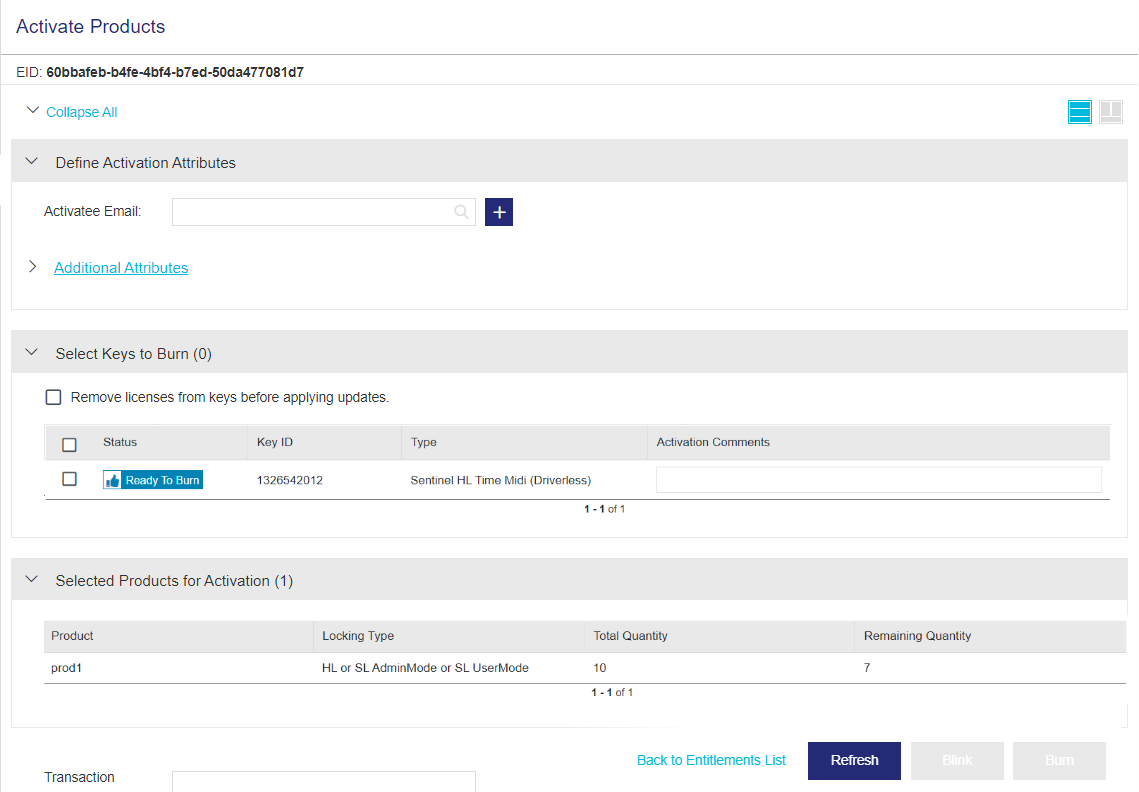
5.In the Define Activation Attributes pane, modify the attributes if needed.
6.In the Select Keys to Burn area:
a.Select the required keys.
–If the required keys are not listed in the Select Keys to Burn pane, click Refresh to display them.
–To locate keys that are connected to your machine, click Blink. The LED of the selected keys blinks for five seconds.
b.(Optional) In the Activation Description box, enter a description (up to 500 characters).
c.(Optional) Select the Remove licenses from keys before applying updates checkbox to clear any pre-existing licenses from the selected keys. This might be useful, for example, if features or products have been discontinued. This option does not clear data from the key memory. When this checkbox is selected, any pre-existing products on the key are updated according to the entitlement. For example, if Apply License is set to Add or Overwrite, then the license attributes are added or overwritten accordingly instead of being removed. For details, see Apply License.
7.In the Define Product Attributes pane, specify the quantity to activate if needed.
8.Click Burn. The entitlement is written to the Sentinel HL key and the production totals (Total Quantity and Remaining Quantity) are updated. The key is marked as Burned.

 Activating Variants in Dynamic Entitlements for Versionless Products
A versionless product is a "container" for one or more variants. When you activate a dynamic entitlement containing a versionless product, you select the required variant from the list of available variants for that versionless product and then activate that variant.
When activating a variant for a versionless product:
>In the Selected Products for Activation section, you select a variant when activating a versionless product, as shown below. To expand the list, click in the field or press the space bar.

>Supported activation methods for variants: Fixed, Partial, or Full
•
![]() Cloud-served connected licenses: Fixed
Cloud-served connected licenses: Fixed
•
![]() Redundant lease licenses: Full
Redundant lease licenses: Full
>Depending on the selected variant, the system displays the relevant attributes.
>Whenever a new feature is added to a deployed versionless product, a new license certificate is generated after entitlement activation.
>There is no pre-allocated quantity defined for a variant. A quantity limit is allocated as a whole for the versionless product and can be used to activate any of its variants. Therefore, the quantity of licenses that are activated for a variant is determined by the customer and the activation method.
>After revoking a license for a variant, the customer can reallocate the quantity freed to activate another variant.
>With changing requirements, new variants can be created independently and made available to the customer in an existing entitlement for activation. This is also known as future key activation.
Future Key Activation
To quickly adapt to ever changing business requirements, software vendors must often add new features to existing products and entitlements. To future-proof the business, vendors can leverage the future key activation process to accommodate additional features into future activations, without having to issue new entitlements. If a new feature is added to a variant after an initial activation, then all future activations of the same versionless entitlement will automatically include the additional feature.
This enables you to incrementally add and deliver new features to the customers without generating the new entitlements. A future key helps accommodate the missing features into the license.
Activating Multiple Line Items in a Single Entitlement
You can activate more than one line item in an entitlement simultaneously.
To activate multiple line items in a single entitlement:
1.Navigate to the Entitlements page.
2.Expand a completed entitlement. Under Associated Products, select the checkboxes for the line items that you want to activate together.

•All line items must be activated together for:
–Entitlements where Entitlement as a Whole is set to "Yes"
–
![]() Cloud-served entitlements
Cloud-served entitlements
•Multiple line items must have the same locking
3.Click Activate.
4.In the Activate Product Keys page, enter the Activatee Email and other activation attributes as required. For more information, see Define Activation Attributes.
5.Click Complete Activation.
Activating Multiple Line Items Across Entitlements
You can activate multiple entitlements simultaneously by activating multiple line items across several entitlements. When you activate multiple entitlements simultaneously, all license strings can be sent to a specified email address.
Prerequisite: The Multiple Entitlement Activation property must be enabled in the Administration Console.
NOTE
![]() If the Sentinel LDK enforcement is also available in your Sentinel EMS instance, make sure to disable the Multiple Entitlement Activation property in the Administration Console before activating entitlements that use Sentinel LDK.
If the Sentinel LDK enforcement is also available in your Sentinel EMS instance, make sure to disable the Multiple Entitlement Activation property in the Administration Console before activating entitlements that use Sentinel LDK.
Support information: Not supported for versionless products, lease entitlements, and cloud-connected entitlements.
To activate multiple line items across entitlements:
1.Navigate to the Entitlements page.
2.Expand a completed entitlement. Under Associated Products, select the checkboxes for the line items in the entitlements that you want to activate together.
3.At the bottom of the screen, click Activate.
4.If multiple locking criteria are specified for the selected line items, select a single locking criterion in the message box that opens.
5.In the Activate Product Keys page that opens, enter the Activatee Email and other activation attributes as required. For more information, see Define Activation Attributes.
6.Click Complete Activation.
Activating Lease Entitlements
After a lease entitlement is created and marked as completed, it can be activated using the Sentinel Cloud Plug-in (SCP).
SCP integrates with the Sentinel RMS components to provide cloud licensing capabilities. For more information on SCP, refer to the Sentinel Software and Services Solution Guide.
Following are the important points to remember while activating lease entitlements:
>You can activate a line item of a lease-based entitlement only once if its Activation Method is Full. Renewing the license to increase the quantity and adding a new fingerprint will not allow you to consume the additional quantity.
>A tolerance of 15 minutes is provided for the activation of lease-based entitlements to bridge the time gap of the client machine time that might be set ahead of the license server machine time.
For example, suppose a client machine time is 2:40 PM 10th June, and the license server time is 2:30 PM 10th June. In this case, without the tolerance time, a lease-based license fetched for the client machine will have the start time of 2:40 PM, and the license server will not load the license string as the license is considered to be a future-dated license. The tolerance time of 15 minutes is subtracted from the activation start time to ensure that the license fetched for the client machine has a valid start time and the license server generates a license string for it.
> If you switch between variants on the same machine by revoking the activation of a lease-based entitlement for one variant and then reactivating that lease-based entitlement for another variant, you may need to provide a unique fingerprint Friendly Name value.
Future Key Activation
Future start date activation can be performed for line items of lease-based entitlements. Future start date activation means that line items can be activated before line item start date. This includes renewed line items. A customer who has renewed a license can activate it as soon as it is renewed and does not have to wait until the start date of the renewed line item.
An example of future key activation for lease-based entitlements is given below:
If a leased-based license has a duration of 90 days and the following line item details:
|
Product Name: Product A Start Date: 1 Jan 2020 Lease Duration: 90 Days |
|
| Feature Name | Start Date |
| Feature 1 | 1 March 2020 |
| Feature 2 | 1 July 2020 |
So, if 1 January 2020 is the current date and a lease is requested on the current date, then:
>Feature 1 can be consumed because its start date, 1 March 2020, lies between 1 January 2020 + 90 Days (lease duration)
>Feature 2 cannot be consumed because its start date, 1 July 2020, does not meet the lease duration window from the current date.
Future start date activation enables you to incrementally add and deliver new features to the customers without generating the new entitlements. After renewal, a future key helps accommodate the missing features into the license.
Activating Connected Entitlements for Cloud LM (License Manager) Deployment
You can activate a connected entitlement or Cloud LM Deployment using the Sentinel EMS vendor portal. For details, see Activating a Product. A customer's administrator users can also activate their connected entitlements for Cloud LM Deployment using the customer portal. After an entitlement is activated, the license is deployed on the cloud and is available for consumption.
Consumption of a Connected License Deployed on Cloud LM (License Manager)
A customer needs an active internet connection and an authorization (auth) token to consume the connected licenses deployed on cloud LM. Sentinel EMS enables customers to manage access to these authorization (auth) tokens using registration tokens. After activation, you or a customer's administrator user can create these tokens for customers, who can make them available to all their licensed application consumers of a connected license. When a connected license is being consumed, it creates a session. These sessions can be managed by a customer's administrator user using the customer portal. For more details, see the
Activating On-premises Entitlements Using Standard Locking Codes and Fingerprints
As a software vendor, you can provide locking information for your on-premises deployments by providing either the fingerprint or locking code values. The following table provides a comparison between the two methods.
Comparison Between The Standard Locking Code and Fingerprint Methods
| Comparison Parameters | Fingerprint-based Method | Locking Code-based Method |
|---|---|---|
| Format |
An XML file containing the actual values of the various machine identifiers (known as the locking criteria), such as disk ID, host name, Ethernet address and serial number. |
A string computed using the fingerprints of the chosen machine identifiers (known as the locking criteria), such as disk ID and serial number. |
| Modifications |
The collection of fingerprints of the various locking criteria is a one-time activity. The fingerprint data does not change unless an underlying machine component is added or removed. |
The locking code value changes when different locking criterion is chosen. So, the locking code value needs to be generated again on the same machine on the customer's end. |
| Supported deployment types | The fingerprint-based method is also used for activating entitlements for lease deployments. Hence, it provides a familiar user experience to customers dealing with both types of deployments—lease and on-premises. | The locking code-based method is only used for on-premises deployments. The method is also referred to as the standard locking for activation. |
| Setting to decide which method is shown when creating an entitlement or product |
The Fingerprint for On-premises Licenses setting in the Administration Console globally enables or disables the availability of the fingerprint-based method. If needed, you can override the global setting at the entitlement level. |
The locking code-based method is available only if the fingerprint-based method is disabled. |
The fingerprint-based method provides a different workflow for activation as compared to the locking code-based method. The following sections Activating On-premises Entitlements Using Standard Locking Codes and Activating On-premises Entitlements Using Fingerprints provide instructions for activation.
Activating On-premises Entitlements Using Standard Locking Codes
To activate products by specifying locking codes:
1.Navigate to the Entitlements page.
2.Expand a completed entitlement. Under Associated Products, select the checkbox for every line item that you want to activate using a locking code.

3.Click the Activate button. The Activate Products page appears. (If the Multiple Entitlement Activation property in the Administration Console is set to Yes, the Activate button is located at the bottom of the screen instead of under the entitlement.)
4.Enter the Activatee Email, Activation Description, and Additional Attributes (Time Zone and Send Notification). For details, see Define Activation Attributes.
5.In the Define Locking Criteria section, specify the locking code value. The locking code value is generated using the Sentinel RMS utilities (Wechoid or echoid) or an option that calls the corresponding locking code generation API. You may be asked to provide values for more than one locking criterion during product activation, depending on the number of user nodes.
6.Click Complete Activation.
Activating On-premises Entitlements Using Fingerprints
A machine fingerprint is the information collected about a device for the purpose of identification. Using machine fingerprints, the licenses that are obtained for an entitlement can be locked to specific permitted systems including clients, application servers, or both. If the locking information embedded in the license code does not match the system data, then the licensed software fails to run on the system.
Systems can be identified using the machine fingerprint criteria, such as IP address, host name, disk ID, and so on. For greater security and flexibility, licenses can be locked to more than one standard locking criterion.
Following are a few important points when adding and associating fingerprints:
>You can associate the same fingerprint with one or more products in an entitlement.
>When Entitlement as a Whole is specified for the entitlement, the entitlement is treated as a single entity even if it contain several products. For such entitlements, a fingerprint is registered at the entitlement level and not for the individual products.
>Some entitlements include several variants of a single product. For such entitlements, you register fingerprints at the variant level of the entitlement instead of at the product level. You must register a unique fingerprint for each variant of a product.
To activate products by adding and associating a fingerprint:
1.Navigate to the Entitlements page.
2.Expand a completed entitlement. Under Associated Products, select the checkbox for every line item that you want to activate using a fingerprint.

3.Click the Activate button. The Activate Products page appears. (If the Multiple Entitlement Activation property in the Administration Console is set to Yes, the Activate button is located at the bottom of the screen instead of under the entitlement.)
4.Enter the Activatee Email, Activation Description, and Additional Attributes (Time Zone and Send Notification). For details, see Define Activation Attributes.
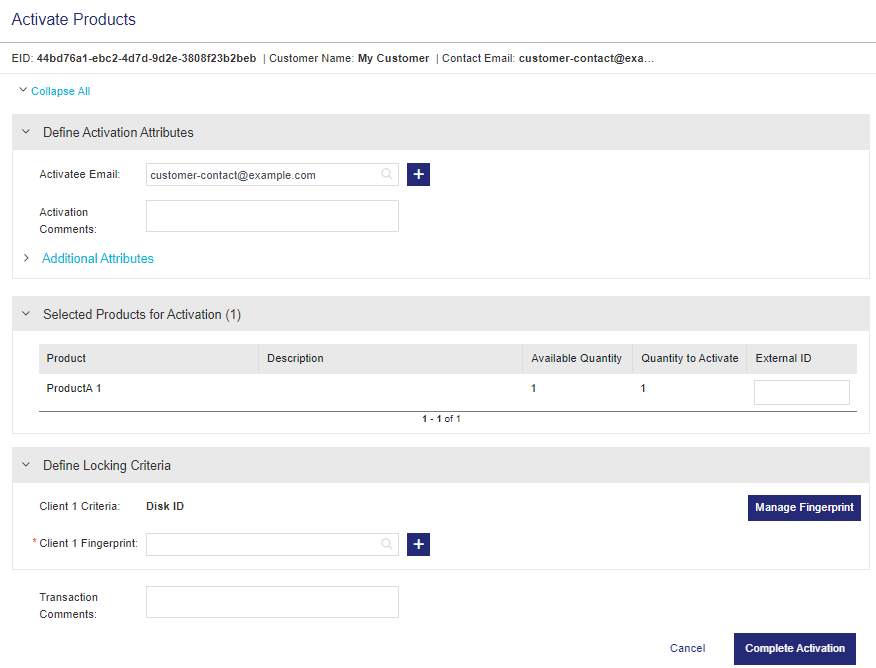
5.On the Activate Products page, under the Define Locking Criteria section, do one of the following:
•If a fingerprint is already associated with the selected product, enter the value in the Fingerprint box. As you start typing, you can select from the list of suggestions that is displayed. Or, press the space bar to obtain a full list of fingerprints.
OR
•Click the Manage Fingerprint button and follow the instructions in Adding and Associating a Fingerprint Using the Manage Fingerprints Option. Then complete the activation. This is useful if you want to associate multiple fingerprints with a product or manage existing fingerprints.
OR
•Click  (Add & Associate Fingerprint) to open the Add Fingerprint dialog box. This is useful if the product is not yet associated with any fingerprint.
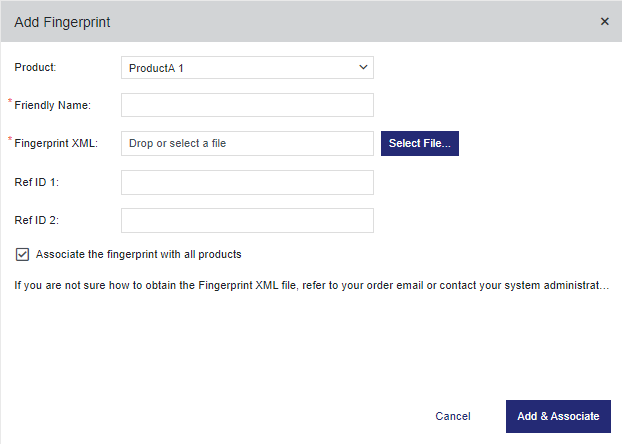
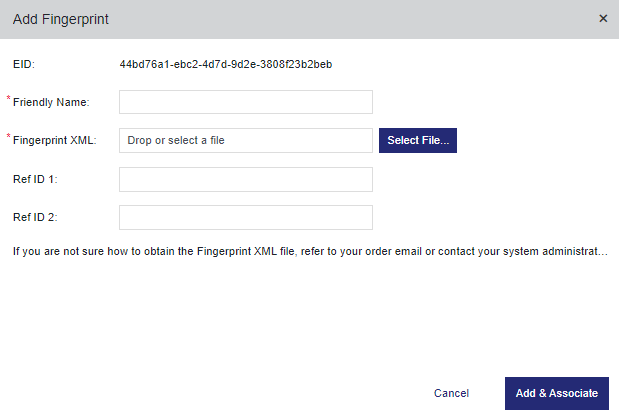
The Add Fingerprint dialog box has different options depending on the entitlement details, as shown in the following examples:
The first example shows the dialog box that is displayed when activating one of several products. You can select a product from the list. (If only one product is being activated, then the product name is shown as read-only.)
If the entire quantity is being activated simultaneously, for example, if only one activation is available or if the entitlement is set to Entitlement as a Whole, then the following dialog box opens:
The following table explains the attributes in the Add Fingerprint dialog box.
| Attribute | Description | Required/Optional | Valid Values | |
|---|---|---|---|---|
|
One of the following: |
Product
|
The name of the product to which you are associating the fingerprint file. If you are activating multiple products at the same time, you can select the relevant product from the displayed list. TIP If you want to apply the same fingerprint file to all of the products being activated simultaneously in this entitlement, select the Associate the fingerprint with all products checkbox, described below. |
Required |
One of the following: > Read-only product name (when a single product is selected for activation) >Any product in the list (when multiple products are selected for activation) |
| EID | The EID for the entitlement that contains the products being activated. | Required |
Read-only EID |
|
| Friendly Name |
A name for the machine fingerprint to make it easier to identify and use the fingerprint file. |
Required |
Alphanumeric |
|
| Fingerprint XML |
The XML file containing the machine fingerprint. Click Select File to upload the fingerprint XML file. TIP You can obtain the fingerprint XML file using the Sentinel RMS Run-time API. For details, refer to the API reference guides, which are located under Sentinel RMS guides. |
Required |
A fingerprint XML file |
|
| Ref ID 1 |
Reference identifier that identifies the fingerprint in an external system. |
Optional |
>0 to 100 characters >Alphanumeric |
|
| Ref ID 2 |
Reference identifier that identifies the fingerprint in an external system. |
Optional |
>0 to 100 characters >Alphanumeric |
|
|
Associate the fingerprint with all products checkbox |
Select this checkbox to associate the fingerprint with all of the products being activated simultaneously in this entitlement. Available only if you are activating multiple products at the same time. |
Optional |
Selected or cleared |
|
After you fill in the required information, click Add & Associate to apply the association. If the fingerprint is not displayed in the Fingerprint box, start typing the friendly name and select it from the list of suggestions.
6.Click Complete Activation.
Reprinting Multiple Activations
You can reprint one or more activations together in a single receipt. A Reprint button is visible when you select the checkbox for at least one on the Activations page. Clicking the Reprint button allows you to send multiple activation details to a maximum of 15 users in a language specified by you.
To reprint multiple activations together in a single receipt:
1.Navigate to the Activations page.
2.Select the activations that you want to reprint.
3.Click Reprint. The Reprint dialog box opens.
4.Click Send Email. The Send Email dialog box opens.
5.Enter the relevant Email Address. You can enter up to 15 users separated by a comma (,).
6.Select the Language.
7.Click Send.
Rehosting
Rehosting is the process of marking a selected activation as revoked and generating a new license in its place. For example, you may want to rehost an activated license that is locked to a specific device to enable an end user to move the license to another device. In this case, you would revoke the existing activation and specify the locking code for the new device.
You can rehost one or more activations simultaneously. A Rehost button is visible when at least one activation checkbox is selected on the Activations page.
NOTE
![]() When you rehost an activation for Sentinel Fit, the license is not removed from the original device. Use this option only if you want to copy the existing license and lock it to another device. Otherwise, if you only want to re-issue the license without affecting the count, use Revoke Immediately.
When you rehost an activation for Sentinel Fit, the license is not removed from the original device. Use this option only if you want to copy the existing license and lock it to another device. Otherwise, if you only want to re-issue the license without affecting the count, use Revoke Immediately.
To rehost an activation:
1.Navigate to the Activations page.
2.Select the checkboxes for the activations that you want to rehost.
3.Click the Rehost button at the bottom of the page. The Rehost Activation page opens:
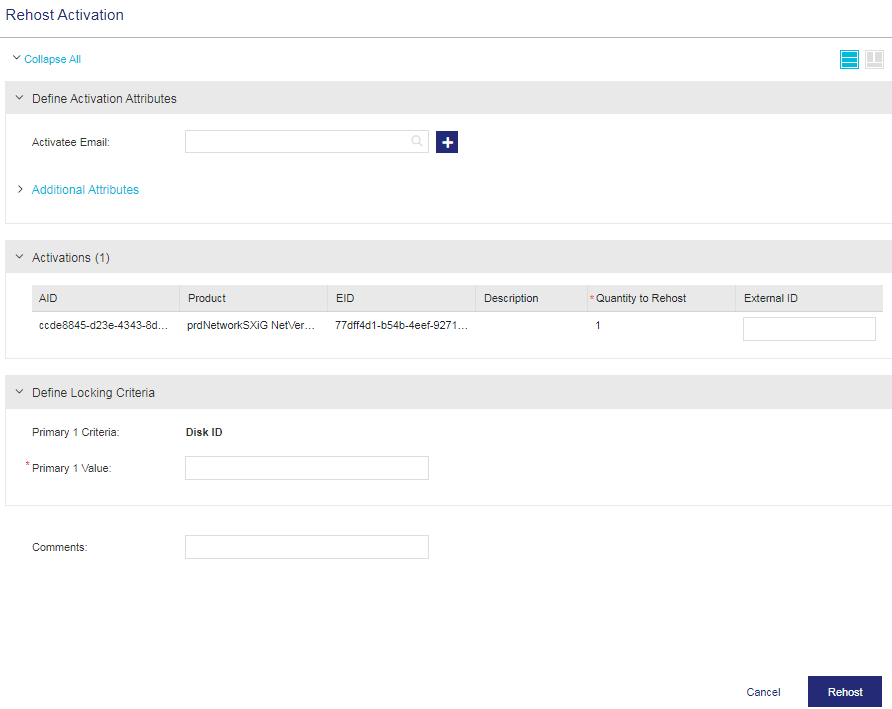
4.Enter the Activatee Email and other activation attributes as required. For more information on these attributes, see Define Activation Attributes.
5.Click Rehost.
After the rehosting process is complete, the activation status is Activated for the new activations and Rehosted for the existing activations that were revoked.
Viewing Activation Attributes
After you activate a license, you can view the activation attributes in the Activations grid.
To view the activation attributes:
1.Navigate to the Activations page.
2.Select and expand the activation for which you want to view the activation attributes.
3.Click the Activation Attributes tab. The attributes for the selected activation are displayed.
The following table lists some of the common activation attributes that are displayed in addition to the attributes defined during the activation process. An activation may also include enforcement-specific attributes and custom attributes.
| Attribute | Description | ||||||||||||
|---|---|---|---|---|---|---|---|---|---|---|---|---|---|
| Status | The status of the activation. For possible values, see Activation Status. | ||||||||||||
| AID | The activation ID. | ||||||||||||
| Activation Date |
The date that the license was activated. The default time zone is UTC. |
||||||||||||
|
Earliest Start Date |
The activation date, which is the earliest date How is the earliest start date calculated? The license start date for each feature is defined in its associated license model. Sentinel EMS examines the license data for every feature included in the entitlement and displays the earliest possible start date available. In some cases, this may be an estimated start date, for example, if all of the feature licenses are set to start the first time that the license is used
|
||||||||||||
| Latest End Date |
The latest date on which a license can expire based on all of the licenses in the activation. The default time zone is UTC. How is the latest date calculated?
|
Viewing Revocation Attributes
In addition to the revocation Activation Status, you can view the revocation attributes in the Activations grid.
To view the revocation attributes:
1.Navigate to the Activations page.
2.Select and expand the activation for which you want to view the revocation attributes.
3.Click the Revocation Attributes tab. The attributes for the selected revocation are displayed.
The following table lists some of the common activation attributes that are displayed in addition to the attributes defined during the revocation process.
| Attribute | Description |
|---|---|
| Revoked By | The user name of the individual who initiated the revocation process. |
| Recredited Quantity | The number of licenses (activations) re-credited back to the |
| Send Notification | Indicates whether a notification email was sent about the revocation. |
| Revocation Initiation Date | The date and time when the revocation process was initiated. |
NOTE The Creation Date (in the Activations section) indicates when the record was initially created in the database. The Activation Date (in the Activation Attributes section) informs users of the Activation API about when an Entitlement was activated. Ideally, both values are the same.
Actions for Activations
You manage activated licenses using the Activations page, which you access from the navigation pane. The following table lists the actions available for activations:
| Action | Description | |
|---|---|---|

|
|
Begins a four-step process to perform a revocation. For more information, see Revocation Requests. Use for: Sentinel RMS entitlements—excluding cloud-served lease entitlements. (Although the action button is visible for cloud-served lease entitlements, if you click the button, an error message is displayed. Use Revoke Immediately instead.) |

|
|
Opens a dialog box in which you can mark the selected activation as "Revoked" instantly. This trust-based option is useful when an end user's device is lost, stolen, or damaged, for example. Use for: >
>
>
>
>Situations in which you are facing issues with the revocation request process. >Situations in which a feature is not supported for the device or locale used by the customer. What happens when you revoke an activation immediately? The activation is immediately re-credited to the entitlement. No revocation proof is needed from the device on which the license is installed. Therefore, the vendor does not receive proof that something happened to the device or that the end user actually revoked the license. Revoking an activation immediately does not remove the license from the end user's device. It simply enables the device vendor to re-issue the license without affecting the count. This means that if a lost device is later found, the device will still retain the original, usable license. Attributes: >Send Notification: Specifies if an email notification is sent to the entitlement user when the revocation completes successfully. >Comments: Enter remarks if required. Note: >
>
>
|

|
Transactions |
View transaction details of a selected activation. For more information, see Transactions. |

|
|
Renew a license. For an activated entitlement, you can renew the end date of associated line item. For more information, see Renewing a Line Item. |
| View Entitlement |
For a selected activation, opens the entitlement in the Entitlements page. |
|
|
|
View and email the license certificate of the activation. For more information, see Viewing the License Certificate. |
|
|
|
When more than one line item is activated, view the license details for all the line items using this action. |
|
| View Downloads |
View and associate downloads with the product within the activation using the Downloads page. This action is visible to vendor users with "View" permissions for downloads. To link a download with a product: 4.In the Actions column, select View Downloads to open the Downloads page. 5.Follow the steps in Creating a Download to create and associate a download with a product in an entitlement. |
|
| View Provisioning Requests | View and update the status of provisioning requests using the Provisioning Requests page. For details, see Provisioning Requests. | |
| Manage Activatees |
Manage activatees (the users, individual or customer, that generate a license code for products |
|

|
|
Upload the revocation receipts. This action is available only for activations with the "Revocation in Progress" status. For more information, see Revocation Requests. For multiple permission tickets generated as a .zip file, the revocation tool generates multiple revocation receipts as a .zip file. This action can be used to upload multiple revocation receipts as a .zip file |
|
|
Download the permission tickets. This action is available only for activations with the "Revocation in Progress" status. For more information, see Revocation Requests. For large feature sets, multiple permission tickets are generated during revocation and using this action can be downloaded as a .zip file. |
|

|
|
Confirm the revocation and re-credit the remaining quantity. This option is available for activations with the "Revoke Confirmation Pending" status. After clicking Confirm Revocation, the status changes to "Revocation Confirmed". |
|
|
Reject the revocation request. |
|
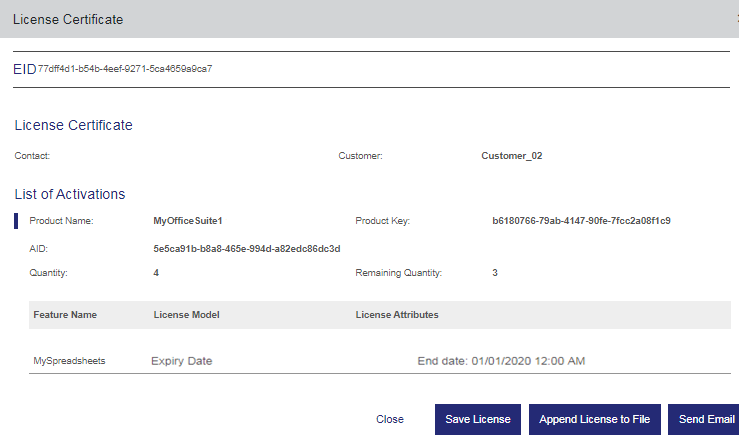
Viewing the License Certificate
The license certificate contains the details of the entitlement.
To view, save, or email a license certificate for an activation:
1.Select an activation.
2.In the Actions column, click View License Certificate. The license certificate opens.
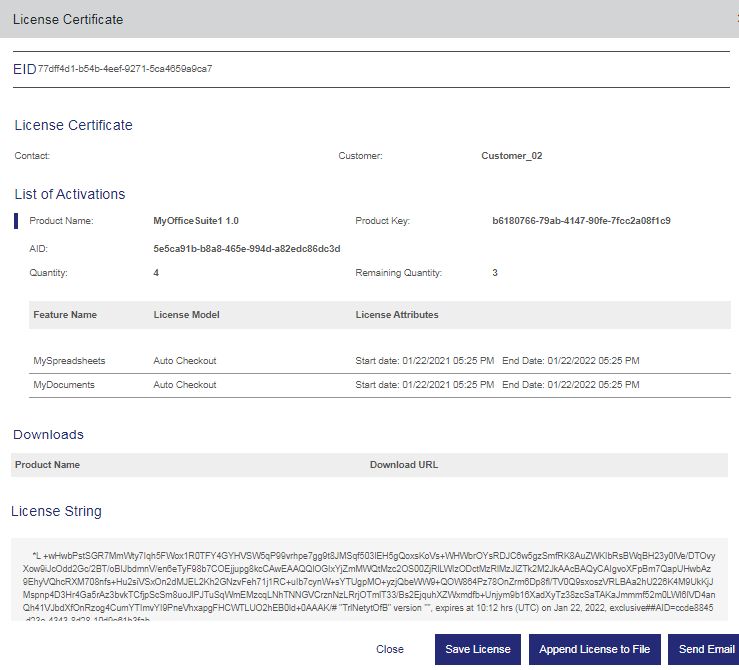
NOTE
![]() The product key is not available on license certificates for cloud served–lease entitlements.
The product key is not available on license certificates for cloud served–lease entitlements.
3.Click one of the following buttons to perform the given action:
•Send Email: Sends details of the license certificate to the specified email. Sentinel EMS also enables you to select a language, based on the language packs installed to send this email.
•Save License: Enables you to save the license certificate as a file.
•Append License to File: Enables you to append the license certificate details to an existing file.
•Close: Closes the window.
NOTE FOR FIREFOX
When you click Save License, the license certificate (lservrc) file is saved to the default Downloads folder with an .htm extension. Do the following to configure the browser settings to save the file without an extension. (Not required if Firefox is already configured to save files to a location other than the default Downloads folder.)
1.Open the Firefox browser menu and select Options.
2.In the General tab, under Files and Applications > Downloads, select the Save files to option.
3.Specify the location. This will save the file to the specified location without an .htm extension.
Revocation Requests
This is a mode of license revocation where you perform a few steps and the end user (customer) performs the rest. To start the revocation process, you generate the permission tickets and send them to the customer using the Activations page. The customer then performs revocation and uploads (or sends you) the revocation receipts. After the revocation receipts are uploaded, you can confirm or reject the revocation. This four-step process is explained in detail below.
Step 1: Create a Revocation Request
When you create a revocation request for a product, permission tickets are generated. These tickets are required for license revocation on the customer's device. For large feature sets in a single revocation, multiple permission tickets are generated bundled into a .zip file.
To generate the permission tickets:
1.On the Activations page, select the activation to revoke.
2.In the Actions column, click Request to Revoke. The Create Revocation Request dialog box opens:
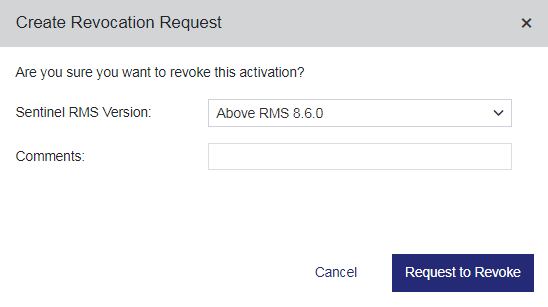
3.Select the Sentinel RMS Version and enter Comments if any. The Sentinel RMS Version is the version of Sentinel RMS on the system that will run the revocation tool to implement revocation.
4.Click Request to Revoke to download the permission tickets. The status of the selected activation changes to Revocation In Progress.
If you need to download the permission tickets again, select the Download Permission Ticket action.
NOTE If a license is locked with multiple criteria, then revocation can be performed only if all the locking criteria match.
Step 2: The Customer Generates a Revocation Receipt
The customer can receive the permission tickets in one of the following ways:
>If the customer's email is specified in the entitlement, the customer receives an email with an attachment containing the permission tickets.
>If the customer's email is not associated with the entitlement, you can save the permission tickets and send them to the customer.
>The customer can log in to Sentinel EMS and download the permission tickets.
Using the permission tickets, the customer needs to generate the revocation receipts with the help of a revocation tool.
Step 3: You or the Customer Uploads the Revocation Receipt
The customer can upload the revocation receipts using the Sentinel EMS portal. Alternatively, the customer can send you the revocation receipts, which you can upload.
A revocation receipt is generated for each corresponding permission ticket. For multiple permission tickets in a .zip file, multiple revocation receipts are generated as a .zip file. The number of revocation receipts generated is always same as the number of permission tickets.
To upload a revocation receipt:
1.On the Activations page, select the activation detail for which revoke has been initiated. This activation must be marked as "Revocation in Progress".
2.In the Actions column, click Upload Revocation Receipt. The Upload Revocation Receipt dialog box opens.
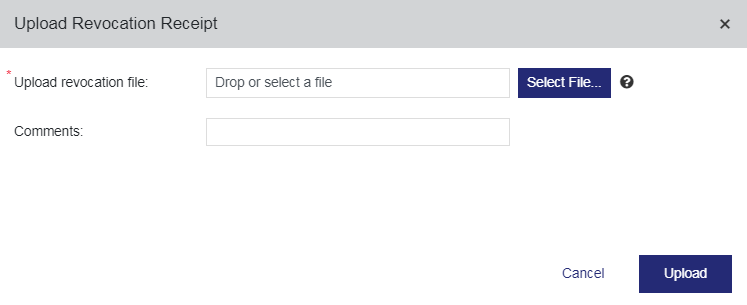
3.Click Select File to browse to the revocation receipt file. For multiple revocation receipts, a .zip file can be uploaded.
4.Enter Comments if required.
5.Click Upload. The Revocation in Progress status changes to Revocation Confirmed if the Auto Confirm attribute is set to "True". Otherwise, the status changes to "Revoke Confirmation Pending".
Step 4: Confirm or Reject the Revocation
You can confirm or reject the revocation after uploading the revocation receipt.
To confirm a revocation:
1.On the Activations page, select the activation detail for which revocation receipt has been uploaded.
2.In the Actions column, click Confirm. In the Re-credit Revoked Quantity field, specify a quantity that you want to re-credit to the customer. The value will be added to the remaining quantity of the product. The re-credit quantity cannot be more than the activation quantity.
To reject a revocation:
1.On the Activations page, select the activation detail for which revocation receipt has been uploaded.
2.In the Actions column, click Reject Revocation.
Viewing and Applying the License File (V2CP)
When you activate an entitlement, the output is a file that can be sent to the customer by email. This file is known as a Vendor-to-Customer Package (V2CP) file.
To view the V2CP file:
1.From the navigation pane, select Activations to view the Activations page.
2.Expand the required activation.
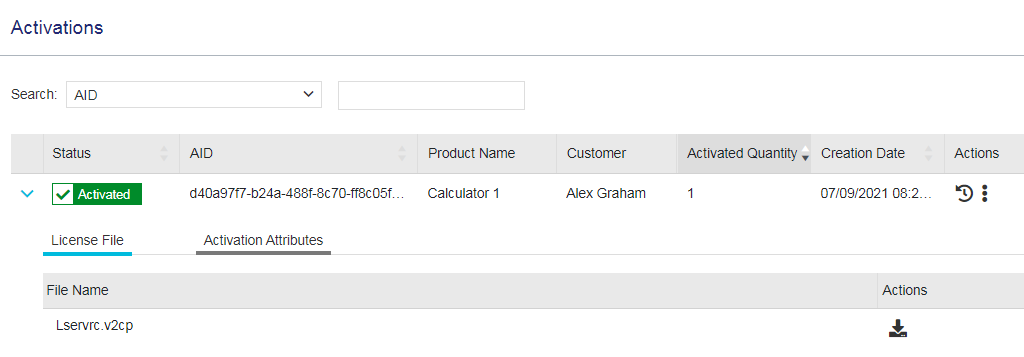
3. Click the ![]() Download button. The lservrc.v2cp file is downloaded to your default downloads folder.
Download button. The lservrc.v2cp file is downloaded to your default downloads folder.
4.Open the lservrc.v2cp file with any text editor.
To apply the V2CP file:
1.Locate the lservrc.v2cp file.
2.On the target machine, apply the lservrc.v2cp file using Sentinel Admin Control Center or a utility that you provide to your customers.
Managing Activatees
You manage activatees by clicking the Manage Activatees action button for a selected record on the Activations page. The Manage Activatees page that opens is displayed below:
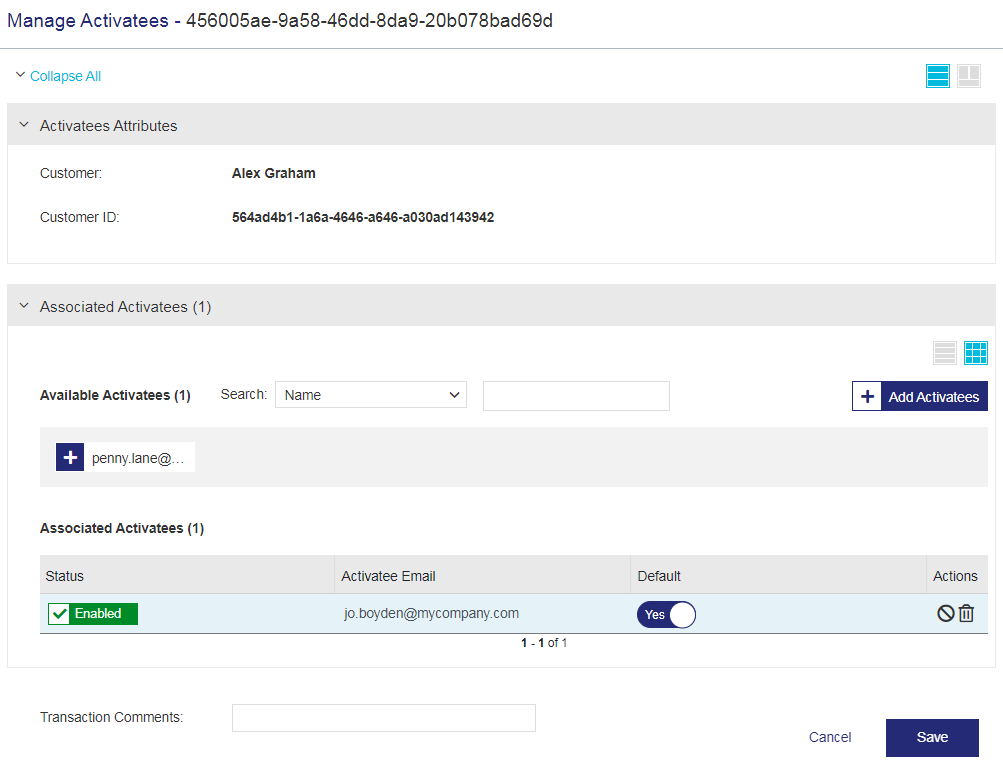
The Managing Activatees page can be used to perform the following actions:
>Add and associate activatees
>Mark an activatee as default
>Delete an associated activatee
>Disable an associated activatee
>Enable an activatee that was previously marked as "disabled".
Adding and Associating Activatees
You add and associate activatees by clicking the Add Activatees button on the Manage Activatees page. The following shows an example of the page that opens:
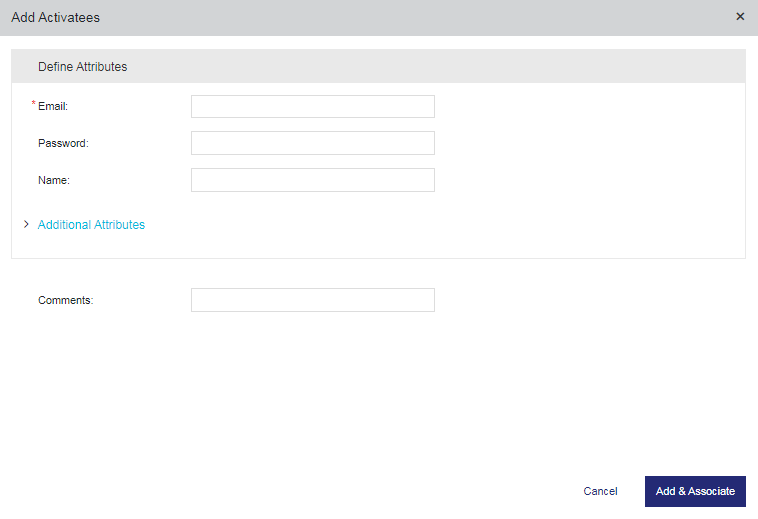
The following table explains the activatee attributes:
| Attributes | Description | Required/Optional | Valid Values |
|---|---|---|---|
| User ID |
Unique identifier of the activatee (user). |
Required |
>3 to >Alphanumeric >Special characters supported: underscore (_) |
|
Name of the identity provider that is used to authenticate the activatee (user) that accesses your application or service. If more than one identity provider is available, select the relevant option from the list. Otherwise, Sentinel IDP is used by default and is displayed as read-only. If you select an identity provider other than Sentinel IDP, and User Attribute for Identity Federation is set to External ID, you must also specify a value for External ID. |
Optional |
Sentinel IDP or your own identity provider. |
|
|
Email of the activatee (user) who performs the activation. |
Required | A valid email address. | |
| Password | Password the activatee (user) uses to log on to the Sentinel EMS customer portal. | Optional |
> 8 to 30 characters >At least one lowercase character (a-z) >At least one uppercase character (A-Z) >At least one number (0-9) OR special character (! @ # $ % ^ & * ( ) _ - + = , .) |
| Enforce Password Change on First Login |
(Displayed when you start entering a password.) Specifies whether the activatee (user) must change the password after the first successful login to Sentinel EMS. When set to Yes, the activatee (user) must change the password after the first successful login before accessing Sentinel EMS, ensuring that the initial password is replaced with a secure one. This attribute inherits its default value from the Enforce Password Change on First Login Administration Console property, but you can modify this value. If you clear the password, this attribute is not displayed. NOTE For the Sentinel EMS customer portal, password change at first login is enforced only when logging in using user credentials (user ID or email address and password), and does not apply to login using EID or PKID. |
Optional |
Yes OR No |
| Name | Name of the activatee (user). | Optional |
>1 to 100 characters >Alphanumeric >Cannot contain: ( ) |
| User Type |
Type of activatee (user). |
Read-Only | Standard OR Administrator |
| External ID |
External reference identifier that uniquely identifies the activatee (user) in an external system. |
Required only if: > The activatee (user) belongs to an Identity Provider other than Sentinel IDP >User Attribute for Identity Federation is set to External ID |
>0 to 60 characters >Alphanumeric >Must be unique across users |
|
Additional Attributes |
|||
| Ref ID 1 | Reference identifier that identifies the activatee in an external system. | Optional |
>0 to 100 characters >Alphanumeric >Must be unique across Sentinel EMS for all activatees |
| Ref ID 2 | Reference identifier that identifies the activatee in an external system. | Optional |
>0 to 100 characters >Alphanumeric |
| Phone | Telephone number of the activatee. | Optional |
0 to 100 characters |
| Language |
Display language for the activatee. Select a language from the available languages to specify a language other than English. Automatically generated emails (for example, entitlement certificate, license certificate) are sent to the activatee in this language. Also, when the activatee logs on to the Sentinel EMS, the pages displayed are in the selected language. |
Required | The options displayed depend on the language packs installed for Sentinel EMS. |
| Company Website | URL of the company website | Optional | A valid URL |
|
Billing and Shipping Address Attributes Billing Address |
|||
| Street/PO Box | Street address or the post office box details of the activatee for billing statements (for example credit card statements). | Optional | 0 to 100 characters |
| City | City of the activatee. | Optional | 0 to 30 characters |
| State/Province | State of the activatee. | Optional | 0 to 30 characters |
| Country | Country of the activatee. | Optional | 0 to 30 characters |
| ZIP Code / Postal Code | ZIP or postal code of the activatee. | Optional | 0 to 20 characters |
| Use as Shipping Address |
>Select Yes to use the same address for both billing and order shipment. > Select No to expand the pane and specify a different Shipping Address for receiving orders. |
Yes OR No |
|
Actions for Managing Activatees
The following table lists the actions available for managing activatees:
| Action | Description | |
|---|---|---|

|
Delete |
Deletes the activatee. You can delete an activatee to remove its association with the activation. |

|
Disable | Disables the activatee. |
|
|
Enable | Re-enables an activatee that is marked as disabled. |